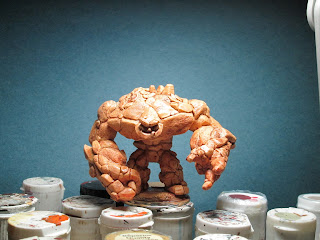
For my second figure to paint I selected the large Earth Elemental from the BONES "Forces of Nature" optional add-on set.
This was one of the figures I was most anticipating, because I really needed it to supply a "heavy weapon" unit for my GASLIGHT Rockmen of Mars force.
The figure comes in four pieces: body, two arms, and head. They all fit together really easily and snugly. I just needed to do a little trimming to reduce the length of the pin on the head that fit into the body. The joints were tight enough that no putty work was needed. I gave the figure a bath in some water with a drop of dish soap in it, and rinsed it well, before assembling using Gorilla brand super glue. Finally I glued the figure to a 1.5 inch fender washer with Aleene's Tacky glue
For my color selection I was greatly influenced by the look of the rock monster called Gorignak in the sci-fi comedy movie, "Galaxy Quest". It is a yellowish sandstone looking color. So, to start with I painted the whole thing with Ceramcoat Maple Sugar Tan.
When this was dry I gave the entire figure a wash with Iron Wind Metals (Ral Partha) Chestnut Brown Ink. Then I set it aside to let it dry. This helped give the figure a slightly reddish brown cast.
The next step was to give it a second wash, this time with Games Workshop Devlan Mud (now called Agrax Earthshade). This helped darken the crevices between the rocks nicely.
My final step when the washes had dried, was to drybrush the whole thing with a light coat of Americana Buttermilk. This helped really bring out the details. The last thing was adding two small black dots for eyes. Then, when all this had dried overnight, I gave the figure a coat of Ceramcoat brush-on matte varnish.
Next up was the base. I first coated the washer with white glue and then coated it with a layer of sand mixture. When it was dried, I painted it black, and then drybrushed it with reds and oranges to match my mars ground cloth. When ll this dried, the final step was a coat of Testor's Dullcote.
It wasn't a particularly hard figure to paint, as it used just one color and a couple of washes. But I think it turned out well.
Figure 2 of 264, finished.


Nailed another one. You know I don't think I had that bones in my figures I got. Now i'll have to go back and look : /
ReplyDeleteThanks! It wasn't one that came along free with the Vampire pledge, it was part of one of the stretch goal sets you had to pay for separately.
DeleteForces of Nature was the only add-on which was cheaper after the KS! FRPGames has it at a discount.
DeleteThanks for the tutorial. The color selections are also useful!
Didn't know he had a dinosaur on his back!
Does this mini (one of my favorite elementals ever) still have the weird stuff on his back--I think it was a skeleton or something?
ReplyDeleteThanks!
--Scott
Yes, it has a dinosaur fossil on it's right shoulder/upper back. It can partially be seen in the next to last picture.
DeleteDid you give him blue eyes?
ReplyDeleteFMB
No, no blue eyes. Just small black slits.
DeleteGreat stuff! I will be jealously eyeing your blog until my Bones make their way across the Atlantic to good old Blighty :-)
ReplyDeleteThanks! I hope you don't have to wait much longer for your box!
DeleteNice work! And bonus points for the Galaxy Quest shout-out.
ReplyDeleteThanks! Glad you liked the GQ reference. :)
DeleteNicely painted elemental.
ReplyDeleteTony
Thanks!
DeleteHi, a question about Aleene's Tacky glue... Is it like a white glue? I'm not sure if I have used it before. Is there anything "special" about it?
ReplyDeleteThanks! JR
Yes, Aleene's is a thicker stickier version of basic white glue. It also dries flexible.
DeleteWhat would you say the Varnish is doing vs. the Dullcote?
ReplyDeleteAre both needed? Is it just more protection?
Thanks! JR
JR- Since I use my minis primarily for gaming, I like to make sure they're extra protected. I do the brush on first because I feel it's a little thicker than the spray, and I can guarantee all-over coverage, also it give the figure an initial protective coat while I handle to do the basing. I use the Dullcote, to give an extra layer of protection, and becuase I fins a lot of the brush-on varnishes, even when they say they are Matte, aren't as truly dull as I'd like them to be.
DeleteSo, in the end I would say that perhaps both aren't needed, but it's how I've come to do it, and I'm happy with the results I get. There are lots of different methods folks use, and this is just one of them.
Thx Chris!
ReplyDelete