Thursday, October 29, 2015

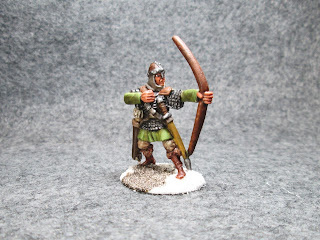
Town Guard (Anhurian) Bowman: Bones II Figure

     This week I also completed the Town Guard Bowman from the Bones II, Expansion 2.  I hadn't bought Expansion 2 during the Kickstarter, but I was able to get the Town Guard set from a friend, as I was keen to use them for Frostgrave soldiers.
      I prepped the figure in the usual way; soaking it in a dish of water with a couple drops of dish- soap added, then giving it a light scrub with a soft toothbrush, and then rinsing and drying it.  I then glued the figure to a white-primed 1" fender washers with Aleene's Tacky glue, and then glued the washer-mounted figure to a tongue depressor with a couple drops of the Elmer's glue.
     I began by painting the chainmail Black, and then drybrushing it with Ceramcoat "Metallic Pewter".
     Next, I painted his pants with Americana "Territorial Beige", his tunic with Americana "Avocado", and his shoulder pads with Crafters Edition "Spice Brown". His hoodie I painted with Americana "Zinc, and the little secondary shoulder pads under the other shoulder pads I painted Americana "Dapple Grey"
     I then painted his bow with Crafters Acrylic "Cinnamon Brown", then did his face and hands with Americana "Shading Flesh".  I painted his boots with Folk Art "Dark Brown" and his belts with Americana "Charcoal Grey".  Then I did his helmet, sword grip, and quiver with Americana "Asphaltum". The top of the scabbard I painted with Americana "Khaki Tan". 
   Next, I painted his scabbard with Aleene's "Deep Khaki", then did the arrow shafts with Crafters Edition "Taupe", and the fletchings with Folk Art "Porcelain White".  Then, after everything had a while to dry, I gave all the non-metallic parts a wash with GW "Agrax Earthshade" wash using a wet brush.
     After the wash had plenty of time to dry, I began doing highlights.  First I painted his eyes, then I highlighted his skin with the base "Shading Flesh".  Next, I highlighted his tunic with some of the "Avocado" mixed with a little Americana "Jade Green".  Then I highlighted his pants with some of the "Khaki Tan". His double shoulder pads I highlighted with their respective base colors, then I highlighted the bow with its base "Cinnamon Brown" . His boots I highlighted with Americana "Sable Brown", and then I highlighted his belts, helmet, and scabbard with Americana "Mississippi Mud". His scabbard I highlighted with the base "Deep Khaki", and his hood I did with Crafters Acrylic "Storm Cloud Grey".  The arrow shafts I highlighted with the "Taupe", and the fletchings I highlighted with Crafters Acrylic "Light Antique White".
   Next, I painted his helmet bands, his buckles, and the metal parts of his sword and scabbard with Accent "Princely Pewter". I then highlighted these with the "Metallic Pewter". I also took this opportunity to highlight any of his chainmail armor that needed a touch up with the "Metallic Pewter".
     Lastly, I painted his base White.  I then applied a little area of white glue to the base and sprinkled some sand on it.   When the glue was dry, I painted the sanded area with Ceramcoat Walnut. Then when it was dry, I drybrushed it with Folk Art "Medium Grey", then Folk Art "Barn Wood". When everything had overnight to dry, I gave the figure a coat of Ceramcoat "Matte Varnish".  Then, the next morning, I flocked the white areas with Woodland Scenics "Snow" flock.  Later that afternoon I sprayed the figure with Testor's Dullcote.
     I'm really pleased with this guy.  I think he came out looking good with a nice simple paint job.

Monday, October 26, 2015

Sascha Dubois: Figure 176 of 265

   This week I completed the Sascha Dubois figure from the Chronoscope Set.  I had posted an article here two week as ago about how I had converted this figure to be more of a fantasy figure than a sci-fi one, so it could fill the roll of a Chonomancer apprentice for my Frostgrave games.
       I had already prepped the figure in the usual way before I did the conversion work, so I moved directly to gluing the figure to a white-primed 1" fender washers with Aleene's Tacky glue, and then glued the washer-mounted figure to a tongue depressor with a couple drops of the Elmer's glue.
     I began by painting her skin with Americana "Shading Flesh".  I then painted her top with Accent "Mustard Seed", and her pants with Americana "Zinc".
     Next, I painted her coat with Accent "Deep Forest Green", and then went back to the "Mustard Seed" and used that to paint all the facings  and turnbacks on her coat. I then painted her boots, scabbard, belts, and the stone circle she stands on, with Black.  I used to Crafters Edition "Spice Brown" to paint her gloves, and Americana "Territorial Beige" to paint her hair.   When everything had had a while to dry, I gave all the browns,  yellows and her skin a wash with Winsor Newton "peat Brown ink using a wet brush.
   When the wash was dry, I painted her eyes and lips; then highlighted her hair, first with Apple Barrel "Maple Syrup", and then with Apple Barrel "Lemon Chiffon".  I then highlighted her skin, first with the base "Shading Flesh",  then adding a little Crafters Acrylic "Flesh" to it to do some lighter highlights.  I then highlighted her coat, first with Americana "Forest Green", and then with Americana "Leaf Green".  Next, I did the highlights on her top, and all the coat facings and turnbacks with, first, Crafters Acrylic "Bright Yellow", and then Crafters Acrylic "Daffodil Yellow".  Her pants were next, and I highlighted them with, first, Americana "Neutral Grey", and then Crafters Acrylic "Storm Cloud Grey".  Her boots, belts and scabbard I gave highlights with Folk Art "Settlers Blue". I painted her wand (?) hanging from her belt with the "Spice Brown", then highlighted the gloves and the wand with Americana "Sable Brown". I then painted the sword grip with Ameircana "Asphaltum".
   I then worked on the stone circle, drybrushing it first with Apple Barrel "Rock Grey", and then with Folk Art "Platinum Grey".
   
    Next, I worked on the metals, painting her epaulets, buttons, buckles, the pocket watch, the key at her belt, the rings on her wand, and the sword and scabbard parts all with Ceramcoat "Bronze". I then went back and highlighted all these parts with Cermcoat "14k Gold".  I then painted the bead string on her belt with Folk Art "Metallic Blue Sapphire". Lastly, I painted the base around the stone with "White" to cover any paint that had accidentally gotten on it; and while I had the White out, I panted in the face of the pocket watch, and then got the Black and my thinnest brush and painted a pair of hands on the watch face.
      When everything had overnight to dry, I gave the figure a coat of Ceramcoat "Matte Varnish".  The next morning I flocked the base around the stone circle with Woodland Scenics "Snow" flock.  Late that afternoon I sprayed the figure with Testor's Dullcote.

     I'm really pleased with how this figure turned out.  I think  she will fit fine as the Chronomancers Apprentice.

Monday, October 19, 2015

Rex, Dark Future Hero: Figure 175 of 265

    This week I completed Rex, Dark Future Hero from the Chronoscope set.  It wasn't hard to see that this was supposed to be a not-Arnold figure from Terminator, so I did a quick Google search to see the exact colors of his classic T-1 outfit were. (Edit: I've been informed that this is a not-Mad Max figure, not an Ah-nuld one. Oops!  Though I think it works I'm both roles)
       I prepped the figure in the usual way; soaking it in a dish of water with a couple drops of dish- soap added, then giving it a light scrub with a soft toothbrush, and then rinsing and drying it.  I then glued the figure to a black-primed 1" fender washers with Aleene's Tacky glue, and then glued the washer-mounted figure to a tongue depressor with a couple drops of the Elmer's glue.
      I began by painting the entire figure Black.  I then drybrushed the entire figure with Folk Art "Settlers Blue".  Next, I painted his shirt with Americana "Zinc".
     I then painted his skin with Americana "Shading Flesh", and the stock of the shotgun with Crafters Acrylic "Cinnamon Brown".   After these were dry, I gave the skin and the stock a wash with Winsor-Newton "Peat Brown" ink using a wet brush.
     When the wash was dry, I painted his eyes, then did highlights on his face, hands, and arm with the base "Shading Flesh".  I then mixed a little Americana "Mocha" into the "Shading Flesh" to do some lighter highlights.  It was at this time that I realized that he was wearing what looked like a fingerless motorcycle glove on his right hand.  So, I quickly painted it Black and did some "Settlers Blue" highlights on it.  I took this opportunity to add Black eyebrows on him, and do some more specific "Settlers Blue" highlights on his black outfit.  I then added highlights to his shirt with Folk Art "Medium Grey".
     I now worked on the metallics, painting the metal parts of the shotgun with Accent "Princely Pewter". I then highlighted the gun parts and painted his belt buckle with Ceramcoat "Metallic Pewter".  Finally, I painted his jacket's many zippers with Folk Art "Silver Sterling".
      I decided I was going to leave the metal plate he is standing on exposed when I flocked the base, so I wanted to paint it like a piece of rusty metal and began by painting it with Ceramcoat "Walnut".  Then, with an old frazzled small brush, I stippled and splotched Crafters Edition "Spice Brown" over it trying to keep it off his boots.  Next, I did the same, but to a lesser extent with Accent "Golden Oxide". I then touched up any areas on his boots with Black where I had gotten spots on them.
       After the figure had the afternoon to dry, I gave it a coat of Ceramcoat "Matte Varnish" in the evening.  The next morning I flocked the base, and later that afternoon I sprayed the figure with Testor's Dullcote.  I let the figure st overnight, and the next morning I applied a gloss varnish to his leather jacket to make it look really shiny like it does in the Terminator photos I had looked at.
     I'm pleased with how the figure turned out. Nothing terribly impressive, but a nice useful pulp, zombie, or sci-fi genre  game figure.

Wednesday, October 14, 2015

Sascha Dubois: Figure 176 of 265- Conversion Work in Progress

     Yes, I know I skipped a number. :) That is because I'm doing some conversion work on this figure, so I know I won't be able to paint it until a week or so from now. Figure 175 will be another figure that I will have painted by this coming Monday.
     When I looked at this figure, I really liked the look of her coat, which reminded me very much of an 18th century officer's coat.  This made me think of the Elquin High Elf Adventurer figure I had painted a little while ago, which I painted as wearing a 19th century uniform and overcoat.  I intend at some point to get another Elquin and paint him again, this time with a snow base, as a Chronomancer for my Frostgrave games, and it seemed that Sascha in her coat from the 1700s might be perfect to be the Chronomancer's apprentice.  The idea of them traveling in time, and picking up articles of clothing from different eras, really appeals to me.
     While I liked the blend of the old fashioned coat and the futuristic bit and bobs on her outfit, I thought the laser pistol at her side might be too much. This, combined with the fact I wanted to include something that might tie her to a medieval-like fantasy world a little more, gave me the idea to replace the pistol with a sword.  So, I set about doing the conversion.
    The first thing I needed was a suitable sword donor. So I sifted through my 'out' box and found Mi-Sher with her double swords. All I would need is to trim the hand off one of the hilts.  So, I prepped the figures in the usual way; soaking it in a dish of water with a couple drops of dish- soap added, then giving them a light scrub with a soft toothbrush, and then rinsing and drying.

      I then cut off one of the swords, and trimmed away the hand.  I then cut the sword into three sections, as I wanted it to fit in the crease between her outer thigh and her coat where her pistol had been, and I wanted the tip to stick out under the back bottom of the coat. I also trimmed part of the hilt's cross-guard away, so it would fit up against her hand. I then cut away Sascha's pistol at this point; and trimmed off the blocky parts sculpted on the front of her boots, as I felt they made her footwear look too modern. Lastly, I trimmed the communicator in her hand to attempt to make it look more like a pocket watch.
     I then used some superglue and glued the parts into place.
        I was left with a gap between her hand and the hilt...
      And a gap between the sword and the coat.
      So, I got out some Milliput I had and filled the gap between the sword and the coat.  I then attempted to resculpt the hand so it looked more like it was resting on cross-guard part of the hilt.
      I'm not a great sculptor, and the close confines of where the hand was located made it difficult to work on, but hopefully it is good enough that paint will hide a multitude of sins.  And, after all, it is intended as a gaming piece, not a display figure.

     So, now I will let it sit for a little bit so everything is good and dry, and we will pick up in couple weeks with the painting article.  I'm not sure what color I will paint her coat; British scarlet? Russian green? Austrian White?  I'll have to do some thinking.

Monday, October 12, 2015

NOVA Corp. Sergeant: Figure 174 of 265

     This week I completed the NOVA Corp. Sergeant from the Chronoscope set.  I hadn't realized this figure was tucked away in this set when I completed the other NOVA Corp. soldiers earlier this year. However, with a paint scheme  already in place from those earlier figures, (intended to look like some sort of Sci-Fi chameleon armor that reproduces the colors of the surrounding terrain), it didn't take me long to finish this fellow.
      I prepped the figure in the usual way; soaking it in a dish of water with a couple drops of dish- soap added, then giving it a light scrub with a soft toothbrush, and then rinsing and drying it.  I then glued the figure to a black-primed 1" fender washers with Aleene's Tacky glue,  When it was dry, I gave the washer and figure's base a brush on coat of Elmer's white glue, and dunked it into a course sand mix.   When the sand mix had dried, I glued the figure to a tongue depressor with a couple drops of the Elmer's glue.
       I began by painting the the figure, and the sand base, completely with Americana "Charcoal Grey".
       I then gave the figure and base a drybrushing with GW Khemri Brown.
      When the "Khemri Brown" was dry, I followed up by drybrushing the figure and base with Ceramcoat "Raw Sienna".
      Lastly, I gave the figure and base a lighter drybrushing with Americana "Buttermilk".
      I then moved on to paint the goggles with Accent "Real Umber", and added some small reflective light highlights to the goggles with White paint.  I then painted some of the assorted straps, breathing tubes, and ammo magazine with Folk Art "Butter Pecan".  Lastly I painted the guns' muzzles black, and a small insignia on their right shoulder with Folk Art "Tomato Red".
    Once again, I'm pleased with the look of these figures.  I think I may order some more so I have a full unit of ten.

Thursday, October 8, 2015

The Black Mist; Figure 173 of 265

   I continued working on the Chronoscope set this week, and completed the not-The Shadow figure, called The Black Mist.  With the completion of this figure I am halfway through the set, and only have 5 Chronoscope figures left to do.
       I prepped the figure in the usual way; soaking it in a dish of water with a couple drops of dish- soap added, then giving it a light scrub with a soft toothbrush, and then rinsing and drying.   I then glued the figure to a 1" black-primed fender washer with Aleene's Tacky glue, and glued the washer to a tongue depressor with a couple drops of Elmer's White Glue.
      I decided to paint the figure in the traditional red and black The Shadow costume. So, I began by painting his clothing all Black, except for the lining of his cape, and his scarf.  I then drybrushed the Black with Duncan "Slate Grey"
      Next, I painted his face and hands with Americana "Shading Flesh", then painted his cape lining and scarf with GW "Blood Red".  After these had had time to dry, I gave his face, hands, cape lining, and scarf all a wash with Winsor Newton "Peat Brown" Ink using a wet brush.
    When the wash was dry, I painted his eyes, then began with the highlights.  I did his face and hands first; highlighting them with the base "Shading Flesh", then adding a little Americana "Mocha" to it to do some lighter highlights.   I then highlighted his cape lining and scarf, first with the base "Blood Red" then with some Americana "Burnt Orange". I then worked on his pistols; painting them first with Accent "Princely Pewter", then doing highlights with Ceramcoat "Metallic Pewter".  I finished by painting his base with Cermacoat "Walnut".
      After the figure had the afternoon to dry, I gave it a coat of Ceramcoat "Matte Varnish" in the evening.  The next morning I flocked the base using a sand mixture and static grass, and later that afternoon I sprayed the figure with Testor's Dullcote.
     I like how he turned out. "Who knows what evil lurks in the hearts of gamers? The Black Mist knows!"

Figure 173 of 265: Complete

Monday, October 5, 2015

No Figure Today

     As you may have guessed, it was a busy week last week, and I wasn't able to complete a figure in time for posting today. My goal now is to have it ready post Thursday.
     As always, thanks for stopping by, and reading the blog!

Thursday, October 1, 2015

Bags and Jars: Bones II Dungeon Accssories

     This week I also completed The Bags and Jars from the Bones II Dungeon Decor set, as I needed a couple more Frostgrave Treasure Tokens.
      I prepped the pieces in the usual way; soaking them in a dish of water with a couple drops of dish- soap added, then giving them a light scrub with a soft toothbrush, and then rinsing and drying.   I then glued them each to a 7/8" black-primed fender washer with Aleene's Tacky glue, and glued the washer to a tongue depressor with a couple drops of Elmer's White Glue.
I began by painting one of the bags and one of the pots with Americana "Territorial Beige". I then painted one bag and one pot with Folk Art "Barn Wood".  I then painted two of the bags with Americana "Khaki Tan", and the remaining fifth bag with Folk Art "Porcelain White".  I then continued painting the pots, painting the next to last one Apple Barrel "Burnt Sienna", and the last one Black.  I then painted the contents of the black pot with Americana "Avocado".  I finished up by painting a small design on the fat pot with some Americana "Wedgewood Blue", and painting the rope ties on the bags with either Americana "Buttermilk" or Americana "Sable Brown".
  I then painted the bases, both the integral objects' bases and the washers, with Folk Art "Medium Gray".  When everything had had a while to dry, I gave both pieces a wash with GW "Agrax Earthshade" wash using a wet brush.
    I then added highlights to everything. I used Folk Art "Butter Pecan" to highlight the bag and pot I had painted with the "Territorial Beige", and I used the "Barn Wood" mixed with a little White to highlight the bag and pot I had painted with the "Barn Wood". The "Khaki Tan" bags i highlighted with Crafters Edition "Taupe", and the "Porcelain White" bag I highlighted with the base "Porcelain White" with a little White added. The "Burnt Sienna" Pot I highlighted with the Crafters Acrylic "Orange Spice", and the Black pot I highlighted with Duncan "Slate Blue".  The contents of the Black pot I highlighted with Crafters Acrylic "Wild Green".  I finished by highlighting the stones on the objects' integral bases with Apple Barrel "Rock Grey".
    I'm pleased with how these turned out. I think they'll make great treasure tokens, as I had hoped.