Monday, September 30, 2019

Townsfolk, Farmer: Bones 4 Figure

   This past week, because it was the weekend of our club's regional gaming convention, BARRAGE, and I knew time would be scarce; I picked a relatively simple figure to paint, and did the Townsfolk Farmer from the Bones 4 Townsfolk Set.
      I prepped the figure in the usual way, soaking it in a dish of water with a couple drops of dish-soap added, then giving it a light scrub with a soft toothbrush, and then rinsing and drying it.  I then glued the figure to a black-primed 1" fender washer with Aleene's Tacky glue, and then placed the figure in my painting grip.
      I began by painting his face and hands with Americana "Mocha".  I then did his tunic with Americana "Asphaltum", and his pants with Vallejo "Brown Violet"
      Next, I painted his hood with Folk Art "Dapple Grey", and his leggings with Ceramcoat "Territorial Beige".  After that, I did his shoes (as well as the whole base) with Americana "Mississippi Mud", the shaft of his hoe with Reaper MSP "Turkey Brown", and the head of the hoe with Americana "Zinc".
     I then painted his belt with Accent "Real Umber", his buckle with Accent "Princely Pewter", and the head of the hoe with Folk Art Metallics "Gunmetal Grey".   After that, I let everything dry for a while, and then gave his face and hands a coat of Citadel "Reikland Fleshshade" wash.  When that was dry, I gave the rest of the figure a coat of Citadel "Agrax Earthsahde" wash".     When the washes were dry, I painted his eyes, and then highlighted his skin with Crafter's Acrylic "Flesh". 
    I then highlighted his hood with Folk Art "Grey Green", his tunic with the "Territorial Beige", and his pants with some of the base "Brown Violet" mixed with some Americana "Jade Green".  After that, I highlighted his leggings with Americana "Khaki Tan", and his shoes with Folk Art "Barn Wood".    Lastly, I painted the entire base with "Americana "Mississippi Mud".
      I let the figure dry overnight and the next day I gave it a coat of Americana "DuraClear Matte" varnish.    Then, when  the varnish was dry, I used some white glue to cover the base with a mix of dried coffee grounds and sand to look like fresh dirt.  Another overnight dry, and I sprayed the figure with Testor's "Dullcote".  

     A simple figure, but I'm happy with how he turned out.

Monday, September 23, 2019

Stone Giant Guard: Bones 4 Lost Valley Figure

     This past week I painted the Stone Giant Guard from the Bones 4 Lost Valley Expansion.  I had painted a Stone Giant before when I did the one that came with Bones 2 Expansion Set 1, and since I liked how that one had turned out,  I figured I'd just copy how I had done that one to some extent.
       I prepped the figure in the usual way, soaking it in a dish of water with a couple drops of dish-soap added, then giving it a light scrub with a soft toothbrush, and then rinsing and drying it.   Then, after trimming the figure's integral base a little, I glued the figure to a black-primed 2" fender washer with Aleene's Tacky glue, and then used some blue-tac to stick it to the top of a pill bottle.
      I began by painting his skin, mixing equal part Crafters Acrylic "Storm Cloud Grey" and Folk Art "Milkshake".  I then painted his fur loin cloth with Americana "Charcoal Grey" and his apron with Apple Barrel "Burnt Sienna"  I then painted his club with Americana "Light Cinnamon".
     Next, I painted his belts and straps with Citadel "Snakebite Leather", and the wraps around his club with Accent "Real Umber".   After that, I painted the buckles, chisels, and other metal bits with Americana "Zinc", and I painted the cord around his neck with Ceramcoat "Territorial Beige".
     I then painted the rectangles on his apron with Americana "Charcoal", and the ones hanging at his belt with Citadel "The Fang".  I also used "The Fang" to paint the knobs on the club, and I painted the crystals on his necklace with Americana "Margarita". After that, I worked on the rock he was holding, as well as the rocks on the base, painting them with Americana "Neutral Grey" and then splotching it with some Folk Art "Dapple Grey", and some of the "Charcoal".  I let everything dry for a while and then gave the entire figure a coat of Citadel "Nuln Oil" wash.
     When the wash was dry, I painted the eyes, and then highlighted the skin with some of the "Milkshake" mixed with the lighter Duncan "Slate Grey". I then highlighted the apron with some Americana "Shading Flesh", and the rectangles at the bottom of the apron with the "Zinc", and those at the top of the apron with Ceramcoat "Denim", and a little Folk Art "Cloudy Day".
     Next, I highlighted his belts and straps with Ceramcoat "Maple Sugar Tan", and the wraps on the club with Nicole's Brown.  I then highlighted the club with Americana "Sable Brown", and the stones in the club with Folk Art "Cloudy Day".  After that,  I drybrushed the throwing rock and the stones in the ground, with some Americana "Dove Grey".  I then painted the hammer head, buckles, and studs in the apron with Folk Art Metallics "Gunmetal Grey", and lastly, I painted the base around the rocks with "Americana "Mississippi Mud".
      I let the figure dry overnight and the next day I gave it a coat of Americana "DuraClear Matte" varnish.    Then, when  the varnish was dry, I used some white glue to flock the base around the stones.  Another overnight dry, and I sprayed it with Testor's "Dullcote".   When the "Dullcote" was dry, I went back and painted the crytal necklace with Tamiya "Clear Green".


     I'm really pleased with how this big guy turned out.  I'm looking forward to tackling the Stone Giant Champion now.
A quick added photo to show the new Stone Giant's size in relation to the old Bones 2 Stone Giant and Sir Forscale.

Monday, September 16, 2019

Pig Cart: Bones 4 Figure

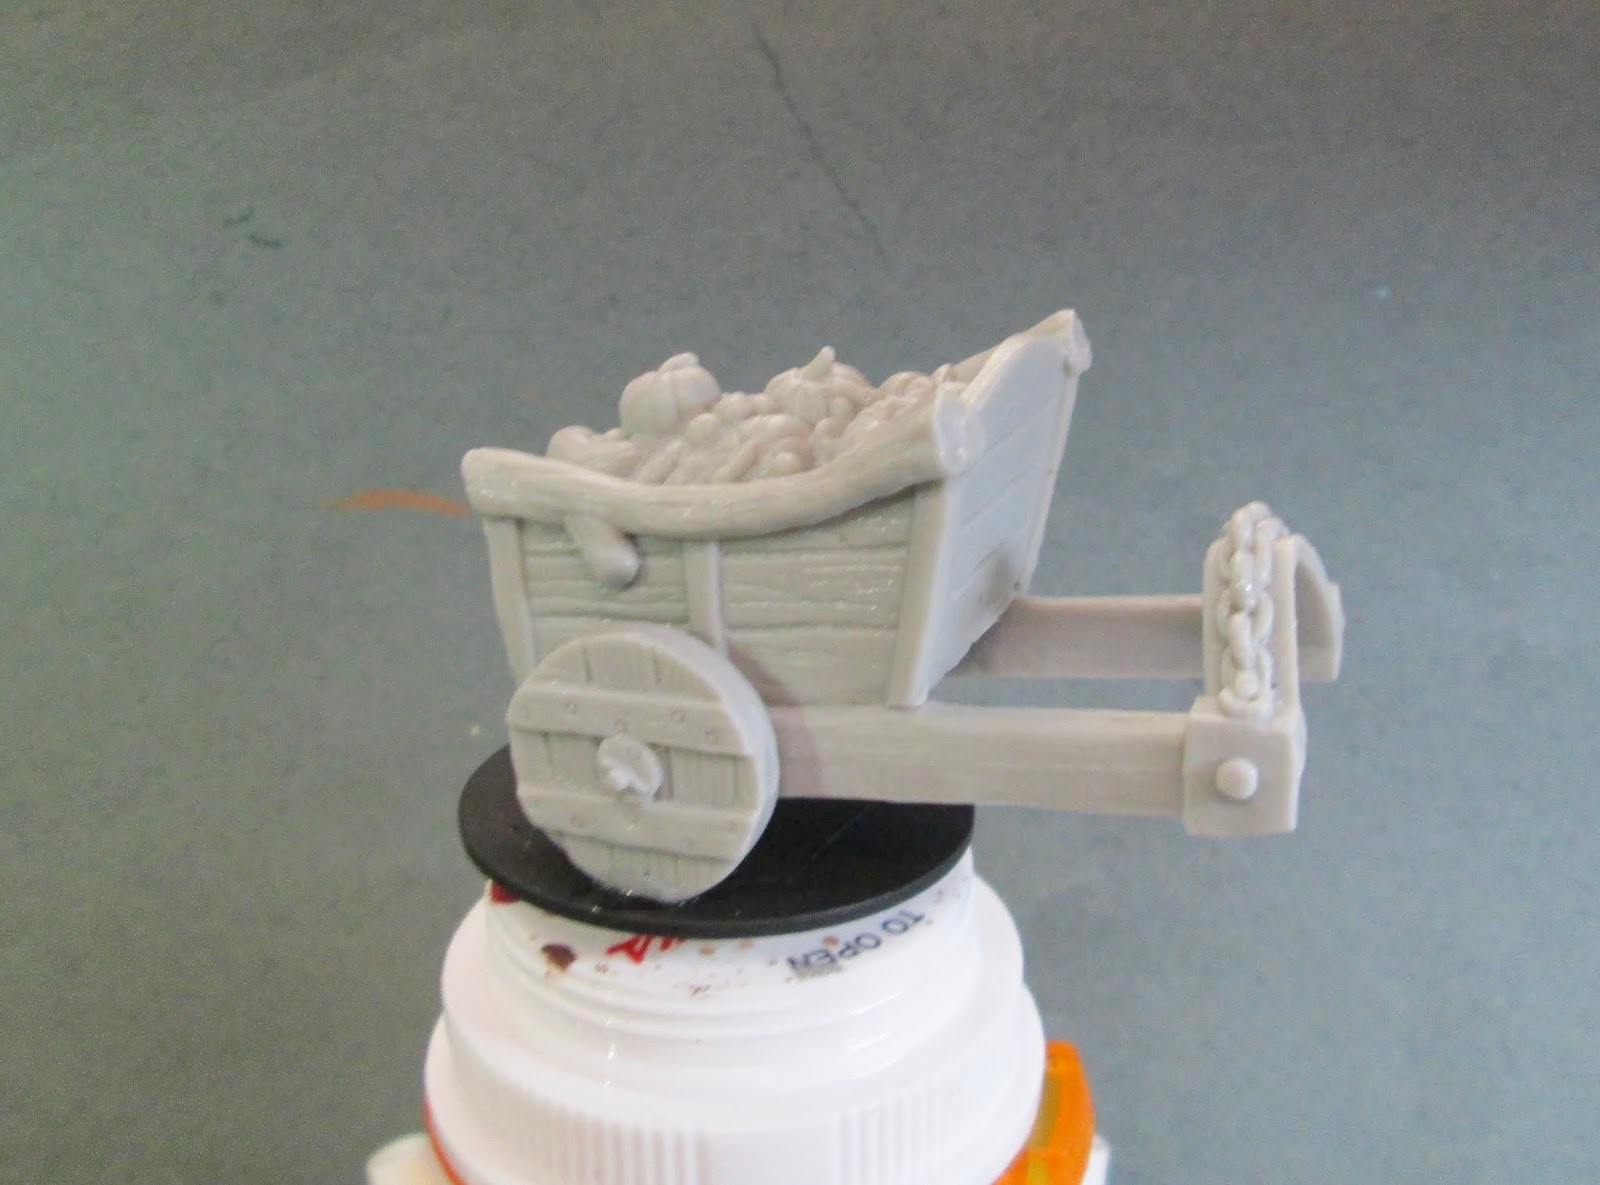
     This past week I painted the Pig Cart set from the Bones 4 Core Set.   This was another one of my favorites from Bones 4.
     I prepped the 2 pieces in the usual way, soaking them in a dish of water with a couple drops of dish-soap added, then giving them a light scrub with a soft toothbrush, and then rinsing and drying them.  I then glued the pig to a 1.5" to a black-primed 1" fender washer, and the cart to a 1.5" fender washer, both with Aleene's Tacky glue.  I then placed the pig figure in my painting grip, and attached the cart to a pill bottle with a little blue-tac.

     I began by painting the pig a mix of Apple Barrel "Apple Flesh" and "Apple Lt Pink".  I then painted the hooves with Americana "Asphaltum".
     Next, I gave the pig a coat of Citadel"Reikland Fleshshade" wash.   Then, when the wash was dry, I drybrushed the pig with, first, some Folk Art "Milkshake", and then some Crafter's Acrylic "Light Antique White".  After that, I highlighted the hooves with Americana "Mississippi Mud", and painted the nose and undersides of the ears with Crafter's Acrylic "Cherry Blossom Pink".   I wrapped the pig up by painting his eyes and nose holes with Ceramcoat "Black".  Then, lastly, I painted the entire base with "Americana "Mississippi Mud".

     Next, I got to work on the cart.   I first painted the cart with Reaper MSP Bones "Tropical Blue".  After that, I painted the wheel rims, harness fittings, and chain with Reaper MSP "Scorched Metal", and then did the harness strap with Apple Barrel "Burnt Sienna".
     I then worked on the harvest load in the back of the cart; painting some of the pumpkins with Crafter's Acrylic "Orange Spice", and some with Reaper MSP "Pumpkin Orange".  Next, I painted the apples with Americana "Cranberry Wine", and what looked like yams to me with Ceramcoat "Territorial Beige".  I then painted the big squash with Crafter's Acrylic "Bright Yellow", the pumpkin stems with Duncan "Olive Green", and some leaves here and there with Americana "Forest Green".
     Next, I painted the log side pieces, and the corner pieces with Americana "Grey Sky". Then I did a little floral border pattern along the top of the front and back of the cart, and in the corners of the two sides.  I allowed all the paint time to dry, and then I gave the fruits and veggies in the cart a coat of Citadel "Agrax Earthshade" wash.  Then, when that wash was dry, I gave the rest of the cart a coat of Citadel "Nuln Oil" wash.
     When the washes were dry, I highlighted the blue parts of the cart with Crafter's Acrylic "Tropical Blue".  I then highlighted the logs and corner pieces with Americana "Snow White", and the leather harness with some of the "Orange Spice".  After that, I highlighted the chain, wheel rims,  and metal fittings with Folk Art Metallics "Gunmetal Grey".
    Next, I worked on highlighting the fruit; using Crafter's Acrylic "Pure Pumpkin" for some of the pumpkins, and Americana "Tangerine" for the others.  I then highlighted the apples with a mix of the base "Cranberry Wine", an a little Crafter's Acrylic ""Tutti Frutti".  I also tried mixing in a little Americana "Margarita" with some of them to give them a some yellow-greenish areas.  The yams were highlighted with Folk Art "Butter Pecan, and the big Yellow squash with the base "Bright Yellow".  I then highlighted the pumpkin stems with Americana "Olive Green".  Lastly, I painted the entire base with "Americana "Mississippi Mud".
      I let the pig and cart dry overnight and the next day I gave them a coat of Americana "DuraClear Matte" varnish.    Then, when  the varnish was dry, I used some white glue to apply a sand mixture onto their bases.  When that was dry, I gae the sand a little drybrushing with Americana 'Bleached Sand".   Another overnight dry, and I sprayed the pieces with Testor's "Dullcote".


     I'm really pleased with this little set.  While I've seen a number of carts done in plain wood, I like the look of it painted up with a little decoration on it.

Monday, September 9, 2019

Terror Fish: Bones 4 Dreadmere Figure

     This past week I painted theTerror Fish, from the Bones 4 Dreadmere Expansion.
     I prepped the figure in the usual way, soaking it in a dish of water with a couple drops of dish-soap added, then giving it a light scrub with a soft toothbrush, and then rinsing and drying it.
  I thought the figure reminded me a bit of those deep sea fish that have the little illuminated antenna that hover over their head to attract prey; so I set about modifying the figure to resemble one of those.  First, I sliced off one of the spikes on its head.  I then drilled a little hole where the spike was, and inserted a a short bit of translucent plastic string I had; gluing it in place with superglue.
     I then glued the figure to a black-primed 1" fender washer with Aleene's Tacky glue, and then glued it to a tongue depressor with a couple drops of Elmers glue.
     For fun I thought I'd base the color scheme off of the Dory character from the animated movie "Finding Nemo".  Dory is based on a real fish called a Royal Blue Tang.
      I began by painting the body of the fish with Americana 'True Blue".  I then painted markings on the body as close as I could to those that appear on Dory, and I painted the eyes, with Ceramcoat "Black".   When all the paint was dry, I gave the painted areas a wash with Citadel Nuln Oil wash.
     Next, I painted his tail fin and side spikes with Accent "Golden Harvest".  After that, I painted the inside of his mouth with Apple Barrel "Apple Lt. Pink", and his teeth with with Americana "Bleached Sand".
     I then painted the tip of his antenna with Tamiya "Clear Yellow", and then gave the inside of his mouth a coat of Citadel "Reikland Fleshshade" wash.  After that, I gave his teeth, tail, and side fins a coat of Citadel "Agrax Earthshade" wash", and then painted the rim of his eyes with Americana "Grey Sky".
     Next, I highlighted his body with Reaper MSP Bones 'Tropical Blue", and highlighted his tail and side spikes with Crafter's Acrylic "Bright Yellow".  After that, I highlighted his feet and his black markings with Citadel "The Fang", mixed with some of the base "Black"; and then highlighted his teeth with Crafters Acrylic "Light Antique White".   I also highlighted his antenna dot with some of the "Bright Yellow" with a dot of Americana "Snow White".  I also used this white to add eye highlight dots.   Lastly, I painted the entire base with "Americana "Mississippi Mud".
      I let the figure dry overnight and the next day I gave it a coat of Americana "DuraClear Matte" varnish.    Then, when  the varnish was dry, I used some white glue to flock the base.  Another overnight dry, and I sprayed it with Testor's "Dullcote".   When the "Dullcote" was dry, I went back and hit its eyes, the light dot on his antenna,  and this teeth with a little Americana "DuraClear Gloss" varnish.


     I'm really happy with how killer Dory came out. :)   I like the addition of the light antenna, and I think the color scheme is kind of fun.

Monday, September 2, 2019

Razormouth: Bones 4 Dreadmere Figure

   This past week I painted the Razormouth figure from the Bones 4 Dreadmere Expansion.
   I prepped the figure in the usual way, soaking it in a dish of water with a couple drops of dish-soap added, then giving it a light scrub with a soft toothbrush, and then rinsing and drying it.  I then glued the figure to a black-primed 1.25" fender washer with Aleene's Tacky glue, and then glued him to a tongue depressor with a couple drops of Elmers glue.
     I forgot to take a photo of it before I began so grabbed this one from the Reaper website.

     I began by painting the body with Folk Art "Hauser Green Medium".   I then painted the spines with Americana "Wedgewood Blue", and the inside of the mouth with Crafter's Acrylic "Cherry Blossom Pink".  After that, I did the teeth with Americana Bleached Sand".
      Next, I painted the claws with Aleene's "Deep Khaki, and then did the scales with Folk Art Color Shift "Green Flash".
     I let everything dry for a while, and then gave the inside of the mouth a coat of Citadel "Reikland Fleshshade" wash.  When that was dry, I gave the rest of the figure a coat of Citadel "Nuln Oil" wash.  Then after the washes were dry, I painted the very deepest part of the mouth with Ceramcoat "Black".
     Next, I painted the eye using Accent "Golden Harvest", and gave it a "Black" pupil.  I then highlighted the body with the base "Hauser Green Medium", mixed with a little Americana "Jade Green", and highlighted the spines with Crafter's Acrylic "Tropical Blue".   After that, I highlighted the claws with Aleene's "Dusty Khaki", and his teeth with, first, Crafter's Acrylic Light Antique White", and then some Americana "Snow White". Following that, I did his scales with the base 'Green Flash", and then did the inside of his mouth with the base "Cherry Blossom Pink".   Lastly, I painted the entire base with "Americana "Mississippi Mud".
      I let the figure dry overnight and the next day I gave it a coat of Americana "DuraClear Matte" varnish.    Then, when  the varnish was dry, I used some white glue to flock the base.  Another overnight dry, and I sprayed it with Testor's "Dullcote".   When the "Dullcote" was dry, I went back and hit its eyes and the inside of his mouth with a little Americana "DuraClear Gloss" varnish.


   I'm really happy with how this guy came out.  he may ned to appear in the Ghost Archipelago...