Monday, December 31, 2018

Reaper Nativity Set (Metal)

   Happy New Year's Eve everybody.  It's been a hectic week here this past week between Christmas Day and today, so, though I got a Bones figure all ready to paint, I never got a chance to work on it.  Instead, I thought I'd show off the Reaper Nativity set I painted for my wife for Christmas, even though it's metal.  Unfortunately, due to time again, I didn't get it totally done yet.
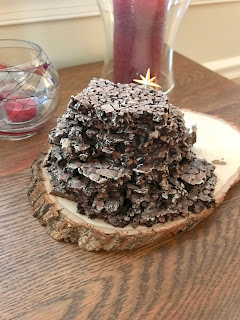
    I decided I wanted to set the nativity in the more historical cave setting, than in the traditional wooden stable; so I set about using broken up cork tiles to make the cave.  I used hot glue to stack them on a tree cross-section I got at the local big box craft store.
This is the kind of tile I used to make the cave.


Back view.
     I added a little hidden compartment in the top that I could place a small tea-light in order to illuminate the interior.
Top view.
     I first painted Mary, Joseph, and the Baby.
   And then as time allowed, I painted the Sheep and Shepherd, since they were quick and simple figures.
    And this is how it looked all put together.  There is a Donkey yet, and the three Wise Men, that will be added.  I eventually would like to add an appropriate Angel, and perhaps a Cow as well, though they are not included in the kit.

See you all in 2019!   It's hard to believe, but the arrival of the Bones 4 Kickstarter could be in less than two months!

Tuesday, December 25, 2018

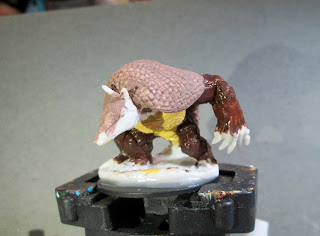
Were-armadillo: Bones 3 Figure, as the Holiday Armadillo!

      [Edit: I meant to publish this yesterday (Monday the 24th), but got so caught up in Christmas Eve activities, I totally forgot.  Now that Christmasing has quieted down for a moment, I thought I'd take the opportunity to get it on the blog. Enjoy and Merry Christmas!)
     This past week I  once again mined my Bones backlog for something quick and simple that I could squeeze in painting among the usual pre-Christmas chaos.  I also, wanted something I could give a Holiday or Winter spin, and thus I landed on the Were-armadillo figure from the Bones 3 Stoneskull Expansion, which I thought would make a pretty good "Holiday Armadillo".
     For those of you who weren't regular watchers of the 80s-90's sitcom "Friends", the Holiday Armadillo is a character made up by one of the show regulars, named Ross, in one of the Holiday episodes.  Ross wants to teach his son, who is half Jewish, about Hanukkah instead of focusing on the Christmas holiday as is usually the case.  In the end though, Ross gives in to his son's desire for Santa to visit, and tries to rent a Santa costume, only to find out there are none available. In a desperate move, he settles for an Armadillo costume, and comes up with the story that he's the Holiday Armadillo, Santa's half-Jewish friend and assistant.  This leads to a great opportunity for Ross to talk about Jewish traditions with his son.
     In subsequent years, the Holiday Armadillo has taken on a bit of a life of its own, and a quick Google search reveals all sorts of T-shirts and ornaments available for purchase, as well as a generous assortment of memes.
   My goal was to try and copy, as best I could, the coloration of the costume.
      I prepped the figure in the usual way; soaking it in a dish of water with a couple drops of dish-soap added, then giving it a light scrub with a soft toothbrush, and then rinsing and drying it.   I then, after clipping the edges of the figure's integral base to make it smaller,  glued the figure to a black-primed 1.5" fender washer with Aleene's Tacky glue, and then placed the figure in my painting grip.
     I began by painting his back armor with Americana "Mississippi Mud", and then his chest plates with Accent "Golden Harvest".  After that, I painted his legas and arms with Accent "Real Umber".
     I then decided to repaint the middle back armor section with Folk Art "Teddy Bear Brown", and .  used the same color to paint his tail.  Afterwards, I painted his face and hands with Anita's "Burnt Sienna" and then painted his claws and nose with Americana "Bleached Sand".
    Then, after everything had overnight to dry, I gave the entire figure a coat of Citadel "Agrax Earthshade" wash.  When the wash was dry, I drybrushed is upper and lower back armor, as well as the small bit of armor on his head with Crafter's Acrylic "Storm Cloud Grey", and then a little Folk Art "Platinum Grey".   I then painted the eyes ceramcoat "Black", and highlighted his face and hands with a mix f the base "Burnt Sienna", and some Crafter's Acrylic "Orange Spice".
     Next, I highlighted the middle section of back armor with a mix of the "Storm Cloud Grey and Americana "Khaki Tan", and then highlighted his underbelly with Crafter's Acrylic "Daffodil Yellow".  After that, I highlighted his arms and legs with a drybrush of Americana "Neutral Grey" mixed with Americana "Light Cinnamon", and highlighted his claws and nose with the base "Bleached Sand".  I wrapped things up by highlighting his tail with the "Khaki Tan".
     Lastly, I painted the base with Ceramcoat "Snow White".
     I let the figure sit overnight, and the next morning I gave it a coat of Americana "DuraClear Matte" varnish.   Later that afternoon I flocked the base using Woodland Scenics snow flocking.  Another overnight dry, and I sprayed them with Testor's Dullcote".


   I'm happy with how this fellow turned out.  The yellow should have been a little paler to truly match the costume; and seeing the final photos, I see I need to go back and add some tiny reflection dots to the eyes, but overall I think I came pretty close.

Monday, December 17, 2018

Psychologist: Bones 3 Figure

     This past week I finished working on the group of Pulp Chronoscope figures I got in a trade, and did the Psychologist, from the Bones 3 "Mythos Expansion: Part 3".
      I prepped the figure in the usual way; soaking it in a dish of water with a couple drops of dish-soap added, then giving it a light scrub with a soft toothbrush, and then rinsing and drying it.   I then glued the figure to a black-primed 1" fender washer with Aleene's Tacky glue, and then placed the figure in my painting grip. 
     I began by painting his head and hands with Crafter's Acrylic "Flesh".  I then painted his lab coat with Americana "Dove Grey", and his pants with Americana "Zinc".
     Next, I painted his shirt with Americana "Salem Blue", his tie with Ceramcoat "Opaque Red", and his hair with Americana "Light Cinnamon".  After everything had a chance to dry, I gave his head and hands a wash with Citadel  "Reikland Fleshshade".  When that was dry, I gave the rest of his body a wash with Citadel "Nuln Oil ".
     I then painted his eyes, and then the rims of his glasses with Ceramcoat "Black". After that, I highlighted his face and hands with the base "Flesh", his hair with Americana "Sable Brown", and  his tie with the base "Opaque Red".
   Next, I highlighted his shirt with Crafter's Acrylic "Cool Blue", and his lab coat with Americana "Snow White".   I then highlighted his pants with Crafter's Acrylic "Storm Cloud Grey", and painted his shoes with the "Black".   When the shoes were dry, I highlighted them with Citadel "The Fang". 
Lastly,  I  painted the figure's integral base with Americana "Bittersweet Chocolate".
     I let the figure dry overnight and the next day I gave it a coat of Americana "DuraClear Matte" varnish.    Then, when  the varnish was dry, I used some white glue to flock the base.  Another overnight dry, and I sprayed it with Testor's Dullcote".  After the Dullcote dried, I went back over the lens of the glasses with Americana "DuraClear Gloss Varnish".
     Well, I'm happy.  He was the perfect fast and simple figure to get done during a busy holiday week; and I don't think he looks too shabby.

Monday, December 10, 2018

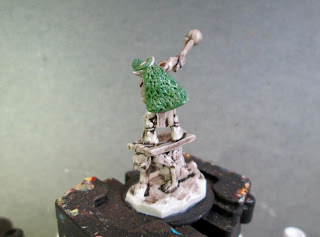
Goblin Honor Guard Drummer, Converted to Chieftain: Bones 3 Figure

    This past week I painted the Drummer which comes with the  Goblin Honor Guard, and was part of the Bones 3 "Ogre Command" add-on set.  I picked this figure up in a trade, as there was something about it that I thought would make it a good candidate to convert into a Goblin Leader of some sort.
   I prepped the figure in the usual way; soaking it in a dish of water with a couple drops of dish-soap added, then giving it a light scrub with a soft toothbrush, and then rinsing and drying it.
(Photo from Reaper online store)


      I forgot to take a "before" photo, so above is one from the Reaper online store to show what it looked like originally.    I first sliced off the mallet in his left hand.  Then I cut his right arm at the shoulder and elbow and trimmed and then superglued them so that it would (hopefully) look like he was using his scepter to point.  I then glued the figure to a black-primed 1" fender washer with Aleene's Tacky glue, and then placed the figure in my painting grip. 
          I began by giving the figure a wash with Reaper MSP "Brown Liner".  It was at that point I finally decided that it bothered me enough how un-chieftain he looked like to do something about it, and make him look more like an important goblin Bigwig!  So I took the time to make him a greenstuff cape and a crown.    I let those dry overnight, and then got back to painting.
     I first painted all their skin with Accent "Golden Oxide"; and when that was dry I painted a shirt on the top guy (he isn't really sculpted with one) using Crafter's Acrylic "Purple Passion".  I then painted his loin cloth with Anita's "Burnt Sienna", and the under-Goblin's loincloth with Ceramcoat "Territorial Beige".
     Next, I painted the wooden platform with Americana "Mississippi Mud", and then the Chief's shoes with Americana "Light Cinnamon".  I then painted the under-Goblin's shoes with Crafter's Acrylic "Cinnamon Brown", and the Chief's scepter handle with Folk Art "Barnyard Red".  After that, I painted the Chief's cape with Americana "Bittersweet Chocolate", and the crown and scepter skull with Accent "Golden Harvest".
        I then painted edging on his shirt with Ceramcoat "Opaque Red",  and then painted the "saddle" with Ceramcoat "Black".  Next, I painted the skulls on the "saddle" with Apple Barrel "Yellow", and then did his scepter skull and crown with Ceramcoat "14K Gold".    I gave everything a chance to dry, and then gave the entire figure a wash with Citadel "Agrax Earthshade"
     When the wash was dry, I painted their eyes, and then highlighted their skin with a mix of the base "Golden Oxide" with some Ceramcoat "Maple Sugar Tan".
     Next, I highlighted the Chief's shirt with some Apple Barrel "Apple Lavender", mixed with some of the base "Purple Passion".  I then highlighted the shirt's edging with the base "Opaque Red", and his loin cloth with Americana "Georgia Clay".   After that, I highlighted the under-Goblin's loincloth with Americana "Khaki Tan", and then highlighted their shoes; Chief's with Americana "Sable Brown", and under-Goblin's with Folk Art "Teddy Bear Brown".  I then highlighted the skulls on the "saddle" with Crafter's Acrylic "Daffodil Yellow", and the "saddle" itself with Americana "Zinc".  Lastly, I painted the nails in the platform with Folk Art Metallics "Gunmetal Grey", and then painted the figure's integral base with the "Bittersweet Chocolate".
     I let the figure dry overnight and the next day I gave it a coat of Americana "DuraClear Matte" varnish.    Then, when  the varnish was dry, I used some white glue to flock the base.  Another overnight dry, and I sprayed it with Testor's Dullcote".


     I'm really happy with how this duo turned out!   Not a great conversion; I still don't think he looks like an important enough Grand-Poobah Goblin.  But for a quick job, that gets the figure tabletop ready, I'm very pleased.

Monday, December 3, 2018

Pulp Era Professor: Bones 3 Figure

  This past week I continued working on the group of Pulp Chronoscope figures I got in a trade, and did the Pulp Era Professor, from the Bones 3 "Mythos Expansion: Part 3".
       I prepped the figure in the usual way; soaking it in a dish of water with a couple drops of dish-soap added, then giving it a light scrub with a soft toothbrush, and then rinsing and drying it.   I then glued the figure to a black-primed 1" fender washer with Aleene's Tacky glue, and then placed the figure in my painting grip.   
      I decided I wanted to paint him in a tween suit, so went to Google and found one I liked.  I wasn't sure how to paint tweed though,  so I headed over to the Reaper forum to ask some advice: Tweed?  Armed with this information, I thought I might be able  to pull off something good enough for the game table.  However, I didn't want my professor to be quite as sharply dressed as the man in the example  photo, so I decided to make a few adjustments to the outfit, to make him look more "absent-minded".
      I began by painting his face and hands with Americana "Shading Flesh".  I then painted his suit with a mix of Ceramcoat "Territorial Beige" and  Vallejo Model Color "Brown Violet" .  After that, I painted his vest withAmericana "Avocado".
     Next, I painted his shirt with Americana "Dove Grey", and his bowtie with Accent "Golden Harvest".  I then painted the cover of his book with Apple Barrel "Apple Maroon", and the book's pages with Americana "Antique White". After that, I painted his shoes with Crafter's Acrylic Cinnamon Brown", and his hair with Americana "Neutral Grey".
      When everything was dry, I gave his face and hands a wash with Citadel  "Reikland Fleshshade" wash.  When that was dry, I gave the rest of his body a wash with Citadel "Agrax Earthshade",  and his hair a wash with Citadel "Nuln Oil ".    I then painted his eyes, and highlighted his face and hands with the base "Shading Flesh", mixed some Crafter's Acrylic "Flesh".  After that, I highlighted his hair with Americana "Grey Sky". 
     I then highlighted his shirt with Americana "Snow White", and highlighted his tie with Crafter's Acrylic "Daffodil Yellow".   After that, I highlighted his vest with Americana Jade Green" mixed with a little of the "Avocado" and dded highlights to his shoes with Americana "Sable Brown".  I then went back and did a check pattern on the vest with the "Daffodil Yellow.
     I now attempted my tweed effect.   Using Aleene's "Dusty Khaki", heavily thinned, I attempted a fine, light, crosshatch pattern on the jacket and pants.   I tried to do it a bit heavier on the highlights, and I didn't do any in the shadows.
     I wasn't happy with the results at all.  The crosshatching was much too heavy, and contrasty, and looked more like someone had scribbled on his jacket than a texture.  I also wanted to see if I could add the random black spots you see on tweed.   So, first I mixed some of Ceramcoat "Black" with a little of the "Dusty Khaki" to "grey" it just a little, and then heavily thinned it, and add some short random lines here and there across the whole suit.    When dry, I took some of the original "Brown Violet" and heavily thinned that, then applied it as a glaze over the whole suit to help tone down the cross hatching.  I ended up applying a couple layers before I was happy; but in the end got it to a place I was happy with.
     Lastly, I highlighted the book under his arm with some Folk Art "Burgundy", and applied some decoration and a title to it with Ceramcoat "Wedding Gold".   I then painted the figure's integral base with Americana "Bittersweet Chocolate".
     I let the figure dry overnight and the next day I gave it a coat of Americana "DuraClear Matte" varnish.    Then, when  the varnish was dry, I used some white glue to flock the base.  Another overnight dry, and I sprayed it with Testor's Dullcote".

     Well, I'm rather happy with how the tweed came out for a first attempt.    And I think the rest of the painting is good enough for the tabletop, so in general I'm please with the figure.  Like the rest of the Pulp figures I've painting in the last few weeks, this one too has a very odd pose; leaning back the way he is.

Monday, November 26, 2018

Ship Hand: Bones 3 Figure

  This past week I picked another easy one to paint.  With it being the Thanksgiving weekend, I was traveling; and I still have a number of other painting projects I'm trying to finish up before the holiday stuff gets really crazy.   So, following on the heels of the Ship Captain last week, I did the Ship Hand, from the Bones 3 "Mythos Expansion: Part 3" this week.  I didn't buy this expansion, but picked up this figure through a trade.
     I prepped the figure in the usual way; soaking it in a dish of water with a couple drops of dish-soap added, then giving it a light scrub with a soft toothbrush, and then rinsing and drying it.   I then glued the figure to a black-primed 1" fender washer with Aleene's Tacky glue, and then placed the figure in my painting grip.
      I began by painting his face and hands with Americana "Shading Flesh", and then painted his jacket with Crafter's Acrylic "Navy Blue", and his pants with Americana "Neutral Grey".
     Next, I painted his hair with Crafter's Acrylic "Cinnamon Brown", and his hat with Ceramcoat "Opaque Red".  I then painted his neckerchief with Apple Barrel "Apple Scotch Blue", his belaying pin with Americana "Light Cinnamon", and his shoes with Ceramcoat "Black".
    When everything was dry, I gave his face, hands, and hat a wash with Citadel  "Reikland Fleshshade" wash; and when that was dry, I gave the rest of him a wash with Citadel "Nuln Oil " wash.    I then painted his eyes, and highlighted his face and hands with the base "Shading Flesh", and some Crafter's Acrylic "Flesh".  After that, I highlighted his hat with Crafter's Acrylic "Orange Spice", and his hair with Americana "Sable Brown".
     I then highlighted his pants with Crafter's Acrylic "Storm Cloud Grey", and his jacket with Ceramcoat "Denim Blue".  Next, I highlighted his neckerchief with crafter's Acrylic "Cool Blue", the belaying pin with Ceramcoat "Territorial Beige", and his shoes with Americana "Zinc".
      Lastly, I painted the figure's integral base with Americana "Bittersweet Chocolate".
     I let the figure dry overnight and the next day I gave it a coat of Americana "DuraClear Matte" varnish.    Then, when  the varnish was dry, I used some white glue to flock the base.  Another overnight dry, and I sprayed it with Testor's Dullcote".

     I'm happy with this one too.  Like last week's Captain, he's nothing exciting; but will certainly work just fine on the tabletop.

Monday, November 19, 2018

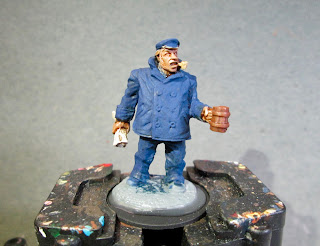
Ship Captain: Bones 3 Figure

   This week I picked another easy one, as the holiday season time pressure has already started to some degree, and I have a number of other painting projects I'm trying to finish up before stuff gets really crazy.   So, I did the Ships Captain, from the Bones 3 "Mythos Expansion: Part 3".  I didn't buy this expansion, but picked up this figure through a trade.
     I prepped the figure in the usual way; soaking it in a dish of water with a couple drops of dish-soap added, then giving it a light scrub with a soft toothbrush, and then rinsing and drying it.   I then glued the figure to a black-primed 1" fender washer with Aleene's Tacky glue, and then placed the figure in my painting grip.
      I began by painting his face and hands with Reaper MSP "Tanned Skin", and then painted his clothing and hat with Crafter's Acrylic "Navy Blue".
      I then painted the rolled up map(?) in his hand with Americana "Bleached Sand", his mug with Americana "Light Cinnamon", and his pipe with Apple Barrel "Apple Maple Syrup".  (I decided it looked like a corncob pipe.)    When everything was dry, I gave his face and hands a wash with Citadel  "Reikland Fleshshade" wash; and when that was dry, I gave his map, mug, and pipe a wash with Citadel "Agrax Earthshade" wash.
     Next, when the washes were dry, I painted his hair with Americana "Zinc", his sweater collar with Americana "Neutral Grey", and his teeth with the "Bleached Sand".  I then painted his shoes, and the brim of his hat,  Ceramcoat "Black".   I let everything dry awhile again, and then gave his hat, hair, and clothing a wash with Citadel "Nuln Oil" wash.
     When the wash was dry,  I painted his eyes and highlighted his face with Raper MSP "Tanned Highlight".   I then highlighted his hair with Americana "Grey Sky".  Next, I highlighted his clothes and hat with Ceramcoat denim Blue", and then did the brim of his hat and shoes with the "Zinc".  I then highlighted his map with Crafter's Acrylic "Light Antique White", and his mug with Americana "Sable Brown".   After that, I went pack and painted in the holes in the pipe and mug with the "Black", and then painted his buttons, and the bands on the mug with Ceramcoat "Bronze".
     Lastly, I painted the figure's integral base with Americana "Bittersweet Chocolate".
     I let the figure dry overnight and the next day I gave it a coat of Americana "DuraClear Matte" varnish.    Then, when  the varnish was dry, I used some white glue to flock the base.  Another overnight dry, and I sprayed it with Testor's Dullcote".
     Well, there he is.  Nothing great, but a good tabletop-ready paint job.   Should have given his eyes more attention, but I was in a hurry to get him done.

Monday, November 12, 2018

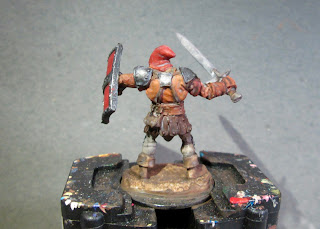
Bandit Leader: Bones 3 Figure

  Well, I was able to squeeze in some painting time last week after all, (despite Fall-In being this past weekend) and I finally finished the figure I had been working on for the past 3 weeks: Bandit Leader, from the Bones 3 Stoneskull Expansion, Part 3.  This is the final figure I had left to do from this set.
   The figure was a bit oddly sculpted I felt, being almost entirely two dimensional looking.  So I decided to do a little modification on him to help look less stilted.
Photo from Reaper's website

     I prepped this figure in the usual way; soaking it in a dish of water with a couple drops of dish-soap added, then giving it a light scrub with a soft toothbrush, and then rinsing and drying it.   I then cut both arms at the elbows and after slicing off a small angled section of each arm, re-glued them so they bent in more.  After that, I glued the figure to a black-primed 1" fender washer with Aleene's Tacky glue, and then placed the figure in my painting grip.
      I began by painting his armor with Ceramcoat "Black".  When dry, I drybrushed the armor with  Folk Art Metallics "Gunmetal Grey".  I then painted his skin with Americana "Shading Flesh".
     Next, I painted his leggings with Americana "Neutral Grey", and his skirt with Accent "Real Umber".  I then painted his hood and sleeves with Folk Art "Barnyard Red", and his leather armor with Americana "Terra Cotta".  After that, I did his waist belt with Americana "Light Cinnamon", and boots and the shield strap with Americana "Raw Umber".
     I then continued with the "Raw Umber, using it to paint all the straps and the pouch on his belt, as well as the grip of his sword.  After that, I painted the front of his shield with Folk Art "Deep Tomato Red",the back with Americana "Mississippi Mud", and the sword with Americana "Zinc".  Then, when the figure had a while to dry, I gave the entire thing a wash with  Citadel "Agrax Earthsahde" wash.
     Unfortunately, I must have fouled my "Agrax Earthsahde" or something, because I found in many places (see the base of the hood for example) it dried white for some reason.
     When the wash was dry, I painted the eyes (I hate doing eyes inside hoods!), and highlighted the face and hands with Crafter's Acrylic "Flesh".   I then highlighted the leggings with Crafter's Acrylic "Storm Cloud Grey", and his hood and sleeves with Crafter's Acrylic "Orange Spice".
     Next, I highlighted the skirt with Nicole's "Brown", and then the leather armor with Accent "Golden Oxide".  I then highlighted the belt with Americana "Sable Brown", and the shoes, belts and straps with Folk Art "Teddy Bear Brown".  After that, I highlighted the face of the shield with Ceramcoat "Bright Red", and then painted the sword with the "Gunmetal Grey".  I then went around and highlighted all the metal with Ceramcoat "Metallic Silver".
      Lastly, I painted the figure's integral base with Americana "Bittersweet Chocolate".
     I let the figure dry overnight and the next day I gave it a coat of Americana "DuraClear Matte" varnish.    Then, when  the varnish was dry, I used some white glue to flock the base.  Another overnight dry, and I sprayed it with Testor's Dullcote".

     Well, considering he took 3 weeks to complete, I'm glad to finally have him done!   There's nothing that great about him, but he will do just fine for the table top.