This past week I painted the "Stone Lurker" from the Bones 4 Darkreach Expansion.
I prepped the "Stone Lurker" in the usual way, soaking the pieces in a dish of water with a couple drops of dish-soap added; then giving the pieces a light scrub with a soft toothbrush, and then rinsing and drying everything. I then glued the two halves of the Lurker together, and then glued in the tentacles, using Gorilla Superglue gel. I then glued the figure to a black-primed 2" fender washer using Aleene's Tacky glue, and then glued the washer to the top of a large pill bottle with a couple drops of Elmers white glue.
As I then considered how I was going to tackle this figure, I realized I probably wanted to apply a sand coat to the base at this point instead of at the end, so I could better blend the coloring of the ground and the Lurker as I was painting.
So I then used some white glue to glue some mixed sand to the base. When the sand was dry, I painted it with a coat of Americana "Charcoal Grey". I then painted the Lurker with Ceramcoat "Charcoal", and tried to blend it into the "Charcoal Grey" on the base. After that, I painted the inside of the mouth with Ceramcoat "Black".
Next, I gave the entire figure a coat of Citadel "Nuln Oil" wash, and then let it dry for a while. When dry, I made a mix of the "Charcoal", and a little Crafter's Acrylic "Bright Yellow", and drybrushed the figure. I added a bit more of the "Bright Yellow", and then drybrushed again.
I then mixed some Americana "Zinc", and Crafter's Acrylic "Daffodil Yellow" together and did a further highlighting drybrush. I added a little more of the "Daffodil Yellow", and did one more level of drybrushing. After that, I used the "Daffodil Yellow" to paint the eyes, and then drybrushed the inside of mouth with Apple Barrel "Apple Maroon". I followed that by painting the "teeth" with Reaper MSP "Coal Black", and use this color to paint the enters of the eyes as well.
I decided I still wanted some slightly lighter highlights on the figure, so mixed some Americana "Grey Sky" with some of the "Daffodil Yellow" and tried painting some more specific highlights along the edges of the mouth and around the eyes. After that, I used some of the "Grey Sky" to paint shiny highlights on the teeth in a tempt to make them look like obsidian. Next I painted all the dots on the tentacles with Americana "Antique Gold" and then went around and highlighted them with the "Daffodil Yellow". I wrapped things up by painting the thorns on the tentacles with Ceramcoat "Black", and then highlighting them with Crafter's Acrylic "Storm Cloud Grey".
Next, I worked on the base, drybrushing the sand with Americana "Mississippi Mud", and then with some Apple Barrel "Rock Grey"; lastly I drybrushed it with a little Americana "Dove Grey".
I let the figure dry overnight and the next day I gave it a coat of Americana "DuraClear Matte" varnish. Another overnight dry, and I sprayed the figure with Testor's Dullcote". When the "Dullcote" was dry, I went back and repainted the "teeth" with a little Americana "DuraClear Gloss" varnish.
I'm really happy with how this guy turned out. For a monster that's basically a rock, it has a good bit of character.
My Efforts to Paint the Miniatures From the 1st, 2nd, 3rd, and 4th BONES Kickstarters!
Showing posts with label Dungeon. Show all posts
Monday, July 27, 2020
Monday, April 9, 2018
Torture Equipment- The Rack: Bones 3 Figure
It was another busy week this past week, so I selected the last piece from the Bones 3 Torture Chamber set to paint.
I prepped the pieces of the figure in the usual way; soaking them in a dish of water with a couple drops of dish-soap added, then giving them a light scrub with a soft toothbrush, and then rinsing and drying them. I then assembled the rack with Gorilla superglue gel. When the glue had set, I glued the rack to a pair of primed 1"x 1" steel bases with Aleene's Tacky glue (I would have just used a 2" x 1", but I didn't have one.), and then glued the mounted figure to a tongue depressor with a couple drops of Elmer's glue.
I began by painting the whole thing with Americana "Neutral Grey". When that dried, I gave the whole piece a wash with Citadel "Agrax Earthshade" wash.
When the wash was dry, I drybrushed the whole thing with Folk Art "Barn Wood". Next, I painted the ropes with Folk Art "Porcelain White", and the metal fittings with Reaper MSP "Scorched Metal".
I let everything dry for a bit again, and then gave the rope and the metal bits a wash with Citadel "Nuln Oil" wash. When the wash was dry, I highlighted the rope with the base "Porcelain White", and I highlighted the metal with Folk Art Metallics "Gunmetal Grey". After that I dabbed on some Winsor Newton"Peat Brown" Ink here and there on the table to look like assorted stains. I also put a little of the "Nuln Oil" on the wheel spokes to look like stains from constant hand contact. Lastly, I painted the base with the "NeutralGrey".
I let the figure dry overnight and the next day I gave it a coat of Americana "DuraClear Matte" varnish. Then, another overnight dry, and I sprayed it with Testor's Dullcote".
I'm really happy with this one. I think the aged wood looks just right, and the addition of the staining adds a nice touch of authenticity.
Monday, April 2, 2018
Torture Equipment- X-Rack and Hot Iron Brazier: Bones 3 Fgures
This past week, because I was getting over a cold, and it was Easter weekend, I selected something relatively easy and quick to paint; the X-rack and Hot Iron from the Bones 3 Torture Chamber set.
I prepped the figures in the usual way; soaking them in a dish of water with a couple drops of dish-soap added and then rinsing and drying. I then glued the X-rack to a primed 1.5" square steel base with Aleene's Tacky glue, and the Hot Iron brazier to a 7/8" black-primed fender washer. I then glued the figures to a tongue depressor with a couple drops of the Elmer's glue.
I began by painting the Brazier Ceramcoat "Black", and the X-rack with Americana "Mississippi Mud". I then drybrushed the Brazier with Folk Art "Medium Grey" followed by Crafter's Acrylic "Storm Cloud Grey". I moved then back to the X-rack, and gave it a wash with Citadel "Agrax Earthshade" wash. When I was done applying the wash, I went back to the Brazier, and gave the coals a light wash with some thinned Iron Wind Metals "Orange" Ink to hopefully make them look like they had a heat glow.
When the "Orange" ink and the "Agrax Earthshade" wash were dry, I drybrushed the X-rack with some Folk Art "Barn Wood". I then painted the Brazier itself , and the little bit of the poker sticking out, along with the fittings on the X-rack, with Reaper MSP "Scorched Metal". After the "Scorched Metal" had time to dry, I applied a little Citadel "Nuln Oil" wash to the "Scorched Metal". When that was dry, I hit the fittings on the X-rack with some thinned Accent "Golden Oxide" to try to give them a little rusty appearance. Lastly, I painted the bases with Americana "Neutral Grey", then when it was dry, I gave the carved rocks under the Brazier a little dab with some of the "Nuln Oil" to help accent the crevices between them.
I let the pieces dry overnight and the next day I gave them a coat of Americana "DuraClear Matte" varnish. Then, another overnight dry, and I sprayed them with Testor's Dullcote".
Well, they're very nice. Nothing exciting; but they're done, and thats a good thing.
Monday, January 1, 2018
Torture Equipment- Stock: Bones 3 Figure
With all the Christmas and New Year stuff going on this past week, I again picked something quick and easy to paint, so this past week chose the Stock from the Bones 3 Torture Chamber set.
I prepped the figure in the usual way; soaking it in a dish of water with a couple drops of dish-soap added, then giving it a light scrub with a soft toothbrush, and then rinsing and drying it. I then trimmed the base a little, and glued the figure to a primed 1"x.5" steel base with Aleene's Tacky glue, and then glued the washer-mounted figure to a tongue depressor with a couple drops of the Elmer's glue.
I began by painting the stock with Nicole's "Brown". When the "Brown" was dry, I gave it a wash with Citadel "Agrax Earthshade" wash.
When the wash was dry, I drybrushed the stock with Americana "Mississippi Mud", and then Folk Art "Barn Wood. I then took a little Citadel "Nuln Oil" wash and painted it in the crevices where the two boards forming the stock would naturally separate, and along the uprights too, to help make it look like all the wood parts were actually separate pieces.
Next, I painted the rope loops with the Mississippi Mud", and the bolts with Americana "Bittersweet Chocolate". I then gave the ropes and bolts a wash with the "Agrax Earthshade" wash. When this wash was dry, I highlighted the rope with Crafter's Edition "Taupe", and the bolts with Crafter's Edition "Spice Brown". After that, I painted the base with Americana "Neutral Grey", and then gave the cobblestones sculpted into the integral base a wash with some thinned "Nuln Oil" wash.
I let the figure dry overnight and the next day I gave it a coat of Americana "DuraClear Matte" varnish. Then, another overnight dry, and I sprayed it with Testor's Dullcote".
Nothing to get excited about, but it is another piece painted for 2017. :)
I want to conclude by saying Happy New Year to everybody, and thanks for your continued support!
Monday, December 18, 2017
Torture Equipment: Iron Maiden: Bones 3 Figure
With all the Christmas stuff to get done around the house, I picked something quick and easy to paint, so chose the Iron Maiden from the Bones 3 Torture Chamber set.
I prepped the figure in the usual way; soaking it in a dish of water with a couple drops of dish-soap added, then giving it a light scrub with a soft toothbrush, and then rinsing and drying it. I then glued the figure to a black-primed 1." fender washer with Aleene's Tacky glue, and then glued the washer-mounted figure to a tongue depressor with a couple drops of the Elmer's glue.
I began by painting the main body with Americana "Bittersweet Chocolate", and the head with Black
I then drybrushed the head with Ceramcoat "Bronze, and when that was dry, I gave the entire piece a wash with Citadel "Nuln Oil" wash.
When the wash was dry, I added some rust effects to the main body with Crafter's Edition "Spice Brown", and then Accent "Golden Oxide".
Next, when the wash was dry, I lightly drybrushed the main body with Folk Art Metallics "Gunmetal Grey". After that I drybrushed some highlights on the head with Ceramcoat "14K Gold". I then painted the base with Americana "Neutral Grey", and when that was dry, gave the stones on the figure's base a light wash using a wet brush with the "Nuln Oil". When the wash was dry, I did a quick highlight on the stones with the base "Neutral Grey".
I let the figure dry overnight and the next day I gave it a coat of Americana "DuraClear Matte" varnish. Then, another overnight dry, and I sprayed it with Testor's Dullcote".
I'm pretty happy with how this turned out. I'm particularly pleased with how the rusty metal ended up looking.
Since next Monday is Christmas I won't be posting a figure. Please tune in again on New Year's Day, when I hope (fingers crossed!) to be able to post my first figure of 2018.
Monday, March 20, 2017
Crates & Barrels: Bones II Pieces
This past week I painted the crates and barrels from the Bones II Dungeon Decor set to use in the Frostgrave Loot Cart scenario we will be doing this weekend.
I prepped the crates and barrels in the usual way; soaking them in a dish of water with a couple drops of dish-soap added, then giving them a light scrub with a soft toothbrush, and then rinsing and drying them. I then glued the crates to a white-primed 1"x.5" steel base, and the large barrel to a 3/4" fender washer, and the small crate to a 5/8" fender washer with Aleene's Tacky glue, and then glued the steel base and washers to a tongue depressor with a couple drops of the Elmer's glue.
I began by painting one crate and one barrel with Americana "Territorial Beige", and the second crate and barrel with Folk Art "TeddyBear Brown". I then gave everything a wash with Citadel "Agrax Earthshade" wash.
When the wash was dry, I drybrushed all the pieces with Americana "Khaki Tan", and then a little Americana "Bleached Sand". After that, I painted the bases with Americana "Mississippi Mud".
I let the crates and barrels dry overnight and early the next morning I gave them and their bases a coat of Americana "DuraClear Matte" varnish. I let it dry all day, and late that afternoon I sprayed it with Testor's Dullcote".
Thursday, April 28, 2016
Caryatid Columns: Bones II FIgures
This week I painted up the Caryatid Columns from the Bones II, Expansion II, Caryatid Column set. We will be doing the "Living Museum" Frostgrave scenario next campaign session, so I thought I should have at least one statue to contribute. :)
I prepped the figures in the usual way; soaking them in a dish of water with a couple drops of dish- soap added, then giving them a light scrub with a soft toothbrush, and then rinsing and drying them. I then glued each figure to a black-primed 1" fender washers with Aleene's Tacky glue. I then glued the washers to a tongue depressor with a couple drops of the Elmer's glue each.
I didn't want to just do them as regular grey stone, so I decided to paint them as green marble. I began by painting them entirely Black. When the Black was dry, I drybrushed them with Accent "Forest Green", followed by a drybrushing with Americana "Leaf Green".
I then added thin striations, specks, and smudges with White and then Black. Next, I painted their sword blades and their bases with Americana "Zinc".
I painted the eyes of the "living" one with Crafter's Acrylic "Citrus Green", and gave the eyes White pupils. I then drybrushed the bases with Crafter's Acrylic "Storm Cloud Grey", followed by Folk Art "Platinum Grey". Next, I painted the sword hilts with Americana "Terra Cotta". I then went back and painted the sword blades with Folk Art Metallics "Gunmetal Grey", and did highlights with Folk Art Metallics "Silver Sterling". Then I painted the sword hilts with Ceramcoat "Bronze", followed with highlights using Ceramcoat "14K Gold".
After the figures had overnight to dry, I gave them a coat of Ceramcoat "Matte Varnish" the next morning.
I really like how these turned out. I think the green marble look helps raise them above the ordinary.
Thursday, October 1, 2015
Bags and Jars: Bones II Dungeon Accssories
This week I also completed The Bags and Jars from the Bones II Dungeon Decor set, as I needed a couple more Frostgrave Treasure Tokens.
I prepped the pieces in the usual way; soaking them in a dish of water with a couple drops of dish- soap added, then giving them a light scrub with a soft toothbrush, and then rinsing and drying. I then glued them each to a 7/8" black-primed fender washer with Aleene's Tacky glue, and glued the washer to a tongue depressor with a couple drops of Elmer's White Glue.
I began by painting one of the bags and one of the pots with Americana "Territorial Beige". I then painted one bag and one pot with Folk Art "Barn Wood". I then painted two of the bags with Americana "Khaki Tan", and the remaining fifth bag with Folk Art "Porcelain White". I then continued painting the pots, painting the next to last one Apple Barrel "Burnt Sienna", and the last one Black. I then painted the contents of the black pot with Americana "Avocado". I finished up by painting a small design on the fat pot with some Americana "Wedgewood Blue", and painting the rope ties on the bags with either Americana "Buttermilk" or Americana "Sable Brown".
I then painted the bases, both the integral objects' bases and the washers, with Folk Art "Medium Gray". When everything had had a while to dry, I gave both pieces a wash with GW "Agrax Earthshade" wash using a wet brush.
I then added highlights to everything. I used Folk Art "Butter Pecan" to highlight the bag and pot I had painted with the "Territorial Beige", and I used the "Barn Wood" mixed with a little White to highlight the bag and pot I had painted with the "Barn Wood". The "Khaki Tan" bags i highlighted with Crafters Edition "Taupe", and the "Porcelain White" bag I highlighted with the base "Porcelain White" with a little White added. The "Burnt Sienna" Pot I highlighted with the Crafters Acrylic "Orange Spice", and the Black pot I highlighted with Duncan "Slate Blue". The contents of the Black pot I highlighted with Crafters Acrylic "Wild Green". I finished by highlighting the stones on the objects' integral bases with Apple Barrel "Rock Grey".
I'm pleased with how these turned out. I think they'll make great treasure tokens, as I had hoped.
Thursday, July 16, 2015
Summoning Circle & Demi-Lich: Bones II Figures
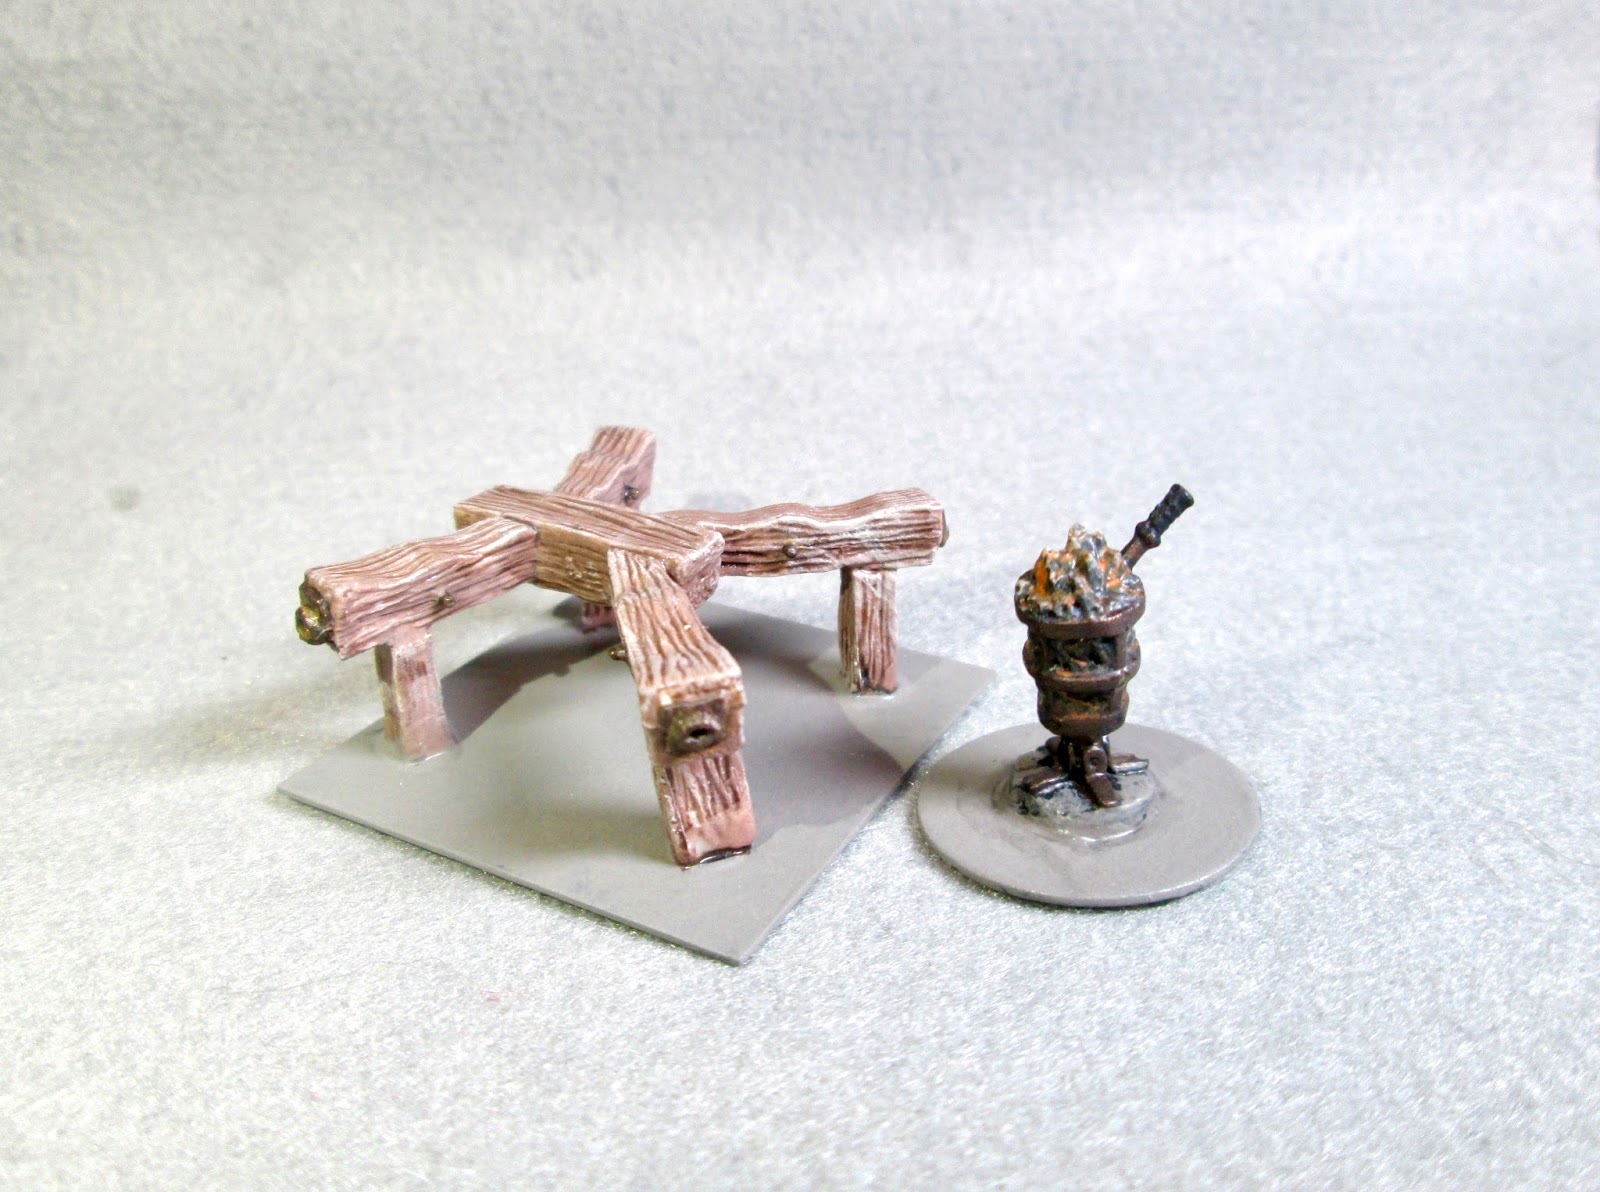
This week I also completed the Summoning Circle and the Demi-Lich from the Bones II Expansion Set I. The two pieces make a nice set, and are both pretty simple, so I thought I'd paint them at the same time.
I prepped the figures in the usual way; soaking them in a dish of water with a couple drops of dish-soap added, then giving them a light scrub with a soft toothbrush, and then rinsing and drying. I then glued the stone circle to a 2" black-primed fender washer, and the Demi-Lich to a 1" black-primed fender washer, both with Aleene's Tacky glue. I glued the Demi-Lich's washer to a tongue depressor with a couple drops of Elmer's White Glue. The 2" washer was big enough to just hand hold.
I began by painting the stones a random mix of DecoArt "Storm Cloud Grey", Apple Barrel "Rock Grey", and Duncan "Slate Grey". I painted the parchment with Apple Barrel "Apple Parchment", and the skulls with Americana "Buttermilk
Next, I painted the Candle with Deco Art "Light Antique White", and the unidentifiable blob next to one of the skulls with Black. The mossy areas I did with DecoArt "Forest Green", and the knife's grip with Americana "Zinc". Lastly, there was one object that I could not identify other than it resembling a hot dog in a bun; so I painted it that way, with a Folk Art "Butter Pecan" Bun, GW "Tanned Flesh" dog.
I began by painting the whole thing Apple Barrel "Apple Lavender" I then painted the bones with the "Light Antique White"
When these colors were dry, I gave the entire thing a wash with Iron Wind Metals "Purple" ink using a wet brush.
I'm not real excited about my results. While thy are both fine and serviceable, in the end everything looks a bit too bright and cheerful. I think I should have gone for a darker palette for both pieces.
I prepped the figures in the usual way; soaking them in a dish of water with a couple drops of dish-soap added, then giving them a light scrub with a soft toothbrush, and then rinsing and drying. I then glued the stone circle to a 2" black-primed fender washer, and the Demi-Lich to a 1" black-primed fender washer, both with Aleene's Tacky glue. I glued the Demi-Lich's washer to a tongue depressor with a couple drops of Elmer's White Glue. The 2" washer was big enough to just hand hold.
I began by painting the stones a random mix of DecoArt "Storm Cloud Grey", Apple Barrel "Rock Grey", and Duncan "Slate Grey". I painted the parchment with Apple Barrel "Apple Parchment", and the skulls with Americana "Buttermilk
Next, I painted the Candle with Deco Art "Light Antique White", and the unidentifiable blob next to one of the skulls with Black. The mossy areas I did with DecoArt "Forest Green", and the knife's grip with Americana "Zinc". Lastly, there was one object that I could not identify other than it resembling a hot dog in a bun; so I painted it that way, with a Folk Art "Butter Pecan" Bun, GW "Tanned Flesh" dog.
I then painted the knife, the metal rings, and the plate the hot dog is on with Ceramcoat "Metallic Pewter. After everything had time to dry, I gave the entire piece a wash with GW "Badab Black" wash using a wet brush.
When the wash was dry, I worked on the highlights. I added highlights to the parchment with the "Light Antique White", and I highlighted the skulls and the candle with plain White. I added script to the parchment, and a wick to the candle, with Black. I also did some red highlight letters on the parchment with Folk Art "Deep Tomato Red". The black blob I highlighted with a little drybrush of Folk Art "Settler's Blue". The hot dog and the moss I highlighted with their base colors. The metal parts I highlighted with Folk Art "Silver Sterling". Lastly, I painted the whole base with GW "Khemri Brown".
I let the circle sit all day, and that evening I gave it a coat of Ceramcoat "Matte Varnish". The next morning I sprayed it with Testor's "Dullcote" spray varnish.
As I worked on the circle, I also worked on the Demi-Lich, adding paint to one, while waiting for a color on the other to dryI began by painting the whole thing Apple Barrel "Apple Lavender" I then painted the bones with the "Light Antique White"
When these colors were dry, I gave the entire thing a wash with Iron Wind Metals "Purple" ink using a wet brush.
When the wash was dry, I highlighted the purple with the base "Apple Lavender". I then mixed in a little White with the "Apple Lavender" and did lighter highlights. I then highlighted the bones with White. I pained Apple Barrel "Yellow" eyes in the skull's sockets and gave them "Deep Tomato Red" pupils, and I painted the inside of the skull's mouth with Black. Lastly, I painted the whole base with GW "Khemri Brown".
I let the figure sit all day, and that evening I gave it a coat of Ceramcoat "Matte Varnish". The next morning I sprayed it with Testor's "Dullcote" spray varnish.
Here's a shot of them together. Next, I plan to work on the pair of Cultists to go with this set-up.I'm not real excited about my results. While thy are both fine and serviceable, in the end everything looks a bit too bright and cheerful. I think I should have gone for a darker palette for both pieces.
Subscribe to:
Comments (Atom)


