Thursday, August 31, 2017

Bones 4 Kickstarter Enters Last Two Days!

  I just wanted to send my readers a reminder that there is only 2 days left to get your pledge in for the Reaper Bones 4 Kickstarter!  A great opportunity to get lots of great Fantasy, Pulp, and Sci-Fi minis at a really great price.
   Check out all you get for $100.  Plus, there are a lot more add-on figure sets you can get.
Just click here to get all the details:  Reaper Bones 4 Kickstarter


Here's a couple of preview videos they've posted.


Monday, August 28, 2017

Wild West Wizard of Oz Lion: Bones 3 Figure

     This past week I moved on to the next figure in the Bones 3 Wild West Wizard of Oz set: the Lion.   This is clearly supposed to be a "not-Hellboy" figure, so I'm not sure why Reaper decided to rebrand him as the Oz Lion.  I guess he fills the bill well enough; though I can't say there is anything particularly "lion-y" about him.  So, I decided to at least try to paint him up in lion-ish colors; keeping to yellows, tans, and tawny shades.
     These figures were actually cast in the newer grey Bones material, and are a bit stiffer than normal Bones.  
      To see the figures from this set that I have already finished, see: Tin Man, and Scarecrow.
      I prepped the figure in the usual way; soaking it in a dish of water with a couple drops of dish-soap added, then giving it a light scrub with a soft toothbrush, and then rinsing and drying it.    I then glued the figure to a black-primed 1" fender washer with Aleene's Tacky glue, and then glued the washer-mounted figure to a tongue depressor with a couple drops of the Elmer's glue.
     I began by painting his face and left hand with Reaper MSP "Tanned Shadow".  I then painted his undershirt with Reaper MSP Bones "Cinnamon Red", and then his outer shirt with Americana "Buttermilk".  After that, I painted his pants with Apple Barrel "Apple Maple Sugar".
     Next, I painted his coat with Folk Art "Butter Pecan", and then his boots, belt, suspenders and holsters with Folk Art "Teddy Bear Brown".  I then painted his hair and the grip of his pistol with Americana "Raw Umber".   After that, I painted his power fist with Accent "Golden Harvest", and his pistol with Americana "Zinc".
     I then went back and painted over the power fist with Ceramcoat "Bronze", and the gun with Ceramcoat "Metallic Pewter".    I waited for everything to dry for a while, and then I gave the entire figure a wash with Citadel "Agrax Earthshade" wash using a wet brush".     When the wash was dry, I painted his eyes and then highlighted his skin with the Reaper MSP "Tanned Skin", and then the Reaper MSP "Tanned Highlight".
    Next, I highlighted his hair; first with Ceramcoat "Territorial Beige", and then with a mix of Americana "Light Antique White" and Accent "Mustard Seed".  I then painted his goggles with Accent "Real Umber", and then did the lenses with Citadel "The Fang".  I then added highlights to the lenses with Crafter's Acrylic "Cool Blue", and added White highlight dots.
     Next, I highlighted his undershirt with Reaper MSP "Holly Berry", and then his shirt with Americana "Bleached Sand". I then highlighted his pants with a mix of the original "Apple Maple Sugar", and Americana "Antique White", and his coat with a mix of Reaper MSP "Ginger Cookie", and the "Bleached Sand".    After that, I highlighted his boots, belts, holsters, and suspenders with Americana "Sable Brown".  I then moved to the metallics, highlighting his power fist with Ceramcoat "Wedding Gold", and his pistol with Ceramcoat "Metallic Silver".  Lastly, I painted the figure's integral base with Americana "Charcoal Grey".
       When I was done painting the figure, I used some white glue to glue a mixture I made of some fine brown sand, and courser black sand to the base.  When this was dry, I drybrushed the sand and the figure's own base with Ceramcoat "Territorial Beige", and then with some Americana "Antique White".  When dry, I glued on some bits of grass tufts.
      I let the figure dry overnight and the next day I gave him a coat of Americana "DuraClear Matte" varnish.  Another overnight dry, and I sprayed it with Testor's Dullcote".

     Well, I'm happy with him; though I don't know ultimately how lion-y he is.   I guess though, since none of the three companion figures really look a lot like their movie/book counterparts; it's more an Oz feel of the whole group than of the individual components.

     I also wanted to remind folks that the Bones 4 Kickstarter is now in it's last 5 days!  So pledge now, and pledge often! :)  Just click here: Reaper Bones 4

Thursday, August 24, 2017

Rauthuros, Demon: Bones 1 Figure

    Many years ago, I think it was abut a year after the first Bones Kickstarter was delivered, I picked up the Rauthuros figure from the Bones 1 add-on Demons set in a gaming convention flea market.   I started working on it shortly after that, and for some reason it got set aside in favor of other projects.  It continued to sit in various states of being undone over the years, with me feeling guilty enough every now and then to pick it up and dab a little more paint on it.
     Anyhow, I recently picked it up once again, and since there really wasn't much left to do on it, I set about finishing it once and for all.  Sadly, any photos of the project, or notes n what colors I used along the way, have long since been left behind on my old computer.
     When I first washed and assembled it, I mounted it on a 3"x 1.5" inch base with the intent of using it as a super huge colossal  demon boss with my 10mm armies for the "Bear Yourselves Valiantly" mass combat fantasy rules.  I figured he would still be usable on this base for regular 28mm use as well.
   Anyway, here he is.  I figured I'd go ahead and post him for thoroughness sake, since he was a Bones Kickstarter figure.
That's an impressive inch wingspan he has!

And here he s terrorizing a unit of 10mm High Elves.

Monday, August 21, 2017

Wild West Wizard of Oz Scarecrow: Bones 3 Figure

    Last week I started the Bones 3 Wild West Wizard of Oz set and posted the Tin Man mini. This past week I continued working my way through the set by painting the Scarecrow.  As I said before, I don't know what particularly makes this set Wild West; it seems to me it would fit in in any kind of Steampunk, VSF, Pulp, or Post-Apocalyptic setting.
     These figures were actually cast in the newer grey Bones material, and are a bit stiffer than normal Bones.
     To see the already completed figure from this set, follow the link: Tin Man.
     In painting this figure, I wanted to try to copy the colors used in the Scarecrow from the movie; with the realization that they weren't dressed or constructed exactly the same.

    I prepped the figure in the usual way; soaking it in a dish of water with a couple drops of dish-soap added, then giving it a light scrub with a soft toothbrush, and then rinsing and drying it.    I then glued the figure to a black-primed 1" fender washer with Aleene's Tacky glue, and then glued the washer-mounted figure to a tongue depressor with a couple drops of the Elmer's glue.
       I began by painting his hat, head, torso, arms and legs all with Black.   I had assumed at first that he was a skeleton figure underneath his clothing, as I clearly saw the ribcage and spine.  Then, as I began applying paint, I realized is arms and legs were supposed to be, in fact, wood. That left me a little perplexed as to how he was supposed to be put together; was it a human ribcage on a wooden frame?   That just seemed odd; and I thought it might look odd once painted.   I decided, therefore,  to go with an all over dry grayish-brown wood color, and hoped that visually it would just look right.  So, when the black was dry, I drybrushed his internal structure with Americana "Mississippi Mud", and then went over it with a lighter drybrush of Folk Art "Barn Wood". Next, I painted his head with Americana "Antique White".
      I then painted his straw hair with Accent "Golden Harvest", and the rope around his neck with Ceramcoat "Territorial Beige".  I decided I didn't think his head looked yellowish enough, so repainted it with Americana "Moon Yellow".  Next, I painted his pants with Nicole's "Brown", and then did his shirt in Folk Art "Porcelain White".  After that, I painted his coat with Crafter's Acrylic "Forest Green", and his boots with Americana "Raw Umber".
     Next, I painted his rifle stock with Crafter's Acrylic "Cinnamon Brown", and the metal parts on it with Ceramcoat "Walnut".  I painted what looked like rope around his wrist, and wrapped around part of the gun with the "Territorial Beige."  I one again decided his head didn't look the right shade of yellow tan, so repainted it once more with Apple Barrel "Apple Maple Syrup", and then painted his nose with Apple Barrel "Raw Sienna".  I let everything Dry for a while, and then I gave the entire figure a wash with Citadel "Agrax Earthshade" wash using a wet brush.
     When the wash was dry, I drybrushed his hat with Americana "Asphaltum", and highlighted his straw hair with the "Moon Yellow". I then applied a little Iron Wind Metals "Mid Green" ink to each eye socket.  When the ink was dry, I painted the pupils with Crafter's Acrylic "Citrus Green", and then added a White highlight dot.  After that, I highlighted his head with Apple Barrel "Lemon Chiffon", and the rope around his neck with Folk Art "Butter Pecan".
     Next, I highlighted the remains of his shirt with the base "Porcelain White", and his coat with Folk Art "Hauser Green Medium".  I then highlighted his pants with Americana "Sable Brown", and his boots with Folk Art Teddy Bear Brown".  I did the ropes around the gun and his wrist with the "Butter Pecan".   After that, I worked on the rust effects on the gun, and the bolts in his knees, blotching the metal parts with Crafter's Edition "Spice Brown", and then applying thinned Accent "Golden Oxide" to the crevices.   Lastly, I touched up the highlights on his wooden limbs using the "Barn Wood", and then painted his base with the "Walnut".
   When I was done painting the figure, I used some white glue to glue a mixture I made of some fine brown sand, and courser black sand to the base.  When this was dry, I drybrushed the sand and the figure's own base with Ceramcoat "Territorial Beige", and then with some Americana "Antique White".  When dry, I glued on some bits of grass tufts.
      I let the figure dry overnight and the next day I gave him a coat of Americana "DuraClear Matte" varnish.  Another overnight dry, and I sprayed it with Testor's Dullcote".

     I'm pleased with how this fellow turned out.  I have to add in closing though; one thing I puzzled over while I was painting him (other than the human ribcage on a wooden frame??), is why the sculptor chose to give him what is clearly a modified Game Workshop Kroot rifle?

Monday, August 14, 2017

Wild West Wizard of Oz Tin Man: Bones 3 Figure

     This past week I started the Bones 3 Wild West Wizard of Oz set and did the Tin Man mini.  I don't know what particularly makes this set Wild West; it seems to me it would fit in in any kind of Steampunk, VSF, Pulp, or Post-Apocalyptic setting.
     These figures were actually cast in the newer grey Bones material, and are a bit stiffer than normal Bones.
       I prepped the figure in the usual way; soaking it in a dish of water with a couple drops of dish-soap added, then giving it a light scrub with a soft toothbrush, and then rinsing and drying it.    I then glued the figure to a black-primed 1" fender washer with Aleene's Tacky glue, and then glued the washer-mounted figure to a tongue depressor with a couple drops of the Elmer's glue.
      I began by painting the entire figure, and his base, with Black.   When the Black was dry, I drybrushed the figure with  Folk Art Metallics "Gunmetal Grey".  I then passed over it with a lighter drybrush of Ceramcoat "Metallic Silver"
     I applied a little Iron Wind Metals "Medium Blue" Ink to the eye sockets, and then that was dry, I pianted the eyes with Crafter's Acrylic "Tropical Blue".  I then did pupils with Crater's Acrylic "Cool Blue", and then added White dots in the center  of the pupils.
     Next, I painted his pendant and the chain it is on, as well as some of the rods in his abdomen with Ceramcoat "Bronze".  I then painted the pendant with Ceramcoat "Opaque Red", and did a shadow on it with Ceramcoat "BlackCherry", and a highlight with Crafter's Acrylic "Tutti Frutti".  I finished the pendant by doing small White highlight dots on it.
     I then went back and highlighted the "Bronze" pendant, chain and rods, with Ceramcoat "14K Gold", and after that I went back and did more specific highlights on his armor with the "Metallic Silver".
     When I was done painting the figure, I used some white glue to glue a mixture I made of some fine brown sand, and courser black sand to the base.  When this was dry, I drybrushed the sand and the figure's own base with Ceramcoat "Territorial Beige", and then with some Americana "Antique White".  When dry, I glued on some bits of grass tufts.
      I let the figure dry overnight and the next day I gave him a coat of Americana "DuraClear Matte" varnish.  Another overnight dry, and I sprayed it with Testor's Dullcote".

     I'm really pleased with how this figure turned out, particularly the glowing blue eyes.  Next up, I will be working on the Scarecrow.

Thursday, August 10, 2017

Dagon Statue: Bones 3 Terrain

   I thought I'd make a quick Thursday post for a bit of terrain I just completed.  I painted up the Dagon Statue from Bones 3.  This figure was added in to the Bones 3 Kickstarter at the very end via the Pledge Manager.   I picked it up, since I figured it would make a good terrain piece for Ghost Archipelago.
      I prepped the 2 pieces in the usual way; soaking them in a dish of water with a couple drops of dish-soap added, then giving them a light scrub with a soft toothbrush, and then rinsing and drying them.    I then glued the large section to a black-primed 2" fender washer, and the smaller section to a 1.25" black-primed fender washer, both with Aleene's Tacky glue.
      I began by painting both pieces entirely with Black.  I then drybrushed them heavily with Americana "Zinc".
     I then drybrushed both pieces with Americana "Neutral Grey", followed by Apple Barrel "Rock Grey", and then Folk Art "Porcelain White".
      I let the pieces dry overnight and the next day I gave them a coat of Americana "DuraClear Matte" varnish.    Then, when  the varnish was dry, I used some white glue to glue a little sand to the base.  When this was dry, I painted the sand with Americana "Asphaltum".  When the "Asphaltum" was dry, I drybrushed the bases with some of the Ceramcoat "Territorial Beige", and then some Americana "Antique White".   Lastly, I glued on some tufts of grass.
       I let the figure dry overnight and the next day I gave it a coat of Americana "DuraClear Matte" varnish.  Another overnight dry, and I sprayed the statue with Testor's Dullcote".

    I'm real happy with how this terrain turned out.  It's nothing fancy, but a welcome addition to my growing collection of Ghost Archipelago terrain.

Monday, August 7, 2017

Painting my Bones 3 Shipwreck Revenant Conversion with Succubus Queen Figurehead

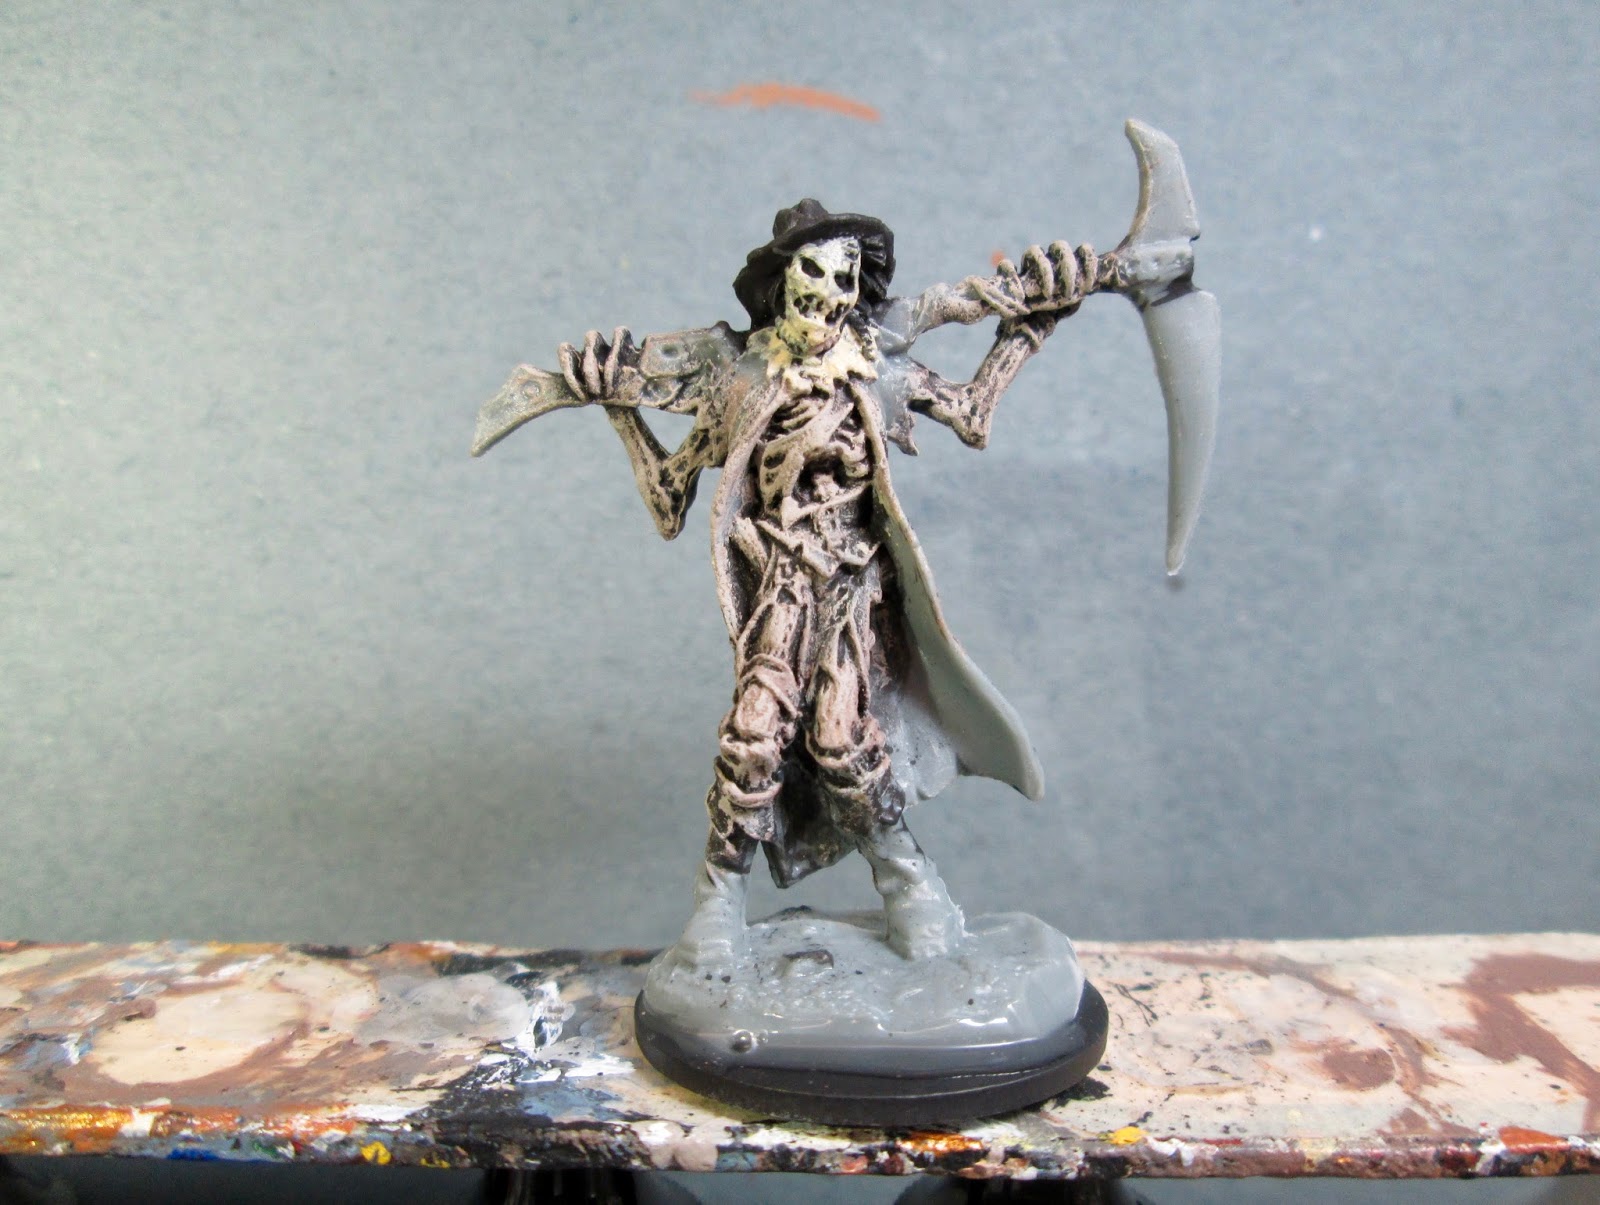
     Last week, I posted my article for the conversion work I did on my Shipwreck Revenant, from the Bones 3 Titans of the Tide add-on set.    Since then I have been busy painting the model, and here are the results.
     To go way back to the beginning, the first thing I did before I even started the conversion work, was to soak the parts in a dish of water with a couple drops of dish-soap added, then I gave them a light scrub with a soft toothbrush, and then rinsed and dried them.  I then did all the conversions.
     My first step to begin the painting process was to spray all the parts with Krylon with Fusion "Flat Black" spray paint.
    After the Black primer was dry, I drybrushed the whole model with Americana "Charcoal Grey", and then Americana "Mississippi Mud".
  I then did a final dry brush of Folk Art "Barn Wood".
     I decided to paint this model in parts rather than glue it together first and then trying to paint it as one piece.  I selected the left arm to begin with.   When all the the drybrushing had a little while to dry, I began by applying some thinned ink splotches here and there to represent various algae and slimes. I used Iron Wind Metal "Orange", "Chestnut Brown", "Dark Green", and "Deep Turquoise".
     When the ink was dry, I base coated the coral with Crafter's Acrylic "Cherry Blossom Pink", Ceramcoat "Maple Sugar Tan", and Americana "Buttermilk".  I painted the lantern with Americana Sea Breeze, and the cannon with Ceramcoat "Walnut". The rope was painted Ceramcoat "Territorial Beige".
   When the paint was dry, I gave the parts I had just painted (coral, cannon, lantern, rope) all a wash with Citadel "Nuln Oil" wash.  When the wash was dry, I highlighted the coral with Apple Barrel "Apple Light Pink", the "Buttermilk", and Crafter's Acrylic "Light Antique White".  The cannon I applied some Duncan Aged Metal "Iron", and then I highlighted the rope with Folk Art "Butter Pecan.  Next, I drybrushed the lamp with some Ceramcoat "Bronze", and afterwards painted some broken glass in the panels of the lamp with White edges and Folk Art "Cloudy Day" streaks.  I also decided everything might look better if I tinted some of the wood a different shade so it didn't all look the same color, so I gave the cannon mount a wash with some Citadel "Agrax Earthshade". wash
     I basically repeated all the above steps for the other arm as well.  On this arm there were some barnacles as well, which I base coated with Americana "Dove Grey", and then highlighted with White.

     I then moved on to the lower body.  I also used some Winsor Newton "Peat Brown" Ink here to give some of the wood a different shade, as well as the"Agrax Earthshade".  And, on this piece there were some starfish which I painted with Ceramcoat "Raw Sienna", and some little knobby shellfish or coral of some kind which I painted Citadel "The Fang", and a couple larger shellfish which I painted Folk Art Pearl "Aqua Moire".  Also on this piece I painted some of the coral areas with Folk Art "Hunter Green" to (hopefully) look like seaweed.
     After the "Nuln Oil" wash was dry, besides doing the highlighting I had already listed with the left arm above; I highlighted the starfish with Citadel "Bronze Flesh", the knobby shellfish with the "Cloudy Day", and the seaweed with Crafter's Acrylic "Holiday Green".
    Lastly, I painted the top, just like I had painted the other parts.  However, there were some additions here:   There was an octopus around the back which I painted with a Reaper MSP mis-match sample that is kind of a salmon orangish color, and a paper handbill which I painted with Americana "Bleached Sand".  The skeleton I painted with Americana "Antique White", and the succubus I painted with Folk Art "Tomato Red".  I painted the gold coins with the "Bronze"
     After the "Nuln Oil" wash was dry, I did the highlights as outlined on the other parts above.  I also highlighted the handbill with the "Light Antique White", and did a little freehand writing on it with some Americana "Raw Umber".  The skeleton I highlighted with the "Bleached Sand", and the Succubus I highlighted with the base "Tomato Red". 
      When I was done painting the figure, I glued all the parts together with Gorilla superglue.    I then used some white glue to glue a coarse sand mix to the base.  When this was dry, I painted the whole base with the "Raw Umber"; then, when that was dry, I drybrushed the  base with the "Territorial Beige", then with some of the "Antique White", and lastly with some of the "Bleached Sand".  When dry, I glued on some tiny seashells, a little flocking, and some plastic foliage bits.
      I let the figure dry overnight and the next day I gave it a coat of Americana "DuraClear Matte" varnish.  Another overnight dry, and I sprayed it with Testor's Dullcote".   When the Dullcote was dry, I superglued some tiny gems onto the gold pile in the upper hull.


     I'm really happy with this project and how it turned out.  Unfortunately it's one of those models that don't really photograph well, but are better seem in person.  The way the long arms stick out to the front really blocks a lot of the good camera angles, and look weird jutting straight at the camera when photographed from the front straight on.  I also noticed the whole thing is a little top heavy from a composition standpoint.   I think if I were to do this model again, I might remove a couple sections from the middle and back end of the harpoon/anchor attachment, just to help bring it in a bit, and help it look less unwieldy.

Thursday, August 3, 2017

Bones 3 Shipwreck Revenant Conversion with Succubus Queen Figurehead Addition.

     Over the past week I worked on doing a big conversion on the Bones 3 Shipwreck Revenant from the Titans of the Tide add-on set.   I was never thrilled with the "face" on the Shipwreck Revenant; it always looked a little contrived and dorky to me.  So when I got the model in the Bones 3 Kickstarter, I imediately began to think about how I would like to modify it.
I forgot to take a picture of the model before I started working on it, so I snatched this shot off the web.  It's not a great shot, but gives you an idea of what the face of the piece was supposed to look like; it was just a bit of curved planking with two portholes in it.
     To me, I thought, it would have looked much better with some sort of menacing figurehead on the front.   Then it struck me that Reaper's Dark Maiden would be prefect for this.  I tried mine out, and was amazed at how perfectly it fit on the front, and how good it looked.
     But before I shelled out the money to order a new Dark Maiden, I thought I'd dig through my Bones pile and see if anything would fill the bill.  That's when I hit on the Succubus Queen from the Bones 3 Stoneskull Expansion.    She had a plain enough pose that she looked like she'd be a good candidate for a figurehead.  And as I played around with bending her wings back, I realized if I flipped them over they closely mirrored the curve of the prow of a ship. I thought her demonic appearance would help sell the evil feel of the Shipwreck Revenant as well.
     So the first thing I did was carefully pry the wings off the back of the figure, and test fit them on the prow.
     I then gave the Succubus Queen figure a quick and simple greenstuff top, so I could use the finished model in family friendly games.  I also cut off her right hand so I could later affix one that would be holding a sword.
     Next, I hunted through my plastic figure stash for a piece of sprue that had the right curve in it for me to use to make the front center beam of the prow of the ship.  I then drilled some holes in it, because I knew I would have to pin the Succubus figure to it in order to get her to hang properly in the curved figurehead position.
     I then glued the wings to the front of the model.  It took very little modification to get them to fit.  I simply had to carve down some of the inner wing spines to help them lie more closely to the existing hull.
     I then pinned the Succubus to the prow's center beam and glued her with some superglue; clamping the figure to help hold it into position while the glue hardened.
     I then glued the assembly to the front of the ship by inserting the little tabs on the wings (which I trimmed down) into the slot in her back where the wings had originally been mounted.
At this juncture, I cut some sections of coffee stirrers to make some planking for the prow; then after wetting them I set them under some weights to warp the wood into a curved shape suitable for constructing the ship's prow.
     My next step was to construct a bowsprit to insert into the hole where the face had originally mounted.  I glued it in place so it ran just over the top of the Succubus' head.  I also glued a bit of decorative shape cut from a GW Wood Elf banner to give the prow beam a touch of artistic scrollwork.
     I then glued my warped coffee stirrers into place, affixing one end of each plank under the wings, and the other end to the prow's center beam.  I didn't attempt to rebuild the entire prow, just enough planks to help anchor the masthead, and give the impression of a rotted ships prow.
     I finished off the prow by adding a sword-wielding hand to the figurehead.
     The second part of the Shipwreck Revenant that I really didn't like was the silly tiki head on the back.  I felt it didn't really fit in with the shipwreck motif.    So I sawed it off, and replaced it by a bit of dowel stuck in a half of a plastic barrel; with the idea it would look like a stump of broken mast.  I also added an old broken ship's wheel I had to help hide the lower area where the tiki head had been.
       Another thing that I was not thrill with on this model was the shear abundance of coral. One of the ways I hoped to reduce this was to make it look like the skeleton "driver" was laying in a pile of treasure, and not coral.  So I covered the coral around the skeleton with some white glue, and glued a bunch of glitter down to look like gold coins.  My plan was to paint over the glitter, as I was really only using it for its coin shape; it was mush too bright to look like old shipwrecked treasure in it's natural state.
       Then, just for fun, I added a section of greenstuff barnacles to one leg to help cover a bit of coral.
    I thought I was finished at this point, but then I noticed that, just from gravity working on it as it hung attached to the side of the model, the harpoon arm had begun to bend downward.
  So, I cut way some sections of rope running along the underside and glued in a section of bamboo skewer.
     I then used some more greenstuff to re-sculpt the missing rope over the skewer addition.
     At this point I declared the model done.  My next step is to prime it, and then begin painting it.  I will be posting that article separately.  I will try for Monday, but I can't promise it will be done by then; so perhaps the Monday after that.  Be sure to tune in for the exciting conclusion!