Showing posts with label Monster. Show all posts

Monday, March 14, 2022

Dire Cabbage: Bones 5 Fan Favorites Figure

    This past week I painted the "Dire Cabbage" from the Bones 5 Fan Favorites Expansion.  
    I prepped the figure in the usual way, soaking it in a dish of water with a couple drops of dish-soap added, then giving it a light scrub with a soft toothbrush, and then rinsing and drying it.  I then trimmed the figure's integral base a little, and glued the figure to a 1" black-primed metal washer with some Aleene's Tacky glue.  I then placed the figure in my painting grip.   
     I began by painting the entire figure with Americana "Olive Green".  I then heavily drybrushed it with Ceramcoat "White".
     I let the first coats dry for a while, and then gave the entire figure a coat of thinned Citadel  Contrast "Creed Camo".  When this was dry, I went back and dry brushed it again with the base "Olive Green", and then drybrushed with the "White". 
               Next, I went over his legs with a coat of Citadel Contrast "Aggaros Dunes".  I then painted the mouth with Anita's "Violet", and the spikes on his tail with Crafter's Acrylic "African Violet" .  After that, I mixed a little Reaper MSP "Breast Cancer Awareness Pink" into the "African Violet", and blended in some lighter tips on the tail spikes.
          I then painted his claws with Folk Art "Barn Wood", and his teeth with Reaper MSP "Bleached Linen". After that, I painted the eye socket with Citadel Contrast "Wyldwood". 
      I let the claws and teeth dry for a while, and then gave then a coat of Citadel "Agrax Earthshade" wash.  When the wash was dry, I highlighted the claws with the base "Barn Wood", and the teeth with the base "Bleached Linen".  After that, I painted the eye with Reaper MSP "Holy Berry".  I went back then and did spot highlights on the teeth, and a pinpoint highlight in the eye, using some Ceramcoat "White".  Lastly, I painted the base with Americana "Charcoal Grey". 
     I let the figure dry overnight and the next day I gave it a coat of Americana "DuraClear Matte" varnish. When dry, I used some white glue to glue a mix of dried used coffee grounds and nutmeg to the figure's base. Another overnight dry, and I sprayed the figure with Testor's Dullcote". 


     I'm really happy with this little guy!  It is such a fun and imaginative figure; and there's a lot of detail in the sculpt which made painting it a lot of fun.  


Monday, July 26, 2021

Boulderkin: Bones 5 Figures

      This past week I painted the "Boulderkin" from the Bones 5 Core Set.  In Bones 5, Reaper added a couple sets of figures that were groupings of similar figures in different poses.  As a gamer I loved this concept for unit building.  The Boulderkin were one such set, including 6 poses of the same basic rock creature.  As a wargamer I thought this was great, and ended up buying 3 extra sets of these figures for a total of 4; giving me 24 Boulderkin figures.   I decided to divide them into two groups: one group of 12 to base individually, and one group of 12 to mount on movement stands.
     With four total sets, that gave me 4 of each individual pose; so I decided to paint them in groups of 4 like figures.  Since I wanted half for individual basing, and half for stand basing, I glued 2 to 1" primed washers using Aleene's Tacky glue, and left 2 on just their integral bases.  I then glued my groups of 4 onto tongue depressors using regular white glue.

     But before I did that, I decided I wanted one of my individually-mounted Boulderkin to be a distinct command figure.  So I choose a suitable pose, and chopped him in the middle and then chopped of one arm..
     Using green stuff, I extended his middle so he would be slightly taller, and repositioned his right arm, and then re-sculpted the hand into a classic officer pointing pose.
          Since I had so many of these to point, I decided I wanted to use Citadel Contrast Paints to speed the process.  So, to begin, I gave all the figures a base coat of Ceramcoat "White".
     When the base coat was dry, I painted each figure entirely with Citadel Contrast "Basilicanum Grey".
     When the "Basilicanum Grey" was dry, I then went back and added a second layer to the insides of the mouths and their eyebrows to darken them.  On some of their eyebrows I did the second coat with "Citadel Contrast "Space Wolves Grey" to mix things up. At this point, I drybrushed the figures with some Americana "Dove Grey", paying particular attention to their "teeth" to help them stand out.   I then dabbed some of the "Space Wolves Grey", some Citadel Contrast Militarium Green", and some Citadel Contrast Aggaros Dune" here and there on different rocks of their bodies to add some visual interest.  After that, I painted their eyes with Crafters' Acrylic "Daffodil Yellow", and then painted Ceramcoat "Black" pupils.
     Lastly, I painted their bases with Americana "Mississippi Mud".
     I let all of them dry overnight and the next day I gave them a coat of Americana "DuraClear Matte" varnish.    Then, when  the varnish was dry, I  gave them tiny hairdos with some  different kinds of static grass and flock in an attempt to look like moss; gluing it on with white glue. When dry, I used the white glue to flock the bases. 
     Another overnight dry, and I sprayed the figures with Testor's Dullcote". 


     I'm generally happy with how these guys turned out.  The "Basilicanum Grey"  is a little splotchier than I would have liked, but the ability to paint so many figures quickly overshadowed those concerns.  

Monday, March 29, 2021

Moor Troll: Bones 4 Figure

      This past week I painted the "Moor Troll" figure from the Bones 4 Trolls Set. 
       I prepped the figure in the usual way, soaking it in a dish of water with a couple drops of dish-soap added, then giving it a light scrub with a soft toothbrush, and then rinsing and drying it.  I then glued the figure to a grey-primed 2" fender washer with Aleene's Tacky glue.  I then used a couple large drops of Elmer's to glue him to the top of a pill bottle.
     I began by painting the figure entirely with Ceramcoat "White".  I then let it dry for a while, and when I came back I gave it a coat of Citadel Contrast "Space Wolves Grey".  While the "Space Wolves Grey" was still wet, I went over the figure and dabbed it here and there with splotches of Citadel Contrast "Creed Camo". 
          When the Contrast paint was dry, I painted the scaled areas on his legs and forearms with Citadel "The Fang".   When dry, I drybrushed the entire figure with Folk Art "Cloudy Day", and then followed with a lighter drybrush of Americana "Grey Sky".  After that, I did some spot highlighting with some Folk Art "Dove Grey", and a little Americana "Snow White".  I then painted his hair with Ceramcoat "Charcoal". 
          Next, I painted the rope belt on his loincloth with Reaper MSP "Shield Brown", and then painted the loincloth with Vallejo "Brown Violet".  I then painted the fur hanging on the loincloth with Americana "Charcoal Grey", and the skull with Americana "Antique White".  after that, I painted the inside of his mouth with Americana "Shading Flesh", and his teeth with Folk Art "Porcelain White".
     I let everything dry for a while, and then I gave his hair a coat of Citadel "Nuln Oil" wash.  I then the inside of his mouth, and the loincloth, rope, and other items on the loincloth a coat of Citadel "Agrax Earthshade" wash.   After that, I painted his eyes using Americana "Buttermilk" for the "whites, and I then highlighted the inside of his mouth with Reaper MSP "Rosy Skin", and highlighted his teeth with Americana "Bleached Sand".  
         I then highlighted his hair with Americana "Zinc", and Americana "Neutral Grey".  Next, I highlighted the rope belt with Ceramcoat "Territorial Beige, and the loincloth with Duncan "Olive Green" with a little Americana "Jade Green" mixed in.  After that, I highlighted the fur with Americana "Mississippi Mud", and the skull with the base "Antique White", and then used a little Crafter's Acrylic "Light Antique White" for lighter highlights.  Lastly, I painted his base with the "Mississippi Mud".  
     At this point, while I was painting the base, I realized I hadn't painted the claws on his hands or feet.  So I quickly painted them with some Folk Art "Dapple Grey", and when dry, gave them a coat of the "Nuln Oil" wash.  When that was dry, I highlighted them with Folk Art "Gray Green".   
      I let the figure dry overnight and the next day I gave it a coat of Americana "DuraClear Matte" varnish.    Then, when  the varnish was dry, I used some white glue to flock the base.  Another overnight dry, and I sprayed it with Testor's "Dullcote".  


     I'm generally happy with this guy.   As usual, the Contrast paint looks rather splotchy when used on large surfaces, but I think it's an okay look for a troll.  Also, oof!, that mold line really shows in the photos across his shoulders and arms.  Luckily, it's not quite as visible when looking at the figure in person. Must be the way the light and shadow are hitting it in the pictures. 

     No figure for next Monday, as we have some stuff going on Easter weekend that will prevent me from getting any painting done.  So tune back in in two weeks please for my next post.  See you then! 

Monday, February 22, 2021

Gulper (Giant Catfish): Bones 4 Dreadmere Figure

      This past week I painted the "Gulper" giant catfish figure from the Bones 4 Dreadmere Expansion set.  The figure is designed with a flat spot on its underside so you can glue it directly on a base if you want, but I decided I wanted mine to be swimming, so I grabbed a reaper flight stand I had and drilled a matching hole into the Gulper's belly. 
      I then prepped the figure in the usual way, soaking it in a dish of water with a couple drops of dish-soap added, and then gave it a light scrub with a soft toothbrush, and then rinsed and dried it.   Next, I stuck it onto the flight stand's peg, and put the peg in a pair of alligator clips for ease of holding.
When painting animals, I always like to look for real world inspiration, so I Googled images of "colorful catfish", and came upon the Redtail Catfish.  I thought it would be a fun pattern to paint, so I looked through a bunch of photos to get a sense for the coloration on this type of catfish.
     Because the figure has a bit of weight to it, I glued the base of the flight stand to a 2" fender washer with some Aleene's Tacky glue.  When the glue was dry, I sprayed it brown.   
     To begin with, I painted the figure with Americana "Dove Grey".  I then painted on the darker pattern with a mix of Americana "Charcoal" and Aleene's "Deep Khaki".
     Next, I drybrushed the light areas with some Americana "Snow White", and then highlighted the darker parts with a mix of the "Charcoal Grey" with the lighter Aleene's "Dusty Khaki"  After that, I painted the dot pattern on his head with Ceramcoat "Black", mixed with a little of the "Charcoal Grey", and then painted the tail with Reaper MSP "Holly Berry".   After that, I painted the inside of the mouth with Folk Art "Milkshake", and then painted the eyes with the "Snow White" and added inner circles with the "Black"
     When the mouth was dry, I gave it a coat of Citadel "Nuln Oil" wash.  I then drybrushed the tail with some Crafter's Acrylic "Pure Pumpkin", and then used the "Pure Pumpkin" to paint the edges of the top and underside fins.   Next, I highlighted the fin edges, and parts of the tail with some Americana "Tangerine", followed by some spot highlights with Crafter's Acrylic "Bright Yellow". 
      I then painted the eels affixed to the Gulper's sides with Apple Barrel "Apple Black Green".  By this time the "Nuln Oil" wash was dry, so I highlighted the mouth with the base "Milkshake", and then a little of the "Milkshake with some Ceramcoat "White" added.   I then painted the teeth with Crafter's Acrylic "Light Antique White", and highlighted them with the "Snow White".    At this point I went back and painted the eels with the "Deep Khaki", leaving a thin edge of the "Apple Black Green" to serve as a shadow, and then highlighted with the "Dusty Khaki".  Lastly, I aded some tiny "Black" dot eyes. 
      I let the figure dry overnight and the next day I gave it a coat of Americana "DuraClear Matte" varnish.  I didn't shake the varnish a lot in hopes of getting more of a semi-gloss shine than a matte finish. I wasn't going to use my regular Dull Cote final spray on this, as I thought a slightly shiny fish would be better than a matte one.   I then used some white glue to glue some course sand all over the base.  When the sand was dry,  I made a water and white glue mix and painted that over the sand to help it stay in place; since I wasn't going to paint it or spray it.  Lastly, I added some tiny shells and plants.  


     I'm happy with how this turned out.   Doing creatures with irregular color patterns like this never look just right while I'm doing them, especially if in nature the dividing line is not sharp but made up of individual hairs or fur; but I think this doesn't look too bad when viewed at table distance or in photos.

Monday, October 19, 2020

Gloom Stalker: Bones 4 Darkreach Figure

      This past week I painted the "Gloom Stalker" from the Bones 4 Darkreach Expansion; this is Reaper's version of the D&D Hook Horror.   This is the last figure from the Darkreach Expansion I had left to paint.  So it feels good to get one expansion completed. (Note: I traded or sold the Fungoids, and all but two of the Bloodstone Gnomes.) 
     I began by painting the body of the figure with Ceramcoat "Black".   Then when the "Black" was dry, I drybrushed it with Crafter's Acrylic "African Violet".  After that, I gave it a lighter drybrush of Apple Barrel "Apple Lavender".  I then worked on the underbelly, first using a mix of the "Black" and the "African Violet" around the outer edges, and then adding in some of the "Apple Lavender" to blend it lighter towards the center.  Lastly, I mixed in some Folk Art "Milkshake" for the center.  I then drybrushed it with Americana "Dove Grey", and then directly painted some "Dove Grey" highlights.
     Next, I painted the feet with the "Milkshake", and then painted the blade-like "hooks", talons, and beak with Folk Art "Barn Wood".  When dry, I attempted to blend them all into the black body by mixing the base color, ("Milkshake" for the feet, "Barn Wood" for the blade-like "hooks", talons, and beak,) with Citadel Contrast "Black Templar".  When that was dry, I gave the blade-like "hooks", talons, beak, and feet all a coat of Citadel "Nuln Oil".
     When the wash was dry, I drybrushed the blade-like "hooks", talons, and beak, with the base "Barn Wood".  I then did some direct brush highlights with the same color where it was too close to the black body to drybrush well.  Next, I mixed some Crafter's Acrylic "Light Antique White" with the "Barn Wood" and did another round of lighter highlights.  After that, I did a few spot highlights with just the plain "Light Antique White".  I then highlighted the feet with the base "Milkshake".  
     Moving on to the eyes next, I painted the immediate area around them with the "African Violet", and then painted the eyeball with Americana "Zinc".  When dry, I painted large pupil with Crafter's Acrylic "Daffodil Yellow", and then  a smaller inner pupil with Ceramcoat "White".
   I let the figure dry overnight and the next day I gave it a coat of Americana "DuraClear Matte" varnish. I then used some white glue to glue some fine sand around the edge of the integral base to cover the areas where the black under-base showed.  When the sand was dry, I painted it with a coat of Americana "Charcoal Grey". When this was dry, I drybrushed the sand with the "Mississippi Mud", and then with some Apple Barrel "Rock Grey"; lastly I drybrushed it with a little Americana "Dove Grey". Next, I painted the sculpted bone on the base with the "Light Antique White".  When that was dry, I gave it a coat of Citadel Contrast "Skeleton Horde".
      Another overnight dry, and I sprayed the figure with Testor's Dullcote". When the "Dullcote" was dry, I went back and repainted the eyes with a little Americana "DuraClear Gloss" varnish.


     I'm really happy with how this guy turned out.  I wasn't expecting a lot from the figure, but for some reason the black, purple, and off-white color scheme really seems to make it pop for me.  Sadly this is another figure that suffers from some poorly placed mold lines, and I just don't have the patience to spend a lot of time trying to remove them from uneven and textured surfaces.  

Monday, October 12, 2020

Troglodytes (Spearman, Warrior & Boss): Bones 4 Darkreach Figures

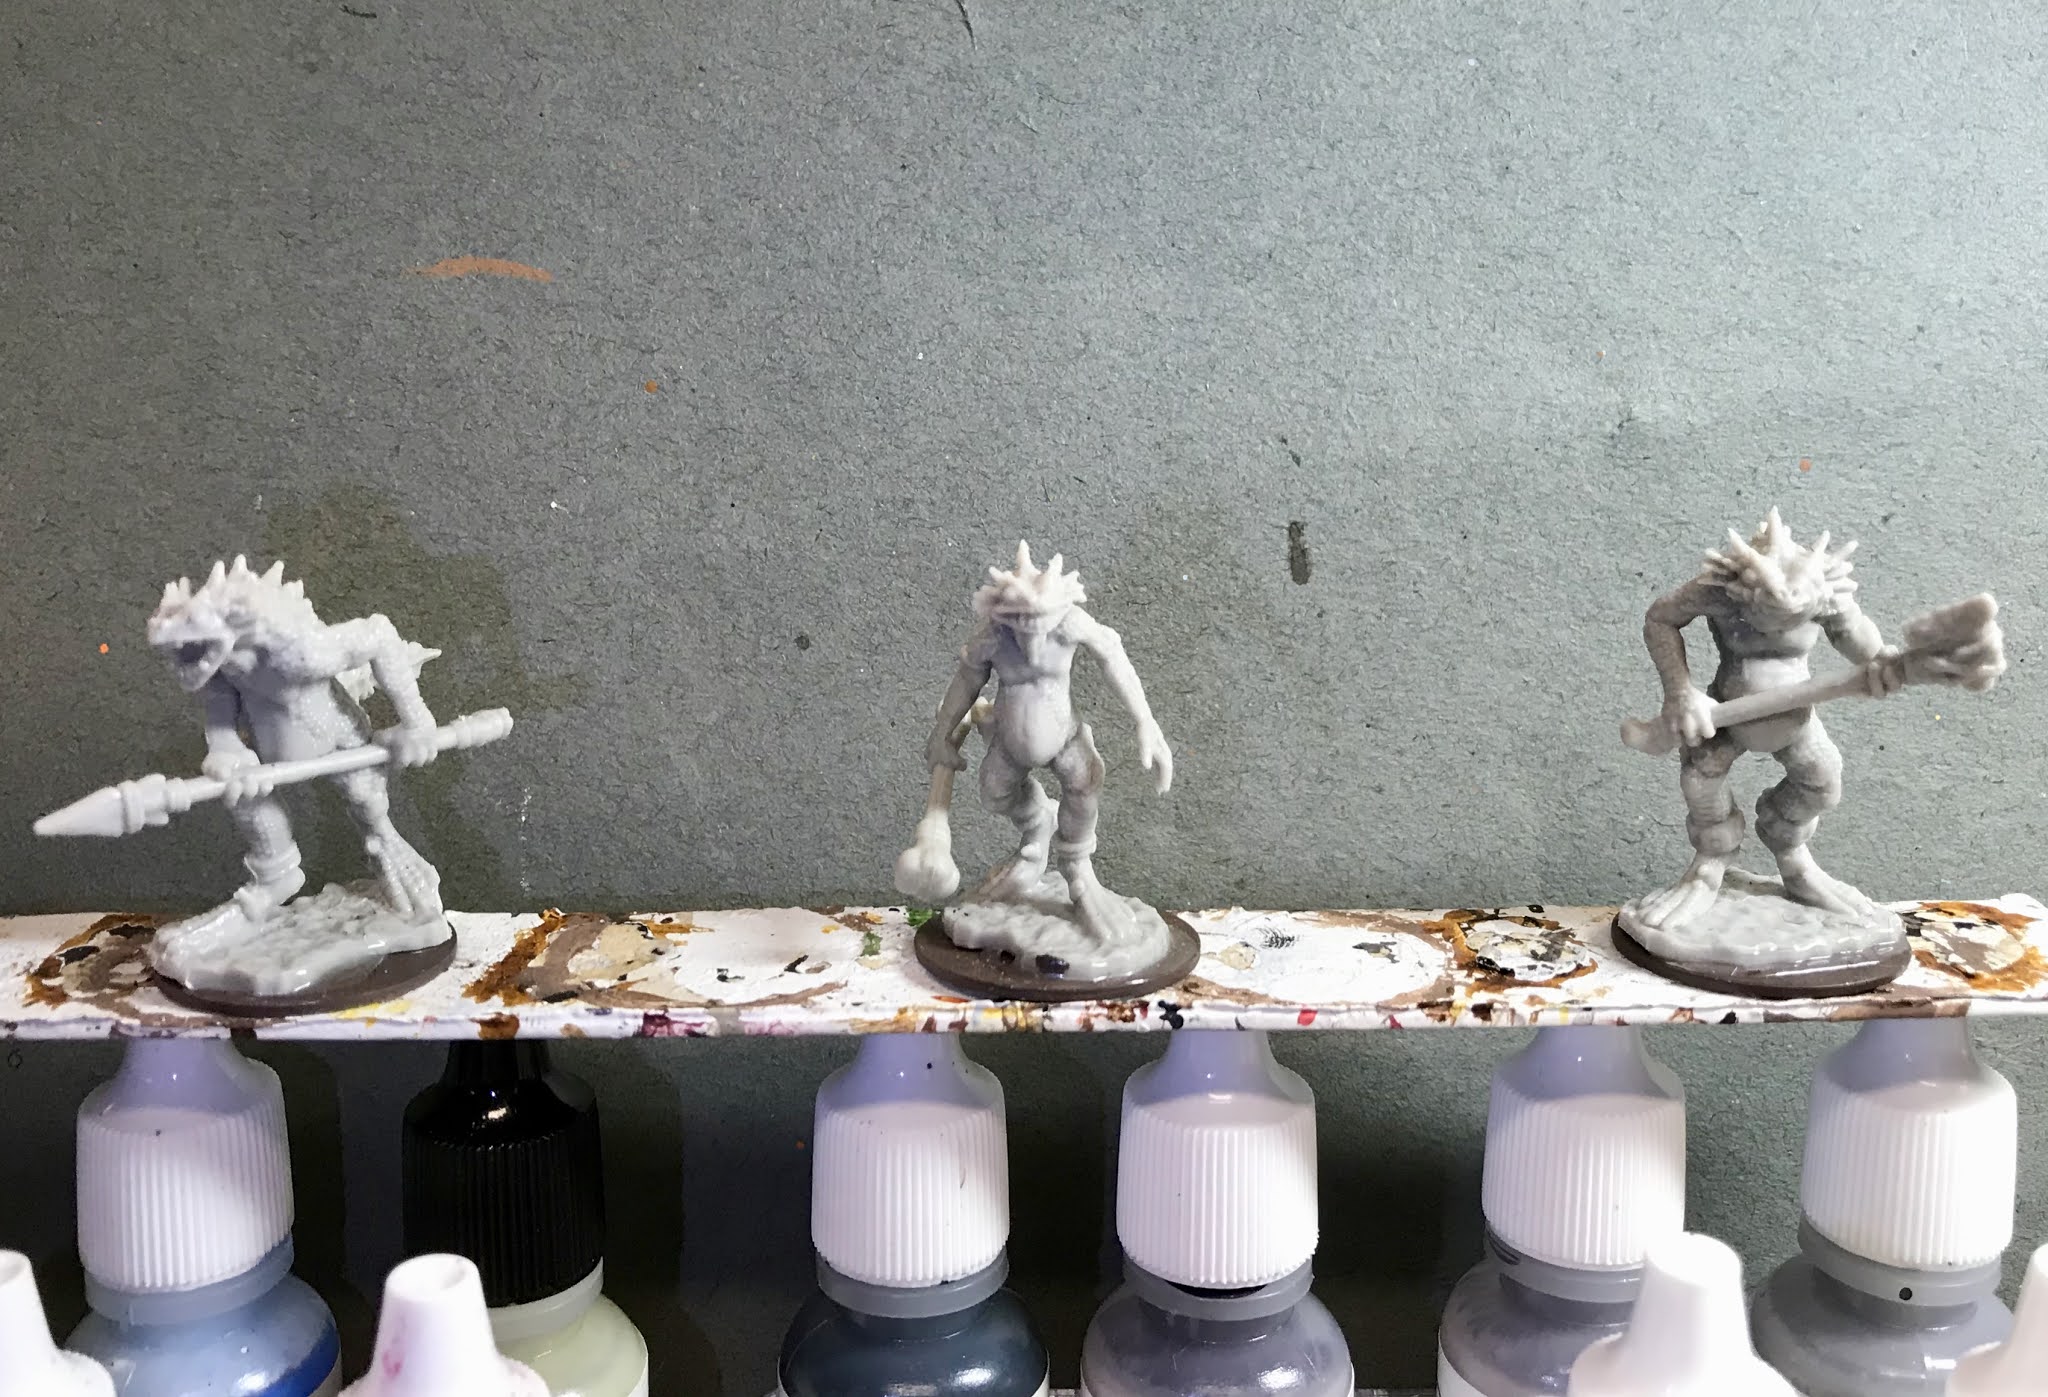
     This past week I painted the "Troglodyte Spearman", "Troglodyte Warrior", and "Troglodyte Boss" figures from the Bones 4 Darkreach Expansion.  I've only got one Darkreach figure left to do after these guys, and I'll have completed all the figures I kept from that expansion.   These guys had a lot of nice detail sculpted into their scaly skin, so I thought they might be good candidates for some Citadel Contrast paint.  So I thought I'd try something of a hybrid approach using both the Contrast paint and regular paint.
      I prepped the figures in the usual way, soaking the parts in a dish of water with a couple drops of dish-soap added, then giving them a light scrub with a soft toothbrush, and then rinsing and drying them. I then glued them to 1" brown-primed fender washers with Aleene's Tacky glue.  I then glued the washers onto a tongue depressor with a couple drops of Elmer's white glue.
     I began by giving all of them complete coats of Ceramcoat "White".  When that was dry, I painted their bodies with Citadel Contrast "Militarum Green".
     I began by working on their abdomen, chest, and the bottoms of their feet areas, using a blend of the base "Militarum Green" and mixing in some Americana "Antique White"; I then gradually increased the amount of the "Antique White" as I worked towards the higher center areas.  After that, I used some Americana "Jade Green" to highlight areas of the body like fingers, toes, and lips.  I then used Folk Art "Grey Green" to paint the spikes, horns, and claws; and then highlighted these areas with Folk Art "Porcelain White".  I felt the highlight wasn't enough, so I went back and added some Folk Art "Celadon Green" to the very tips.
          Next, I repainted the center figure's bone club, and the bone handle of the righthand ones' axe, with the "White".  I then painted the lefthand one's spear handle with Americana "Mississippi Mud", then painted the spear point, axe head, and all their ankle bracelets with Accent "Golden Oxide".  After that, I painted the bindings on the spear, club and axe, with Ceramcoat "Territorial Beige". I then moved to their mouths, painting the inside of the lefthand one's mouth with Folk Art "Milkshake", and then painting all their teeth with Folk Art "Barn Wood".  I then went back and gave the center figure's bone club, and the bone handle of the righthand ones' axe a coat of Citadel Contrast "Skeleton Horde".
         I then applied a coat of "Nuln Oil" wash to the teeth and mouth of the figures.  While that dried, I did highlights on the spear shaft using some of the "Barn Wood" mixed with the base "Mississippi Mud".  By now the "Skeleton Horde" Contrast paint had dried, so I did some light drybrush highlights on the bone club, and axe handle with Americana "Bleached Sand".  The "Nuln Oil" was dry too, so I highlighted the teeth with the "Bleached Sand" as well.  After that, I highlighted all the bindings on the weapons with Folk Art 'Butter Pecan".   
     Next, I moved to the metallics, Painting the spear point and axe head with Folk Art Brushed Metal "Brushed Bronze".  I let that dry for a while, and then came back and drybrushed it with some Ceramcoat "MetallicBronze".  I then mixed some of the "metallic Bronze with a little DecoArt Metallic "Bight Brass" to do lighter highlights.
    Finishing up, I painted the back of the open mouth on the lefthand one with a little Citadel "Black Templar" Contrast to give the appearance of a throat.  I then painted the eyeballs with the "Black Templar" as well.   When they were dry, Ipainted the eyeballs again using Crafter's Acrylic "Daffodil Yellow"  and then gave them Ceramcoat "Black" slit pupils.  Lastly, I painted the bases with Americana "Mississippi Mud".
         I let the figures dry overnight and the next day I gave them a coat of Americana "DuraClear Matte" varnish.    Then, when  the varnish was dry, I used some white glue to flock the bases.  Another overnight dry, and I sprayed them with Testor's "Dullcote". When the "Dullcote" was dry, I went back and repainted the eyes and teeth with a little Americana "DuraClear Gloss" varnish.


     I'm really happy with how this trio turned out.  I think the Contrast paint really was effective on the scaly skin, and blended well with more conventional paints.