Monday, August 26, 2013

Painting the Skeleton Warrior Spearmen: Figures 32 & 33

Last week I finished up the two skeleton spearmen warriors from the Undead Horde Set.  I began by priming the figures with Krylon Camouflage with Fusion Flat Black spray paint, and then glued them to  black-primed fender washers.
To start, I gave both a heavy drybrushing with GW "Bleached Bone".
I then gave them a  lighter drybrushing with plain white paint, then when dry, I gave them a light wash with GW "Devlan Mud" wash. Afterwards, I went over them again with a light drybrush of the plain white.
  This was followed with painting the spear shafts with Americana "Mississippi Mud", and one shield with GW "Blood Red", and the other with plain black. I then added decorations to the shields with plain white.
I then gave the spear shafts a drybrushing with Folk Art "Barn Wood" and painted the back of the shields, rims, and hubs with Ceramcoat "Bronze". The spear points I painted with Ceramcoat "Metallic Pewter". The straps on the shields were next, with Americana "Charcoal Grey". Then I painted some splotches on the spear points with Duncan Aged Metal "Iron", and the strap rivets with the "Bronze". Lastly, I gave the straps and the spear points a wash with the "Devlan Mud" wash. 
   When everything had dried, I gave he figures a coat with Ceramcoat "Matte Varnish", and then flocked the bases.  Afterwards, I sprayed them with Testor's "Dullcoat".
Overall I'm pleased with them. They were nice simple figures to paint.

Figures 32 & 33: Complete

Thursday, August 22, 2013

A Bit About My Bones Basing Basics

I had a question from a reader about what I used to base my figures, so I thought I would take the time today to tell a bit about my basing technique. As I have mentioned in my posts before, I like to glue all my figures onto a fender washer that has been primed with flat black spray paint.  I usually use the cheap .96 cent flat black from Walmart for this. I like to us fender washers, because I line my storage boxes with magnetic sheeting, and these washers help the figures stay in place when transporting my figure boxes.  I use various sizes of fender washers, and tend to pick the size that fits the inherent figure base best.
  So, after I am finished painting a figure, I paint it with a brush on matte varnish by Ceramcoat.  This helps protect the figure's paintjob while I'm flocking it's base.  To flock the base I used a mixture of three different Woodland Scenics Turf products.  I mix roughly equal parts of these into an old metal lunchbox that I use for my basing
To adhere this turf mix to the bases, I mix cheap brown craft paint with elmers glue at about a ratio of two parts paint to one part glue.  I keep this mixture in an old plastic 35mm film container that has a nice airtight seal.
I also have a number of household items that I sometimes use in my basing. Shown below are some of these: Cheap Oregano (which makes nice scattered fallen leaves), coarse sand, dried coffee grounds (which make nice dirt), and dried tea (which makes nice dirt or dead vegetation).
 I also cut short lengths of undyed rope to make tall grasses, and use a bag of chamomile I have for dried or dead grass.
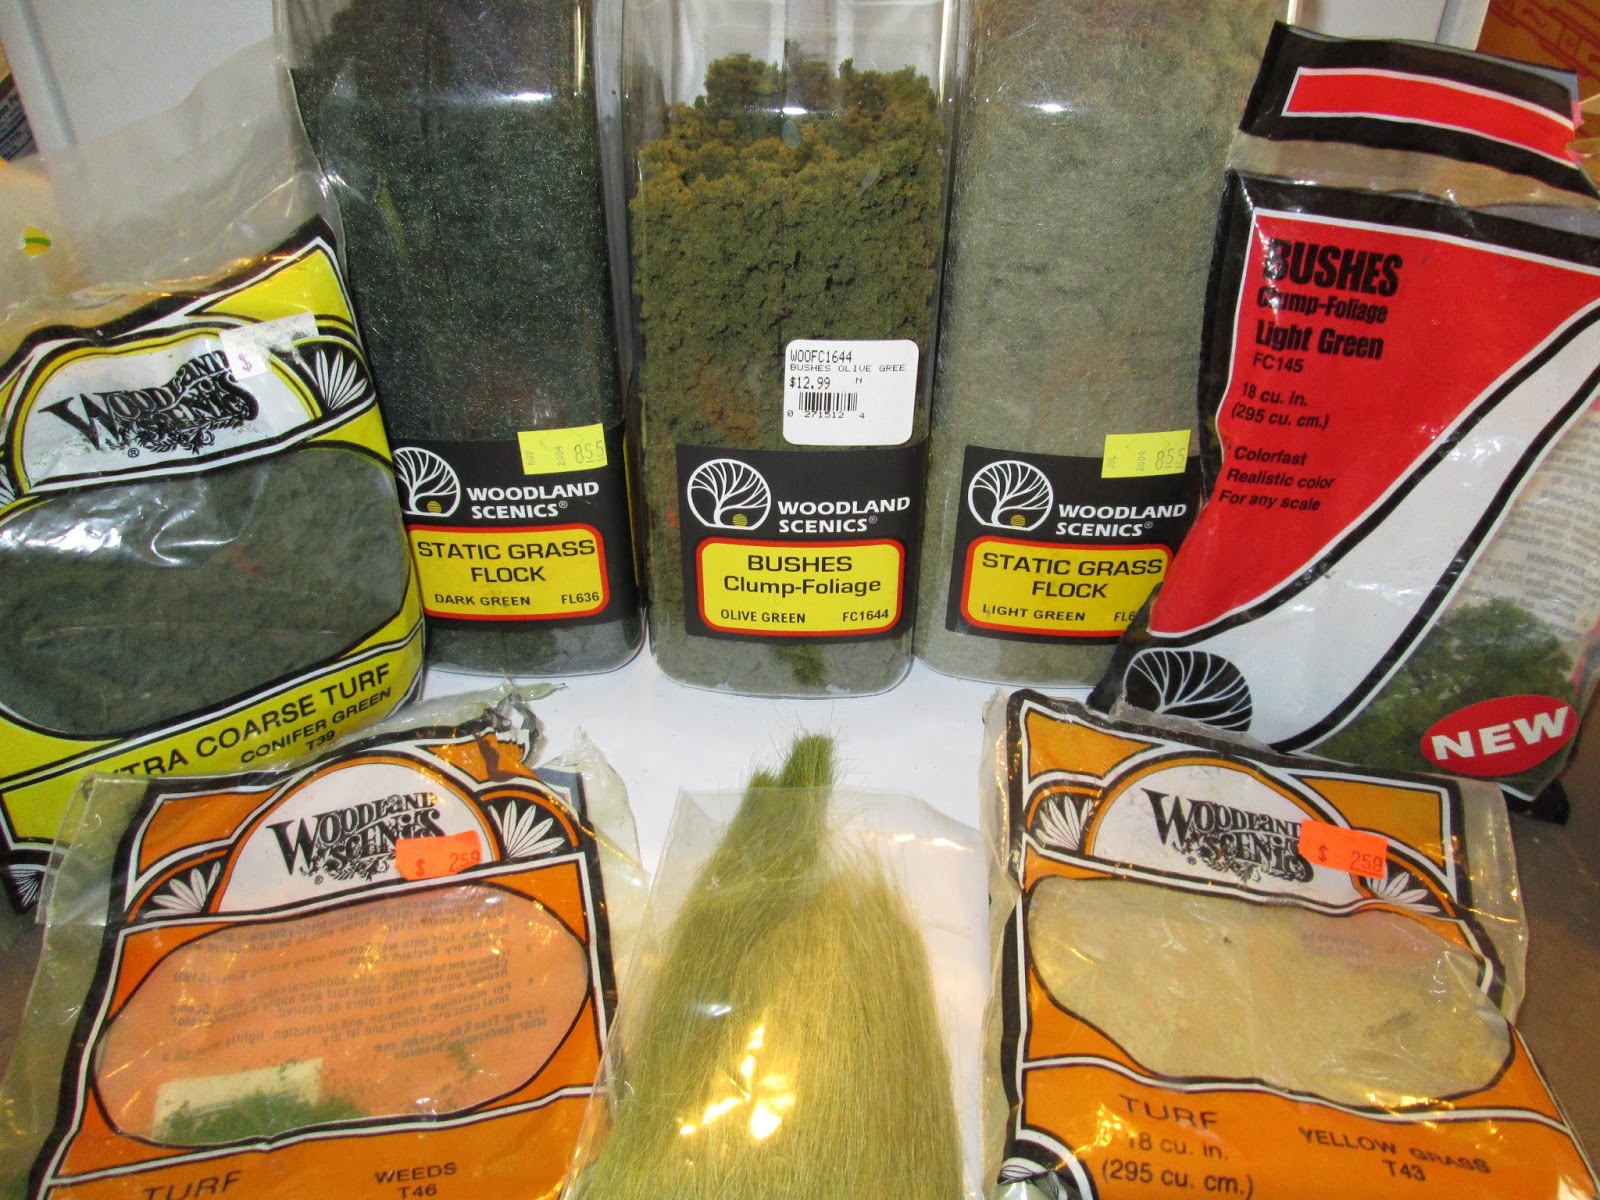
 Of course, I have also gathered a number of Woodland Scenics products over the years, including Clump foliage, static grass, long grass, and various shades of fine turf.
And I have a number of different small stones I sometimes glue on bases. Shown below are: gray kitty litter, decorative gravel, and brown aquarium gravel
Also, handy is various plastic foliage, which can sometimes be glued on to bases, though I usually use this for larger scenery projects.
So, on to the actual basing.  To begin with, I paint the base with my glue and paint mixture, being careful not to paint up over the figure's feet.
Then I add any odd scatter I  want to include on the base.  Here, in the photo, I'm sprinkling some coffee grounds onto the wet paint, to make it look like loose soil on the base.
Then i dunk the whole thing in my turf mixture and gently swirl it around a bit, so I make sure all the base is covered.  I then let it sit in here for a few hours to let everything dry.
Afterwards I take the figure out, and gently tap the base to remove any loose turf.  Then I use white glue to glue on any decorative elements I choose.  Here in the photo, I'm gluing on a bit of dark green clump foliage to make a little bush or weed.
And here's the finished basing project show below. (And a sneak peak at one of Monday's figures) I now will let the glue dry for a few hours, and then will spray the whole thing with Testor's Dullcoat to help seal the figure's paint and the flocking onto the base.

Monday, August 19, 2013

Flesh Golem and Clay Colem: Figures 30 & 31 of 265

Over the weekend I finished up  the second two figures from the Golems set, making this the first set for me to have completed. (Yay!)  I began by soaking both figures in water with dish soap in it, and then rinsing them, and gluing them to black primed fender washers. The Flesh Golem had some really bad flash along his arms and shoulders, which I tried to remove the best I could, but the many crevices of his muscles made this difficult.
    At first I started to paint the Flesh Golem with the same color I do my zombies with, but rethought that, as I didn't want him to look like just another zombie.  So instead of the green rotting flesh look, I decided to go with the bluish-pinkish-grayish  rotting flesh look. I wasn't sure how exactly I wanted to do this, as I didn't want him to end up looking purple.  So, as a trial, I painted one arm with Apple Barrel "Flesh" and the other with a mix of the "Flesh" and Duncan "Slate Blue".  Then over the pure flesh one I did a wash with Iron Wind Metals "Dark Blue' ink, and over the other arm I did a wash of the "Dark Blue" ink mixed with GW "Badab Black" wash. In the end, this second arm, was the one I liked best, so I painted his complete torso with a mix of the "Flesh' and "Slate Blue".
       Meanwhile, I had thought about what color I wanted the Clay Golem to be; and decided that when I think of clay I think of a grayish-tanish color.  So I thought I would try to give him that look.  So, I began by painting him entirely with Folk Art "Milkshake", which is a very neutral flesh color. I also decided I wasn't going to paint his little Speedo a separate color, as the whole idea of a Golem putting on a little pair of briefs just seemed silly to me; so I just assumed them to be a result of the modesty of his creator, and an inherent part of his body.
I then gave the entire Flesh Golem a wash with an even mix of  the"Dark Blue" ink and "Badab Black" wash.
And I gave the Clay Golem a wash with GW "Devlan Mud" wash.
When this had dried I felt that it was too brown, and made the 'clay' look too flesh like, so I went over it with a wash of the "Bedab Black" which helped grey it up a bit. When this was dry, I gave the whole body a quick drybrushing with Folk Art "Platinum Grey". To finish I added black dot pupils.
  I then did some drybrushing on the Flesh Golem's skin with a mix of the original colors again, then I went over the scar areas carefully and lightly with some of the "Milkshake" color to give them that whitish scar look. I then went and painted the pants on the Flesh Golem. I wanted a color that would contrast nicely with the bluish skin, so I chose GW "Vermin Brown", and I painted the rope holding up the pants with Folk Art "Barn Wood" Then I gave the pants and rope a wash with Windsor Newton "Peat Brown" ink.
  I then went back an did some highlighting on the rope and pants.  I painted his eyes with Americana "Buttermilk, and then gave then added black pupils.  His teeth and finger & toe nails I did with the "Platinum Grey"  His nipples I did with a little bit of black added to the original skin color.  When everything had dried, I gave both figures a coat of Ceramcoat "Matte Varnish", and then I flocked the bases.  I let them sit overnght, then sprayed them with Testor's "Dull Coat" the next morning.
     I'm pleased with how these turned out. I think the bluish-pinkish-grayish skin color really turned out looking effective. And the color for the Clay Golem, while not clearly shouting 'clay', I think still comes across as something other than skin.

Figures 30 & 31: Complete 

Thursday, August 15, 2013

Zombie-palooza!: Figures 26 - 29 of 265

This week, as things are still busy in my life, I completed the four Zombie figures from the "Undead Horde" set.  I figured they would be nice easy figures to paint.  Before I began though, I decided I wanted to reposition their arms a bit, so they didn't look too identical to each other. I tried the popular dipping in microwaved water method, but, while good for bending things back tot their original shape, I found I couldn't get the arms to bend into totally new positions this way and stay there.  They kept moving back to their original position.  So I resorted to holding them (carefully!), with an 'Ove Glove, in the steam stream from a simmering tea kettle. I then used pliers to bend and hold the arm in place as I dunked the figure in cold water.  This worked after several tries, but as you can see in the some of the photos, left plier marks on a couple of the arms.
 After scrubbing with dish soap, and gluing to a black-primed fender washer, I applied Americana "Reindeer Moss Green" to their skin. I then used, Anita's "Burnt Sienna", Folk Art, "Poppy Seed", Duncan "Slate Blue", and Accent "Mustard Seed" to paint each zombies pants a different color.   For their hair I used GW "Graveyard Earth", Americana "Asphaltum", Accent "Real Umber", and Americana "Moon Yellow".  I then gave them all a wash with Windsor Newton "Peat Brown' ink.  After this dried, I added yellow pupil-less eyes. Then I painted some bloody gore on their hands, mouths, and spattered randomly across their bodies, with Apple Barrel "Apple Maroon",with a couple highlights done with GW "Blood Red".  On the open-mouthed ones, I painted their teeth with Americana "Buttermilk".
 To finish them off I gave each a coat of Ceramcoat "Matte Varnish".  When this was dry I flocked their bases.  Then the next day I sprayed them all with Testor's "Dull Coat".
 
I'm pleased with how they turned out, but I basically copied the same paint scheme I established when I did the Zombie from he Original 30 Bones set a few weeks ago, so I kind of knew what I was going to get when I began painting them.
 
Figures 26-29: Complete


Monday, August 12, 2013

Elf Paladin: Figure 25 of 265

This week I worked on one of the elf figures from the Original 30 Bones set. I wasn't sure who this elf was, so I searched the Reaper store but couldn't find him anywhere.  I finally resorted to doing a 'tag' search for "peacock" because of the bird on his shield, and that led me to this fellow: Turanil the Elf Paladin , who seems to be this fellow, but with the pose and armor changed a bit.
  This turned out to be a very frustrating figure to paint because I found a lot of the detail was missing or too soft for me to interpret; and I had trouble figuring out the exact arrangement of belts and armor, as well as where some of the armor began and ended. There were also casting errors in his hands and there were different areas where the plastic material seemed  to form creases within itself.
   I began with the usual bath in soapy water, then I glued him to a black-primed fender washer. I wanted to try something different this time: black priming only part of the figure.  So, I painted his armor and shield with black craft store acrylic and left his cape, hands, face and sword, all the natural Bones material.
 To start, I drybrushed his scaled armor tunic with Ceramcoat "Bronze" and his chest and hip plates with GW "Chainmail". I then went back over the tunic with Cermacoat "14K Gold" applying a very heavy highlighting. And then I went over the other armor with GW "Mithril Silver." I then painted the cape Americana "Salem Blue" and the belts and pouches Apple Barrel "Navy Blue."  The sword and dagger scabbards I did with Folk Art "Metallic Blue Sapphire"
 I also painted the shield with the "Navy Blue", and the inside of the shield with Ceramcoat "Walnut"
Next, I gave the cape a wash with Iron Wind Metals "Dark Blue" Ink.  I also painted the face and hands with GW "Elf Flesh". When the ink as dry on the cape, I added highlights to the raised folds with the "Salem Blue" with a bit of white added to it.
On the shield, I drybrushed the peacock with the "14k Gold" paint, and then filled in the area where I over-brushed with the "Navy Blue". This didn't work out as I had hoped, there was not enough relief in the design to allow the dry brushing to really pick out the individual sections of the peacock design, so I went back over it with some GW "Badab Black" Wash. This did the job but also muted the gold considerably, so I had to go back and paint the individual sections of the bird by hand to brighten them up.
I then painted the sleeve and the collar of his under tunic with Accent "Golden Harvest", and then gave a wash to his face and hands with Windsor Newton "Peat Brown" ink.  When that was dry I painted his hair Americana "Charcoal Grey"
When the hair was dry I drubrushed it with Americana "Moon Yellow" and then added highlights with Americana "Buttermilk. I painted the sword hilt with the 14K Gold" and the blade with "Chainmail". Then I gave the gold a wash with the "Peat Brown" Ink, and added "Mithil Silver" highlights to the blade. I painted the gems with GW "Enchanted Blue", adding the shadows with GW "Regal Blue" and highlights with the "Salem Blue" and white. Finally I painted the eyes. About this time I realized I hadn't painted his shoes, so I gave them a quick drybrush with "Chainmail" and highlights with "Mithril Silver" 
I then painted the base GW "Codex Grey" and then gave it a wash with the "Badab Black" wash. This was followed by some light drybrushing with GW "Fortress Grey". When everything had dried overnight I painted the whole thing with Ceramcoat "Matte Varnish", and when this had dried, I sprayed the figure with Testor's "Dull Coat"
Not a great paint job, but a nice basic one. I got frustrated early with this figure so after a while just wanted to get it done.

Figure 25 of 265: Complete.

Wednesday, August 7, 2013

Sorry, No Post This Week. :(

Unfortunately, a busy 'real life' week combined with a figure that is proving to be a pain to paint, has caused me to fall behind on my usual Monday and Thursday updates this week. My apologies about that.  Look for my regularly scheduled Bone blogging posts to return next Monday.  In the meantime, here is a 'work in progress' photo of (hopefully!) Monday's figure:
 
 
Figure 25 of 265: In progress

Thursday, August 1, 2013

Awww, Rats! Figures: 13-24 of 265

  This past week I finished up the dozen Giant Rats included in the "Dungeon Attack" set. A nice quick and simple way to boost my numbers. :-)  I began by gluing the rats to fender washers with Aileene's Tacky glue , and then primered them with with Krylon Camouflage Flat Black with Fusion.  I didn't want to do all plain monotone black rats, so I decided to do half as brown rats, half as black, and one odd one as a white rat to act as a kind of group leader if I should ever need to designate one.
I glued them a half dozen each to a tongue depressor for painting, and for the brown ones I began by giving them a heavy drybrushing of Americana "Charcoal Grey", followed by a lighter drybrushing of GW "Graveyard Earth'.  I then painted the tails, feet, and noses with Americana "Milkshake"; the teeth with Americana "Buttermilk", and the eyes with black.  The bases' stonework I drybrushed with GW "Codex Grey", and then painted odd stones here and there with either GW "Fortress Grey' or Folk Art "Poppyseed". I then painted the remaining surface of the fender washer with the "Codex Grey"
    I did the black rats in a similar manner, except I began by dryrushing the bodies with just the Codex grey. I then finished the tails, feet, noses, teeth, and eyes exactly like I did for the brown rats.  For the white rat I first drybrushed with the "Fortress Grey", and then I drybrushed with pure white.  When I did the tail, feet and nose, I added a little bit of Apple Barrel "Apple Lt. Pink" to the "Milkshake" paint to give it a more pinkish hue. I painted the teeth with the same "Buttermilk" as before, but  the eyes I did with GW "Blood Red" and then added a tiny white dot to them.


   After everything had dried, I panted on a coat of Ceramcoat "Matte Lacquer", and then the next morning sprayed with Testor's "Dull Cote".
All in all I'm pleased with these.  It was very quick to finish them, and they came out looking good with minimal effort.
 
Figures 13-24: Complete