Showing posts with label Elemental. Show all posts

Monday, July 26, 2021

Boulderkin: Bones 5 Figures

      This past week I painted the "Boulderkin" from the Bones 5 Core Set.  In Bones 5, Reaper added a couple sets of figures that were groupings of similar figures in different poses.  As a gamer I loved this concept for unit building.  The Boulderkin were one such set, including 6 poses of the same basic rock creature.  As a wargamer I thought this was great, and ended up buying 3 extra sets of these figures for a total of 4; giving me 24 Boulderkin figures.   I decided to divide them into two groups: one group of 12 to base individually, and one group of 12 to mount on movement stands.
     With four total sets, that gave me 4 of each individual pose; so I decided to paint them in groups of 4 like figures.  Since I wanted half for individual basing, and half for stand basing, I glued 2 to 1" primed washers using Aleene's Tacky glue, and left 2 on just their integral bases.  I then glued my groups of 4 onto tongue depressors using regular white glue.

     But before I did that, I decided I wanted one of my individually-mounted Boulderkin to be a distinct command figure.  So I choose a suitable pose, and chopped him in the middle and then chopped of one arm..
     Using green stuff, I extended his middle so he would be slightly taller, and repositioned his right arm, and then re-sculpted the hand into a classic officer pointing pose.
          Since I had so many of these to point, I decided I wanted to use Citadel Contrast Paints to speed the process.  So, to begin, I gave all the figures a base coat of Ceramcoat "White".
     When the base coat was dry, I painted each figure entirely with Citadel Contrast "Basilicanum Grey".
     When the "Basilicanum Grey" was dry, I then went back and added a second layer to the insides of the mouths and their eyebrows to darken them.  On some of their eyebrows I did the second coat with "Citadel Contrast "Space Wolves Grey" to mix things up. At this point, I drybrushed the figures with some Americana "Dove Grey", paying particular attention to their "teeth" to help them stand out.   I then dabbed some of the "Space Wolves Grey", some Citadel Contrast Militarium Green", and some Citadel Contrast Aggaros Dune" here and there on different rocks of their bodies to add some visual interest.  After that, I painted their eyes with Crafters' Acrylic "Daffodil Yellow", and then painted Ceramcoat "Black" pupils.
     Lastly, I painted their bases with Americana "Mississippi Mud".
     I let all of them dry overnight and the next day I gave them a coat of Americana "DuraClear Matte" varnish.    Then, when  the varnish was dry, I  gave them tiny hairdos with some  different kinds of static grass and flock in an attempt to look like moss; gluing it on with white glue. When dry, I used the white glue to flock the bases. 
     Another overnight dry, and I sprayed the figures with Testor's Dullcote". 


     I'm generally happy with how these guys turned out.  The "Basilicanum Grey"  is a little splotchier than I would have liked, but the ability to paint so many figures quickly overshadowed those concerns.  

Monday, September 12, 2016

Seltyiel, Iconic Magus: Figure 244 of 266

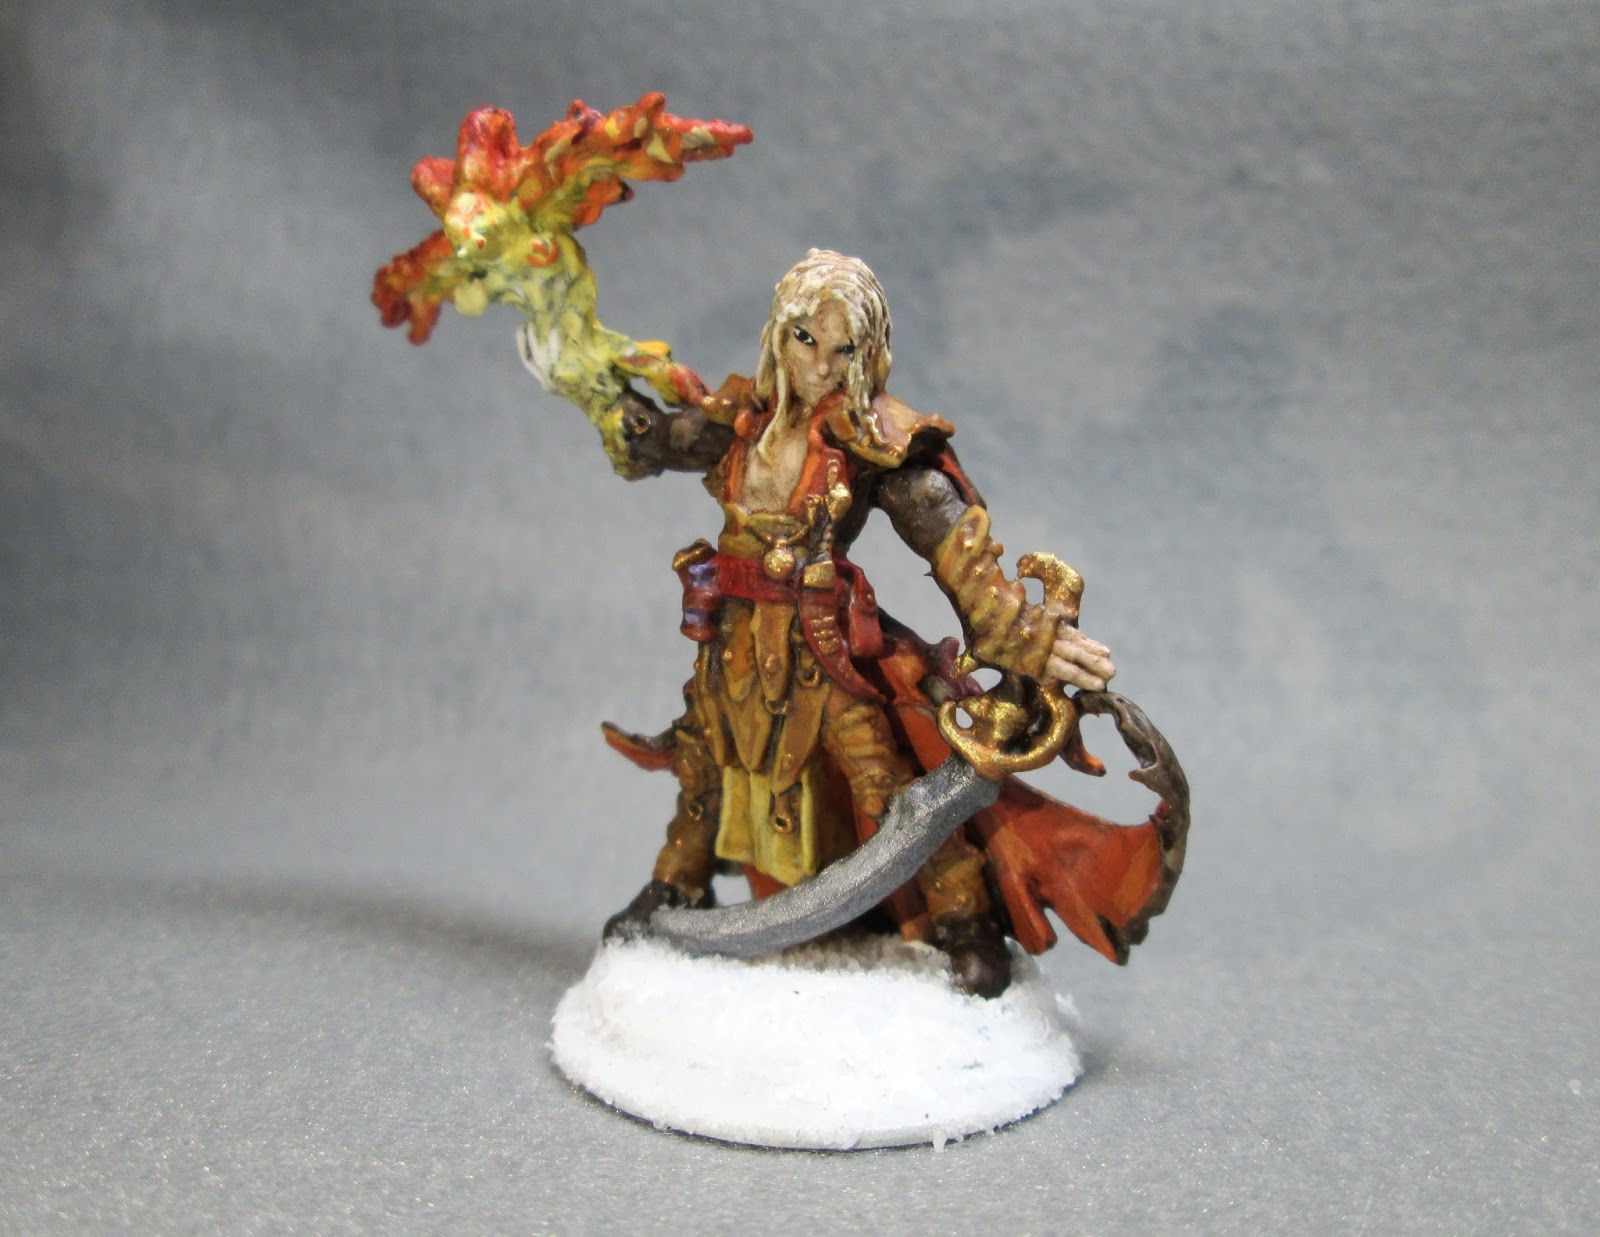
  Over the weekend I finished up the first of the Iconics II Pathfinder Miniatures set: Seltyiel, Iconic Magus.  I've slowly been trying to create a Wizard and Apprentice pair for each of the 10 schools of magic from the Frostgrave core rulebook, and one of the ones I haven't done yet is the Elementalist type.   I thought this guy might make a good fire-based Elementalist, so decided to go that direction with my painting.
         I prepped the figure in the usual way; soaking it in a dish of water with a couple drops of dish- soap added, then giving it a light scrub with a soft toothbrush, and then rinsing and drying it.  I then glued the figure to a white-primed 1" fender washer with Aleene's Tacky glue, and then glued the washer-mounted figure to a tongue depressor with a couple drops of the Elmer's glue.
    I began by giving the entire figure a wash with Reaper MSP "Brown Liner" using a wet brush.
   When the Liner wash was dry, I began painting by doing his skin with Crafter's Acrylic "Flesh".   Next, I painted his coat with Americana "Asphaltum", and then painted the lining with Crafter's Acrylic "Orange Spice".
     I then painted his waist hanging with Apple Barrel "Yellow", and then ll his armor bits with Citadel "Snakebite Leather".  Next, I painted his sash with Ceramcoat "Opaque Red"; and then did his dagger scabbard, side scabbard, pouch, and bottle holder all with Apple Barrel "Burnt Sienna".  I then painted the scabbard around back with Ceramcoat "Black Cherry", and his boots and weapon grips with Ceramcoat "Walnut".
     Next, I painted his hair with Apple Barrel "Apple Maple Syrup", and then painted the bottle at his waist with Crafter's Acrylic "Purple Passion".  I then painted all the little studs and buckles, the hilt of the sword, and the fittings on the scabbards, all with Accent "Mustard Seed".  I then went back and repainted all these with Ceramcoat "Bronze".
     After everything had a while to dry, I gave the entire figure a wash with Citadel "Agrax Earthshade" wash using a wet brush.  When the wash was dry, I painted his eyes; and then highlighted his skin with the base "Flesh", and then mixed in a little Crafter's Acrylic "Light Antique White" to do lighter highlights.    I then highlighted his hair with Americana "Buttermilk", and then used a little of the "Light Antique White".  After that, I highlighted his coat with a mix of Folk Art "Barn Wood" and the original "Asphaltum".
     Next, I highlighted the coat's lining with a mix of the base Orange Spice", and some Crafter;s Acrylic "Pure Pumpkin".  I then highlighted all the leather armor using a mix of the base "Snakebite Leather", and some of the Apple Maple Syrup" I had used on the hair.  I highlighted the sash with Americana "Cadmium Red", and the waist hanging with Crafter's Acrylic "Daffodil Yellow". Then I highlighted the little bottle with a mix of the base "purple Passion", and some Apple Barrel "Apple Lavender".    Next, I began work on the flaming bird spell effect in his hand by painting his hand and the bottom of the bird with Apple Barrel "Lemon Chiffon".  I tried to feather it down his forearm a little.
     Next, I used some of the "Daffodil Yellow" working out from the "Lemon Chiffon", both up the body of the bird, and along the edges of the "Lemon Chiffon" on his forearm. After that I used some of the "Yellow", working up the body of the bird and out across the underside of his wings; and then Americana "Tangerine", and then the "Orange Spice".  I followed this with some of the "Cadmium Red", and lastly along the tips of the wings and tops of the birds horns, some Ceramcoat "Black Cherry".  I then went back and added highlights to his fingers with plain "White".
      I then painted his sword blade with Americana "Zinc".  After that I went back and added highlights to the parts I had painted with the "Bronze", using Ceramcoat "14K Gold". And I followed up that by painting the sword blade with Folk Art Metallics "Gunmetal Grey".  I then highlighted the blade with Folk Art "Silver Sterling".   Lastly, I painted the figure's integral base with White.
    When everything had overnight to dry, I gave the figure a coat of Ceramcoat "Matte Varnish" early the next morning.  Midday, I flocked the white areas with Woodland Scenics "Snow" flock and the next day I sprayed the figure with Testor's Dullcote.

     I'm pleased with how he turned out, especially the flaming bird spell effect.

Figure 244 of 266: Complete

Monday, June 6, 2016

Fire Elemental Familiar: Figure 221 of 266

   This past week I knew I was going to be short of time again, with just having returned from Nashcon, and the holiday on Monday; so I picked out one of the remaining figures from the Familiars set: the Fire Elemental.
      I prepped the figure in the usual way; soaking it in a dish of water with a couple drops of dish- soap added, then giving it a light scrub with a soft toothbrush, and then rinsing and drying it.  I then glued the figure to a white-primed 7/8" fender washer with Aleene's Tacky glue, and then glued the washer-mounted figure to a tongue depressor with a couple drops of the Elmer's glue.
      Rather than go with the usual red fire, I thought this would be a perfect opportunity to again try the green fire I had used on the Kobold Shaman a couple weeks ago.  I began by paitning the entire figure with Nicole's "Neon Green".  When dry, I gave the entire figure a wash with Iron Wind Metals "Dark Green" ink, using a wet brush.
      When the ink wash was dry, I mixed a little of the "Neon Green" with some White, and added highlights.    I then started working outwards toward the tips of the flames with slightly thinned Crafter's Acrylic "Holiday Green".
   Next, I added a further outer layer with Americana "Leaf Green", and lastly, I painted the tips of the flames with Accent "Forest Green".  I also used the "Forest Green" to paint the elemental's eye sockets.  Then I went back and added eyes with Folk Art "Metallic Emerald Green".   Lastly, I painted the figure's base White.
      When everything had overnight to dry, I gave the figure a coat of Ceramcoat "Matte Varnish" early the next morning.  Midday, I flocked the white areas with Woodland Scenics "Snow" flock and late that afternoon I sprayed the figure with Testor's Dullcote.

     Well, I'm generally pleased.   I'm not sure if I like it with the empty hollow eyes, or whether a pinpoint highlight in each might be an improvement.

Figure 221 of 266: Complete

Thursday, June 4, 2015

Large Water Elemental: Bones II Figure

  This week I also completed the Large Water Elemental from the Bones II Water Elementals Add-On Option.
       I prepped the figure in the usual way; soaking it in a dish of water with a couple drops of dish- soap added, then giving it a light scrub with a soft toothbrush, and then rinsing and drying.   I then glued the figure to a 2" brown-primed (It was brown because it was left over from another project and was the only washer I had on hand that would fit this large figure.) fender washer with Aleene's Tacky glue. I didn't need to glue the washer to a tongue depressor as it was big enough to hold easily in my hand while painting.
     I began by giving the whole figure a wash with Iron Wind Metals "Deep Turquoise" ink applied liberally with a very wet brush.
     When the ink was dry, I drybrushed the entire figure with Americana "Salem Blue".
     I then dry brushed the figure with White, trying mainly to hit the edges and tips of the waves.
     After the figure had overnight to dry,  I gave it a coat of Americana "DuraClear Gloss" Varnish.  When this was dry, I flocked the base.  I let the flock dry, and then I painted some of the DuraClear Gloss" Varnish on the flock immediately around the figure to give the impression of a wet area on the ground around the elemental.
    I'm really pleased with how this figure turned out.  I think the watery look really comes across.

Monday, December 23, 2013

Large Fire Elemental: Figure 55 of 265

This week I wrapped up a project that I have been working on for a while now; the Large Fire Elemental from the Fire it Up set. It also is marks my completetion of the Fire it Up set.   Ever since I saw the illuminated samples Reaper had on display at their booth at Historicon, I have been thinking about how to do this myself.  The one thing I didn't like about the ones I saw at  Historicon was the tealight bases, which to my tastes were too tall, and in the case of the Large Fire Elemental, too small in diameter for such a big figure.
    So, since last Summer I had been thinking about a way to solve the problems I had with the look of the tealight base.  I bought a pack of cheap dollar store tealights, and began to play around them.  The first step I tried was to remove the cover from one of the tealights. This was easily accomplished with the tip of a hobby knife blade inserted in between the base and cover of the light.  This solved the height problem, but not the base size problem.  So I began to ponder ways to expand the base. At first I wanted to use a metal washer, since all my other figures are mounted on washers, but I resigned myself to the fact there was just no way I could use one that I could think of, and still have access to the switch underneath the light.  So I next look at plastic bases.  I pulled out a large 2.5 inch base I had in my bits box and got the idea of cutting out a circle in the center for the tealight base to fit into.  By clipping off the three tiny pegs that act like feet on the bottom of the tealight, the tealight base was a perfect fit for under the large plastic base.
   The figure would still not be able to sit flush with the black plastic figure base, but instead would be elevated about a quarter of an inch above it.  I felt this was an acceptable amount, and I could build up a small mound with Milliput around the tealight base for the figure to 'sit' on.
I now set about working on my plan.  First, I did my usual prep to the figure of soaking it overnight in some dish soap and water.   Then, I cut a rough circle in the plastic base.  I only needed it large enough for the light itself, the battery compartment, and the switch mechanism to fit through. I then drilled a hole up into the underside of the figure.  I tried to go as far up as I could without risking poking though the figure.
The next step was to glue the base of the tealight up under the black plastic figure base.  I used E-6000 glue for this.
When dry, I then glued the figure over the light, to the top of the bulb-holder/battery compartment.  You'll notice in the photo below that I had to glue a little section of popsicle stick between the figure and the switch compartment, as without the light's outer housing the switch is not held firmly in place, and this bit of wood, would act as a cover to the switch holder, and prevent the switch from popping out.
I as now ready to build my Milliput mound around the tealight base to hide it, but I was concerned about getting the putty into the switch and other small openings in the tealight base.  To fix this I found a small plastic lid I had, and cut it down so it made a nice little housing around the switch.  I also glued some bits of cardstock around the tealight base to cover any small openings that the Milliput might get into.
My last step of construction was to build up a mound around the tealight base using Milliput, that would look like a rise in the ground the Elemental was standing on.
I masked the figure with a bit of masking tape and newspaper, and sprayed the base with flat black spray paint.  For the figure, I used the same paint scheme that I had used on the Medium Fire Elemental last week.   I began by giving the outer edges of the figure, the base, body, and upper arms, a drybrushing with Apple Barrel "Apple Maroon", and then just inside this, working my way towards the center, and down towards the bottom of the base, I gave it a dry brushing with GW "Blood Red"
Next I did the oranges, doing a drybrush with GW "Blazing Orange" first, again painting just inside the previous color. And then I  did a drybrush with Americana "Tangerine"
Now I moved to the yellows. I did a drybrush in the center of the body, around the bottom of the base, the face,  bottoms of the arms, and the center of the fireball hands, with GW "Golden Yellow. This was followed by a drybrushing with Apple barrel "Yellow"
 My final steps was to add heat highlights with Apple Barrel "Lemon Chiffon"  to the very bottom of the figure, the center of its "torso" , the face, and the hands.   Then I added a bit of white to the "Lemon Chiffon"" ,and did some small pinpoint highlights on the parts I mentioned above. I didn't like the fact that this figure had no face, so I gave it some eyes by painting on two smudgy black eye shapes, and then painting inside these with the "Lemon Chiffon" with some white highlights.  I also did a mount with a "Lemon Chiffon"and white mix. When all was dry I painted the figure with Ceramcoat "Matte Varnish", and then flocked the base.  I used a bit of dried coffee around the base of the Elemental  to represent singed grass, and when the flocking was dry I gave the immediate area around her feet a light drybrushing with black to make it look like burnt grass.  Finally, I gave the figure a coat of Testor's "Dullcote" spray paint.
The figure as it appears with the tealight turned off.

Photographed in a darkened room with the tealight turned on.

Photographed in a lit room with the tealight turned on.
Below is a short video of the figure to show you the flickering effect of the tealight.
I'm really pleased with how this figure turned out.  It was a fun project to complete, and makes a nice novelty figure on the table.

Figure 55 of 265: Complete

Monday, December 16, 2013

Medium Fire Elemental: Figure 54 of 265

This week I painted the Medium Fire Elemental from the Fire It Up set.  I did my usual prep of soaking it overnight in water with a little dish soap added, and then rinsing and drying.  I then glued it using Aleene's Mighty Tacky Glue  to a black-primed 1 inch fender washer. I then glued this to a tongue depressor with a couple drops of white glue.
I wanted this figure to appear as if the source of its heat was coming from its core, so I wanted it to be hottest and brightest in the center and darkest and coolest as you reached the outer edges.  To do this effect I had to think of the figure almost two dimensionally, and luckily the sculpt lends itself to that.  I began by giving the outer edges of the figure, the wings, body, and upper arms, a drybrushing with Apple Barrel "Apple Maroon", and then just inside this, working my way towards the center, I gave it a dry brushing with GW "Blood Red"
Next I did the oranges, doing a drybrush with GW "Blazing Orange" first, again painting just inside the previous color. And then I  did a drybrush with Americana "Tangerine"
Now I moved to the yellows. I did a drybrush in the center of the body, and the wings, and the bottoms of the arms with GW "Golden Yellow. This was followed by a drybrushing with Apple barrel "Yellow".
  My final steps was to add heat highlights with Apple Barrel "Lemon Chiffon" to her chest, stomach, the raised leg, her brow and nose.  I also put two dots of this color in her eyes to give them a focus. Then I added a bit of white to the "Lemon Chiffon"" ,and did some small pinpoint highlights on the parts I mentioned above.  When all was dry I painted the figure with Ceramcoat "Matte Varnish", and then flocked the base.  I used a bit of dried coffee around her feet  to represent singed grass, and when the flocking was dry I gave the immediate area around her feet a light drybrushing with black to make it look like burnt grass, as reader 'adeptgamer' suggested on my previous figure, the Hell Hound.  Finally, I gave the figure a coat of Testor's "Dullcote" spray paint.
All in all I'm very pleased with how this figure turned out.  I think I'm finally getting the hang of doing the shading for fire on these translucent figures, (and solid figures as well).  With my first attempts I was almost afraid to cover the translucency. I also was working under the false impression of fire being darker at he base and lighter at the edges. Which is how we paint most normal figures, with lighter highlights on the outer edges.

    Next up, for my Christmas special, I will do the large fire elemental....and this one will be electrified! :)
A preview:

  Stay tuned...

Figure 54 of 265: Complete

Monday, October 28, 2013

Spirit of the Forest: Figure 41 of 265

This past week I finished the second member of the Forces of Nature set: The Spirit of the Forest. I did my usual prep of soaking in water with a little dish soap added. When dry, I glued the head on with E6000 glue. I then glued the figure to a large black primed washer with Aileen's Mighty Tacky glue.
I began by giving the whole thing a coat of heavily thinned Americana "Asphaltum"paint. And then let this dry
Next I  painted anywhere there was a bare end of a log or stick with Americana "Khaki Tan", and then drybrushed the whole figure lightly with some Folk Art "Barnwood".  I then began picking out the mushrooms and other fungi with various shades of off-whites and greys, and all the foliage with various shades of green. 
I painted some of the mushroom caps with GW "Tanned Flesh", and the vines wrapping around the figure I painted with Americana "Sable Brown".
When this had all dried I gave the whole thing a wash with Windsor Newton "Peat Brown" ink.
I then went back and did some light green drybrushing highlights on the foliage.  I also painted the remaining mushrooms with GW "Blood Red" and added little white dots.  The eyes I painted with Apple Barrel "Maple Syrup", and then gave them black pupils with tiny white highlight dots.
When everything had dried overnight, I painted the whole figure with Ceramcoat "Matte Varnish", and then when dry, I flocked the base.   Finally when the base had had time to dry, I sprayed the figure with Testor's "Dullcoat"
All in all, a neat looking sculpt that really comes to life with some quick and easy painting.  The flora growing on him is so splotchy and jumbled, It's easy to paint and pops nicely with the brown wash.

Figure 41 of 265: Complete