Monday, April 29, 2019

Giant Bats: Bones 4 Darkreach Figures

     This past week I painted my first figures from the new Bones 4 Kickstarter; the Giant Bats from the Darkreach Expansion.  They aren't the most exciting figures to start with, but they are some of the creatures from the Kickstarter that I've eagerly been waiting for to help complete my Bestiary for our Ghost Archipelago Campaign.  So I picked these, that I had a pressing need for, to start with.
      These figures are the new Bones Black material, and  I prepped the figures in the usual way; soaking them in a dish of water with a couple drops of dish-soap added and then rinsing and drying.   I then glued the one on the tombstone to a 1" fender washer, and the other 2 to 7/8" black-primed fender washers, with Aleene's Tacky glue.  I then glued the figures to a tongue depressor with a couple drops of the Elmer's glue each.
      I began by painting the all three figures entirely with Ceramcoat "Black".  When dry, I gave the three bats a light drybrushing with Americana "Charcoal Grey", and then drybrushed them with Americana "Asphaltum", concentrating mainly on their bodies and the wing spines.
      I then carefully gave their bodies a light drybrushing with Crafter's Acrylic "Cinnamon Brown".   After that, I mixed a little Folk Art "Barn Wood", and Folk Art "Milkshake", and drybrushed their faces.  Next, I painted the insides of their ears with the "Milkshake", and then painted their mouths with Americana "Shading Flesh".   I then tried to paint their little fangs with Americana "Snow White", and their eyes with Ceramcoat "Bright Red".
      I decided I wanted a little more highlight on the bat bodies, so I gave them a final drybrush with some Americana "Light Cinnamon".  I then worked on the stones they're perched on; drybrushing them first with Americana "Neutral Grey", followed with a drybrush of Folk Art "Platinum Gray".   Lastly, I painted the all the bases with Americana "Mississippi Mud".
     I let the figures dry overnight and the next day I gave them a coat of Americana "DuraClear Matte" varnish.    Then, when  the varnish was dry, I used some white glue to flock the bases.  Another overnight dry, and I sprayed them with Testors "Dullcote".

NOTE: Recently I had been using Winsor & Newton Professional "Matt Varnish", but I have found those Bones figures have since turned tacky; so stopped using it on Bones.

Just noticed I missed the wing on the lefthand one with the matte spray...
     I've always painted bats by painting them Black and then simply drybrushing then some sort  of Grey or Blue-Grey.  This time, I actually Googled "Vampire Bats", and was surprised to see how Brown they actually were, and their faces were mostly bare skin.  So, I thought I'd try something a little different this time, and go for a more brown-colored bat.    In the end, I'm happy with how they turned out, and I think they look a lot better than if I had had just dybrushed them Grey.

Monday, April 22, 2019

The Reaper Bones 4 Kickstarter is Here!

  Well, I'm happy to announce that this past week my box from the Reaper Bones 4 Kickstarter arrived; 22.7 pounds of plastic goodness!  I've spent the last few days going through it all.
Official box inspectors check out the shipment to make sure it is satisfactory! :-D
In the end, this is what I had ordered:

1) Core Set
2) Dreadmere Expansion Set
3) Darkreach Expansion Set
4) Lost Valley Expansion Set
5) Fan Favorites Expansion Set
6) Dragon Turtle Add-On
7) Tree of Despair Add-On
8) Frost Giant Raiders Add-On
9) Mossbeard Add-On
10) Stygian Barge Add-On
11) Skeletal DragonAdd-On
12) Trolls Add-On
13) Extra Snakemen
14) Extra Ape Attack
15) Extra Ghost Pirates   

Upon opening. What magic awaits?!
   This Kickstarter ended up being produced in a a mix of regular Bones (which is now tinted grey-ish) and Reaper's new Bones Black material (which is a slightly darker grey).    These are the Bones Black sets and add-ons:

Sets:
Chronoscope Expansion
Lost Valley Expansion
Dreadmere Expansion
Darkreach Expansion
Fan Favorites Expansion

Add-On:
Trolls
Living Statues Amazons
Living Statues Spartans
Tree of Despair
Baba Yaga’s Hut
Lord of the Jungle
King Cobra
Frost Giant Raiders

All the packages spread out.
    Below is a sampling of a random mix of figures.

Frost Giant Raiders

Dragon Turtle.  It's huge!

Mossbeard.  Another huge model.

From the Lost Valley Expansion; the Tribal Hut and Warchief Mumlak.  The Hut I thought was smaller than expected, while the Warchief is about 50% taller than expected.  

The Stygian Barge Add-On is a monster of a model!   I look forward to working on this though I think I'm going to try and de-necro it to make it look more like just an old barge.

The Herbalist from the Dreadmere Expansion.  Bones have come a long way since the first Kickstarter, and the Bones Black material is amazing. Look a the detail; she has eyelids and brows!  (Plus two adorable wee hedgehogs assisting her...)

Amazing detail on the Dark Elf Queen from the Darkreach Expansion.  

Perhaps my favorite figure; the Pack Turtle from Dreadmere.

A comparison shot of the materials.  The First figure is Original Bones, the second is New Bones from Bones 4, and the third is Bones Black from Bones 4.

As I offered before, if there is any particular model you would like to see, let me know in the comments and I'll try to get it added it to this entry.

Reader Requests:
Dreadmere 413 & 420

Darkreach Deep Gnomes

Fan Favorites Isobael the Bard & Friend.

Monday, April 15, 2019

War Pugs!: Bones 3 Figure

     Well, my Bones 4 Kickstarter order was shipped this past week, but it isn't supposed to arrive until tomorrow; so in the meantime I painted the 3 War Pugs that originally came with the Bones 3 Dwarf King's Companions Optional Add-on Set.  I picked this trio up in an exchange.
    I prepped the figures in the usual way; soaking them in a dish of water with a couple drops of dish-soap added and then rinsing and drying.   I then glued them to 7/8" black-primed fender washers with Aleene's Tacky glue.  I then glued the figures to a tongue depressor with a couple drops of the Elmer's glue each.
     I began by painting two of the pugs with Americana "Bleached Sand", and the third with Ceramcoat "Black".  When dry, I gave the two light colored pugs a wash with Citadel "Agrax Earthshade" wash.  When the wash was dry, I drybrushed the light colored pugs with the "Bleached Sand", and then added highlights with Ceramcoat "White" mixed with a little of the "Bleached Sand".    I painted the third pug Ceramcoat "Black".
     Next, I did a light drybrush on their lower backs of the lighter colored two with a mix of Americana "Cinnamon", and Americana "Asphaltum."   I then painted their muzzles, ears, and eye sockets a mix of the "Black" and "Asphaltum".
     I then painted the inside of the open mouth with a mix of Americana "Shading Flesh" and Crafter's Acrylic "Tutti Frutti".  While it dried, I painted the eyes and noses "Black".    I then gave the open a mouth a wash with some of the "Agrax Earthshade".  While the wash dried, I added "White" highlight dots to the eyes, and Americana "Neutral Grey" highlights to the noses and around the mouths.  After that, I highlighted the tongue with Crafter's Acrylic "Cherry Blossom Pink". 
     It was now time to turn my attention to the black pug.  I drybrushed him with a little Americana "Zinc" and then added more specific highlights with Crafter's Acrylic "Storm Cloud Grey".
      Lastly, I painted the figures bases with Americana "Mississippi Mud".

     I let the figures dry overnight and the next day I gave them a coat of Americana "DuraClear Matte" varnish.    Then, when  the varnish was dry, I used some white glue to flock the bases.  Another overnight dry, and I sprayed them all with Testor's Dullcote".


     I'm really happy with how these little fellas turned out.  Now I need to find an excuse to get them on the table.  :)

   So tomorrow I hope to be swimming in Bones 4 goodness!  I will try to get some unboxing photos up on the blog either this Thursday, or next Monday, time permitting.    Let me know if there's anything particular you would like pictures of; and if I ordered it, I will try to grab some shots.

Monday, April 8, 2019

Vulture Demon: Bones 2 Figure

     This past week I painted the Vulture Demon from the Bones 2 Lesser Demons set.  We're doing a scenario for Ghost Archipelago this month that requires a birdman kind of creature, and this seemed to fit the bill well enough.
       I prepped the figure in the usual way, soaking it in a dish of water with a couple drops of dish-soap added, then giving it a light scrub with a soft toothbrush, and then rinsing and drying it.  I then glued the figure to a black-primed 1.5" fender washer with Aleene's Tacky glue, and then placed the figure in my painting grip.
      I googled some pictures of real vultures before I bean to give myself an idea of what an actual vulture looked like.   I then began by painting the body and base with Ceramcoat "Black.  When dry, I drybrushed it with Americana "Charcoal Grey", and then with Folk Art "Barn Wood".  I did the Barn Wood" drybrush a little  heavier on the bottom 2/3's of the wings to give those feathers a lighter appearance.  I then painted the head with Reaper MSP "Rosy Shadow", and then feathery collar with Crafter's Acrylic "Light Antique White".
     Next, I painted the front 3/4's of the head with the "Light Antique White", and then painted the tips of the beak and the neck crest feathers with the "Black".  After that, I painted the inside of the mouth with Americana"Shading Flesh", and the talons and claws, as well as the skulls on the base, with Americana "Antique White".
     After everything had a while to dry, I gave the head and feather collar; as well as the talons, claws, and skulls, a wash with Citadel "Agrax Earthshade" wash.   When the wash was dry, I highlighted the skin with Reaper MSP "Rosy Skin", and the inside of the mouth with Apple Barrel "Apple Flesh".    I then drybrushed the neck crest feathers and the tips of the beak with Americana "Zinc".  Next, I drybrushed the collar feathers and highlighted the front of the face with Americana "Snow White", and then painted the eyes "Black" with "Snow White" dots.   I highlighted the talons, claws, and skulls with Americana 'Bleached Sand"; and also used this color to paint the teeth.  Lastly, I painted the entire base with "Americana "Mississippi Mud".
       I let the figure dry overnight and the next day I gave it a coat of Americana "DuraClear Matte" varnish.    Then, when  the varnish was dry, I used some white glue to flock the base.  Another overnight dry, and I sprayed it with Winsor & Newton Professional "Matt Varnish".


     A rather simple figure, but I'm pleased with how it came out.   It looks suitably evil and should fill the roll of a birdman just fine.

     In other news, Reapers Bones 4 shipping to the US should start today (fingers crossed!).  I'm Wave 1, so hopefully will have my box shipped in the next day or two; so I should have some unboxing photos ready for next Monday!

Monday, April 1, 2019

Kobolds, Part B: Bones 3 Figures

     This past week I painted the other 3 of the six Kobolds from the Bones 3 Stoneskull Expansion set.
      I prepped the figures in the usual way; soaking them in a dish of water with a couple drops of dish- soap added, then giving them a light scrub with a soft toothbrush, and then rinsing and drying them.  I then glued the figures to 7/8" fender washers with Aleene's Tacky glue.  I then glued the washers to a tongue depressor with a couple drops of the Elmer's glue each.
  I began by painting the figures entirely Ceramcoat "Black".  When the Black was dry, I painted their skin Folk Art "Barnyard Red".  I then painted the tunic of the first one with Accent "Golden Harvest", and of the second one, as well as the under shirt of the third one, with Folk Art "Teddy Bear Brown".  Next, I painted the hood and collar of the first one, the tabard of the second one, and the tunic of the third one with Reaper MSP Bones "Cinnamon Red".  After that, I painted any pants or leggings with Reaper MSP "Pumpkin Orange".
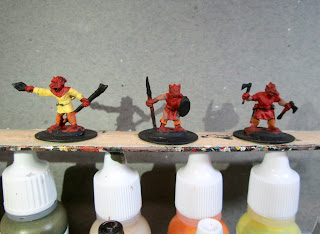
      Next, I painted the wooden axe handles and spear shaft with Folk Art "Barn Wood", their belts with Americana "Sable Brown", and the wizards staff with Folk Art Colr Shift "Black Flash". I then painted the wizard's scroll pouch and the back of the spear Kobold's shield with Americana "Light Cinnimon", and followed u by painting their teeth, as well as the scroll, with Americana "Bleached Sand".   After that, I painted their horns Americana "Khaki Tan", the front of the shield with Folk Art " DeepTomato Red", and the stone in the wizard's staff with Crafter's Acrylic "Tropical Blue".
     I painted the spearpoint and axe heads with Folk Art Metallics "Gunmetal Grey"; and then after the figures had a while to dry, I gave them all a complete wash with Citadel "Agrax Earthshade" wash.   When the wash was dry, I highlighted the figures' skin with the base color "Barnyard Red". I then painted black noses on the Kobolds, and Reaper MSP "Holly Berry" dots for eyes. I also added claws in with Americana "Antique White".
     Next, I highlighted the wizard's tunic with Crafter's Acrylic "Daffodil Yellow", and then highlighted the pants/leggings with Reaper MSP "Hearth Fire".  I then highlighted the "Teddy Bear Brown" clothing with Ceramcoat "Territorial Beige", and highlighted the "Cinnamon Red" clothing with Crafter's Acrylic "Orange Spice". The shield was highlighted with Reaper MSP HD "Rusty Red", and then given a "Claw" design with the "Daffodil Yellow".  I then painted the flame in the wizard's hand with the "Tropical Blue", and then highlighted it, as well as the stone in the staff, with Crafter's Acrylic "Cool Blue".  I then added a little Americana "Snow White" highlight to the flame. I then highlighted the spearpoint and axe heads with Ceramcoat "Metallic Silver".  Lastly, I painted the all the bases with Americana "Mississippi Mud".
     I let the figures dry overnight and the next day I gave them a coat of Americana "DuraClear Matte" varnish.    Then, when  the varnish was dry, I used some white glue to flock the bases.  Another overnight dry, and I sprayed them with Winsor & Newton Professional "Matt Varnish".

     I'm much happier with these guys than last weeks.  I spent a little more time with these, and I think it paid off.
 
It now looks like the Bones 4 Kickstarter isn't going to start shipping in the US until April 8th.  So I still have at least another week to work on my Bones backlog.  For more info see Reaper's News Update video: