Showing posts with label Fan Favorites. Show all posts

Monday, November 4, 2019

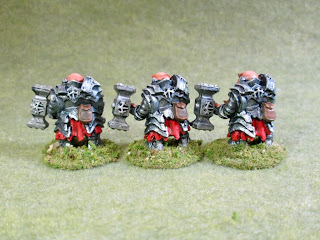
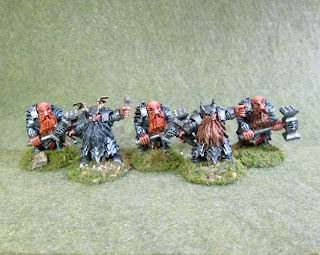
Dark Dwarves "Striker", "Smiter" and "Cleaver": Bones 4 Fan Favorite Figures

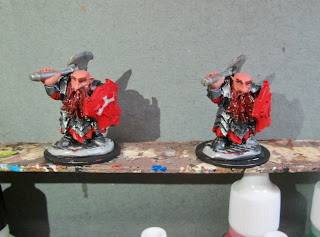
      This past week I painted a pair of the Dark Dwarf "Striker", "Smiter", and a pair of the "Cleaver" figures, from the Bones 4 Fan Favorites Expansion.    I wanted to use these for a unit of regular Dwarves, having more gaming use for them that way than painted up as Dark Dwarves; and while they're a little more ragged looking than the average Dwarf, I thought they'd fill the bill of a  unit of normal Dwarves just fine. Maybe hard worn veterans.  Last week I painted the first half of my unit, doing the "Irontongue Priests" and "Pounder" figures from this set.
       I prepped the figures in the usual way, soaking them in a dish of water with a couple drops of dish-soap added, then giving them a light scrub with a soft toothbrush, and then rinsing and drying them.  I then glued them to 1" black-primed fender washers with Aleene's Tacky glue.  I then glued the figures in onto tongue depressors.

      I started with the two "Striker" figures and the "Smiter"; painting them entirely with Ceramcoat "Black".  When the Black was dry, I drybrushed the figure with  Folk Art Metallics "Gunmetal Grey".  I then passed over it with a lighter drybrush of Ceramcoat "Metallic Silver".
      Next, I painted their tunics and shields with Reaper MSP "Fresh Blood", and their faces and hands with Americana "Shading Flesh".   After that, I painted the spikes on their shields with Americana "Zinc", and then their hammers with Reaper MSP "Aged Pewter".
      I then painted the beards and eyebrows on the first and third with Americana "Neutral Grey", and the beard and eyebrows on the center one with some  Americana"Asphaltum".  I also painted the eyepatches with the "Black".   Next, I let everything dry for a while, and then gave their faces and hands a coat of  Citadel "Reikland Fleshshade" wash.   When that was dry, I gave the tunics, shields, and the center beard a coat of Citadel "Agrax Earthshade" wash. Lastly, I gave the beards on the first and third a coat of Citadel "Nuln Oil" wash. After that, I painted the two pouches on the "Smiter" with Americana "Raw Umber" for one, and Americana "Mississippi Mud" for the other.
      I let all the washes dry,  and then I painted their eyes, and then highlighted their faces and hands with Crafter's Acrylic "Flesh".  After that, I highlighted the first and third's beards with Americana "Grey Sky", and the center one's beard with Americana "Sable Brown".  Next, I highlighted the tunics and shields with Reaper MSP "Holly Berry", and the spikes on the shiled with Crafter's Acrylic "Storm Cloud Grey".  After that, I did spot highlights on the armor and weapons with the "Metallic Silver". Lastly, I painted the bases with the "Mississippi Mud".


        At this point I moved on to the two "Cleaver" figures, painting them entirely with the "Black".  When the Black was dry, I drybrushed the figure with the "Gunmetal Grey".  I then passed over it with a lighter drybrush of the "Metallic Silver".
     Next, I painted their tunics and shields with Reaper MSP "Fresh Blood", and their faces and hands with the "Shading Flesh".   After that, I painted their pouches with Americana "Asphaltum", thier beards with Reaper MSP Pathfinder "Urgathoa Red", and then their hammers with the "Aged Pewter".
       Next, I painted the spikes on the shilds with the "Zinc".   After that, I let everything dry for a while, and then gave their faces and hands a coat of the "Reikland Fleshshade" wash.   When that was dry, I gave the tunics and the beards a coat of Citadel "Agrax Earthshade" wash.
  I let all the washes dry,  and then I painted their eyes, and then highlighted their faces and hands with Crafter's Acrylic "Flesh".  After that, I highlighted their beards with Reaper MSP HD "Rusty Red".  Next, I did highlights on the pouches with the "Mississippi Mud", and highlighted the tunics highlights with the "Holly Berry".  After that, I did spot highlights on the armor and weapons with the "Metallic Silver". Lastly, I painted the bases with "Americana "Mississippi Mud"

 I let all the figures dry overnight and the next day I gave them a coat of Americana "DuraClear Matte" varnish.    Then, when  the varnish was dry, I used some white glue to flock the bases.  Another overnight dry, and I sprayed them with Testor's "Dullcote".


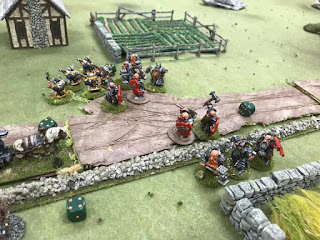
     I'm really happy with this unit turned out and was even lucky to be able to use them in a game last Friday!  I will be using them again in a game I'm doing at the Fall-In convention in a couple weeks.


Monday, October 28, 2019

Dark Dwarves "Irontongue Priest" and "Pounder": Bones 4 Fan Favorite Figures

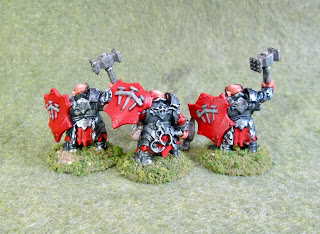
     This past week I painted a pair of the Dark Dwarf "Irontongue Priest" figures , and a trio of the "Pounder" figures, from the Bones 4 Fan Favorites Expansion.    I wanted to use these for a unit of regular Dwarves, having more gaming use for them that way than painted up as Dark Dwarves; and while they're a little more ragged looking than the average Dwarf, I thought they'd fill the bill of a  unit of normal Dwarves just fine.
     I got a set of 5 of these Dark Dwarves with the Bones 4 Kickstarter, then was lucky enough to pick up 4 more in a trade; then luckily, the free October Bones Black figure from Reaper turned out to be the Dark Dwarf "Pounder" figure, supplying me with the 10th one I would need to make a unit. 
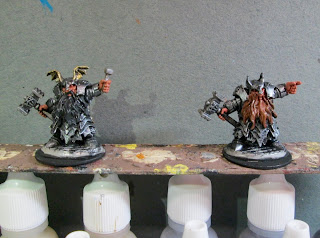
          I planned to use the two "Irontongue Priests" as the command figures for my unit; so I kept one the way it was originally sculpted to be the main leader. For the other, I trimmed down the wings on the helmet, and cut the spike out of the other hand.  I then cut his pointer finger free and bent it out to make him look like he was pointing.
       Next, I prepped the figures in the usual way, soaking them in a dish of water with a couple drops of dish-soap added, then giving them a light scrub with a soft toothbrush, and then rinsing and drying them.  I then glued them to 1" black-primed fender washers with Aleene's Tacky glue.  I then glued the figures in onto tongue depressors.

     I started with the two "Irontongue Priest" figures that I would be using as my command figures, painting them entirely with Ceramcoat "Black".  When the Black was dry, I drybrushed the figure with  Folk Art Metallics "Gunmetal Grey".  I then passed over it with a lighter drybrush of Ceramcoat "Metallic Silver"
     Next, I drybrushed the capes on them both; the one with the spike I used Folk Art "Brushed Metal "Brushed Bronze", and the other I used Ceramcoat "Copper".  I also used the "Brushed Bronze to paint the helmet wings on the one holding the spike.  After that, I painted their hammers and the spike with Reaper MSP "Aged Pewter".
     I then painted their faces and hands with Americana "Shading Flesh, and did the beard on the lefthand one with the "Black", and the beard on the righthand one with Americana "Light Cinnamon".   Next, I let everything dry for a while, and then gave their faces and hands a coat of Citadel "Reikland Fleshshade" wash.   When that was dry, I gave the beard on the righthand one a coat of Citadel "Agrax Earthshade" wash.
      I let all the washes dry, and then did spot highlights on the armor and weapons with the "Metallic Silver".  I also drybrushed the cape on the lefthand one using some Ceramcoat "14K Gold".  Next, I highlighted their faces and hands with Crafter's Acrylic "Flesh"; and after that highlighted the lefthand one's beard with Crafter's Acrylic "Cloudy Shy", and the righthand one's beard with Americana "Sable Brown".  Lastly, I painted the bases with "Americana "Mississippi Mud".


     I set the two Priests/Leaders aside, and began on the trio of "Pounders"; painting them entirely with the "Black".  When the Black was dry, I drybrushed the figure with the "Gunmetal Grey".  I then passed over it with a lighter drybrush of the "Metallic Silver"
    Next, I painted their tunics with Reaper MSP "Fresh Blood", and their faces and hands with the "Shading Flesh".   After that, I painted their pouches with Americana "Raw Umber", and then their hammers with the "Aged Pewter".
     I then painted the beards and eyebrows on the left two with Crafter's Acrylic "Orange Spice", and the beard and eyebrows on the righthand one with some "Light Cinnamon".    Next, I let everything dry for a while, and then gave their faces and hands a coat of  the "Reikland Fleshshade" wash.   When that was dry, I gave the tunics and the beards a coat of Citadel "Agrax Earthshade" wash.
  I let all the washes dry,  and then I painted thier eyes, and then highlighted their faces and hands with Crafter's Acrylic "Flesh".  After that, I highlighted the lefthand pair's beard with Crafter's Acrylic "Pure Pumpkin", and the righthand one's beard with Americana "Sable Brown".  Next, I did highlights on the pouches with the "Light Cinnamon", and highlighted the tunics highlights with Reaper MSp "Holly Berry".  After that, I did spot highlights on the armor and weapons with the "Metallic Silver". Lastly, I painted the bases with "Americana "Mississippi Mud".

  I let all the figures dry overnight and the next day I gave them a coat of Americana "DuraClear Matte" varnish.    Then, when  the varnish was dry, I used some white glue to flock the bases.  Another overnight dry, and I sprayed them with Testor's "Dullcote".


     I'm happy with them.  They're simple, but I think they'll make a fine gaming unit.  Now I've got the other five figures of the unit to paint for next week.

Monday, October 14, 2019

Hell Hounds: Bones 4 Fan Favorites Figure

     This past week I painted the Hell Hounds from the Bones 4 Fan Favorites Expansion.   When I first saw these, I had the idea that I'd like to get two of the sitting version of the Hound to paint as innocuous statues, perhaps for guarding a gate or doorway, and then use the two standing versions to  paint as their demonic counterparts; that the statues would change into when anyone got too close to what they were guarding.
     I then lucked out and found a second copy of the sitting one in the flea market at our club's gaming convention a couple weeks ago.
       I prepped the figures in the usual way, soaking them in a dish of water with a couple drops of dish-soap added, then giving them a light scrub with a soft toothbrush, and then rinsing and drying them.  I then glued the two sitting figures to  black-primed 1" fender washer, and the two standing figures to black-primed 1.25" fender washers, all with Aleene's Tacky glue.  I then glued the figures in pairs onto tongue depressors.

     I began by painting the two seated hounds entirely with Americana "Charcoal".  When that was dry, I gave them both a coat of Citadel "Nuln Oil" wash.
     When the wash was dry, I drybrushed them with some Americana "Neutral Grey" mixed with a little of the "Charcoal", and then just the plain "Neutral Grey".  After that, I painted their neck rings with Americana "Asphaltum", and then dabbed them with a little Accent "Golden Oxide".   Lastly, I painted their bases with "Americana "Mississippi Mud".
      I let them dry overnight and the next day I gave them a coat of Americana "DuraClear Matte" varnish.    Then, when  the varnish was dry, I used some white glue to apply a sand mixture onto their bases.

   I then started work on the standing versions.  I wanted to try a bit of a lava/interior heat effect, and I didn't feature having to hand paint all the teeny tiny cracks sculpted into the hounds, so I thought I'd try it in a bit of short cut way.
     I began by panting them entirely with Reaper MSP Bones "Cinnamon Red".
          I then drybrushed the hounds with the "Charcoal".
          Next, I drybrushed them with some Ceramcoat "Black".  I then tried an experiment on the left one, and gave it a coat of thinned Iron Wind Metals "Yellow" ink.  That looked really bad, so I then tired hand painting the cracks with Reaper MSP "Golden Glow".  I just wasn't happy. with the results.
     So, I did what I had tried to avoid, and painted all the cracks individually; this time with Americana "Tangerine".  I then painted the crack centers with Crafter's Acrylic "Bright Yellow".    I painted the eyes and teeth with the Bright Yellow" as well, and then gave the eyes and teeth all highlights with Apple Barrel "Lemon Chiffon".  After that, I painted their neck rings with Americana "Asphaltum", and then dabbed them with a little Accent "Golden Oxide".   Lastly, I painted their bases with "Americana "Mississippi Mud".,
      I let them dry overnight and the next day I gave them a coat of Americana "DuraClear Matte" varnish.    Then, when  the varnish was dry, I used some white glue to apply a sand mixture onto their bases. 
  Another overnight dry, and I sprayed all four hounds with Testor's "Dullcote".


          Well, they won't win any painting awards, but for gaming use I think they turned out okay.  Those cracks in the dogs were just so small to paint properly...

Monday, June 24, 2019

Female Efreeti: Bones 4 Fan Favorites Figure

     This past week I painted the Female Efreeti figure from the Bones 4 Fan Favorites Expansion set.  Since I did the Djinni, last week, I thought I should do her counterpart this week to complete the pair.
      I prepped the figure in the usual way, soaking it in a dish of water with a couple drops of dish-soap added, then giving it a light scrub with a soft toothbrush, and then rinsed and dried it.  I then glued on the head on with Gorillas superglue.  Then, after cutting down the base a little, I glued the figure to a black-primed 1.25" fender washer with Aleene's Tacky glue, and then placed the figure in my painting grip.
     I began by painting the figure's armor with Ceramcoat "Black".  When dry, I drybrushed it with Ceramcoat "Bronze".
     Next, I painted the skin with Folk Art "Barnyard Red", and the loincloths with Crafter's Acrylic "Pure Pumpkin".  I then painted the sword grips with Reaper MSP HD "Umber Brown", the metal parts of the hilt with Accent "Mustard Seed", and the blades with Americana "Zinc"
     I then painted the metal on the sword hilts with the "Bronze", and the sword blades with Folk Art Metallics "Gunmetal Grey".  I decided I didn't like the blades, and wanted to do something more unique with them, so when dry I repainted them with Folk Art Color Shift "Black Flash".    After that, I painted her fangs and the teeth on her necklace with Americanas "Fawn".   I also took this opportunity to carefully paint the areas of her hair that bordered her skin and armor with the "Black".  If I had it to do again, I should have painted the head/hair piece separately, as the hair is sculpted to really intermingle closely with her body.   
     Then , when everything had a chance to dry, I gave her skin and loincloths a wash with Citadel "Reikland Fleshshade" wash.  When that was dry, I gave her armor and swords a wash with Citadel "Nuln Oil" wash. 
     When the washes were dry, I painted her eyes using Folk Art "Lemon Chiffon" for the "whites", and then painted "Black" pupils.  I then went back and painted the pupil centers with Folk Art Color Shift "Red Flash".   Next, I painted the lips, and afterwards highlighted the face and rest of the skin with a mix of the base "Barnyard Red" and varying degrees of Americana "Shading Flesh".  After that, I highlighted her teeth with Americana "Snow White", and the teeth on the necklace with Americana "Bleached Sand".  
     I then highlighted the loincloths with the base "Pure Pumpkin" with varying degrees of Americana "Tangerine" mixed in, and then mixed in a little of the "Lemon Chiffon" and did lighter highlights.  I wasn't happy with the splotchy way the "Reikland Fleshshade" had pooled in the loincloth creases, so I reapplied shadows using Crafter's Acrylic "Orange Spice".   After that, I painted the rest of her hair with the "Black".
     Next, I painted her claws with the "Orange Spice", and then added highlights with Ceramcoat "Raw Sienna".  I then drybrushed her hair with Apple Barrel "Apple Maroon", and then did lighter highlights with Reaper MSP "Holly Berry".  After that, I painted her horns with Americana "Charcoal Grey", and when they had dried for a while, I gave them a wash with the "Nuln Oil".  When the wash was dry, I drybrushed them with Americana "Mississippi Mud".  I then drybrushed the sword blades with Ceramcoat "Metallic Silver"; and afterwards highlighted the armor and sword hilts with Ceramcoat "14K Gold", followed with Ceramcoat "Wedding Gold".   Lastly, I painted the entire base with "Americana "Mississippi Mud".
       I let the figure dry overnight and the next day I gave it a coat of Americana "DuraClear Matte" varnish.    Then, when  the varnish was dry, I used some white glue to flock the base.  Another overnight dry, and I sprayed it with Testor's "Dullcote".  I thought the eyes ended up looking too flat, so I went back and reapplied some of the "Red Flash",  and added highlight dots with the "Lemon Chiffon".


     I'm really happy with how she came out.  It was fun playing with a different kind of skin tone, and I think the red highlights in the hair was an experiment that ended up looking good.

Tune in Thursday for another bonus post!

Monday, June 17, 2019

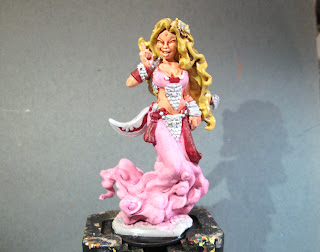
Female Djinni: Bones 4 "Fan Favorites" Figure

  This past week I painted the Female Djinni figure from the Bones 4 Fan Favorites Expansion Set.  I'm thinking of doing the Frostgrave rulebook's "Genie in a Bottle" scenario for this year's Ghost Archipelago campaign, and this figure just seemed like it would be perfect to include.
    When I got the figure, I was a little disappointed in a couple things.  First, it's a very cartoony looking figure; sculpted more in big broad strokes than in the fine detail I expect from Reaper.  Secondly, for some reason, they made the sword so it attached to the figure in a reversed and inverted position from the initial concept art (Compare the illustration above with the production example figure photo below.) Now I have no problem with the Djinni being a lefty but the the sword now hung incorrectly with the bird's head beak pointing up (A good way to impale your palm when reaching quickly for the sword), and the end curve pointed down.   One third and last quibble, the sword is just attached to her butt, without any sculpted straps to show where it would attach to her belt.
(Photo from Reaper Kickstarter Update)
        I prepped the figure in the usual way, soaking the parts in a dish of water with a couple drops of dish-soap added, then giving them a light scrub with a soft toothbrush, and then rinsing and drying them.      The next thing I did was cut off the lamp from the trail of smoke (It is cast as one piece as you can see in the above photo.)  I wanted to mount them separately, so I could use the lamp and or Djinni as unique pieces.    I then sliced the tab off the sword, so I could glue it to the figure in the correct position as shown in the concept illustration.  Lastly, I cut the base that comes with the figure into two pieces, and glued the figure to its part of the base, minus the part I trimmed off where the lamp mounts.  
       I then glued the figure to a black-primed 1.5" fender washer with Aleene's Tacky glue after trimming the base so it would fit.  I also glued the lamp to its piece of base, and then glued it to a black primed 1" fender washer. I then placed the Djinni figure in my painting grip.
     When I first saw this figure in the Kickstarter, being a child of the 60's and 70's, the first image that flashed in my mind was Jeannie from the classic  I Dream of Jeannie TV show.   I knew that this was the color scheme I wanted to use on my Djinni figure.
     So, to begin painting; I painted her skin with Reaper MSP "Rosy Skin".  I then painted her smoke plume/pants, and top, with Crafter's Acrylic "Cherry Blossom Pink".  (I don't think she is sculpted as necessarily wearing pants, but they way they blended into the billowing smoke cloud, I thought I could get away with it.)  After that, I painted any decorative trim that obviously wasn't metal, with Folk Art "True Burgundy".
     Next, I painted her teeth with Crafter's Acrylic "Light Antique White",  her hair with Accent "Golden Harvest", and any metal decorations/jewelry/fittings/ etc., with Americana "Grey Sky".   After that, I gave her skin a wash with Citadel "Reikland Fleshshade" wash.
     When the "Reikland Fleshshade" wash was dry, I gave her hair a wash with Citadel "Agrax Earthshade" wash.  I followed that by giving her clothing and smoke plume a wash with heavily thinned Iron Wind Metals "Purple" ink.   When wall the washes were dry, I painted all the metal with  Ceramcoat "Metallic Silver".
   After the "Metallic Silver" had a while to dry, I went over the metal parts with Citadel "Nuln Oil" wash.  Then when the wash was dry, I painted her eyes and lips, and highlighted her teeth with Americana "Snow White".  I then highlighted her skin and corrected any errors with  various mixes of the base "Rosy Skin" along with Reaper MSP "Rosy Highlight" and "Rosy Shadow".
     Next, I highlighted hair; first with the base "Golden Harvest", then with the "Golden Harvest" mixed with some Americana "Moon Yellow", then the just plain "Moon Yellow", then the "Moon Yellow" mixed with some Apple Barrel "Lemon Chiffon", then the plain "Lemon Chiffon",  then some of the "Lemon Chiffon" mixed with some "Snow White", and lastly just a little plain "Snow White".   I then painted the flowers in her hair with the "True Burgundy", and the flower centers and leaves with the "Grey Sky".
     I then worked on the pants/smoke cloud, highlighting them with the base "Cherry Blossom Pink", and then with the "Cherry Blossom Pink" mixed with some "Snow White", and lastly, a few hits with just the pure "Snow White".  I then highlighted the dark pink "True Burgundy" areas with a mix of Americana "Burgundy Wine", and Crafter's Acrylic "Tutti Frutti.  After that, I painted the leaves and flower centers in the hair with the "Metallic Silver", and wen dry, I went over them with a little of the "Nuln Oil" wash.   My next step was to highlight all the metal, using the base "Metallic Silver", and then Metallic Silver mixed with some of the "Snow White", and then just a little of the pure "Snow White".   Lastly, I painted the entire base with "Americana "Mississippi Mud".
       I let the figure dry overnight and the next day I gave it a coat of Americana "DuraClear Matte" varnish.    Then, when  the varnish was dry, I used some white glue to flock the base.  Another overnight dry, and I sprayed it with Testor's "Dullcote".  

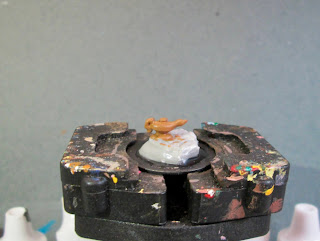
     It was now time to work on the lamp, so I placed it in my painting grip next. 
     I began by painting it with Accent "Mustard Seed".  
      When the "Mustard Seed" was dry, I repainted it with Folk Art Burnished Metal "Burnished Bronze".   When that was dry, I gave it a coat of Citadel "Nuln Oil" wash.  When the wash was dry, I drybrushed it with Ceramcoat "Wedding Gold".   Lastly, I painted the entire base with "Americana "Mississippi Mud".
       I let the lamp dry overnight and the next day I gave it a coat of Americana "DuraClear Matte" varnish.    Then, when  the varnish was dry, I used some white glue to flock the base.  Another overnight dry, and I sprayed it with Testor's "Dullcote".

And here's the final outcome:


     I'm really proud of how this one came out.  I know it's a large figure, but I think the face turned out pretty good.  Now if I could only do that good with standard 28mm tall figures! :)  In retrospect, I don't think I used the correct shade of dark red/pink to perfectly match the original Jeannie outfit, but I think it gets the idea across well enough.   My one real regret is that I didn't pay more attention when basing the two parts so that the tip of the smoke plume actually could touch the lamp.

And, once again, please check in Thursday for another bonus post!