Showing posts with label Grave. Show all posts

Monday, October 4, 2021

Dwarf Queen and King Crypts: Bones 5 Quick Conversion Project.

      I didn't get to finish painting any figures this week, as Real Life intervened.  But, I was able to work on a simple conversion figure over the weekend.  
      As I've mentioned in my previous two posts, I purchased a pair of the Bones 5 The Dwarf King's Crypt Encounter set as I wanted pairs of a number of the set's scenery items, as well as a bunch of the Dwarf Zombies and Dwarf Fighters.
     One of the scenery items I was most looking forward to having a pair of, was the tomb; as I wanted to convert one to be the tombs to be for a Dwarf Queen, to go along with the Dwarf King's tomb.
     First thing I would need was a suitable Bones Female Dwarf figure to use as the tomb cover's carving; as I did not trust my ability to sculpt one from scratch.   I was not sure what figure to use, as so many of the ones I had, or looked at in the online store, were posed somewhat dynamically.  Then, as fate would have it, I came across one of the Gwyddis, Dwarf Valkyrie figures, and realized it was perfect.  Her pose is terribly static and two-dimensional, but it was perfect for what I needed.
The Gwyddis, Dwarf Valkyrie figure next to the tomb cover.

     First thing I did was cut the Dwarf King off of the tomb cover.  Bones Black is a very hard substance to cut, unlike Original Bones; so in order to do this, I let the tomb cover sit in a pot of boiling water for 4 minutes to get soft.  I then quickly pulled it out and carefully sliced the King off of it.  Next, I worked on the Gwyddis figure, which, being Original Bones, didn't need any pre-cutting treatment.  First I removed her backpack by twisting and pulling it off.  I then cut her base off, then her arms just below the shoulders.  After that, I carefully sliced down through the back of her head and skirt, trying my best to keep the blade straight and perpendicular to her orientation, so that she would lie flat on the tomb cover.  I then did a trial fit, and realized she was a little too tall to fit within the boundaries of the cover, so I carefully sliced a couple millimeters off the bottom of her skirt to make her shorter.
     While I was working on the tomb cover, I also drilled through it and the tomb base to insert a couple rare earth magnets, to keep the lid in place when the tomb was being stored or transported.  I then superglued the magnets in place.
     My next step was to superglue Gwyddis in place on the tomb cover. Once the glue was set, I worked on trimming and arranging her arms, and when I was satisfied, I glued them in place as well.
     Once the glue was set, I used 2-part epoxy (greenstuff) to fill in the gaps in the tomb, as well as the gaps between her repositioned arms and her shoulders, and some of the gaps between her arms and her body to help it look more like a solid carving. I also used the greenstuff to level off the hole where I glued the magnet n the lid.
     And here's the finished result, with the King and Queen side-by-side.     I'm really pleased with how this turned out.  It's not perfect, but when all painted up as weathered stone it should look just fine.

     Hopefully next week we will be back to normal and I can complete the last two Dwarf Zombies from this set.  See you all then. 

Monday, October 7, 2019

Grave Minions: Bones 3 Figures

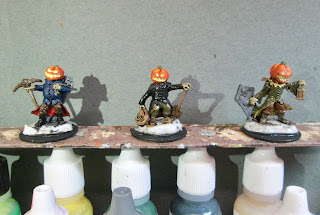
     This past week, with it being the first week of October, I was feeling in a Halloween mood so I painted the Grave Minions, originally released as part of the Bones 3 Graveyard Expansion.  I didn't get that expansion but had ordered these guys directly from Reaper once they were released to retail.
       Because these were the white original Bones material, I began by giving them all a wash with some thinned Reaper MSP "Grey Liner" to help me see the details.   When it was dry, I painted  the pants on the lefthand one and the boots on the center one with Americana "Asphaltum".  I then painted  the pants of center one and the coat of the righthand with Vallejo "Brown Violet".  After that I did the boots of the lefthand one and the coat of the center one with Ceramcoat "Black".  I also painted the pants of the righthand one with Americana "Light Cinnamon".
     Next, I painted the lining of the lefthand one's coat with Reaper MSP Bones "Cinnamon Red", and the coat itself with Crafter's Acrylic "Navy Blue".  I then painted the lining of the center one's coat with Crafter's Acrylic "African Violet", and the lining and collar of the righthand one's coat with Accent "Golden Harvest".   After that, I painted the gravestones with Americana Zinc, the tool handles and rope with Americana "Mississippi Mud", and the metal parts of the tools with Americana "Raw Umber".  I followed that with painting the sack, the skull in it, and the lantern, with Ceramcoat "Territorial Beige", and then the pumpkin heads with Crafter's Acrylic "Orange Spice"
      I then painted the pumpkin stems with Duncan "Olive", and then gave the heads a coat of Citadel "Agrax Earthsahde" wash.  When that was dry, I gave the rest of the bodies a coat of Citadel "Nuln Oil" wash.  After that was dry, I highlighted the pumpkins with, first, a mix of the base "Orange Spice" mixed with a little Americana "Tangerine", and then just the plain "Tangerine.  Next, I painted the insides of the eyes and mouths with Crafter's Acrylic "Daffodil Yellow", and then added smaller highlights in the centers with Americana "Snow White".
      I then highlighted the coat lining on the left figure with Reaper MSP "Holy Berry", and highlighted the coat itself with Americana "True Blue".  Next, I highlighted the pants on the lefthand one with the Territorial Beige" and did the stitching on the coat with Folk Art "Cloudy Day".  After that, I highlighted the coat lining on the center one with Anita's "Violet", and highlighted the coat with the "Zinc".  I followed that by highlighting the pants with Duncan "Olive", and did the stitching with Americana "Grey Sky".   I then moved on to the righthand one, highlighting the coat lining , and collar with the Daffodil Yellow, and the coat with a some of the "Olive" mixed with a little Aleene's "Dusty Khaki". The pants I highlighted with Americana "Khaki", and the stitching I did with the "Dusty Khaki". 
     Next, I highlighted the axe and shovel handles with Americana "Fawn", and highlighted the sack and the rope with Americana "Khaki".  I then highlighted the skull in the sack with, first, Americana "Antique White", and then a little Americana "Bleached Sand".  After that, I drybrushed the tombstones with some Folk Art Platinum Grey", and then painted the lamp panes with the "Black", and then the lamp itself with Folk Art "Brushed Metal "Brushed Bronze".  I also, lightly drybrushed the axe head and shovel head with some Folk Art Metallics "Gunmetal  Grey".  Lastly, I painted the  bases with "Americana "Mississippi Mud".
      I let the figures dry overnight and the next day I gave them a coat of Americana "DuraClear Matte" varnish.    Then, when  the varnish was dry, I used some white glue to flock the bases.  Another overnight dry, and I sprayed them with Testor's "Dullcote".

     I really like how this trio turned out!  They're a quirky set of minis, and were fun to paint.

Sunday, July 7, 2013

Going Batty with the Bat Swarm: 4 of 264

So, I was going batty this weekend. In more ways than one. First, because it was the Fourth of July Weekend holiday here I didn't have a lot of time to paint, so I picked a simple figure to work on: the Bat Swarm. And, secondly, a recent post on The Miniatures Page (See: TMP. I strongly recommend you read this.) has me rather confused about priming and finishing my figures.  It seems some folks are having an issue with their spray primers turning the figures sticky.  So far, I have sprayed a few with Krylon Flat Black Camouflage with Fusion spray paint (designed for use on plastics) and have had no issues with tackiness. So fingers crossed I'm okay on that front.  I'm concerned as well about my final spray using Testor's Dullcote.  The figures I've showcased so far, that I used Dullcote on are all fine so far.  But I think I'll stop using it for a while and let a couple weeks pass, and make sure the figures I've already done are okay, before continuing spraying with it.
     After soaking in some dish soap, and scrubbing with an old toothbrush, and then rinsing and drying,  I actually primed these bats by painting on black craft paint with a brush, not because I was afraid of the spray paint at that point, but because I felt trying to spray into the many nooks and crannies created by the wings and mashed-together bodies would make spraying very difficult.
Apologies, for some reason I photographed the back of this figure here, not the front. 
After this base primer coat dried I drybrushed the bats with my standard black drybursh: GW 'Shadow Grey'. I then did a slightly lighter drybrush on the bats with Apple Barrel 'Apple Scotch Blue' to provide some highlights. Then I gave a heavy drybrush to the gravestone using GW 'Codex Grey', followed by a lighter drybrush of GW 'Fortress Grey' to pick out some highlights.  I tried to be as careful as possible working around the areas where the wings were sculpted to the gravestone itself, but as you can see in the picture below, there were places where I needed to go and touch up the wings with black and a hand painted 'Shadow Grey' highlight.
Next I gave the earth around the gravestone a heavy drybrush with Americana 'Charcoal Grey', followed by a highlighting drybrush of Americana 'Missippii Mud'. I then picked out the upturned bones with Americana buttermilk, followed with brushed on highlights with pure white.
Finally, when all the paint had dried overnight, I painted the figure with Ceramcoat Matte Varnish, and then when that had dried, I flocked the base by painting with with a mix of white glue and brown paint and then quickly dunking it into a tub of flock. As I mentioned in my first paragraph, I didn't spray with Testor's Dullcoate until I have let a couple weeks pass and make sure it doesn't have any ill effect on the figures I've already done.

Figure 4 of 264: Complete