Showing posts with label Bones II. Show all posts

Monday, October 26, 2020

Skeleton Warriors: Bones 2 Figures

     This past week I did a pair of Skeletons from the Bones 2 Shambling Dead set.  I had prepped these back when we were playing Ghost Archipelago a couple years ago, but never got around to painting them, and they had just kind of been floating around my painting table ever since.  I finally got tired of seeing them, so thought I'd slap some quick paint on them and get them finished.
      I had prepped the figures in the usual way, soaking the parts in a dish of water with a couple drops of dish-soap added, then giving them a light scrub with a soft toothbrush, and then rinsing and drying them. I then had glued them to 1" black-primed fender washers with Aleene's Tacky glue.  I now glued the washers onto a tongue depressor with a couple drops of Elmer's white glue.
     Since I planned to use some Citadel Contrast Paint on these, I started off by giving them a base coat of Ceramcoat "White".
     When the base coat was dry, I gave them a coat of Citadel Contrast "Skeletal Horde".  When that was dry, I went over their armor and shields and shield straps with Citadel Contrast "Snakebite Leather".  After that, I did the boots with Citadel Contrast "Wyldwood", and the spear shaft with Folk Art "Barn Wood. 
    Next, I painted the tunic on the righthand one using Reaper MSP Bones "Cinnamon Red", and then I painted the spear point, sword blade, and belt with Americana "Asphaltum".   After that I painted the armor, shields, and sword grip with Folk Art Brushed Metal "Brushed Bronze".
     I then went over the shields and armor with  some thinned Americana "Sea Breeze" to give a verdigris look. When it was dry, I added some splotches to the left shield with Crafters Acrylic "Bright Yellow", and the right shield with Americana 'True Blue, to represent the remains of old paint on the shields.  I let the figures dry for a while, and then went over everything but the skeletal bones themselves with a coat of Citadel "Agrax Earthshade" wash.  I then filled the eye holes and mouths with some Citadel "Nuln Oil" wash to help define them better.
     When the washes were dry, I drybrushed the spear shaft with some Americana "Bleached Sand", and then hit the bones of the skeletons with a light drybrush of some Crafter's Acrylic "Light Antique White".  I then applied some splotchy rust to the spearpoint and sword blade with some accent "Golden Oxide", and then did highlights on the righthand skeleton's tunic with some Crafter's Acrylic "Orange Spice".  After that, I went over the paint remands on the shields again; using Crafter's Acrylic "Daffodil Yellow" for the one on the left, and Americana "Wedgewood Blue" for the righthand one.  I then painted on the remnants of some decorations, using Ceramcoat "Black"on the left, and Americana "Snow White" on the right.  Lastly, I painted the bases with Americana "Mississippi Mud".
     I let the skellies dry overnight and the next day I gave them a coat of Americana "DuraClear Matte" varnish.    Then, when  the varnish was dry, I used some white glue to flock the bases.  Another overnight dry, and I sprayed them with Testor's "Dullcote". 

     Not great, but good enough for the tabletop and I'm happy to finally get them finished and ready for action.

Monday, April 8, 2019

Vulture Demon: Bones 2 Figure

     This past week I painted the Vulture Demon from the Bones 2 Lesser Demons set.  We're doing a scenario for Ghost Archipelago this month that requires a birdman kind of creature, and this seemed to fit the bill well enough.
       I prepped the figure in the usual way, soaking it in a dish of water with a couple drops of dish-soap added, then giving it a light scrub with a soft toothbrush, and then rinsing and drying it.  I then glued the figure to a black-primed 1.5" fender washer with Aleene's Tacky glue, and then placed the figure in my painting grip.
      I googled some pictures of real vultures before I bean to give myself an idea of what an actual vulture looked like.   I then began by painting the body and base with Ceramcoat "Black.  When dry, I drybrushed it with Americana "Charcoal Grey", and then with Folk Art "Barn Wood".  I did the Barn Wood" drybrush a little  heavier on the bottom 2/3's of the wings to give those feathers a lighter appearance.  I then painted the head with Reaper MSP "Rosy Shadow", and then feathery collar with Crafter's Acrylic "Light Antique White".
     Next, I painted the front 3/4's of the head with the "Light Antique White", and then painted the tips of the beak and the neck crest feathers with the "Black".  After that, I painted the inside of the mouth with Americana"Shading Flesh", and the talons and claws, as well as the skulls on the base, with Americana "Antique White".
     After everything had a while to dry, I gave the head and feather collar; as well as the talons, claws, and skulls, a wash with Citadel "Agrax Earthshade" wash.   When the wash was dry, I highlighted the skin with Reaper MSP "Rosy Skin", and the inside of the mouth with Apple Barrel "Apple Flesh".    I then drybrushed the neck crest feathers and the tips of the beak with Americana "Zinc".  Next, I drybrushed the collar feathers and highlighted the front of the face with Americana "Snow White", and then painted the eyes "Black" with "Snow White" dots.   I highlighted the talons, claws, and skulls with Americana 'Bleached Sand"; and also used this color to paint the teeth.  Lastly, I painted the entire base with "Americana "Mississippi Mud".
       I let the figure dry overnight and the next day I gave it a coat of Americana "DuraClear Matte" varnish.    Then, when  the varnish was dry, I used some white glue to flock the base.  Another overnight dry, and I sprayed it with Winsor & Newton Professional "Matt Varnish".


     A rather simple figure, but I'm pleased with how it came out.   It looks suitably evil and should fill the roll of a birdman just fine.

     In other news, Reapers Bones 4 shipping to the US should start today (fingers crossed!).  I'm Wave 1, so hopefully will have my box shipped in the next day or two; so I should have some unboxing photos ready for next Monday!

Monday, March 18, 2019

Translucent Slimes: Bones 2 Figure

     This past weekend was the Cold Wars miniatures gaming convention, so I needed something real quick to paint last week, since I only had a few days to complete it and I was still frantically painting cavalrymen for my War of the Roses game.  So, I chose the two translucent slimes that came with the Bones 2 Gelatinous Cube & Slimes Add-On set.
     I prepped the figures in the usual way; soaking them in a dish of water with a couple drops of dish-soap added and then rinsing and drying.   I then glued them to 1/2"x1/2" black-primed steel bases with Gorilla superglue gel.  I then glued the figures to a  tongue depressor with a couple drops of the Elmer's glue each.
I went back and forth about whether to even base these or not, as bases on translucents are difficult to handle because you can see them through the mini.  In the end I decided on these small steel bases, with the hopes that their size and  the irregular nature of the miniatures' surface would make them had to see.  They fit completely under the large flat slime, and only stuck out a little from the more vertical slime. Their thinness would help the minis sit almost flat on the surface of the table too.

    I decided I would go for a Green Slime look with the vertical one, and an Ochre Jelly look for the flat one. So, I began by painting the vertical one with Mr Color "Clear Green" (This is not an acrylic paint and comes with all sorts of scary warnings on the label, so I would not recommend it.  I only have it as I picked up on clearance at a local hobby shop before I realized what it was.  I hope to replace it soon with some Tamiya clear.) , and I painted the flat one with Tamiya Color "Clear Yellow".
     Next, I gave the vertical one a wash with Iron Wind Metals "Dark Green" ink, and the flat one a wash with Iron Wind Metals "Orange" ink.
     I was happy with the how the vertical one looked at his point, but wasn't satisfied with the flat one; so I painted the shallow areas and crevices of the flat one with some Tamiya Color "Clear Orange" using a wet brush to thin it a little. Lastly, I painted the base of the green one with Americana "Zinc
     When they were dry, I gave them a coat of Americana "DuraClear Gloss Varnish".  I realized I still wanted the base of the green one to be matte, so I subsequently sprayed the figure with Testor's "Dullcote".  When that was dry, I went back over just the slime with the "DuraClear Gloss Varnish", leaving the base flat.

     While simple, I'm really happy with how these turned out. 
      And in those that didn't hear the news, Reaper announced that they have begun Bones 4 Kickstarter fulfillment!  If you didn't see it, check out the Reaper CEO's video message for an amazing look at one of their Kickstarter fulfillment warehouses!

Monday, March 11, 2019

Basilisk: Bones 2 Figure

     This past week I wanted an easy to paint figure because of the pressing last minute painting I'm doing in preparation for Cold Wars this coming weekend.  So, I picked the Basilisk out of my remaining Bones 2 pile.
    I had no idea what a Basilisk was supposed to look like, so I turned to my old 1978 Monster Manual for Guidance.  It's description describes them as being dull brown with yellowish underbellies and glowing pale green eyes; so thats the coloration I decided to go for.
      I prepped the figure in the usual way, soaking it in a dish of water with a couple drops of dish-soap added, then giving it a light scrub with a soft toothbrush, and then rinsing and drying it.  I then glued the figure to a black-primed 1" fender washer with Aleene's Tacky glue, and then placed the figure in my painting grip.
     I began by painting the whole figure including the base with Americana "Raw Umber", and then did the underbelly with Apple Barrel "Yellow".
     Then after those colors had time to dry, I gave the entire figure a wash with Citadel "Agrax Earthshade" wash.  When the wash was dry, I drybrushed the main body with Ceramcoat "territorial Beige", followed by a lighter drybrush with Americana "Khaki Tan".
     I continued with the drybrushing of the main body, moving next to Crafter's Acrylic "Taupe", and then just a touch of Americana "Bleached Sand".  After that, I used the "Bleached Sand" to paint the teeth, then highlighted the underbelly with Crafter's Acrylic "Daffodil Yellow".  Next, I painted the eyes with Crafter's Acrylic "Citrus Green", and then painted the center of the eye with the lighter Americana "Margarita".  I then lightly drybrushed around the eye with the "Margarita" to provide a little of the eyes' Object Source Lighting "glow".  I finished the figure by painting in Americana "Snow White" pupils in the eyes.
      I let the figure dry overnight and the next day I gave it a coat of Americana "DuraClear Matte" varnish.    Then, when  the varnish was dry, I used some white glue to flock the base.  Another overnight dry, and I sprayed it with Testor's Dullcote". 

     Well, it was a rush job, and I think it shows a little; but in general I'm happy with it as a gaming figure.

Monday, September 24, 2018

Herryk, Dwarf Cleric: Bones 2 Figure

     This past week I painted Herryk, Dwarf Cleric, from the Bones 2 Heroes I set.  I was continuing to mess around with the clear weapons sprue, like I did on Kristianna a couple weeks ago; and on this guy I decided to replace his hammer with a new clear top.  I was thinking I'd try to paint it with clear green and make it like some sort of magic Emerald Hammer. 
        I prepped the figure in the usual way; soaking it in a dish of water with a couple drops of dish-soap added, then giving it a light scrub with a soft toothbrush, and then rinsing and drying it. I began by cutting down the big ornamental back piece  he was wearing, as I thought it just looked kind of impractical and a little silly.  (Note, I had already done that in the photo above before I took the "Starting" photo. To see what it looked like, you can check the photo in the Reaper Online Store.)  I then cut the top potion of the figure's hammer off just above the hand.  Next, I got the clear hammer from the basic clear weapon sprue, and cut the head off this hammer too.   I then drilled a hole in the top of the dwarf's right hand to insert the clear hammer head into.  When I was satisfied with the hole, and the fit of the handle into it, I glued it in place with some Gorilla Super Glue. I then glued the figure to a black-primed 1" fender washer with Aleene's Tacky glue, and then placed the figure in my painting grip.
      I began by giving the figure a wash with Reaper MSP "Blue Liner"; and when that was dry, I painted all his armor with Ceramcoat "Black".  When dry, I drybrushed the armor with  Folk Art Metallics "Gunmetal Grey", and then gave it a lighter drybrush with Ceramcoat "Metallic Silver".   I then painted his skin with Americana "Shading Flesh".
     Next, I painted his robes with Reaper MSP "Christmas Wreath", and then did the trim on them, as well as a little freehand along the edge, with Crafter's Acrylic "Tropical Blue".  I then painted the rack on his back with Accent real Umber, and the blank roll attached to it with Allene's "Deep Khaki".   After that, I painted his beard with Americana "Light Cinnamon", and the ropes holding everything on his back with Americana "Khaki".
     I then painted the leather wrapping on the hammer handle with Accent "Mustard Seed", and then painted the metal fittings on the hammer, as well as the anvil on his back, with Americana "Zinc".  After that, I  gave his face, and beard, a wash of Citadel "Reikland Fleshshade" wash.   When that wash was dry, I then gave a wash to the hammer handle, and the all the accouterments on his back with Citadel "Agrax Earthshade" wash.   And, when that wash was dry, I then gave a wash to his robes, and metal fittings on the hammer, and the anvil, with Citadel "Nuln Oil" wash.
    When all the washes were good and dry,   I painted his eyes, and then highlighted his face with a mix of the "Shading Flesh" and some Crafter's Acrylic "Flesh".  I then highlighted his hair using Americana "Sable Brown".   After that, I highlighted his robes with a bit of the "Christmas Wreath" mixed with some Americana "Festive Green", and I highlighted the trip and freehand with a bit of the "Tropical Blue" mixed with Americana "Salem Blue".   I also added to the shadows on the robe, particularly underneath the bottom, and the inner sleeves, with Apple Barrel "Apple Black Green", and a bit of the "Black".
     I then highlighted the wrappings on the hammer with "Raw Sienna", and then went around back and highlighted the rack with Folk Art "Teddy Bear Brown".   Next, I highlighted the bed roll with Aleene's "Dusty Khaki", and the rope bindings with Americana "Antique White".  After that, I painted the Anvil with Accent "Princely Pewter", and then highlighted it with a little of the Gunmetal Grey".  I went around front again, and used the "Gunmetal Grey" to paint the fittings on the hammer.  I then highlighted these with the "Metallic Silver".
     It was now time to finish things up by painting the clear hammer head.  For this I used some clear green paint I got a while back in a hobby store clearance sale:  Tamiya Color "Clear Green".
     Lastly, I painted the figure's integral base with the "Bittersweet Chocolate".
     I let the figure dry overnight and the next day I gave it a coat of Americana "DuraClear Matte" varnish.    Then, when  the varnish was dry, I used some white glue to flock the base.  Another overnight dry, and I sprayed it with Testor's Dullcote".  After the Dullcote dried, I went back over the emerald hammer head with Americana "DuraClear Gloss Varnish"


    I'm really happy with how this fellow turned out!   I don't often do Dwarves in green, usually saving it for Elves, but in this case I think it worked very well.

Monday, September 10, 2018

Balazar, Iconic Summoner

     This past week I painted Balazar, Iconic Summoner, from the Bones 2 Heroes II set.  I needed a Halfling cleric for a game I'm running at the upcoming Fall-In gaming convention, and this was the closest thing I had on hand.  I thought he certainly looked the part of a Halfling religious figure all decked put in his ceremonial robes.  Maybe not the best outfit for adventuring, but the rules of his order must be adhered to! :)
     I prepped the figure in the usual way; soaking it in a dish of water with a couple drops of dish-soap added, then giving it a light scrub with a soft toothbrush, and then rinsing and drying it.  The figure is sculpted with a big long mustache, which didn't look very Halfling-like to me; so after washing and drying the figure, I very carefully trimmed off the facial hair with my hobby knife.   I then glued the figure to a black-primed 1" fender washer with Aleene's Tacky glue, and then placed the figure in my painting grip.
       I began by giving the figure a wash with Reaper MSP "Grey Liner"; and when that was dry, I painted his face and hands with Americana "Shading Flesh".  I then painted his hat and inner sleeves with Crafter's Acrylic "Tropical Blue", and the decoration on the hat as well as the flaps that hang down the sides, with Crafter's Acrylic "Bright Yellow".  I then painted the flaps above the inner sleeves with Americana "Bittersweet Chocolate, and the flaps above those, that go across his neck and chest, with Americana "Khaki Tan".   After that I did his longer robes with Americana "Light Cinnamon", and the longer scarf with Americana "Forest Green".
    Next, I painted his shoes and dagger sheath with Americana "Charcoal Grey", and his pouch with Americana "Mississippi Mud".  I then painted his staff with Crafter's Acrylic "Cinnamon Brown", his blanket roll with Folk Art "Dapple Grey, and his canteen with  Accent "Real Umber.  After that, I painted the fittings on his dagger and sheath with Accent "Golden Harvest", and then let the figure dry for a few hours.  Once it was good and dry, I gave the entire figure a wash with Citadel "Agrax Earthshade" wash.   When the wash was dry, I painted his eyes, and highlighted his face and hands with a mix of the "Shading Flesh" and some Crafter's Acrylic "Flesh".
     I then highlighted his hat and sleeves with apple Barrel "Apple Scotch Blue", and the "Bright Yellow" decorations on it, as well as the "Bright Yellow" flaps, with Crafter'a Acrylic "Daffodil Yellow".  After that, I highlighted the "Khaki Tan" upper sleeve, neck and chest layer with some Americana "Antique White", and the "Forest Green" scarf with Americana "Festive Green".
     Next, I highlighted the lower level of sleeve flaps with Nicole's "Brown", and then the robes with "Folk Art "Teddy Bear Brown".  I did the highlights on the shoes and scabbard with Folk Art "Dark Brown", and the pouch with Folk Art "Barn Wood".   After that, I went around back and highlighted the bed roll with Americanas "Jade Green", the canteen with Crafter's Edition "Spice Brown", and the staff with Americana "Sable Brown".
    I then went back and painted the fittings on the staff and dagger sheath with Ceramcoat "Bronze", and then highlighted with Ceramcoat "14K Gold". Lastly, I painted the figure's integral base with the "Bittersweet Chocolate".
     I let the figure dry overnight and the next day I gave it a coat of Americana "DuraClear Matte" varnish.    Then, when  the varnish was dry, I used some white glue to flock the base.  Another overnight dry, and I sprayed it with Testor's Dullcote".

     Well, certainly not the best I've ever done.  I didn't really like this figure; as I started to paint it I found all the layers and flaps of clothes more and more frustrating, as I tried to figure out what went with what: front and back, top and bottom, and even left and right.   I tried to make him look like he belonged to some kind of agricultural based religion; with his clothing representative of the sun and sky, the dirt, and growing things. It kind of all just ends up being a jumbled mess.  I also think I put the wash on too heavily as he looks rather smudgey.    But he's fine for tabletop use, and in the end, that's all I wanted from the figure.

Monday, August 27, 2018

Rogan, Half-Orc Rogue: Bones 2 Figure

     This past week, continuing to try and do simpler figures for limited time reasons, I painted Rogan, Half-Orc Rogue, from the Bones 2 Heroes I set.
  I prepped the figure in the usual way; soaking it in a dish of water with a couple drops of dish-soap added, then giving it a light scrub with a soft toothbrush, and then rinsing and drying it.   I then glued the figure to a black-primed 1" fender washer with Aleene's Tacky glue, and then placed the figure in my painting grip.
  I began by giving the figure a wash with Reaper MSP "Grey Liner"; and when that was dry, I painted his face and arms with a mix of Americana "Shading Flesh" and Americana "Avocado". (I believe half-orcs should retain some of the pinkish coloration from their human parent, and not be all green.)  I then painted his pants with Americana "Neutral Grey", and his tunic with Americana "Mississippi Mud". When the tunic was dry, I gave it a border with Reaper MSP Bones "Cinnamon Red".
      Next, I painted his boot tops with Americana "Light Cinnamon", and the bag tucked in his belt with Americana "Khaki Tan".  I then painted his belt, sheaths, and dagger grips, with Americana "Bittersweet Chocolate", and his fangs with Americana "Antique White".   After that,  I gave his skin a wash with Citadel "Reikland Fleshshade".  When it was dry, I gave his clothing and accoutrements all a wash with Citadel "Agrax Earthshade" wash.
     When the washes were dry, I painted his eyes, and highlighted his teeth with CraFter's Acrylic "Light Antique White".  I then highlighted his skin with a mix of Americana "Reindeer Moss" and Crafter's Acrylic "Flesh".     Next, I painted his cape, gauntlets, and boots all with Ceramcoat "Black".    While the cape was drying, I highlighted his pants with Crafter's Acrylic "Storm Cloud Grey".  Next, I highlighted his tunic with Ceramcoat "Territorial Beige", and his boot tops with the "Mississippi Mud".  I then highlighted his belt and scabbards with Folk Art "Teddy Bear Brown", and the bag stuck in his belt with the "Antique White".  After that, I highlighted the cape with Americana "Zinc, and while I had it open, I also used the "Zinc" to base paint the weapons and all the but that were going to be painted as metal.  I then went back to the cape and did lighter highlights with some of the "Zinc mixed a bit of the "Storm Cloud Grey".    
    Next, I went back and went over the weapons and metal bits, including all the little stud in his tunic, with Folk Art Metallics "Gunmetal Grey", and then highlighted it all with Ceramcoat "Metallic Silver".   
     Lastly, I painted the figure's integral base with the "Bittersweet Chocolate".
     I let the figure dry overnight and the next day I gave it a coat of Americana "DuraClear Matte" varnish.    Then, when  the varnish was dry, I used some white glue to flock the base.  Another overnight dry, and I sprayed it with Testor's Dullcote".


     I'm happy with how this fellow turned out.  I wish his skin had been a little more towards the pinker side of the skin spectrum, but it was hard balance to get just perfect. 

Monday, August 13, 2018

Count Lorenth: Bones 2 Figure

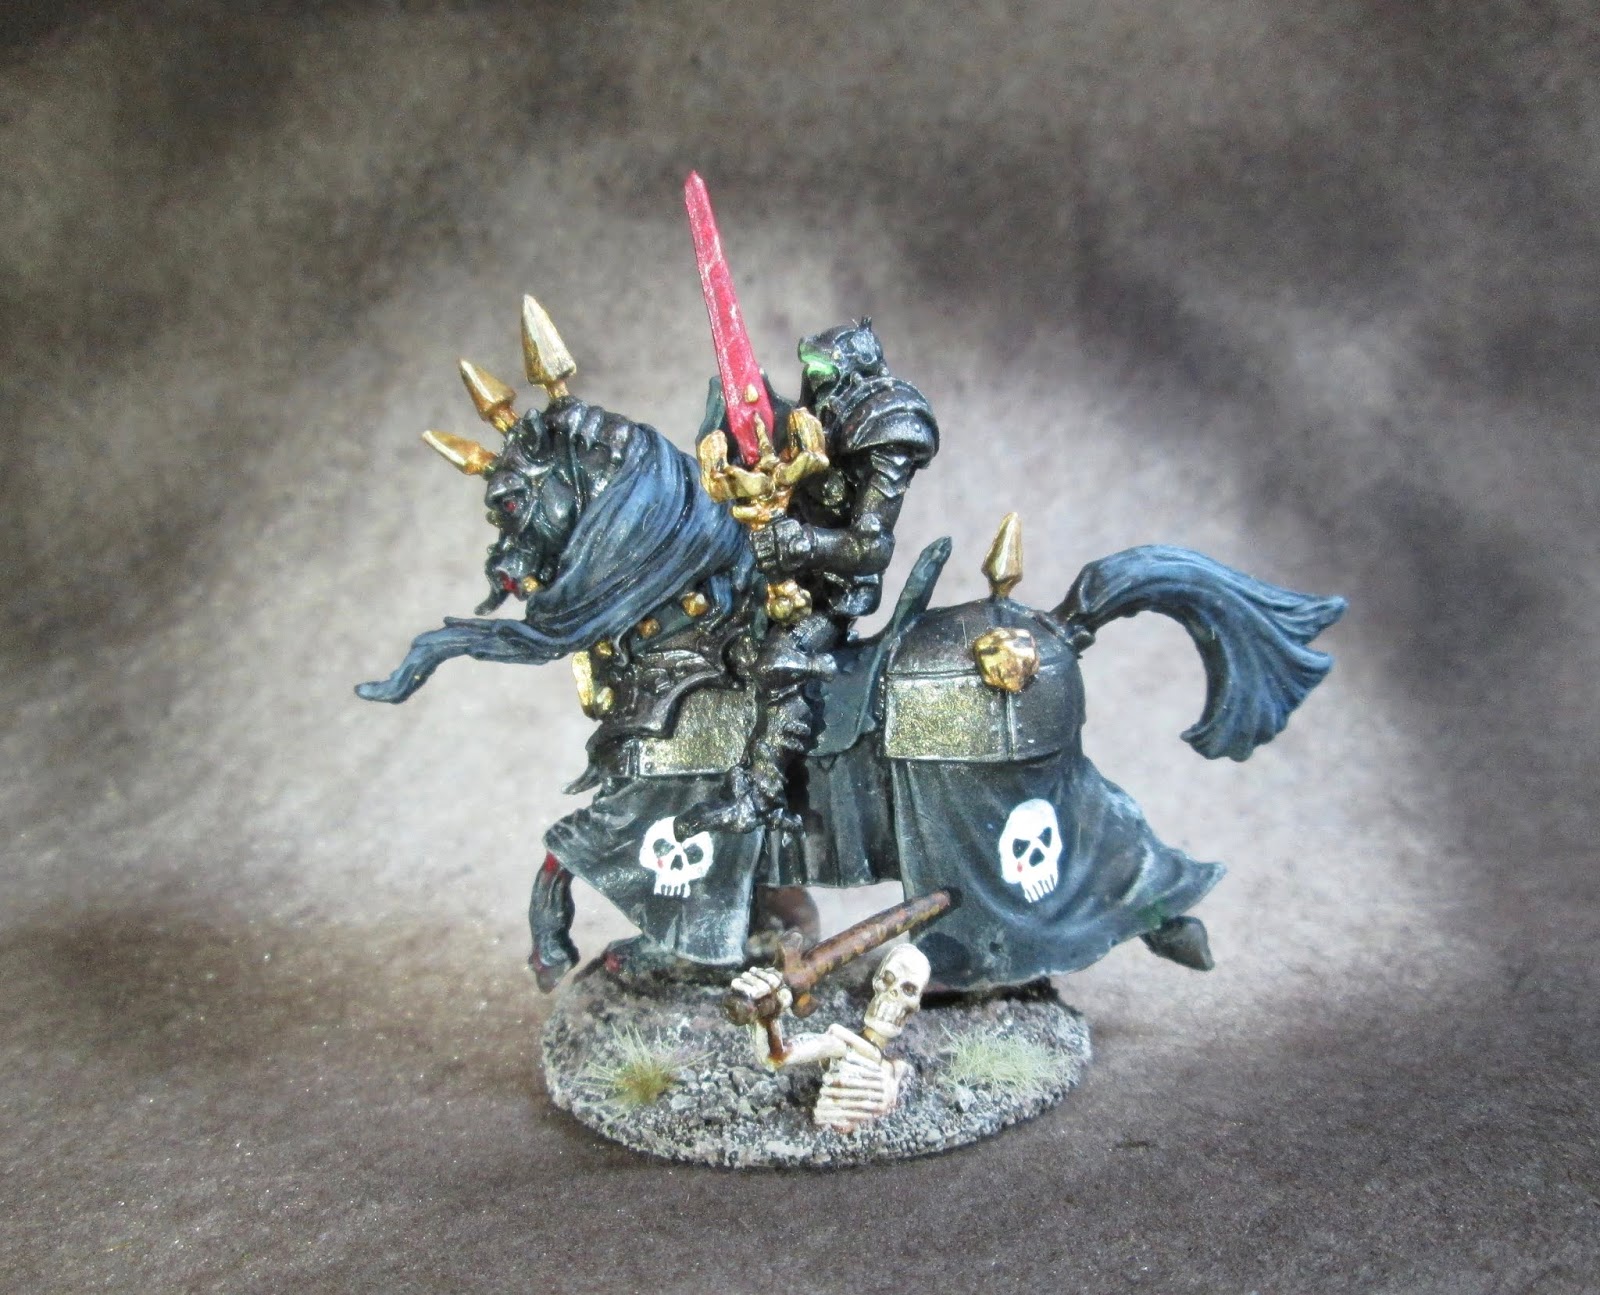
     Back in June I painted the Count Lorenth figure from the Bones 2 Expansion Set 2, to enter in the Reaper Facebook Page's Summer Painting Contest.  I had to enter anonymously, so I wasn't able to identify myself as the painter until after the contest was over.  The contest ended last week, so I can now post this article.  I didn't fare too well with my game table style up against really top notch display painters, garnering only 22 votes; but it was fun to take part.
    While I didn't personally get the Expansion Set 2 during the Bones 2 Kickstarter, I was able to pick up this figure in a trade a while back.
        The figure comes with the rider already attached, so the first thing I did was pry him off his mount to make painting easier.  I forgot to take a photo of the figure before I disassembled it, so here is one from the Reaper store.
I then prepped both pieces in the usual way, soaking them in a dish of water with a couple drops of dish-soap added, then giving them a light scrub with a soft toothbrush, and then rinsing and drying them.    I then trimmed the horse's base and glued it to a black-primed 1.25" fender washer with Aleene's Tacky glue.   And, when the glue was dry,  I put it in my Citadel painting grip.
     I began by painting the entire figure with Ceramcoat "Black".  I then drybrushed the caparison with Americana "Neutral Grey", followed by a lighter drybrushing of Folk Art "Platinum Gray".  Next, I drybrushed the main and tail with Citadel "The Fang", and after that I drybrushed the body of the horse where it could be seen, with Folk Art "Barn Wood".
     I then painted the barding with Folk Art Color Shift "Black Flash", and the saddle and reins with Reaper MSP "Coal Black".  After that, I painted the decorative metal parts with Ceramcoat "Bronze".
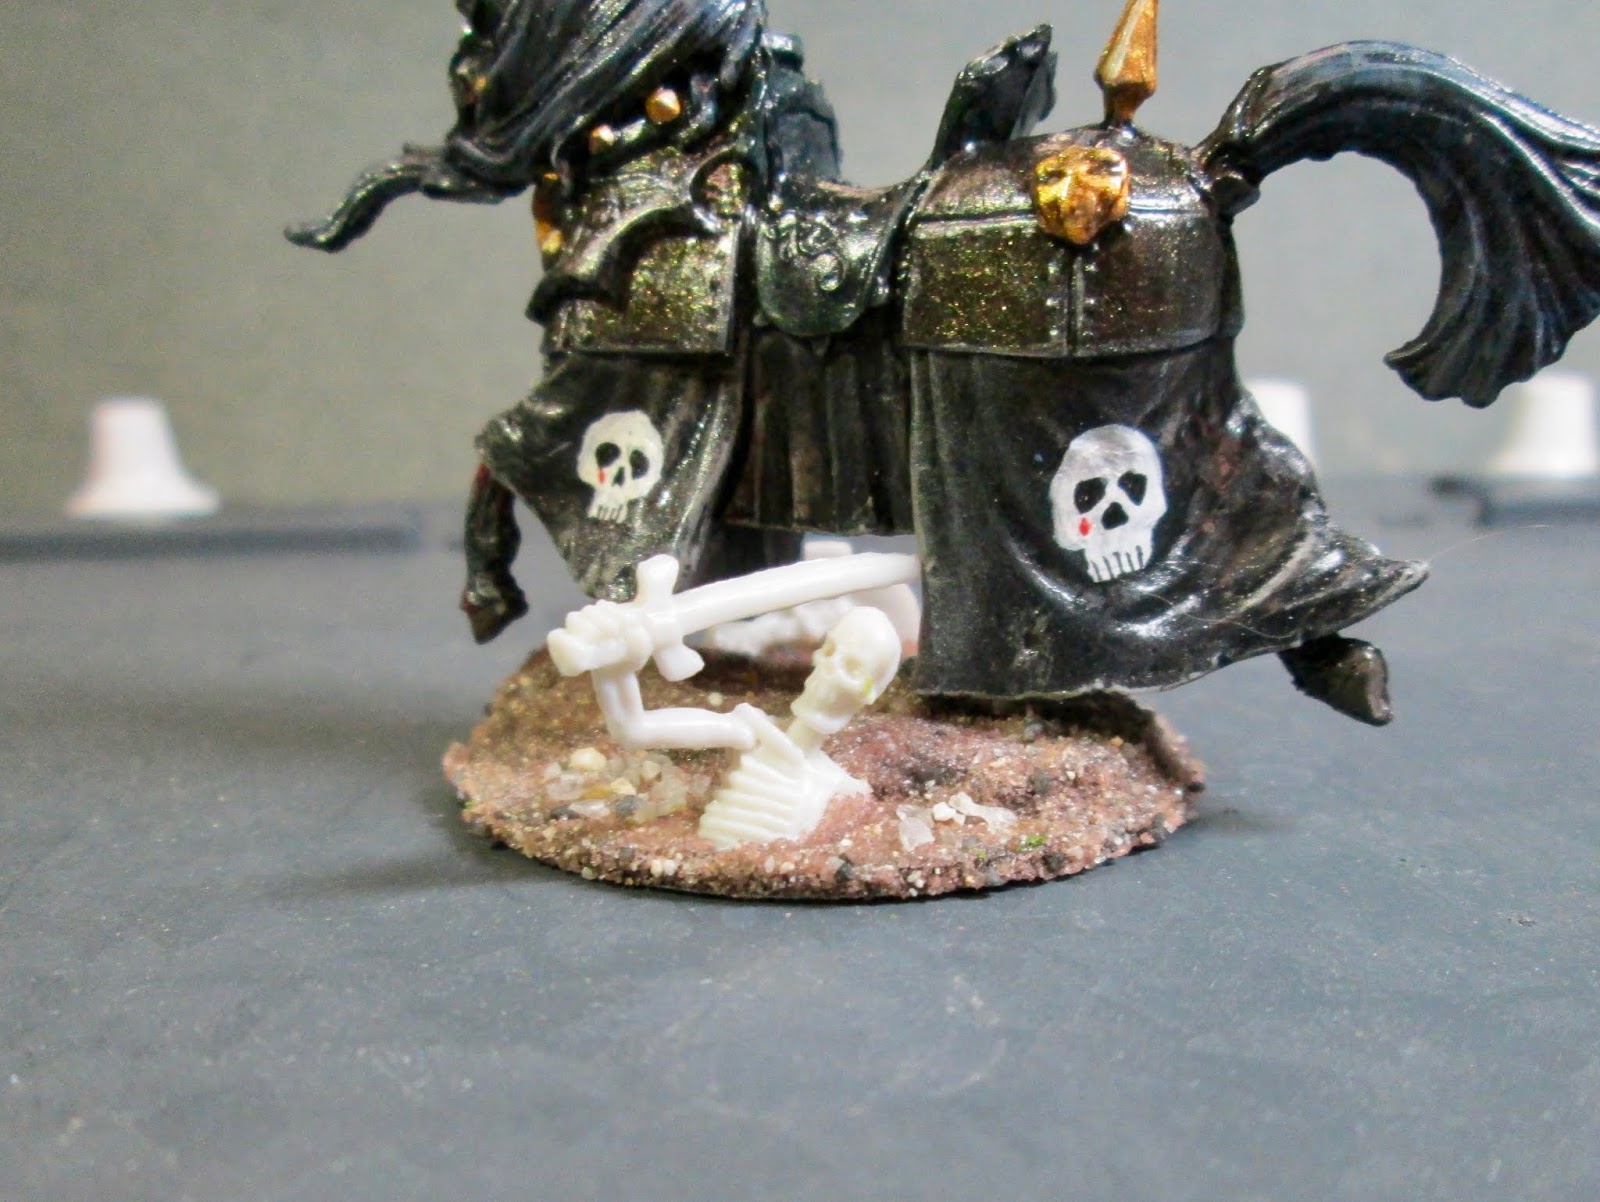
     Next, I applied a wash to the barding, and decorative Bronze medallions on the horses rump, and the decorative chest piece, using some Citadel Nuln Oil wash."  Then, when the wash was dry, I highlighted the barding with some of the "Black Flash" mixed with a little Ceramcoat "Metallic Silver", and highlighted the decorative bits I had painted Bronze with some Ceramcoat "Wedding Gold".  I then highlighted the saddle and reins with some Apple Barrel "Apple Black Green".   After that, I free-handed some blank skulls on each side of the caparison using Ceramcoat "White".
     I then finished painting the faces on the skulls, and then I painted the horse's hooves with Americana "Charcoal Grey".  After that, I painted the horses eyes, and some dripping gore on his nostrils and hooves with Ceramcoat "Cherry Brown", and then highlighted the eyes and gore with some Ceramcoat "Opaque Red".  I also used the "Opaque Red" to paint a tear on each skull, and lastly, painted the figure's base with some Americana "Raw Umber".
       I let the figure dry overnight and the next day I gave it a coat of Americana "DuraClear Matte" varnish. 
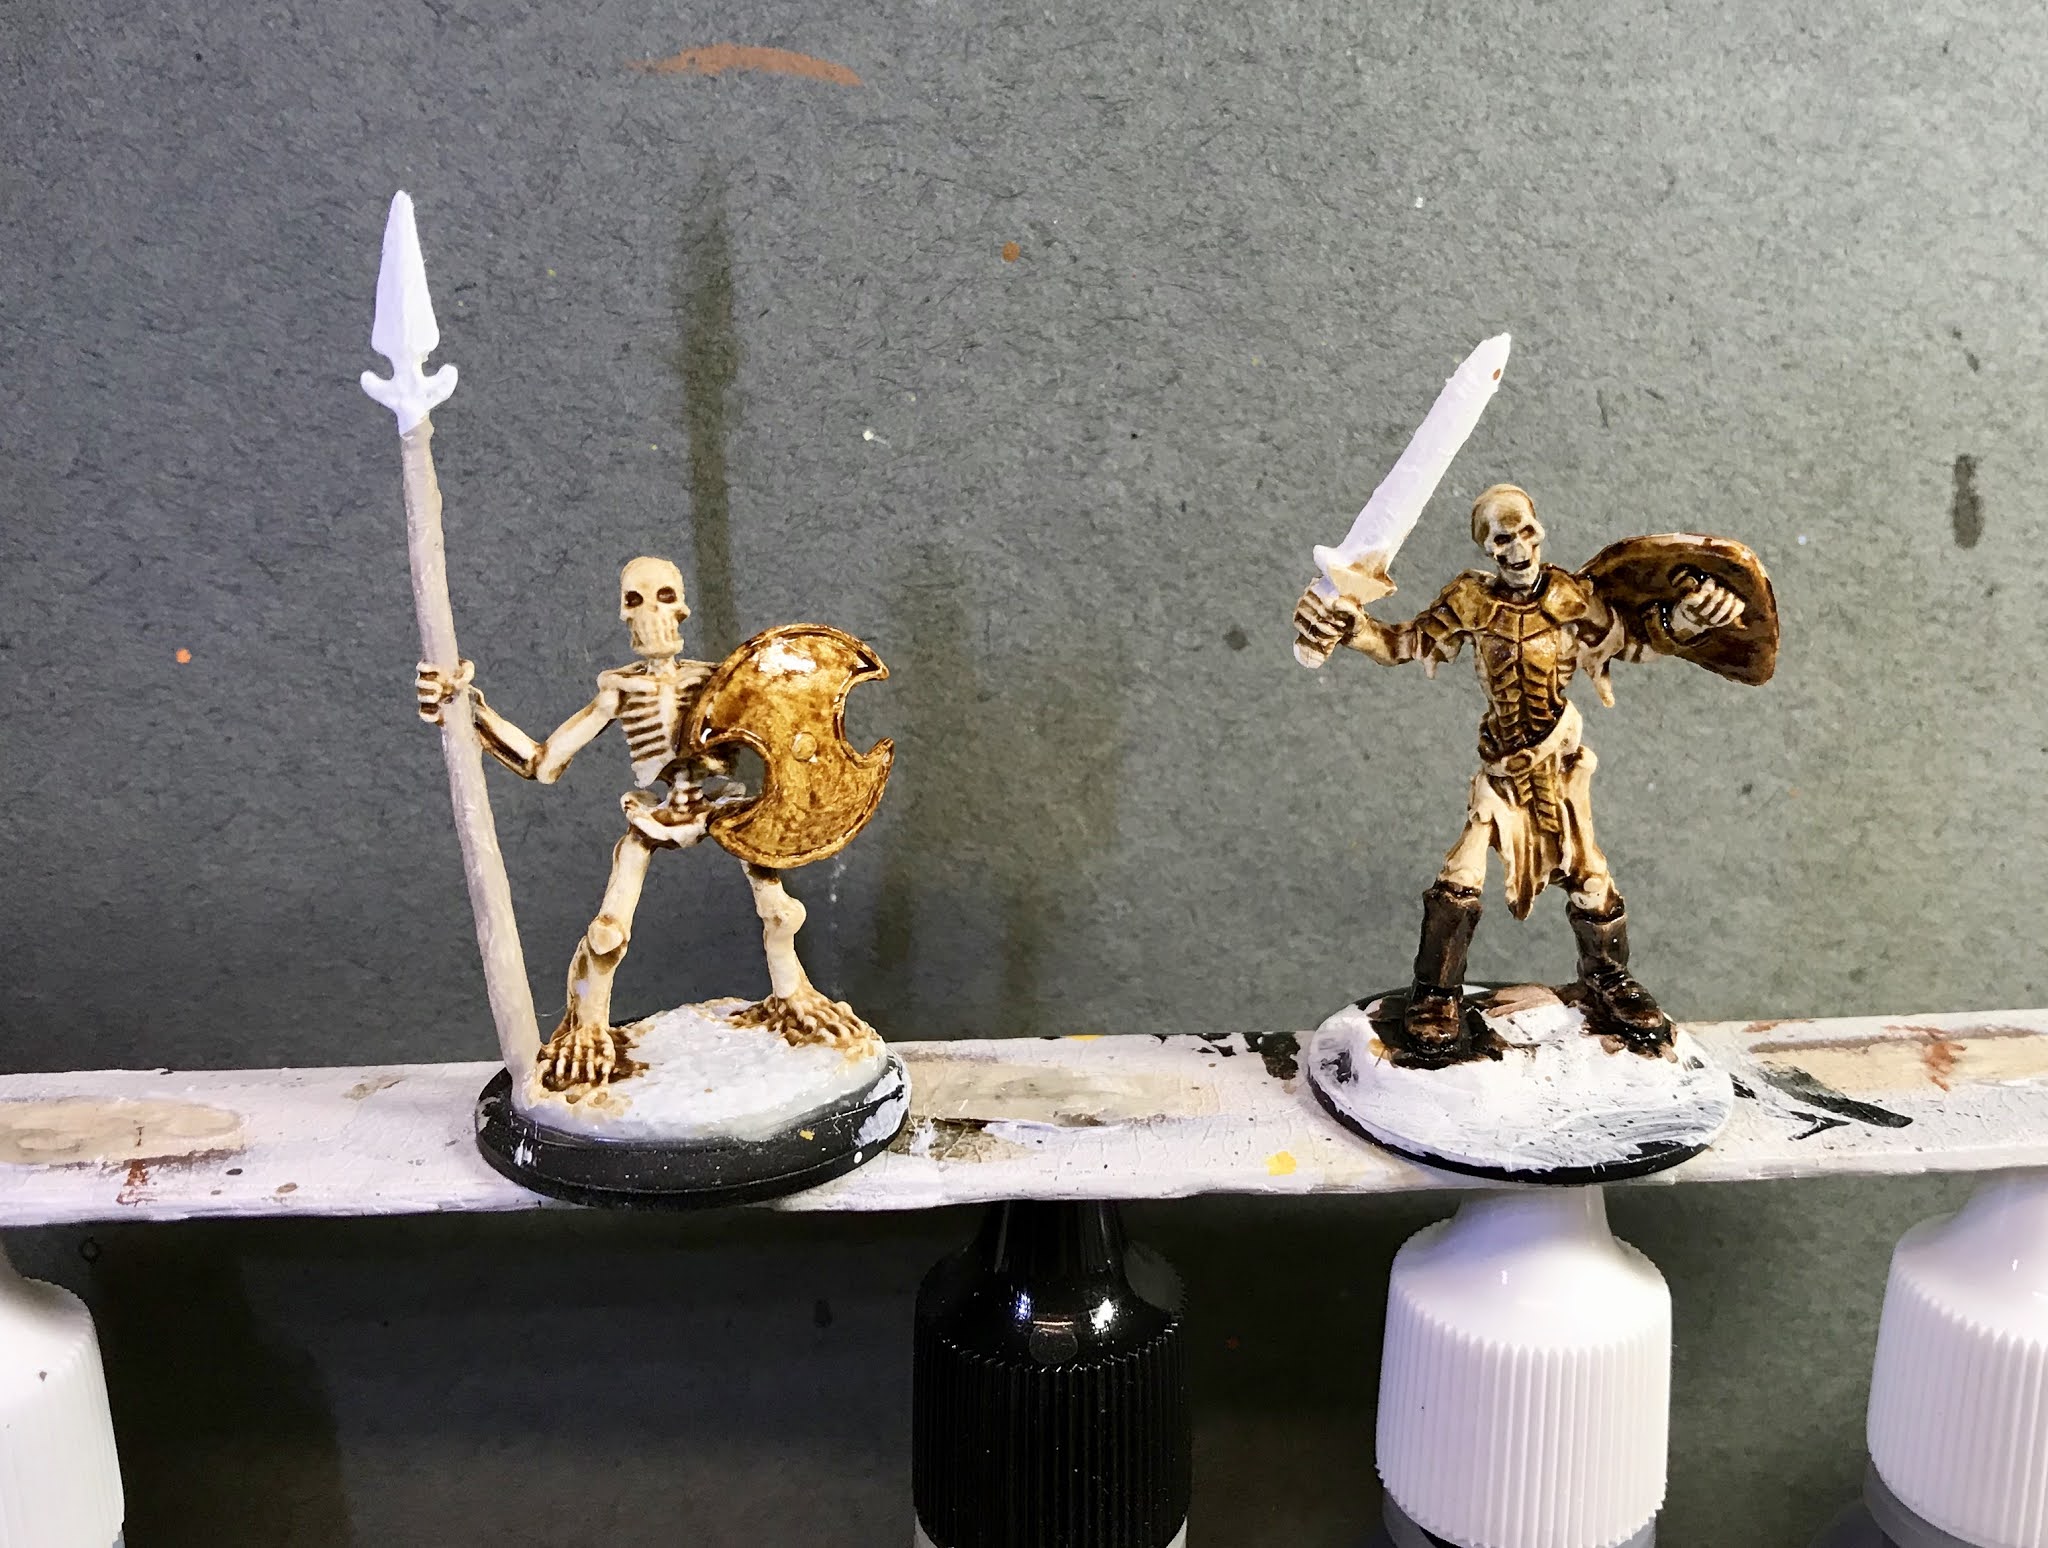
     I wanted to decorate the base somehow, so I tossed about some ideas in my head, and decided on having some undead skeletons emerging from the ground in the wake of their evil lord.   So after scrounging around a little, I found an extra copy of the Skeleton Warrior Sword figure I had, and proceeded to chop him up into some useable pieces.    I glued his upper torso to one side of the base, and half his shield to the other side, using the Aleene's Tacky glue.  While the glue was still wet, I sprinkled a little sand over it.  Then when the Tacky glue was dry, I covered the rest of the base with white glue, and covered it in a course sand mixture.

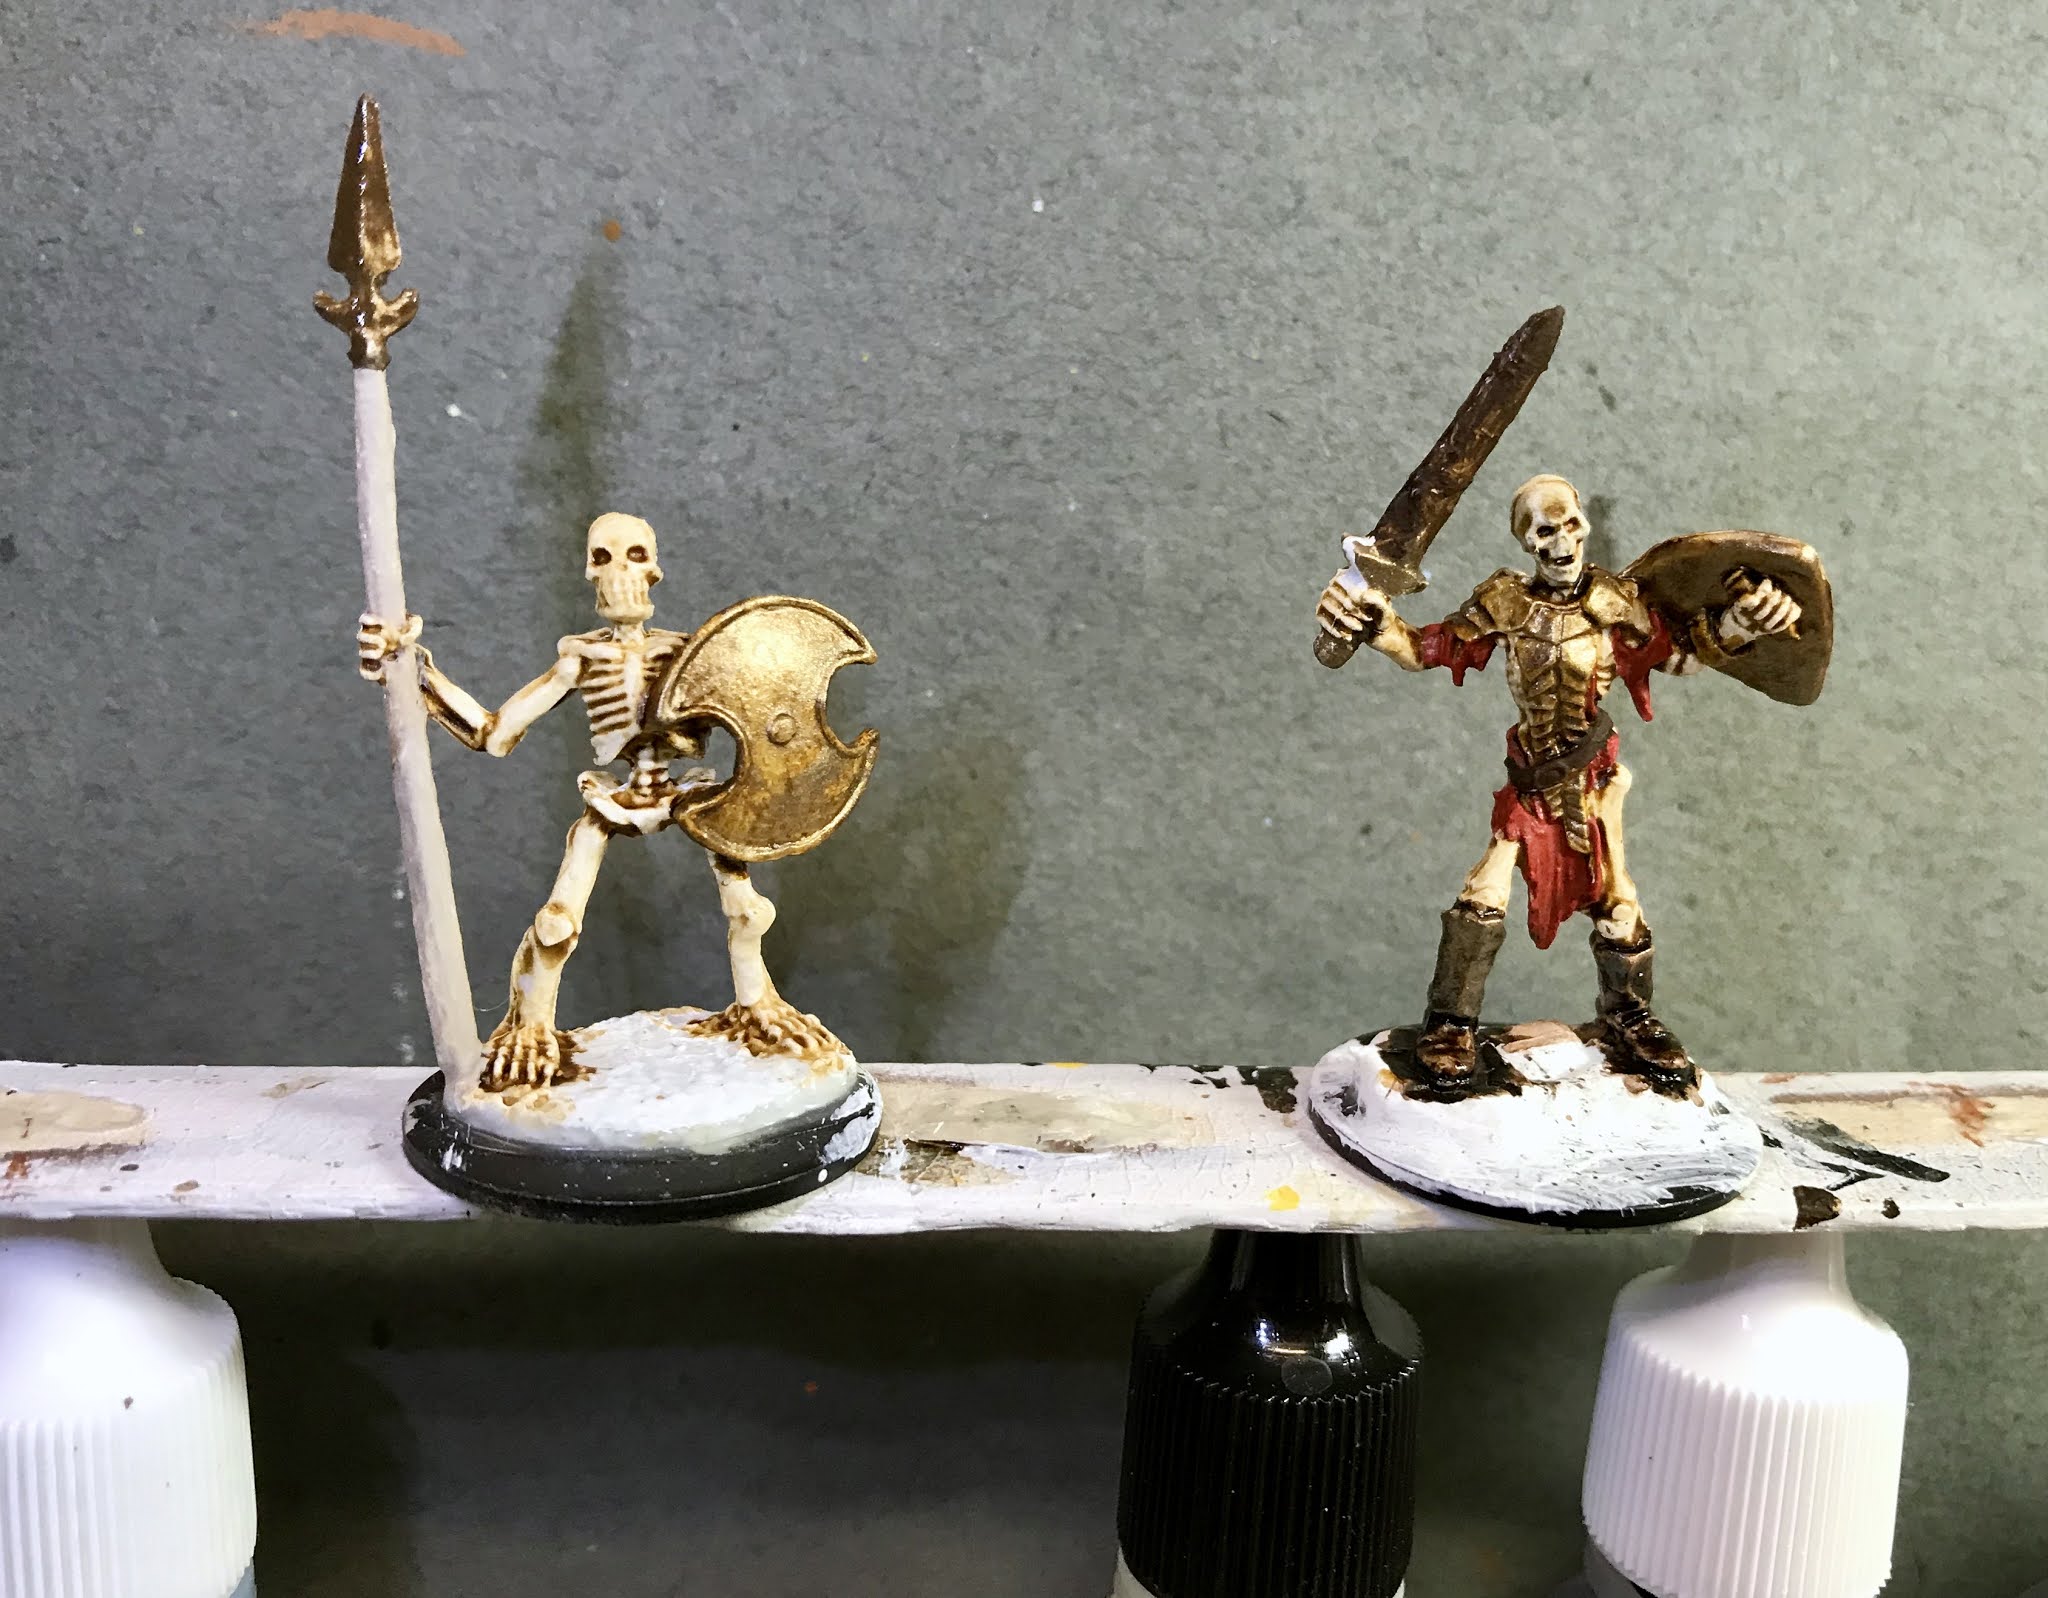
      When all the glue was dry, I painted the skeleton with Americana "Antique White", and the front of the shield with the "Black Cherry".  Next, I painted  the back of the shield with Americana "Mississippi Mud", and then the sword and the rim of the shield with Ceramcoat "Walnut".   When all the paint was dry, I gave the skeleton and shield a wash with the "Nuln Oil" wash.  When that was dry, I went over it again with some Citadel "Agrax Earthshade" wash.
         When the wash was dry, I painted the skeleton with Americana "Bleached Sand".  I then "rusted" the sword, and shield rim and hub, by splotching it with Crafter's Edition "Spice Brown", and then Accent "Golden Oxide".  I then painted the sand base with the Walnut", followed by drybrushes with Americana "Mississippi mud", and then Folk Art "Barn Word", and lastly some of the "Bleached Sand". 
     I let the base dry overnight and the next day I glued on some bits of grass tufts.   Another overnight dry, and I sprayed the horse and base with Testor's Dullcote".

      Next, I worked on the knight.   I put him in an alligator clip to make holding him easier.
    Much like the horse's barding,  I began by painting the whole knight with Black, and then painted his armor with the Color Shift "Black Flash".  When dry, I gave the armor a wash with the "Nuln Oil, and then when the wash was dry, drybrushed it with some of the "Black Flash" mixed with a little of the "Metallic Silver"
      Next, I re painted the shield Black.  I then worked on the visor, which I hoped to make look like it was glowing.  I first painted it with White, and then painted it with Nicole's"Neon Green"., and lightly drybrushed some of the "Neon Green on the surrounding armor.  I then painted a thin strip on the inside of the open visor with the White again, slightly thinned.
     Next, I painted the decorations on the shield, and the hilt of the sword with the "Bronze".  I then painted the blade of the sword with Reaper MSP Bones "Cinnamon Red", and went dry, went over it with a mix of the "Cinnimon Red" and some Folk Art Color Shift "Red Flash".  I wasn't happy with the outcome, so I tried panting over it again with some Folk Art Metallic "Bright Red".  I liked that better.  When it was dry, I did some light highlights across the blade with the "Metallic Silver".  I then highlighted the decorative bits on the shield and the hilt, that I had originally painted Bronze, with some of the  "Wedding Gold".  I then highlighted the edges of the shield with some Apple Barrel "Apple Black Green".
      An overnight dry, and I sprayed the figure with Testor's Dullcote".   I then glued the two pieces together, and it was done.


I'm pretty happy with the way he turned out, even if he isn't competition worthy.  If I have ever have an undead horde that needs a general, I have my man. :)