Monday, December 29, 2014
No Figure This Week
I'm sorry, but I was making merry a little too much this week with friends and family, and I was unable to complete a figure for posting. Hopefully, by next Monday I will have something ready to post. I hope you all have a great New Year. See you all in 2015!
Monday, December 22, 2014
Pathfinder Goblin Warchanter: Figure 131 of 265
This week I painted the last of the Pathfinder Goblins "We Be Goblins" set: the Warchanter. I have put a group photo of the gang down at the end of this post. I will now be moving on to the Elves, and am also preparing a large figure for the upcoming halfway completion mark celebration, which I'll mark with Figure 133, (since Figure 132 would still be .5 short of halfway). So, now on to the figure...
I prepped the figure in the usual way; soaking in water with a bit of dish soap added, giving a gentle scrub with an old soft toothbrush, then rinsing and drying. I then glued it to 7/8" fender washers with Aleene's Tacky glue, and then glued the washer to a tongue depressor with a couple small dabs of Elmer's white glue, for ease of handling during painting.
 To begin with, I painted the skin with Anita's "Baby Blue". When this was dry, I gave the skin areas a wash with thinned Iron Wind Metals "Blue Ink". (I forgot to take a photo before I started to paint the cloths, so excuse the color on her shirt!)
 When the ink wash was completely dry, I began painting the Goblin's outfit. I started with painting her tunic with GW "Graveyard Earth". Then I painted her skirt with Apple Barrel "Rock Grey". Next, I did her "armor" plates with Accent "Mustard Seed". Her leggings I painted Ceramcoat "Mocha", and the legging hangings I painted Folk Art "Burgundy".
Now I worked on some of the detail bits. First, I painted the hair on the Goblin with Folk Art "Medium Gray". I painted her teeth Americana "Buttermilk", and the skull and tusks(?) on her skirt, and the bones(?) in her hair, as well. I painted her tongue with Americana "Wedgwood Blue". Next, I painted the cord around her skirt and neck with Ceramcoat "Maple Sugar Tan". Finally, I painted the whip with Crafters Edition "Spice Brown", and the sword and whip grips with Americana "Asphaltum".
Next step was the metallics. I painted the sword, and the balls on the whip's end, with Ceramcoat "Metallic Pewter". I then painted the ball on the whip handle, hook on the sword hilt, her bracelets, and the chest decoration, with Folk Art "Metallic Blue Sapphire".
 When everything had had time to dry, I went back and carefully applied GW "Agrax Earthshade" wash to all the parts that weren't blue skin. I was as careful as I could be not to let it run onto the blue skin, except I applied small amounts to the eye sockets and mouth.
 After the wash had had time to dry, I went back and added highlights. I began by drybrushing her hair with white paint. Then I highlighted the skin with the original "Baby Blue". This allowed me to cover any mistakes where wash, or the drybrushed white had gotten onto the blue. Next, I added eyes with the "Buttermilk", and then added black pupils. I also used the "Buttermilk" to highlight the teeth and bones. I highlighted the tongue with a mix of the "Wedgwood" and the "Baby Blue". I painted the hair ties with the "Burgundy". I then used the original clothing/armor colors to add highlights to all she were wearing. Lastly, I highlighted the blade of the and sword , and balls on the whip, with Folk Art "Silver Sterling". My final step was to paint the figure's base and washer with white.
I let the Goblins sit overnight, and the next morning I gave them a coat of Ceramcoat "Matte Varnish". Later that afternoon I flocked their bases, using Woodland Scenics snow flocking. With all the Christmas prep going on around here at home, I only just finished it yesterday, so wasn't able to give it it's final Testor's Dullcote spray yet. You'll notice it's a little shiny in the final photo below, my apologies for that.
 I like how she turned out. And, all together they make a nice little horde.
Figure 131: Complete
And let me take this opportunity to say, "Merry Christmas!" to everyone out there in blog land. :)
I prepped the figure in the usual way; soaking in water with a bit of dish soap added, giving a gentle scrub with an old soft toothbrush, then rinsing and drying. I then glued it to 7/8" fender washers with Aleene's Tacky glue, and then glued the washer to a tongue depressor with a couple small dabs of Elmer's white glue, for ease of handling during painting.
Now I worked on some of the detail bits. First, I painted the hair on the Goblin with Folk Art "Medium Gray". I painted her teeth Americana "Buttermilk", and the skull and tusks(?) on her skirt, and the bones(?) in her hair, as well. I painted her tongue with Americana "Wedgwood Blue". Next, I painted the cord around her skirt and neck with Ceramcoat "Maple Sugar Tan". Finally, I painted the whip with Crafters Edition "Spice Brown", and the sword and whip grips with Americana "Asphaltum".
Next step was the metallics. I painted the sword, and the balls on the whip's end, with Ceramcoat "Metallic Pewter". I then painted the ball on the whip handle, hook on the sword hilt, her bracelets, and the chest decoration, with Folk Art "Metallic Blue Sapphire".
I let the Goblins sit overnight, and the next morning I gave them a coat of Ceramcoat "Matte Varnish". Later that afternoon I flocked their bases, using Woodland Scenics snow flocking. With all the Christmas prep going on around here at home, I only just finished it yesterday, so wasn't able to give it it's final Testor's Dullcote spray yet. You'll notice it's a little shiny in the final photo below, my apologies for that.
Figure 131: Complete
And let me take this opportunity to say, "Merry Christmas!" to everyone out there in blog land. :)
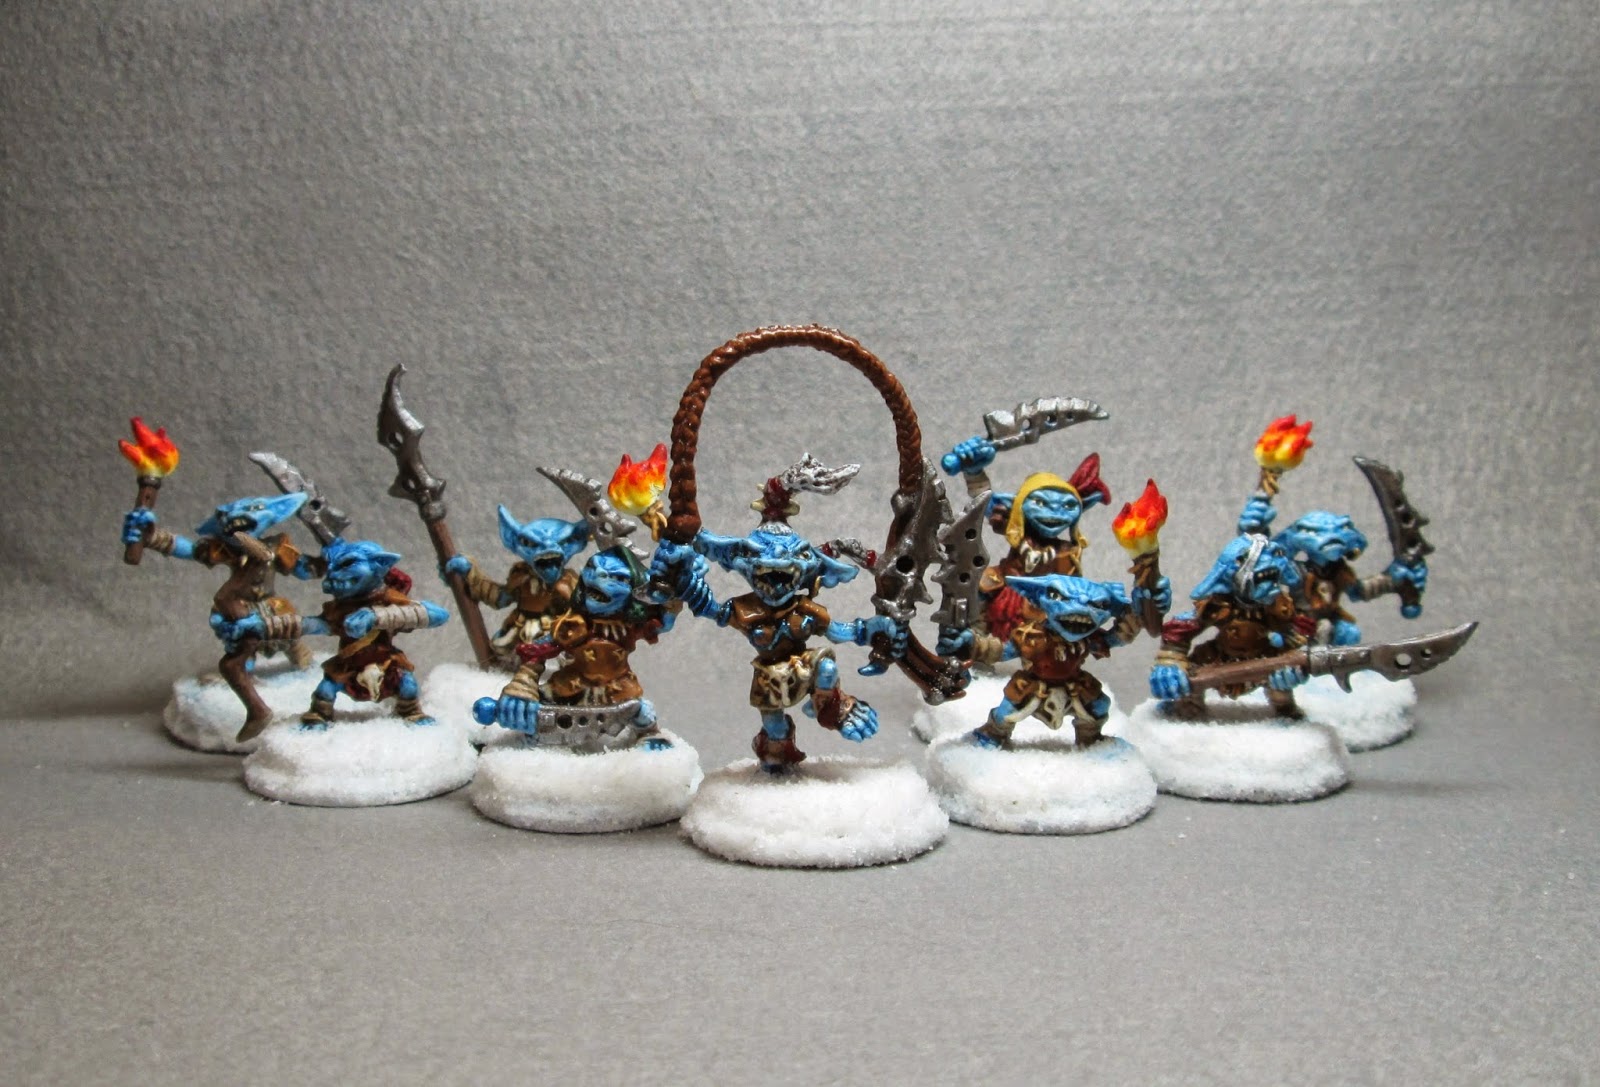 |
| Here's the whole gang; as they'll look in a couple days caroling by torchlight on a snowy Christmas Eve! :) |
Monday, December 15, 2014
Pathfinder Goblin Warriors: Figures 129 & 130 of 265
This week I painted two more on the We Be Goblins! Pathfinder Goblins Set. I prepped them in the usual way; soaking in water with a bit of dish soap added, giving a gentle scrub with an old soft toothbrush, then rinsing and drying. I then glued them to 7/8" fender washers with Aleene's Tacky glue, and then glued the washers to a tongue depressor with a couple small dabs of Elmer's white glue, for ease of handling during painting.
 To begin with, I painted their skin with Anita's "Baby Blue". When this was dry, I gave the skin areas a wash with thinned Iron Wind Metals "Blue Ink".
 When the ink wash was completely dry, I began painting the Goblins' outfits. I started with painting their tunics with DecoArt "Cinnamon Brown". Then I painted their loin "hangings/skirts" with Folk Art "Barnyard Red". Next, I did their "armor" plates, and the Archer's quiver, with Accent "Mustard Seed". Their leggings I painted Folk Art "Butter Pecan", and their wrist wraps I painted Citadel Foundation "Dheneb Stone".
Now I worked on some of the detail bits. First, I painted the hat on the left-hand Goblin with Folk Art "Golden Harvest". I painted their teeth Americana "Buttermilk", and the assorted teeth hanging around their necks I painted with the "Buttermilk" as well. I also used the Buttermilk" to paint the skull on the Archer Goblin. I painted the Archer's tongue with Americana "Wedgwood Blue". Next, I painted the cords on the "armor" plates and hat, the quiver strap, and the necklace cords with Ceramcoat "Maple Sugar Tan". I painted the feathers on the left-hand Goblin's hat with Folk Art "Burgundy" as well as the fletchings on the Archer's arrows, and the pouches they both have on their rear belts with Anita's "Burnt Sienna". I painted the bow and the arrow shafts with Americana "Mississippi Mud", the tips of the bow with Folk Art "Barn Wood", and the sword grip with Americana "Asphaltum". Lastly, I painted the rock the left-hand Goblin has his foot on with Folk Art "Medium Grey"
 I now painted the sword with Ceramcoat "Metallic Pewter". I then painted the ball on the sword hilt with Folk Art "Metallic Blue Sapphire". When everything had had time to dry, I went back and carefully applied GW "Agrax Earthshade" wash to all the parts that weren't blue skin. I was as careful as I could be not to let it run onto the blue skin, except I applied small amounts to their eye sockets and mouths.
 After the wash had had time to dry, I went back and added highlights. I began by highlighting the skin with the original "Baby Blue". This allowed me to cover any mistakes where the wash had gotten onto the blue. Next, I added eyes with the "Buttermilk", and then added black pupils. I also used the "Buttermilk" to highlight the teeth and bones. I highlighted the tongue with a mix of the "Wedgwood" and the "Baby Blue". I then used the original clothing/armor colors to add highlights to all they were wearing. Lastly, I highlighted the blade of the sword with Folk Art "Silver Sterling". My final step was to paint the figures' bases and washers with white.
I let the Goblins sit overnight, and the next morning I gave them a coat of Ceramcoat "Matte Varnish". Later that afternoon I flocked their bases, using Woodland Scenics snow flocking. The next day I gave them a coat of Testor's "Dullcote" spray varnish.
 Another two fine looking Goblins. Jut the one girl Goblin yet to go.
Figures 129 & 130: Complete
Now I worked on some of the detail bits. First, I painted the hat on the left-hand Goblin with Folk Art "Golden Harvest". I painted their teeth Americana "Buttermilk", and the assorted teeth hanging around their necks I painted with the "Buttermilk" as well. I also used the Buttermilk" to paint the skull on the Archer Goblin. I painted the Archer's tongue with Americana "Wedgwood Blue". Next, I painted the cords on the "armor" plates and hat, the quiver strap, and the necklace cords with Ceramcoat "Maple Sugar Tan". I painted the feathers on the left-hand Goblin's hat with Folk Art "Burgundy" as well as the fletchings on the Archer's arrows, and the pouches they both have on their rear belts with Anita's "Burnt Sienna". I painted the bow and the arrow shafts with Americana "Mississippi Mud", the tips of the bow with Folk Art "Barn Wood", and the sword grip with Americana "Asphaltum". Lastly, I painted the rock the left-hand Goblin has his foot on with Folk Art "Medium Grey"
I let the Goblins sit overnight, and the next morning I gave them a coat of Ceramcoat "Matte Varnish". Later that afternoon I flocked their bases, using Woodland Scenics snow flocking. The next day I gave them a coat of Testor's "Dullcote" spray varnish.
Figures 129 & 130: Complete
Monday, December 8, 2014
Norgol, Irongrave Knight: Figure 128 of 265
This week I finished up the BBEG set by painting Norgol, Irongrave Knight. This set now joins the list of Completed Sets over on the right.
I prepped this figure in the usual way; soaking it in a dish of water with a couple drops of dish soap added, then giving it a light scrub with a soft toothbrush, and then rinsing and drying. I then glued the figure to a 1" black-primed fender washer with Aleene's Tacky glue, and glued the washer to a tongue depressor with a couple drops of Elmer's White Glue.
 I then painted him all black. I avoided the cloak's interior as best I could, but didn't worry too much if some black got on it. When the black was dry, I went back over the figure and drybrushed throughly it with Ceramcoat "Metallic Pewter".
 I then touched up anywhere the metallic drybrushing had gotten on the shoulder fur, or the cloak's exterior, with more black. Next, I drybrushed the fur with Folk Art "Medium Grey", and then drybrushed the outer portion of the cloak with Duncan "Slate Blue". I then went back and touched up anywhere these colors had gotten on the armor with the "Metallic Pewter" color
 My next step was to paint the cloak's interior lining with GW "Blood Red". The ax handle I painted Americana "Mississippi Mud", and the belt I painted Ceramcoat "Walnut".
 I then gave the cloak's lining, and the ax handle, a wash with thinned Winsor-Newton "Peat Brow" ink. While this dried, I painted the skull on his chest armor and the one on his ax with Ceramcoat Bronze. I then went back and added highlights to these with Ceramcoat "14K Gold". Lastly, I added highlights to the armor and the ax with Folk Art "Silver Sterling". I then painted any exposed white on the figure's integral base with the "Walnut". I intentionally did not highlight the red lining of the cloak since most of it hung in shadow, I felt it would look odd with highlighting.
The next morning I gave it coat of Ceramcoat "Mate Varnish". Later that afternoon, I flocked the base. The following day, I sprayed the figure with "Testor's Dullcote".
 I'm very pleased with how this guy turned out for what was a very quick and simple paint job. He's got a good menacing attitude about him.
This week, I get back to work on the Pathfinder Goblins.
I prepped this figure in the usual way; soaking it in a dish of water with a couple drops of dish soap added, then giving it a light scrub with a soft toothbrush, and then rinsing and drying. I then glued the figure to a 1" black-primed fender washer with Aleene's Tacky glue, and glued the washer to a tongue depressor with a couple drops of Elmer's White Glue.
The next morning I gave it coat of Ceramcoat "Mate Varnish". Later that afternoon, I flocked the base. The following day, I sprayed the figure with "Testor's Dullcote".
This week, I get back to work on the Pathfinder Goblins.
Monday, December 1, 2014
Pathfinder Goblin Warriors: Figures 126 & 127 of 265
This week I worked some more on the We Be Goblins! Pathfinder Goblins Set, painting two of the warriors. I prepped them in the usual way; soaking in water with a bit of dish soap added, giving a gentle scrub with an old soft toothbrush, then rinsing and drying. I then glued them to 7/8" fender washers with Aleene's Tacky glue, and then glued the washers to a tongue depressor with a couple small dabs of Elmer's white glue, for ease of handling during painting.
To begin with, I painted their skin with Anita's "Baby Blue". When this was dry, I gave the skin areas a wash with thinned Iron Wind Metals "Blue Ink".
 When the ink wash was completely dry, I began painting the Goblins' outfits. I started with painting their tunics with Aleene's "Deep Khaki". Then I painted their loin "hangings/skirts" with GW "Snakebite Leather". Next, I did their "armor" plates with Accent "Mustard Seed". Their leggings I painted Citadel Foundation "Dheneb Stone", and their wrist wraps I painted Folk Art "Butter Pecan".
Now I worked on some of the detail bits. First, I painted the hair on both the Goblins with Folk Art "Medium Gray". I painted their teeth Americana "Buttermilk", and the assorted teeth hanging around their necks I painted with the "Buttermilk" as well. I also used the Buttermilk" to paint the skull and tusks(?) on the left-hand Goblin. I painted their tongues with Americana "Wedgwood Blue". Next, I painted the cords on the "armor" plates, and the necklace cords with Ceramcoat "Maple Sugar Tan". I painted the feathers on the right-hand Goblin's arms with Folk Art "Burgundy", and the pouches they both have on their rear belts with Anita's "Burnt Sienna". Finally, I painted the spear shafts with Americana "Mississippi Mud", and the sword grip with Americana "Asphaltum".
 I now painted the spear-heads, and the sword with Ceramcoat "Metallic Pewter". I then painted the ball on the sword hilt with Folk Art "Metallic Blue Sapphire". When everything had had time to dry, I went back and carefully applied GW "Agrax Earthshade" wash to all the parts that weren't blue skin. I was as careful as I could be not to let it run onto the blue skin, except I applied small amounts to their eye sockets and mouths.
 After the wash had had time to dry, I went back and added highlights. I began by drybrushing their hair with white paint. Then I highlighted the skin with the original "Baby Blue". This allowed me to cover any mistakes where wash, or the drybrushed white had gotten onto the blue. Next, I added eyes with the "Buttermilk", and then added black pupils. I also used the "Buttermilk" to highlight the teeth and bones. I highlighted the tongues with a mix of the "Wedgwood" and the "Baby Blue". I painted the hair tie on the left-hand Goblin with the "Burgundy". I then used the original clothing/armor colors to add highlights to all they were wearing. Lastly, I highlighted the blades of their spears and sword with Folk Art "Silver Sterling". My final step was to paint the figures' bases and washers with white.
I let the Goblins sit overnight, and the next morning I gave them a coat of Ceramcoat "Matte Varnish". Later that afternoon I flocked their bases, using Woodland Scenics snow flocking. The next day I gave them a coat of Testor's "Dullcote" spray varnish.
 I'm again pleased with how these fellows turned out. Three more to go.
Figures 126 & 127: Complete
To begin with, I painted their skin with Anita's "Baby Blue". When this was dry, I gave the skin areas a wash with thinned Iron Wind Metals "Blue Ink".
Now I worked on some of the detail bits. First, I painted the hair on both the Goblins with Folk Art "Medium Gray". I painted their teeth Americana "Buttermilk", and the assorted teeth hanging around their necks I painted with the "Buttermilk" as well. I also used the Buttermilk" to paint the skull and tusks(?) on the left-hand Goblin. I painted their tongues with Americana "Wedgwood Blue". Next, I painted the cords on the "armor" plates, and the necklace cords with Ceramcoat "Maple Sugar Tan". I painted the feathers on the right-hand Goblin's arms with Folk Art "Burgundy", and the pouches they both have on their rear belts with Anita's "Burnt Sienna". Finally, I painted the spear shafts with Americana "Mississippi Mud", and the sword grip with Americana "Asphaltum".
I let the Goblins sit overnight, and the next morning I gave them a coat of Ceramcoat "Matte Varnish". Later that afternoon I flocked their bases, using Woodland Scenics snow flocking. The next day I gave them a coat of Testor's "Dullcote" spray varnish.
Figures 126 & 127: Complete
Subscribe to:
Posts (Atom)