Thursday, June 30, 2016

Dragon Hatchlings: Bones II Figures

   This past week, I worked on painting the Dragon Hatchlings from the Bones II Dragon Hatchlings set.  I decided I wanted to use them as large dragons for my 10mm armies for "Bear Yourselves Valiantly" mass-combat fantasy rules, so I ordered a couple extra from Reaper so I could make a unit of 5, and have one left over to base normally for 28mm gaming purposes.  Also, since they were being used in a unit, I decided I would paint them all in a standard green dragon scheme rather than mess with all the polychromatic differences indicated in their individual names.
     I prepped the figures in the usual way; soaking them in a dish of water with a couple drops of dish- soap added, then giving them a light scrub with a soft toothbrush, and then rinsing and drying them.  I then glued five of the figures to steel bases (4 to a pair of unit sized 3" x 1.5" bases, and one to an HQ sized 1.5" x 1.5" base), and one to a 1" fender wash, all with Aleene's Tacky glue.  I then glued the washer to a tongue depressor with a couple drops of the Elmer's glue each.

      I began by painting the tops of the bodies and wings with Folk Art "Hunter Green". I then painted the undersides of the wings and bodies with Americana "Jade Green".  After those two colors had a couple hours to dry, I gave all the figures complete washes with Iron Wind Metals "Dark Green" ink using a wet brush.
   When the ink was dry, I drybrushed the tops of the bodies and wings with the "Jade Green".  I then mixed some White into the "Jade Green", and drybrushed the undersides of the wings and bodies.
     Next, I painted the insides of the mouths with Crafter's Acrylic "Tutti Frutti", and then painted the teeth White.  I then painted the eyes with "Citrus Green", and gave them Black pupils.  I then went back and carefully applied some GW "Badab Black" wash using a wet brush, to the insides of the mouths.  Lastly, I painted their sculpted bases with Ceramcoat "Walnut".
     After everything had dried overnight, I gave the figures a coat of Ceramcoat "Matte Varnish" and, when dry, flocked their bases.  Another overnight dry, and I sprayed them with Testor's Dullcote".


     I am happy with how these turned out, and they were very quick to paint.  They are fun dynamic little sculpts.

Monday, June 27, 2016

Orc Stalker: Figure 224-227 0f 266

  Over the weekend I finished up the four Orc Stalker figures from the Orcpocalypse add-on set. This leaves me with only four figures left from this set to complete.  As I have done in the past with the similarly-posed Orc figures from this set, I converted three of them to be different from the original.   In the photo below, the first one is the original figure, the second has a new sword added to his raised hand, the third has a replacement GW club added (Not sure if it was orc or troll in origin) and his other hand repositioned, and the fourth has his arms repositioned to hold a spear. from one of the Orc Hunter figures.
    I began by painting them entirely Black; and then when the Black was dry, I drybrushed the chainmail and spikey armor areas with Folk Art Metallics "Gunmetal Grey".  I then went back and used the Black to repaint the fur areas where the "Gunmetal Grey" paint had gotten on them.
     Next, I painted the furs on each of them, doing the top furs and lower fur in different colors.  I usedAnita's "Burnt Sienna", Americana "Neutral Grey", and Folk Art "Dark Brown" as my fur colors, using diferent combinations on each figure.   I then painted all their skin with Aleene's "Deep Khaki".
      Next, I painted the club and the spear shaft with Nicole's "Brown".  I then painted their teeth with Americana Buttermilk.  I then painted the belts and pouch of the first and third one with Americana "Chocolate Brown"; and used the same color to paint the sword grips and wrist wraps the second and fourth figures.   After everything had a few hours to dry, I gave all four figures a complete wash with GW "Agrax Earthshade" wash using a wet brush.
      When the wash was dry, I painted their eyes, and highlighted the teeth, with the "Buttermilk".  I then highlighted their skin with some of the "Deep Khaki" mixed with a little Aleene's "Dusty Khaki".  I highlighted the spear shaft and club with Americana "Missippi Mud".  Next, I painted the swords, and the head of the spear, with Americana "Zinc".  When these parts were dry, I went back and re-painted them wiht Accent "Princely Pewter".  I then used Folk Art Metallics "Gunmetal Grey" to highlights the swords and spear point, as well as clean up the rest of the metal parts on all four figures.  Lastly, I painted their sculpted bases with Ceramcoat "Walnut".
     After everything had dried overnight, I gave the figures a coat of Ceramcoat "Matte Varnish" and, when dry, flocked their bases.  Another overnight dry, and I sprayed them with Testor's Dullcote".
    I ended up having a busy weekend, so I cut a lot of corners in finishing these up; doing hardly any highlights.    Nonetheless,  I think they turned out pretty good for mass-unit tabletop pieces.

Figures 224-227 of 266: Complete

Thursday, June 23, 2016

Dragons Don't Share Ruined Tower: Bones II Terrain Piece

   This week I finally finished up the ruined tower from the Dragons Don't Share (DDS) add-on set.
I had originally boiled the DDS pieces back in September of last year to get the bent ones back in shape.  I have then been working on them here and there over the past nine months, and finally finished them up this week.
Even with boiling, I needed to clamp the two parts of the tower upper story when I glued them (using Gorilla Superglue) together to help make them align properly.
  Also, I had decided I strictly wanted to use this set for terrain, so I used Milliput to fill in the holes on the piece that the dragon is supposed to mount on.
   I also decided to glue the top story to the bottom of the tower, just so the pieces wouldn't be slipping and falling during game play.  I figured there was enough opening to move figures around inside if they should enter.
   I used Deco Art Traditions Artists Acrylic ""Dark Grey, Value 3" to base coat the pieces.
    The little step piece was my guinea pig piece, and I had actually started working on it back last Fall.  I had tried a couple different base coats on it before landing on the one I used.  After the base coat was applied, I gave the pieces a wash with GW "Nuln Oil" wash using a wet brush.  When the wash was dry, I drybrushed with Crafter's Acrylic "Storm Cloud Grey" first, and then Folk Art "Platinum Grey" second.
     I then gave the pieces a coat of Ceramcoat "Matte Varnish".   When the varnish was dry,  I sprayed the pieces with Testor's Dullcote.
   Here is the finished set, shown with the Female Elf Rogue figure that comes with it, to give a sense of scale.


     I'm really happy with how it came out. It's a real testament to the sculpting that it looks so good with just a ink wash and drybrushing paint job. 

Monday, June 20, 2016

Valeros, Iconic Fighter: Figure 223 of 266

   Over the weekend I finished up Valeros, Iconic Fighter; the last of the Iconics and Officially Licensed Pathfinder Miniatures set I had left to complete.  This set now joins the list of completed sets over on the right.
     This was another figure from this set that I wasn't particularly fond of. Yes, it has a great dynamic sculpt, but I just found it to be overly busy feeling; with stuff pointing in several different directions, and no real "front"to the figure.  So, I thought I would use this figure to do an experiment. I had been thinking a while about trying: painting a figure with mainly inks and washes, and I thought this would be a good opportunity to try it.
     So, I prepped the figure in the usual way; soaking it in a dish of water with a couple drops of dish-soap added, then I gave it a light scrub with a soft toothbrush, and then rinsed and dried it.  Next, I glued the figure to a black-primed 1" fender washer with Aleene's Tacky glue, and then glued the washer-mounted figure to a tongue depressor with a couple drops of the Elmer's glue.
     I began by painting the figure with Ceramcoat "Territorial Beige".  I then gave it a complete wash with GW Agrax Earthshade" wash.  When that was dry, I drybrushed it with Americana "Khaki Tan".
  I then gave his pants a coat of Iron Wind Metals "Dark Blue" ink.  When that was dry, I did his tunic with Iron Wind Metals "Dark Green" ink; and when that was dry, I did his leather armor with Iron Wind Metals "Orange" ink.
     Next, I did his shoes, and assorted pouches with Winsor Newton "Peat Brown" ink.  I then did his quiver and scabbard with  Iron Wind Metals "Red" ink", and when dry, I did his bow with Iron Wind Metals "Chestnut Brown" ink.  I realized there was still some cloth hanging down which I hadn't done, and I wasn't sure if it was part of the tunis or what, so I gave that a coat of Iron Wind Metals "Mid Green" ink.  I then did his hair, mouth and eye sockets, as well as the arrow fletchings,  with Vallejo "Black" ink.
     I then painted his eyes teeth, and tongue, then did highlights on his skin with a mix of the "Territorial Beige" ,and some Crafter's Acrylic "Flesh". I the painted his swords with Americana Zinc. Next, I painted the arrow fletchings with Crafters Acrylic "Storm Cloud Grey".  i then went back and painted his swords with Folk Art Metallics "Gunmetal Grey", and followed up with Folk Art Metallics "Silver Sterling" highlights.   Lastly, I painted the figure's integral base with Ceramcoat "Walnut".
   After the figure had overnight to dry, I gave it a coat of Ceramcoat "Matte Varnish".   When the varnish was dry, I flocked the base, and that evening I sprayed the figure with Testor's Dullcote.

     Well, it certainly is an interesting effect.  And I can see it useful if you wanted to get a lot of stuff done quick.  I don't, however, thinkI will be adopting a new panting style. :)

So, that wraps up the Iconics and Officially Licensed Pathfinder Miniatures set.  My plan is to do another four Orcpocalypse figures for next week, and then start in on the Pirates set.

Figure 223 of 266: Complete

Thursday, June 16, 2016

Pathfinder Red Dragon: Bonus Bones I Figure

   This week I finished up the Pathfinder Red Dragon which was a Bones I Add-On option.  I picked this fellow up recently in a trade; and since he wasn't part of my original Bones I purchase, I'm not adding him to the official count.
    We plan to use a dragon or two in our next Frostgrave game, so I thought I would paint him up in winter colors.  I thought the ruins on his base were an ideal fit for the Frostgrave setting.
    I prepped the figure by soaking all the parts for a few hours in a bowl with a little bit of dish-soap added, and then scrubbed them with a soft toothbrush and let them dry.  I then assembled the model with Gorilla Superglue.   I used a little Milliput to fill the gaps around where the wings joined the body.  Next, I glued the finished dragon to a 2" white-primed fender washer.
      I began by painting the underbelly, and the underside of the wings with Crafter's Acrylic "Cool Blue".  I then painted the rest of the body, and the tops of the wings with Crafters Acrylic "Tropical Blue".
     When the paint was dry, I gave the entire dragon a wash with some thinned Iron Wind Metals "Dark Blue" ink. When the ink wash was dry, I drybrushed the underbelly and the undersides of the wings with the "Cool Blue". Next, I drybrushed the tops of the wings and the rest of the body with Americana "Salem Blue".  I then painted all the horns and claws on the dragon with Folk Art "Cloudy Day".
     Next, I painted the inside of the mouth with Crafter's Acrylic "African Violet".  I then painted the teeth with Americana "Bleached Sand".   Then I painted the ruins on the base with Americana "Zinc".  I let everything dry, then gave the horns, claws, and the ruins a wash using GW "Badab Black wash using a wet brush.   I then gave the mouth and teeth a wash with GW "Agrax Earthshade" wash using a wet brush.
     Next, I worked on the highlights on the ruins; drybrushing first with Crafter's Acrylic "Storm Cloud Grey", and then using Folk Art "Platinum Grey".  Then I highlighted all the dragon's horns and claws using a mix of the "Cloudy Day", and Americana "Dove Grey".  I highlighted his tongue and mouth with Crafter's Acrylic "Purple Passion", and then did some lighter highlights with Apple Barrel "Apple Lavender".  I painted his eye sockets and nostrils Black, and then went back and painted in eyes with Crafter's Acrylic "Citrus Green", and then added Black pupils.  Lastly, I painted the rest of the base with White.
    When everything had overnight to dry, I gave the figure a coat of Ceramcoat "Matte Varnish" early the next morning.  Midday, I flocked the white areas with Woodland Scenics "Snow" flock and the next day I sprayed the figure with Testor's Dullcote.


    I really like how this guy turned out, though in the end I wish I had used shades of blue that were further apart on the light/dark scale for his undersides and top parts.  They ended up looking too similar in tone.

Monday, June 13, 2016

Seoni, Iconic Sorceress: Figure 222 of 266

    This weekend I finished painting up the Seoni, Iconic Sorceress, figure from the Iconics and Officially Licensed Pathfinder Miniatures Set.  Only one more figures to go from this set!
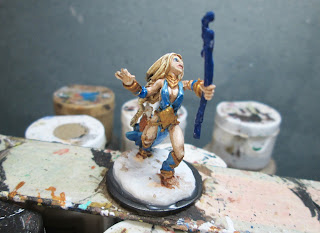
     I can't say I'm a fan of this figure, as it appears to me that the character looks like she is running for her life.  I think I'd prefer something a little braver looking if I was selecting a character for an RPG, or such.  I guess it could make a funny diorama if you showed her with a massive troll chasing after her.  I think it's something about the way the head is tilted slightly to the side, like she is attempting to glance back behind her to see just how close big stompy death is.
    So, I prepped the figure in the usual way; soaking it in a dish of water with a couple drops of dish-soap added, then I gave it a light scrub with a soft toothbrush, and then rinsed and dried it.  Next, I glued the figure to a black-primed 1" fender washer with Aleene's Tacky glue, and then glued the washer-mounted figure to a tongue depressor with a couple drops of the Elmer's glue.
  I forgot to take a starting picture, so here's the catalog picture from the Reaper site.
     I began by painting all her skin with Crafter's Acrylic "Flesh".  I then painted her clothing with Reaper MSP Bones "Tropical Blue", and her hair with Apple Barrel "Apple Maple Syrup". Next, I painted all the parts I planned to eventually paint gold with Accent "Golden Harvest".
     I then painted the little pouches hanging from her outfit, and her shoes, with Americana "Terra Cotta".  Next, I went over all the parts I had painted earlier with the "Golden Harvest, this time using Ceramcoat "Bronze".  After everything had a bit to dry, I gave the figure a wash with GW "Agrax Earthshade" wash, using a wet brush.
      When the wash was dry, I painted the eyes, and the lips, and then highlighted all the skin with the base "Flesh".  I then added a little White to the "Flesh", and did some lighter highlights.  Next i worked on the hair, highlighting it first with Americana "Moon Yellow", and the Apple Barrel "Lemon Chiffon".  I then went back and added a few White highlights to the hair.
      Next, I repainted her blue outfit with Folk Art "Metallic Blue Sapphire", and then went back and added highlights with Folk Art Pearl "Aqua Moire".   I then painted her staff and her dagger's scabbard with Crafter's Acrylic "Navy Blue".
     I painted the  two ribbons hanging from her right side,  with Crafter's Acrylic "Storm Cloud Grey", and then I did highlights on them with Folk Art "Platinum Grey". I finished them by adding White highlights.    While I had the White out, I used it to paint the twine on the staff.  I also painted the little object hanging from the staff with Apple Barrel "Yellow".   I then highlighted the little pouches hanging from her sides with Accent "Golden Oxide". I returned to work on the staff and gave the areas of twine I had painted White a wash with some GW Badab Black" wash using a wet brush".  While that dried, I worked on highlighting all the parts I had painted earlier wth the "Bronze", using Ceramcoat "14K Gold".   I then went back to the staff and highlighted the little object I had painted "Yellow", using Crafter's Acrylic "Daffodil Yellow", and then a pinpoint of White.  And, while I had the White open, I used it to highlight the twine that I had washed with the "Badab Black" wash earlier.   Next, I highlighted the staff with Ceramcoat "Denim Blue".  Lastly, I painted the figure's integral base with Ceramcoat "Walnut", and also used this color to also paint the dagger grip.
   After the figure had overnight to dry, I gave it a coat of Ceramcoat "Matte Varnish".   When the varnish was dry, I flocked the base, and that evening I sprayed the figure with Testor's Dullcote.


     Well, there she is.  This figure was very hard to photograph, as there was no natural front to it; while her body faces one way, her head faces another... and her arms are shooting off in two different directions.  Also, I ended up making a hash of her face; she looks like she has undergone too much plastic surgery.  I just didn't care enough to spend a lot of time trying to fix it.   And, stacked against her is that she was jut a mess of mold lines; and in really crappy places to try and fix, like her fingers and braids.  On the positive side, she is finished.   And I can put her behind me and turn my attention to other things.

Figure 222 of 266: Complete

Thursday, June 9, 2016

Leighlyndana, Illusionist Apprentice (Highland Heroine): Bones II Figure Conversion

  A couple weeks ago, I constructed a new Illusionist Apprentice for my Frostgrave warband, by converting the Bones II Highlander Heroine figure.   I finally got around to painting it this week.  Being an Illusionist, I wanted to try for a very bright and colorful outfit.
     I began by painting the face and hands with Crafter's Acrylic "Flesh".  I then painted the shirt with Crafter's Acrylic "Tropical Blue", and the pants with Crafter's Acrylic "Wild Green".
    Next, I painted her cape and loin cloth with Americana "Forest Green", and her boots/leggings with Americana "Terra Cotta".  I then painted her fur collar and her sporran with Americana "Dove Grey, and her buckler and the small disc at her shoulder with with Accent "Golden Harvest".
     I then worked on the tartan pattern on her cape and loin cloth.  I first painted a crosshatch pattern with Americana "True Blue", and then added a finer pattern with Crafter's Acrylic "Daffodil Yellow".  Next, I painted her hair with Apple Barrel "Burnt Sienna".  Then I worked on her staff; painting the shaft with Americana "Bittersweet Chocolate", and the head with the "Golden Harvest" I used earlier. I also painted the small section of dagger scabbard behind her buckler with Nicole's "Brown".
           I then painted all the wrappings on the staff with Crafter's Acrylic "Holiday Green", and the orb in the head of the staff with Crafter's Acrylic "Cool Blue".  Next, I painted all the bead strings hanging from the staff with assorted colors I grabbed randomly from my paint rack.  Then, after everything had a while to dry, I applied a wash with GW "Agrax Earthshade" wash using a wet brush to her head and boots.  I then applied a wash with GW "Badab Black" wash using a wet brush to the rest of her body, cape, and staff.
      When the wash was dry, I worked on highlighting her hair and painting her eyebrows.  First, I used Crafter's Acrylic"Orange Spice", and then did lighter highlights with Accent "Golden Oxide".  I then painted her eyes, and lips, then highlighted her face and hands with the base "Flesh".
     Next, I highlighted her top with the base "Tropical Blue", then added a little of the "Cool Blue", and did lighter highlights.  I moved next to her pants and highlighted them with the base "Wild Green". I then highlighted her boots/leggings with the base "Terra Cotta", followed with Ceramcoat "Raw Sienna".   I did highlights on her fur collar and sporran next with plain White.  I decided I wanted to try some brighter highlights in her hair, and added these with Apple Barrel "Lemon Chiffon".
   Then I moved to the staff, highlighting the shaft with Crafter's Acrylic "Cinnamon Brown".  I highlighted all the wraps with a mix of the base "Holiday Green", and Nicole's "Neon Green".  I highlighted the beads with the base colors I had used on them.  I then painted the orb with Folk Art Pearl "Aqua Moire".  I added a little white to the "Aqua Moire", and did some highlights on the orb.
    Next, I worked on the metals, painting the head of the staff, the buckler and other discs on her outfit, and the clasp in her hair with "Ceramcoat "Bronze".  I then did highlights on these areas with Ceramcoat "14K Gold".
    Lastly, I painted her base White.
    When everything had overnight to dry, I gave the figure a coat of Ceramcoat "Matte Varnish" early the next morning.  Midday, I flocked the white areas with Woodland Scenics "Snow" flock and the next morning I sprayed the figure with Testor's Dullcote.

   I really like how she turned out.  I think she looks exactly like I had wanted her too: a wizard who isn't afraid to use either end of her staff when danger gets up close and personal.
   And here Leighlyndana is with my Illusionist Kodak. For a brief story of their first meeting, see A New Apprentice.
       I'm really looking forward to their first outing into Frostgrave in a couple weeks.  In the meantime, old Kodak has a lot to teach his new student...