Monday, August 26, 2019

Dreadmere Townsfolk, Crone: Bones 4 Dreadmere Figure

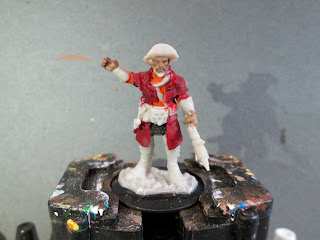
   This past week I painted the Dreadmere Townsfolk, Crone, from the Bones 4 Dreadmere Expansion.
    I prepped the figure in the usual way, soaking it in a dish of water with a couple drops of dish-soap added, then giving it a light scrub with a soft toothbrush, and then rinsing and drying it.  I then glued the figure to a black-primed 1" fender washer with Aleene's Tacky glue, and then glued her to a tongue depressor with a couple drops of Elmers glue.
     I began by painting the face, arms, and legs with an unnamed Reaper MSP Sample Paint. (Christened "Valkyrie Cheekbone" on the Facebook page.)  I then painted the skirt with Folk Art "Poppy Seed", and the blouse with Apple Barrel "Apple Maple Syrup".  After that, I painted the shoes with Reaper MSP HD "Umber Brown".
      Next, I painted her pouch with Americana "Asphaltum", and her walking stick with Americana "Mississippi Mud".  While I had this color out, I also used it to paint the entire base. After that I painted her scarf with Americana "Zinc".  I let the figure dry for a while, and then gave the whole thing a coat of Citadel "Agrax Earthshade" wash. 
     When the wash was dry, I painted her eyes, and then applied a little Citadel "Reikland FLeshshade" wash to her lips.  I then highlighted her skin with some of the Sample Paint, mixed with some Ceramcoat "White" and added some eyebrows with Americana "NeutralGrey".  After that, I highlighted her blouse with Apple Barrel  "Lemon Chiffon", and highlghted her skirt with Folk Art "Dapple Grey".
     Next, I highlighted the scarf with some Crafter's Acrylic "Storm Cloud Grey", and used some of the "Mississippi Mud" to highlight her shoes.  I then highlighted her pouch with Nicole's "Brown", and her walking stick with Ceramcoat "Territorial Beige".
      I let the figure dry overnight and the next day I gave it a coat of Americana "DuraClear Matte" varnish.    Then, when  the varnish was dry, I used some white glue to flock the base.  Another overnight dry, and I sprayed it with Testor's "Dullcote".


     This  is a nice simple figure with a lot of character, and was a nice simple one to paint.

Monday, August 19, 2019

Dreadmere Cart: Bones 4 Dreadmere Figure

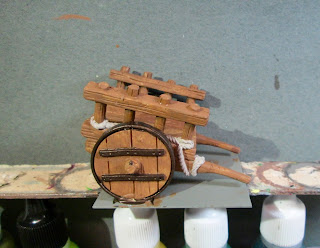
     This past week I painted the Dreadmere Cart from the Bones 4 Dreadmere Expansion.
     I prepped the figures in the usual way; soaking the parts in a dish of water with a couple drops of dish-soap added and then rinsing and drying them.  When dry, I glued the wheels to tha axle so that the card would still be able to rotate on it.  I then superglued the Crate and Barrel to an unprimed 1"x1.5" steel base, and glues the cart to a 2" x 2" grey-primed steel base using  Aleene's Tacky glue.  I then glued the cart to a tongue depressor using a couple drops of Elmer's glue, and stuck the crate and barel piece to some bluetack on a pill bottle.
     I began by painting the cart with Reaper MSP HD "Golden Brown".  I then painted the rope with Folk Art "Barn Wood", and the metal work on the wheels with Reaper MSP "Scorched Metal".
      Then, when everything was dry, I gave the entire cart a wash with Citadel "Agrax Earthsahde" wash.
     When the wash was dry, I highlighted the wood by drybrushing it with Folk Art "Butter Pecan". I then highlighted the rope with Americana "Bleached Sand", and highlighted the metal parts of the wheels by carefully drybrushing them with Folk Art Metallics "Gunmetal Grey".   Lastly, I painted the entire base with "Americana "Mississippi Mud".
       I let the cart dry overnight and the next day I gave it a coat of Americana "DuraClear Matte" varnish.    Then, when  the varnish was dry, I used some white glue to apply a sand mixture onto the base.  When that was dry, I used white glue again to flock the edges of the base.  Another overnight dry, and I sprayed it with Testor's "Dullcote".


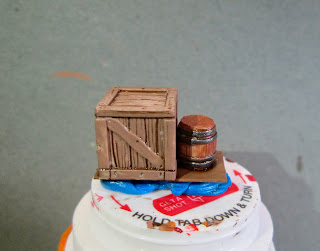
     Next, I worked on the crate and barrel.  The first thing I did was paint the steel base with some Americana "Metal Primer".
     I then painted the crate with Americana "Mississippi Mud", and the barrel with Americana "Light Cinnamon". After that,  I painted the bands on the barrel with the "Gunmetal Grey", and then did the base with the "Golden Brown".
     Then, when everything was dry, I gave the entire assembly a wash with the"Agrax Earthsahde" wash.
     When the piece was dry, I drybrushed the crate with Americana "Fawn", and the barrel with Americana "Sable Brown".  I then added some grain on the base with the "Butter Pecan".
      I let the crate and barrel assembly dry overnight and the next day I gave it a coat of Americana "DuraClear Matte" varnish.  Another overnight dry, and I sprayed it with Testor's "Dullcote".

    Very pleased with how this set turned out.

Thursday, August 15, 2019

Land Terrapin: Bones 4 Dreadmere Figure

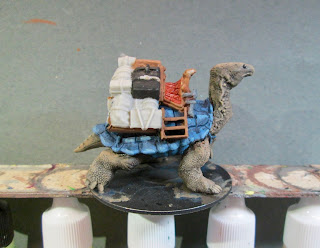
   This past week I painted the Land Terrapin figure from the Bones 4 Dreadmere Epxansion set. Perviously, I painted the Terrapin Driver, so now I can put the set together.
      I prepped the figure in the usual way, soaking the pieces in a dish of water with a couple drops of dish-soap added, then giving it a light scrub with a soft toothbrush, and then rinsed and dried it.  I then glued on the pack portion onto the terrapin's back with Gorillas superglue.  Then, I glued the figure to a black-primed 2" fender washer with the superglue, and when dry, glued the washer to a tongue depressor with a couple drops of Elmer's glue.
     The original model, comes with a lantern on a pole; in fact the same lantern that's included with Bufo the toad/frog man.   There was something about the lantern I didn't like (perhaps the corner cutting that led to them using an already sculpted lantern and not do a new one.  It also just seemed like an extraneous bit, unless you assumed he was traveling at night; a situation I never envisioned using him in.), but, whatever it was, I decided I didn't want to include it on my terrapin. So instead of a lantern, I grabbed a sword from my bits box and, with some superglue, stuck that down in the hole where the lantern went.
     I began by painting the shell with Accent "Paynes Grey", and the head, feet and tail with Vallejo Model Color "USA Olive Drab"
     I then highlighted the shell with, first, Ceramcoat "Denim Blue", and then with "Apple Barrel "Apple Scotch Blue". 
      Next, I gave the head, feet, and tail  a coat of Citadel "Nuln Oil" wash.  Then, when the wash was dry, I then highlighted the heat, feet, and tail with, first, Ceramcoat "Territorial Beige", and then Folk Art "Butter Pecan".  Next, I painted the saddle and pack structure with Reaper MSP HD "Golden Brown".
      I then painted the saddle upholstery with Apple Barrel "Burnt Sienna", and then painted the leather parts of the saddle pistol holster with Accent "Real Umber", and the metal parts with Americana "Zinc".  I then painted the pistol stock with Americana "Light Cinnamon".  After that, I began painting the objects on the pack.  I was going to use so many different colors here, I didn't bother to keep track.
     I finished painting all the items on the pack, and then painted everything that looked like a tie-down rope with Americana "Fawn", and everything that looked like a strap with Ceramcoat "Raw Sienna".   I then did the metal parts with Americana "Zinc", followed by repainting them with Folk Art Metallics "Gun Metal Grey"
     Next, I painted the pommel decoration, as well as the studs along the back of the saddle with Folk Art "Brushed Metal "Brushed Bronze".    Then, after everything dried for a while, I gave the entire saddle and pack load a coat of Citadel "Agrax Earthshade" wash.  
     When the wash was dry, I highlighted the saddle and pack frame with the "Butter Pecan", and the upholstery with Crafter's acrylic "Orange Spice".  I then highlighted all the bits on the pack.
     Next, I highlighted the metal bits, using Ceramcoat "Metallic Silver" for the "Gun Metal" parts, and Ceramcoat "14K Gold" for the "Brushed Bronze" parts.  Lastly, I painted the entire base with "Americana "Mississippi Mud".
       I let the figure dry overnight and the next day I gave it a coat of Americana "DuraClear Matte" varnish.    Then, when  the varnish was dry, I used some white glue to flock the base.  Another overnight dry, and I sprayed it with Testor's "Dullcote".   When the "Dullcote" was dry, I went back and hit its eyes with a little Americana "DuraClear Gloss" varnish.  


And here's the pair together.

     I'm really happy with the terrapin, and with how the two look together.  And I think the sword looks good as a replacement for the lantern, positioned as it is beside the shields.

Tuesday, August 13, 2019

Reaper BONES 5 Kickstarter Delayed

    I thought I'd mention, for those that haven't heard, that the BONES 5 Kickstarter has been delayed until October 1st.  If you want to get a reminder of the start, you can register here on Reaper's site to receive one: Reaper Mini Bones 5 
 
More time to save your pennies! 

Monday, August 12, 2019

Rusgo, Terrapin Driver: Bones 4 Dreadmere Figure

     This past week I painted Rusgo, Terrapin Dirver; the human figure that goes with the Land Terrapin set.  I've been looking for ward to doing the Land Terrapin set since I got my Bones 4 Kickstarter delivery, and it was one of my favorite parts of the Dreadmere set.
       I prepped the figure in the usual way, soaking it in a dish of water with a couple drops of dish-soap added, then giving it a light scrub with a soft toothbrush, and then rinsing and drying it.  I then glued the figure to a black-primed 1" fender washer with Aleene's Tacky glue, and when dry, placed the figure in my painting grip.
     I began by painting his face and hands a mix of Reaper MSP "Tanned Flesh", and Reaper MSP HD "Umber Brown".  I then painted his shirt Crafter's Acrylic "Orange Spice", and what looked like some studded armor peaking out at his waist and under his right arm with Ceramcoat "Black".   After that, I painted his coat with Americana "Cranberry Wine".
     Next, I painted his hat with Accent "Golden Harvest", and his scarf with Crafter's Acrylic "Citrus Green".  After that, I painted his boots with the "Umber Brown", and his leggings and wrist guards with Accent "Mustard Seed".
          I then painted his belts and pouches with Americana "Asphaltum", his canteen with Ceramcoat "Territorial Beige", and his scabbard with Apple Barrel "Burnt Sienna".   Next, I painted the back tucked in his belt with Americana "Mississippi Mud", and his staff with Americana "Light Cinnamon".  After that, I painted the metal parts of his staff and his scabbard/sword handle, as well as the chain around his canteen,  with Americana "Zinc".
     Next, I over-painted the metal parts I had just painted with the "Zinc", as well as the studs on his studded under-shirt, using Folk Art Metallics "Gunmetal Grey".   Then after everything had a while to dry, I gave the entire figure a coat of "Agrax Earthshade" wash.    When the wash was dry, I painted his eyes, and then highlighted his face with a mix of the base "Tanned Skin" and "Umber Brown", along with some Reaper MSP "Tanned Highlight". After that, I painted his beard and hair with the "Black"
      I then highlighted his shirt with Reaper MSP "Pumpkin Orange", and his scarf with Americana "Margarita".  Next, I highlighted his hat with Americana "Moon Yellow", his coat with Crafter's Acrylic "Deep Red", and then did some highlights on his hair and beard with  a little of the "Zinc".
     Next, I did his shoes with the "Mississippi Mud", and then his leggings and wrist guards with a mix of Ceramcoat "Maple Sugar Tan" and Ceramcoat "Raw Sienna".   I then did the highlights on his belt and pouches with Americana "Sable Brown", the highlights on his canteen with Crafter's Edition Taupe, and the highlights on the bag tucked in his belt with Americana "Fawn".  After that I did the highlights on the shaft of his staff using Americana "Khaki Tan", and then highlighted all the metal bits with Ceramcoat "Metallic Silver".   Lastly, I painted the entire base with "Americana "Mississippi Mud".
       I let the figure dry overnight and the next day I gave it a coat of Americana "DuraClear Matte" varnish.    Then, when  the varnish was dry, I used some white glue to flock the base.  Another overnight dry, and I sprayed it with Testor's "Dullcote".


     I'm very happy with how he came out.  It was a fun figure to paint.

     I plan to have the terrapin done for Thursday, so check in then to see the pair together.

Monday, August 5, 2019

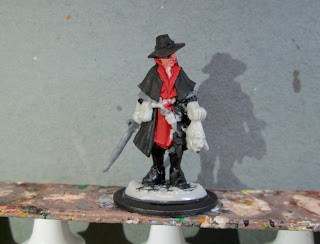
Jakob Knochengard, Bones 4 Dreadmere Figure

     This past week I painted the Jakob Knochengard figure from the Bones 4 Dreadmere Epxansion set.
 I prepped the figure in the usual way, soaking it in a dish of water with a couple drops of dish-soap added, then giving it a light scrub with a soft toothbrush, and then rinsing and drying it.  I then glued the figure to a black-primed 1" fender washer with Aleene's Tacky glue, and then glued him to a tongue depressor with a couple drops of Elmers glue.
      I began by painting his face with Americana "Shading Flesh" and his outfit with Reaper MSP Bones "Cinnamon Red".   I then painted his coat, hat, and boots, with Ceramcoat Black; and then his pants, the mail under his coat's cape, and his sword, with Americana "Zinc".
      I then painted his gauntlets, ascot and hat band with Americana "Dove Grey", and his belts and pouch with Accent "Rea Umber".  Next, I painted his flasks(?) on the back of his belt with Americana "Terra Cotta", and the cover of the book with Accent "Forest Green".  After that, I painted the pages of the book with Americana "Antique White"
      As I began to figure out (or guess at) what everything was, I got the "Zinc" out again and painted his scabbard, the metal parts of his pistol, and what is either another gun barrel or another scabbard, half under his coat.   I then painted the stock of his pistol with Americana "Light Cinnamon", and his hair with Nicole's "Brown". After that, I painted the zombie head with Americana "Reindeer Moss", and its hair with the "Black".  I then got out some Apple Barrel "Apple Maroon", and mixed that with some of the "Black" to pat the gore around the head's neck and mouth.  I followed this by  painting his badge, cross, and the amulets(?) hanging from his coat with Accent "Mustard Seed".
      I then  painted the sword, leg armor, and the chain mail on his shoulders, with Ceramcoat "Metallic Silver".  Next, I painted the scabbard and the metal on the pistol with Folk Art Metallics "Gunmetal Grey", and the badges, amulets, and cross with Ceramcoat "14K Gold".    Then after everything had time to dry, I gave the entire figure a wash with Citadel "Nuln Oil" wash.   When the wash was dry, I highlighted his face with a mix of Crafter's Acrylic "Flesh" with the base "Shadow Flesh", and I highlighted his hair with some Ceramcoat "Territorial Beige".  After that, I highlighted his red clothing with some Crafter's Acrylic "Orange Spice". 
     Next, I highlighted his cloak and hat with first some of the "Zinc", and then a little of some Crafter's Acrylic "Storm Cloud Grey".  I then highlighted his gauntlets and hat band with Americana "Snow White", and his belt and pouches with Americana "Sable Brown".  I painted the buckle on his belt and hats with the "Gunmetal Grey", and highlighted all the silver metal with the "Metallic Silver".  I highlighted the gold metal with some Ceramcoat "Wedding Gold".  I then highlighted the book cover with some Crafter's Acrylic "Holiday Green", and added some gilded decoration to it with the "14K Gold".   After that, I did some highlights on his boots and the hair of the severed head with some Citadel "The Fang", and I painted the eyes on the severed head with Americana Moon yellow".  I highlighted the head with the base "Reindeer Moss".  Lastly, I painted the entire base with "Americana "Mississippi Mud".
       I let the figure dry overnight and the next day I gave it a coat of Americana "DuraClear Matte" varnish.    Then, when  the varnish was dry, I used some white glue to flock the base.  Another overnight dry, and I sprayed it with Testor's "Dullcote".


     This is a great sculpt and really full of character.   It was a fun one to paint, and I''m happy with how it came out.