Monday, October 30, 2017

Sea Hag, Painted as Ghost Archipelago "Swamp Zombie": Bone 2 Figure

     This past week I painted the Sea Hag figure from the Bones 2 Under the Sea set to represent a "Swamp Zombie" for the Ghost Archipelago rules.
   I prepped the figure in the usual way; soaking it in a dish of water with a couple drops of dish-soap added, then giving it a light scrub with a soft toothbrush, and then rinsing and drying it.    I then glued the figure to a black-primed 1." fender washer with Aleene's Tacky glue, and then glued the washer-mounted figure to a tongue depressor with a couple drops of the Elmer's glue.
      Right before starting to paint this figure, I noticed it had a tiny octopus on it's left shoulder; so I trimmed off the oct's main body, with the hope I could paint the remaining legs to look like part of the figure's ragged clothing. In fact, I took the photo below before I noticed the octopus sitting there.
      I began by painting all the exposed skin with Americana "Reindeer Moss Green".  Next, I painted the remains of the dress with Crafter's Acrylic "Forest Green", and then the hag's hair with Apple Barrel "Apple Black Green".
     Next, I painted dried blood splatter here and there with Ceramcoat "Black Cherry".  I let everything dry for a while and then gave the figure a wash with Citadel "Agrax Earthsahde" wash.   When the wash was dry, I painted the eyes with Crafter's Acrylic "Light Antique White", and then highlighted the skin with Some Ameircana "Jade Green" mixed with some of the "Light Antique White.
     I then drybrushed the hair with Crafter's Acrylic "Holiday Green", and highlighted the clothing with Crafter's Acrylic "Citrus Green".  After that I added fresher looking blood  to all the spatter areas using Reaper MSP "Holly Berry". I decided at that point that I wanted more variation in the stuff draped all over her, so some of it might look like swamp vegetation, so I gave some of the more stringy parts of what she's wearing a wash with some Citadel "Dark Green" ink.
     Lastly, I painted the figure's integral base with Ceramcoat "Walnut".
     I let the figure dry overnight and the next morning I gave it a coat of Americana "DuraClear Matte" varnish. When that was dry, I flocked the base. Another overnight dry, and I sprayed it with Testor's Dullcote".  When the Dullcote was dry, I went back and painted the hair and some of the hanging material with some Americana "DuraClear Gloss" Varnish.
     I'm pleased with the results on this figure.  It certainly looks like the kind of zombie one would expect to crawl out of a swamp in my opinion! 

Monday, October 23, 2017

Giant Ticks: Bones 3 Figures

     This past week I painted up a pair of the Giant Ticks from the Bones 3, 24 Bonus Figures set, as part of my continuing effort to prepare some of the monsters I'll need for next year's Ghost Archipelago campaign.
      I prepped these figures in the usual way; soaking them in a dish of water with a couple drops of dish-soap added, then giving them a light scrub with a soft toothbrush, and then rinsing and drying them.   I then cut down their bases a little, and then glued the ticks to black-primed 7/8" fender washers with Aleene's Tacky glue; and then glued the washer-mounted figures to a tongue depressor with a couple drops of the Elmer's glue under each washer.
      I began by painting both figures and their integral bases with Accent "Real Umber".  After that, I painted their backs with Americana "Leaf Green".
     When the "Leaf Green" was dry, I over painted it with Folk Art "Metallic Emerald Green".  Then, when everything had a while to dry I gave both figures a complete coat of Citadel "Nuln Oil" wash".   When the wash was dry, I first highlighted their main bodies with Americana "Mississippi Mud"; then after that, I highlighted their backs with some of the "Metallic Emerald Green" mixed with Ceramcoat "Metallic Silver".  Lastly, I painted in tiny eyes with some Reaper MSP "Holly Berry".
     I let the figures dry overnight and the next day I gave them a coat of Americana "DuraClear Matte" varnish.    Then, when  the varnish was dry, I used some white glue to flock their bases.

     Well, they're not anything special, and I didn't devote a whole lot of time to them; but I think they will do very nicely as Ghost Archipelago "Jungle Ticks".

Monday, October 16, 2017

Fly Demons Painted as Giant Bees: Bones 2 Figures

   This past week I painted two of the Fly Demons from the Bones 2 Lesser Demons set, as part of my effort to start assembling the creatures I will need for next year's Ghost Archipelago Campaign.  The rules' creature list calls for a couple of Giant Wasps; but not having any giant wasp figures on hand, I figure the Bones Fly Demons I had would fit the bill well enough if I painted them as Giant Bees.
      I prepped these figures in the usual way; soaking them in a dish of water with a couple drops of dish-soap added, then giving them a light scrub with a soft toothbrush, and then rinsing and drying them.   I then did the conversion work, and then glued the figures to black-primed 1" fender washers with Aleene's Tacky glue, and then glued the washer-mounted figures to a tongue depressor with a couple drops of the Elmer's glue under each washer.
      I began by painting the bees' heads, undersides, and alternating stripes on their abdomens using Black.  When the Black was dry, I drybrushed it with Americana "Neutral Grey".  I then painted the unpainted alternate stripes on their abdomens with Apple Barrel "Yellow".
      Next, I painted the wings with Americana "Dove Grey".  Then after everything had a while to dry, I gave their wings and the yellow stripes a wash with some thinned Winsor-Newton "Chestnut Brown" ink.  When the wash was dry,  I painted the top spine of each wing with Black and then painted the veins within each wing using some Accent "Real Umber mixed with Black.
     I then painted the center of each wing panel with the"Dove Grey", and did highlights on the mouth and tongue(?) with Crafter's Acrylic "Storm Cloud Grey".  Next, I repainted the eyes with Black to remove any drybrushing that got on them.   After that, I drybrushed the yellow abdomen stripes with some Crafter's Acrylic "Daffodil Yellow", and lastly I did some White highlight dots in the eyes..
     It was now time to work on the base.  First, I drybrushed the the rocky outcroppings with the "Neutral Grey", and then with some Folk Art "Porcelain White".  Next, I drybrushed the log with Americana "Raw Umber", and then with some Americana "Khaki Tan".  Lastly, I painted the skulls with some Americana "Antique White", and then drybrushed them with some Crafter's Acrylic "Light Antique White".
    I then worked on the bases; drybrushing the stones with  Americana "Zinc", then Americana "Neutral Grey", and lastly Folk Art "Porcelain White".  After that, I drybrushed the log with Americana "Raw Umber", then some Americana "Mississippi Mud", and lastly, some Americana "Khaki Tan".   Finally, I drybrushed the skulls with some Americana "Antique White, and then some of the "Light Antique White".
      I let the figures dry overnight and the next morning I gave them a coat of Americana "DuraClear Matte" varnish. When that was dry, I flocked their bases. Another overnight dry, and I sprayed them with Testor's Dullcote".


     I'm generally happy with how these turned out.  I think they made the conversion to giant bees pretty well.

Thursday, October 12, 2017

Undying Lords: Elves, Dwarves, and Halflings Group Photo

  Last week when I posted my completed Halfling Rogues from the Bones 3 Undying Lord set, one of my readers suggested that I post a group photo of all three of the Undying Lords pairs I had painted these past three weeks: Halflings, Dwarves, and Elves.
  I thought it was a great idea, so here it is.  This gives you a better idea of the comparitve size of the three types of figures.
 I also thought to take a group shot with one of the Human skeletons from the Bones 2 Shambling Dead set to give an idea of how they stack up against a regular man-sized figure.

Monday, October 9, 2017

Undead Halfling Rogue & Conversion: Bones 3 Figures

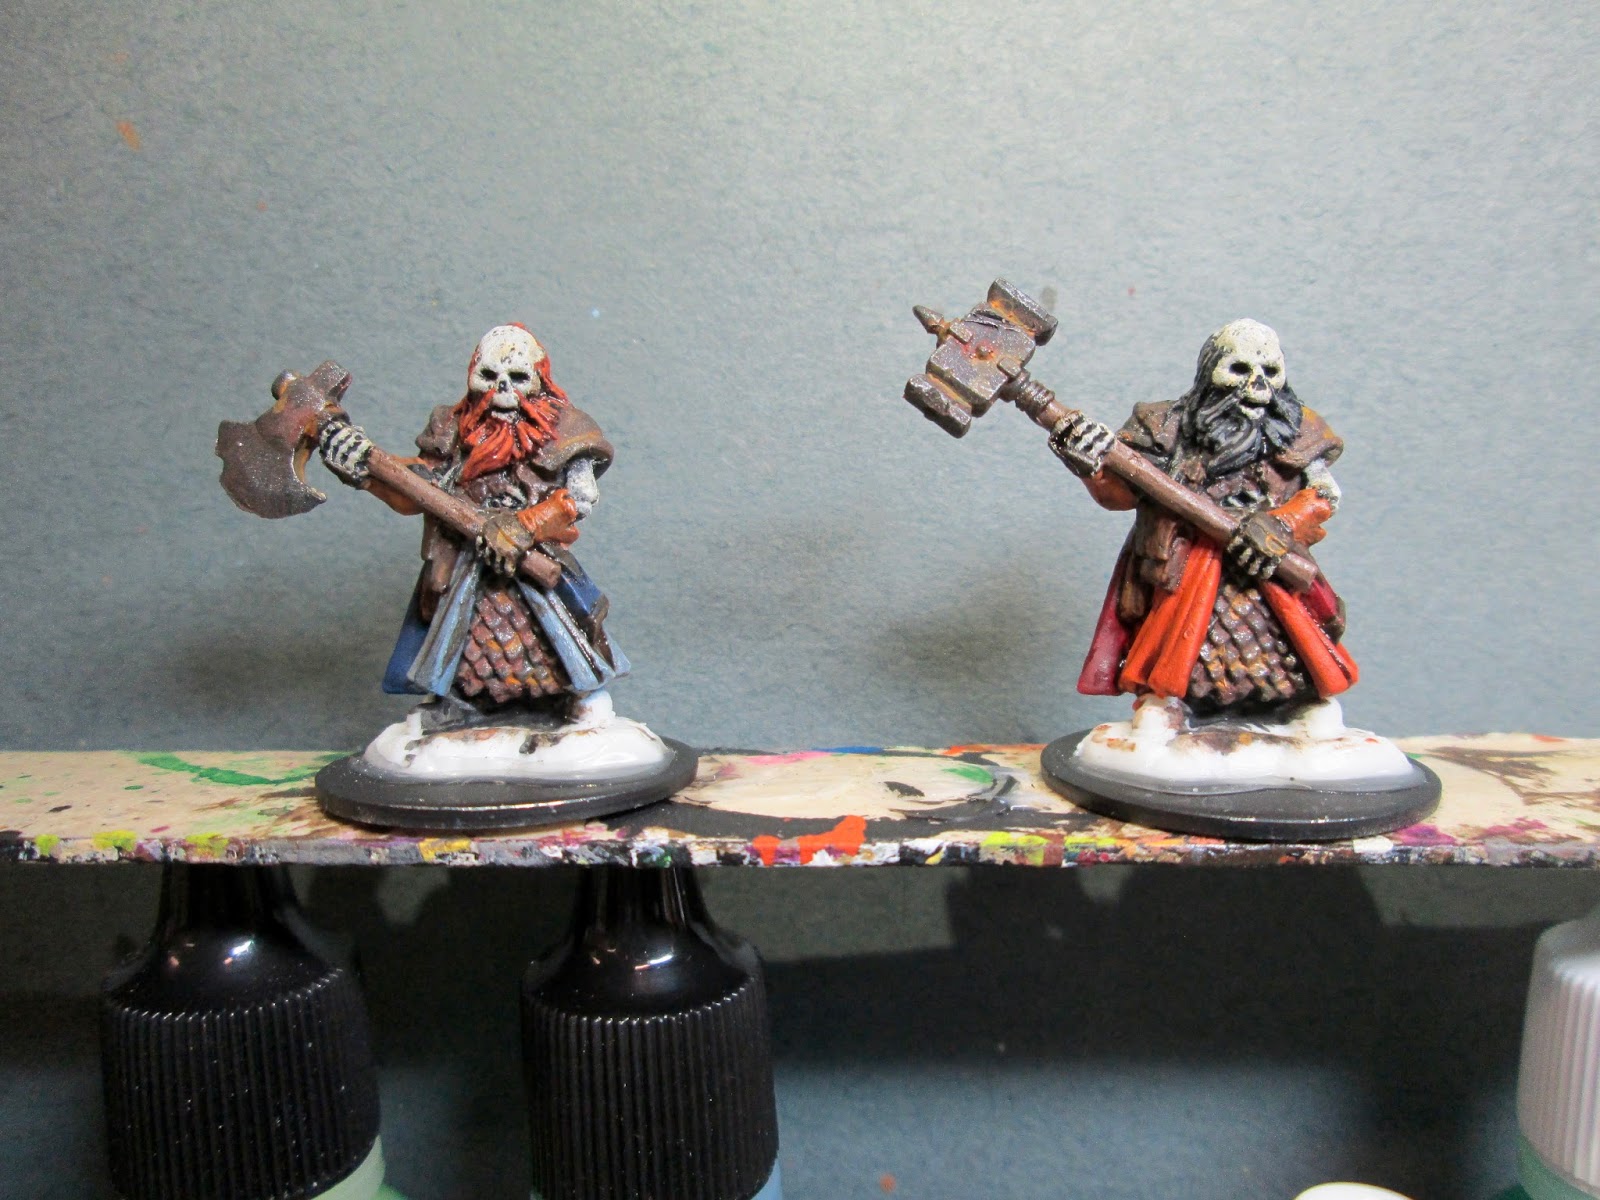
    This past week I finished working on my current project of painting the Elves, Dwarves, and Halflings from my two Bones 3 Add-On Undying Lords sets; and painted the Halfling Rogue; one basic one, and one I modified by changing the sword  to a spear, and removing the axe.  There are still the Undying Lord of Death, the Undying Minotaur and Undying Lizardfolk from these sets; but they will all have to wait for another time.
     To read last week's post where I painted the two Undead Dwarf Fighters, click here: Undead Dwarf Fighters.  To see my two Undead Elf Archers from two weeks ago, click here: Undead Elf Archers
      I prepped these figures in the usual way; soaking them in a dish of water with a couple drops of dish-soap added, then giving them a light scrub with a soft toothbrush, and then rinsing and drying them.   I then did the conversion work, and then glued the figures to black-primed 7/8" fender washers with Aleene's Tacky glue, and then glued the washer-mounted figures to a tongue depressor with a couple drops of the Elmer's glue under each washer.
       I began by painting the metal parts, and skeletal parts with Black.  I then drybrushed the skeletal parts with Americana "Antique White", followed by a light drybrushing of Crafter's Acrylic "Light Antique White"
     Next, I painted the shirt on the lefthand one with Americana "Khaki Tan", and then did his pants with Crafter's Acrylic "Forest Green", and his cape with Aleene's "Deep Khaki".  I then moved on to the righthand one, and did his shirt with Accent "Golden Harvest", his pants with Vallejo "USA Olive Drab", and his cape with Anita's "Burnt Sienna".
      I then painted the spear shaft, and axe handle with Americana "Mississippi Mud", and then painted all the metal parts with Americana "Bittersweet Chocolate".  I also used this color to paint the grip on the sword.  Then after everything had a while to dry, I gave the two figures a wash with Citadel "Agrax Earthshade" wash, doing as best I could to avoid getting any on the skeleton parts.
     Once the wash dried, I began highlighting.  I worked on the lefthand one first, highlighting his shirt with Americana "Bleached Sand", his pants with Americana "Jade Green", and his cape with Apple Barrel "Apple Maple Syrup".  Next I did the righthand one, highlighting his shirt with Apple Barrel "Lemon Chiffon", his pants with Ceramcoat "Territorial Beige", and his cape with Americana "Burnt Orange".  Next, I worked on the rust effects on the weapons, first using Duncan Aged Metal "Iron" to apply some reddish rust patches, and then applying some Accent "Golden Oxide".  I also did a little highlighting on the spear shaft with Folk Art "Barn Wood".  Lastly,  I painted their integral bases with Americana "Charcoal Grey".
     When I was done painting the figures, I used some white glue to glue a mixture I made of some fine brown sand, and courser black sand to the base.  When this was dry, I drybrushed the sand and the figures' own bases with Ceramcoat "Territorial Beige", and then with some Americana "Antique White".  When dry, I glued on some bits of grass tufts.
      I let the figures dry overnight and the next day I gave them a coat of Americana "DuraClear Matte" varnish.  Another overnight dry, and I sprayed them with Testor's Dullcote"

     I'm really pleased with how these guys turned out.  I'm looking forward to having a chance to use all these different skeletons in a game at some point.

Monday, October 2, 2017

Undead Dwarf Fighter & Conversion: Bones 3 Figure

   This past week I continued working on my Bones 3 Add-on Undying Lords sets, and painted the Dwarf Fighter; one basic one, and one I modified by changing the Axe to a Hammer.
    To read last weeks post where I painted my two Undead Elf Archers, click here: Undead Elf Archers.
      I prepped these figures in the usual way; soaking them in a dish of water with a couple drops of dish-soap added, then giving them a light scrub with a soft toothbrush, and then rinsing and drying them.   I then did the conversion work, and then glued the figures to black-primed 1" fender washers with Aleene's Tacky glue, and then glued the washer-mounted figures to a tongue depressor with a couple drops of the Elmer's glue under each washer.  
     I began by painting the metal parts, and skeletal parts with Black.  I then drybrushed the skeletal parts with Americana "Antique White", and I drybrushed the metal parts with Americana "Bittersweet Chocolate".
     I then hit the skeletons with a light drybrushing of Crafter's Acrylic "Light Antique White".  Next, I used some Duncan Aged Metal "Iron" to apply some reddish rust patches to the armor and weapons.  After that, I painted the left one's tabard with Folk Art "Settlers Blue", and cape with Crafter's Acrylic "Navy Blue"; and the right ones tabard with Crafter's Acrylic "Orange Spice", and cape with Ceramcoat "Black Cherry".
          Next, I painted their writ guards with Americana "Terra Cotta", and the shafts of their weapons with Americana "Mississippi Mud".  I then painted the left one's hair with ,Anita's "Raw Sienna" and the right one's hair with Black.  After that, I painted their pouches, with Americana "Asphaltum" and then went back and painted their scabbards the same color as their capes.   I also splotched some Accent "Golden Oxide" on their armor to add to the rust effect.
     I gave them a while to dry, and then I applied a wash with Citadel "Agrax Earthsahde" wash to their clothing, hair, weapons shafts, and wrist guards.     When the wash was dry, I gave the armor and weapons a light drybrushing with Folk Art Metallics "Gunmetal Grey".  I then highlighted the left one's beard and hair with Americana "Burnt Orange", and I highlighted the right one's beard and hair with Americana "Neutral Grey".   I also painted more distinct nose holes on each of the skulls.
     Next, I highlighted the left one's tabard with with Crafter's Acrylic "Cool Blue", and highlighted his robe with Ceramcoat "Demin Blue".  On the righthand one I highlighted the tabard with Americana "Tangerine", and the robe with Reaper MSP "Holly Berry".   I then highlighted the wrist guards with some of the "Golden Oxide".   I realized I hadn't painted the boots; so gave them a quick coat of black, and when that was dry I highlighted them with the "Neutral Grey".   Lastly, I painted their integral bases with Americana "Charcoal Grey".
     I let the figures dry overnight and the next day I gave them a coat of Americana "DuraClear Matte" varnish.    Then, when  the varnish was dry, I used some white glue to glue a little coarse sand to their bases.  When this was dry, I painted the sand and the washer with  the "Bittersweet Chocolate".  When that was dry, I drybrushed the base with some of the "Mississippi Mud", and then some Folk Art "Barn Wood".

     I'm really happy with how this pair turned out.   As you can see, with the realization that our Frostgrave Campaign will be coming to an end soon, and we will be heading to the Ghost Archipelago next year, I have switched the basing for these skeletons from my usual gray theme (like I used on last week's Undead Elves) to a more general purpose grayish-brown.