Monday, December 28, 2015

IMEF Torch McHugh and Sarah Blitzer: Figures 188 & 189 of 265

   This week I completed the IMEF set and painted the Torch McHugh and Sarah Blitzer figures. I now will move on to the Bedeviled set.
      I prepped the figures in the usual way; soaking them in a dish of water with a couple drops of dish- soap added, then giving them a light scrub with a soft toothbrush, and then rinsing and drying them.  I then glued the figures to black-primed 1" fender washers with Aleene's Tacky glue, and then glued the washer-mounted figures to a tongue depressor with a couple drops of the Elmer's glue.
      I began by painting the figures with Ceramcoat "Territorial Beige".  I then painted their faces with  Americana "Shading Flesh"; and their gloves,  knee pads, one of the pouches at their waists, and their elbow pads with Americana "Asphaltum".  I also painted the heat shield pads on the flamethrower figure with Americana "Neutral Grey"
     I then painted some of the parts of their guns, and some of the items on the first figure's back, with Americana "Khaki Tan".   I also painted their pouches, as well as the tubing on the flamethrower, with Americana :Mississippi Mud".  I then did a camouflage pattern all over their armor as a repeated series of three small dots using first, Folk Art "Porcelain White", then Folk Art "Dark Brown". Next, I painted the flamethrower guy's hair with Crafters Acrylic "Orange Spice", and the girl's hair with Accent "Mustard Seed".   The goggles on the flamethrower guy I painted with Crafters Acrylic "Bright Yellow".
      I then gave the figures a wash with GW "Agrax Earthshade"wash using a wet brush.
      When the wash was dry, I drybrushed all the armor, and the guns with Americana "Buttermilk". I then painted the small insignia on the guy's chest plates, and the head pieces on both figures, with Black, and then drybrushed all the Black with Folk Art "Settlers Blue".  I also painted a triangular insignia on the girl's right shoulder with the "Bright Yellow"; and added small red dots with Crafters Acrylic "Christmas Red" to her headpiece, to represent a laser sight.    Next, I painted her eyes, and then did highlights on their faces with the "Shading Flesh".  I then did highlights on all the gloves, knee and shoulder pads with Crafters Edition "Spice Brown", and on the heat shields with Folk Art "Grey Green".  Lastly, I painted their bases with Ceramcoat "Walnut".
          When everything had overnight to dry, I gave the figures a coat of Ceramcoat "Matte Varnish".  Then, when that was dry, I spread some white glue on the bases, and dunked them in a sand mixture.  When the sand mixture on the bases was dry, I painted the sand first with Americana "Charcoal Grey", then dry brushed it with GW "Khemri Brown", then Ceramcoat "Raw Sienna", and lastly Americana "Buttermilk".   The next day, I sprayed the figures with Testors Dullcote".
    I'm very pleased with how they turned out.   Below is a picture of the whole set.  They now join the list of completed sets over on the right.
Figures 188 & 189: Complete

Monday, December 21, 2015

Darkrasp, Evil Priest to Santa Claus Conversion: Figure 187 of 265

    Back at Historicon of 2013, I traded my Bones Griffon to a friend for a couple of his figures, including the Darkrasp, Evil Priest from the Dark Heroes set. (You can see these changes to the count total on the list at the upper right of this blog.) When I had first seen this figure, back when my Kickstarter had arrived, something about its appearance read "Santa Claus" to me; especially with the long "list" he holds in his left hand, obviously containing the names of those who'd been naughty.  So, when I had the chance to get an extra one, I took it; with the thought of some day converting it into a Santa Claus figure.  Well, with the onset of my Frostgrave addiction, that day finally rolled around; as I decided I wanted to make a Santa themed warband, and I selected this fellow to lead it. And, given the season of the year, it seemed the perfect time to paint him.
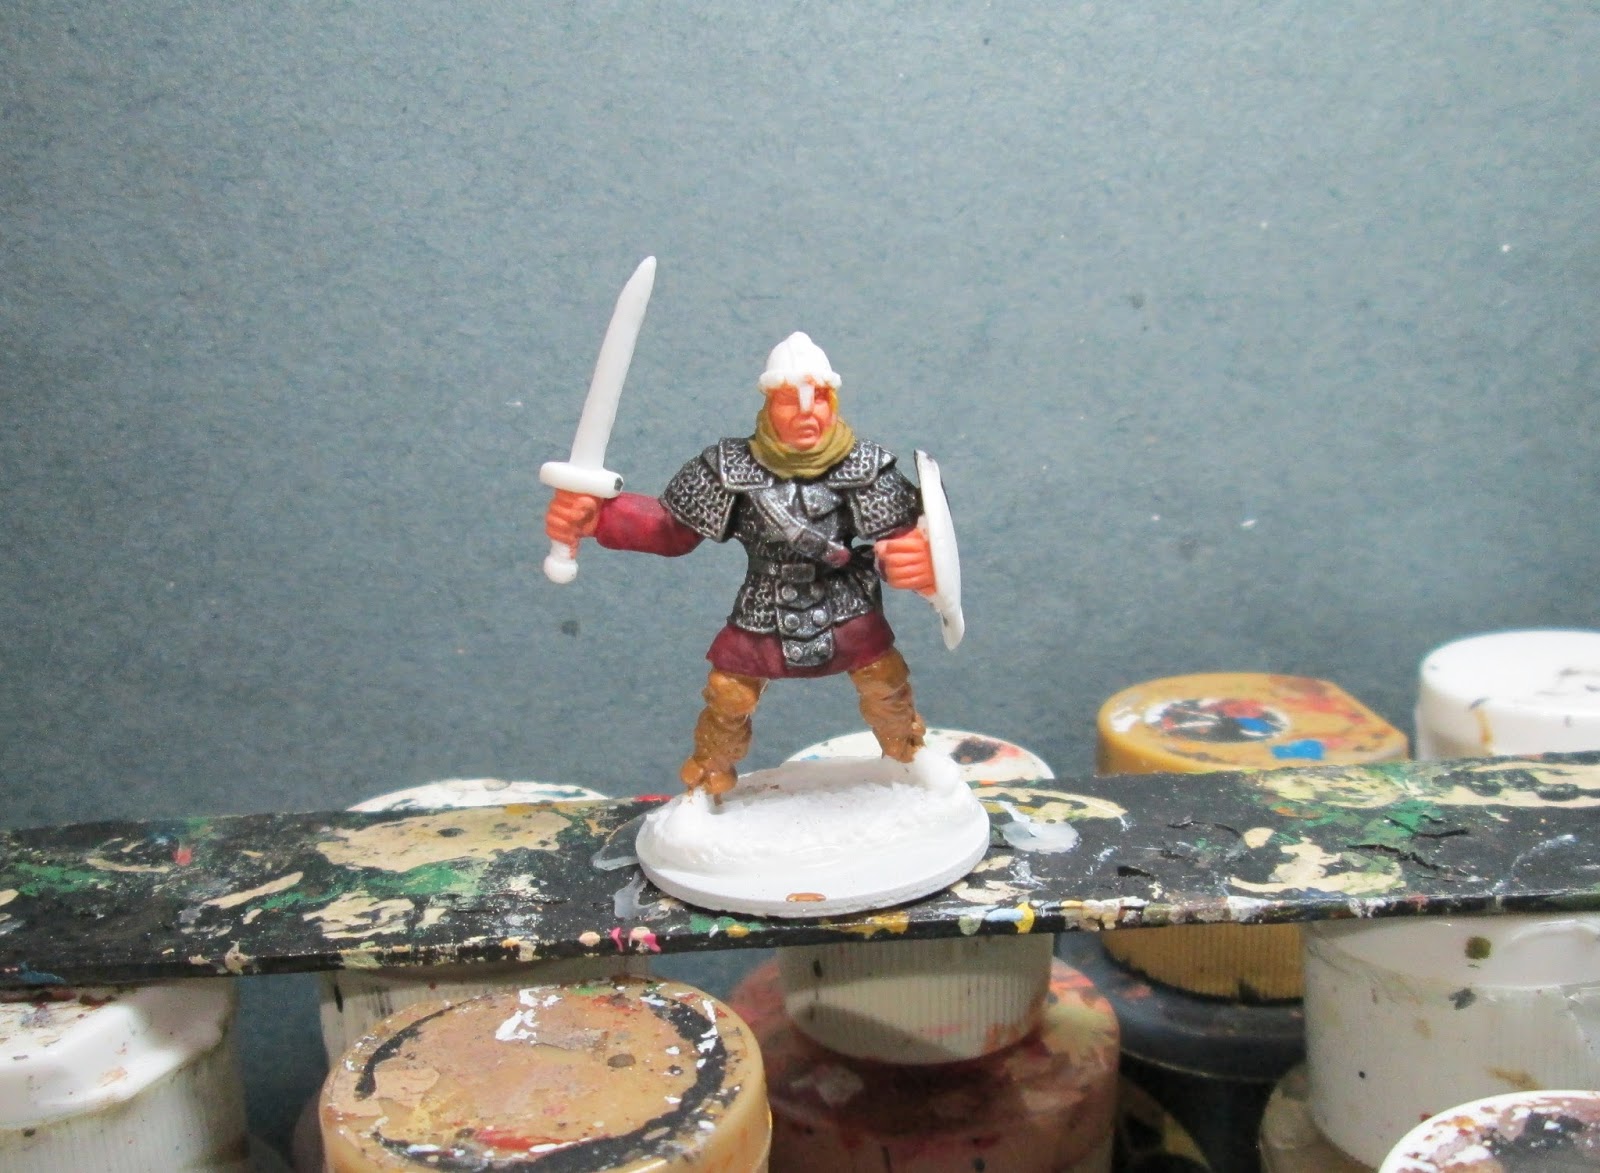
     First,  I prepped the figure in the usual way; soaking it in a dish of water with a couple drops of dish- soap added, then giving it a light scrub with a soft toothbrush, and then rinsing and drying it.  I then had to make some changes to the figure to move him a little closer to Santa, and a little further from Evil Priest. I began by cutting off the blade and skull top of his scythe, turning it into more of a wizard's staff.  I then glued a small piece of lead shot to the end to make it resemble a stylized North Pole.   Next, I cut the bone-like ends off of the roll his scroll is wrapped around.  Lastly, I took some Tacky glue and layered it onto the front of the scroll in an effort to lessen the appearance of the runes that are carved into it, as my plan was to list "naughty" names on it.   I then glued the figure to a white-primed 1" fender washers with Aleene's Tacky glue, and then glued the washer-mounted figure to a tongue depressor with a couple drops of the Elmer's glue. I finished the prep with painting the little round shot on the end of his staff with some clear metal primer.
      I began by painting his entire outfit with Apple Barrel "Apple Blue Spruce"  I then painted his face and hands with Americana "Shading Flesh", and his scroll with Americana "Buttermilk".
     I wasn't happy with the look at this point, as I felt the all-green outfit didn't read Santa enough.  I had chosen the green because I planned to paint his staff in a series of red and white stripes, and I thought that if I painted his outfit red too, the staff might get lost visually.  At that point I made the decision to try a red outfit anyway, so repainted his robes with Apple Barrel "Apple Maroon", and left his cape and hood the original color.  I then painted the shadows on the robe with Americana "Cranberry Wine", and did highlights with Americana "Burgundy Wine".  These highlights really didn't show enough, so I mixed some Crafters Acrylic "Tutti Fruitti" (a bubblegum pink color)  with the "Burgundy Wine" to lighten it.   I then gave his face, hands, and his scroll a wash with GW "Agrax Earhshade" wash using a wet brush.
     Next, I did highlights on his cape and hood with some of the "Apple Blue Spruce" mixed with the much lighter, Folk Art "Gray Green".  Then, I painted the borders on his hood and sleeve cuffs, as well as the white stripes on his staff and the ball at the top,  with Folk Art "Platinum Grey".   I then highlighted all these with White.  I next painted his beard and the object hanging from his front chain (which I planned to paint as a lantern) with Americana "Neutral Grey".   Afterwards, I painted the red stripes on his staff with Crafters Acrylic "Christmas Red".
     I highlighted the red stripes on the staff by mixing a little of the "Tutti Fruitti " with the "Christmas Red".  I then painted the ball on the top of the staff with Folk Art Extreme Glitter "Hologram", in attempt to give it a snow-globe appearance.  Next, I highlighted his beard with Crafters Acrylic "Storm Cloud Grey", and then some of the "Platinum Grey".  I painted his eyes, then highlighted his face and hands with the original "Shading Flesh".  I then mixed a little of the "Burgundy Wine" into the "Shading Flesh" to give him, "a nose like a cherry". Next, I painted the roll his scroll list is wrapped on with some Crafters Acrylic "Cinnamon Brown", and then highlighted the scroll list itself with some Crafters Acrylic "Light Antique White". I then used a ultra-fine point permanent marker to to write "Naughty", and a list of "names" on the scroll. I moved now to the lantern, painting a small glowing circle with White, then painting around this small White area with Apple Barrel "Yellow", and further around this "Yellow" with Crafters Acrylic "Pure Pumpkin.  I then mixed some of the "Pure Pumpkin" with the "Neutral Grey" to try and blend it into the shadowy area of the lantern.
      I then painted  all his chains, and the top and bottom of the lantern, with Ceramcoat "Bronze", then went back and highlighted these with Ceramcoat "14K Gold". I then gave the top and bottom of the lantern a light wash with some GW "Badab Black" wash using a wet brush, to help define them a little better.  Lastly, I used White to  paint the base, especially anywhere that I had accidentally gotten other colors.
      When everything had overnight to dry, I gave the figure a coat of Ceramcoat "Matte Varnish".  Then, the next morning, I flocked the base with Woodland Scenics "Snow" flock.  Later that afternoon I sprayed the figure with Testor's Dullcote.

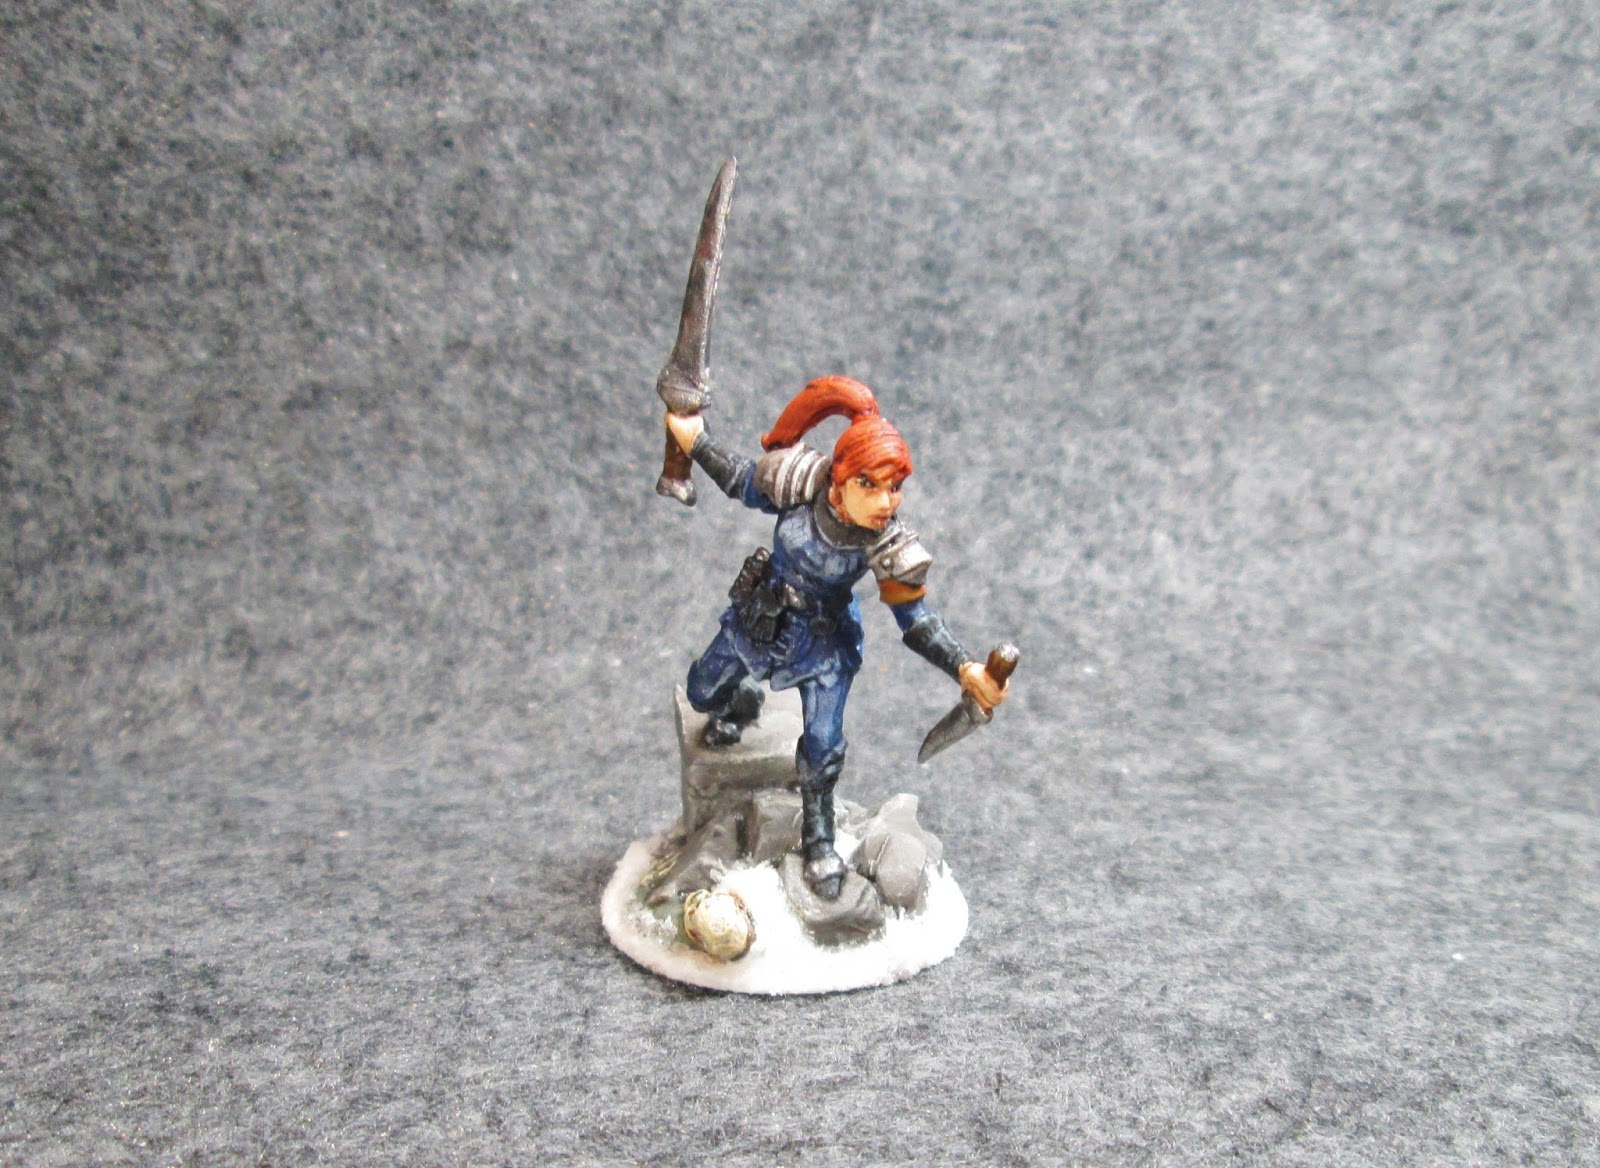
   I'm very happy with how this figure turned out.  I think it really makes for a unique and fierce looking Santa, and will be perfect for my Frostgrave collection.

Figure 187 of 265: Complete

Thursday, December 17, 2015

Bones II: Female Elf Rogue From Dragons Don't Share

   This week I also painted the Female Elf Rogue from the Dragons Don't Share Set.  If ever there was a figure destined to be used for Frostgrave, this is it; posed as she is, nimbly climbing down a pile of ruins with a skeleton laying half buried nearby.
      I prepped the figure in the usual way; soaking it in a dish of water with a couple drops of dish- soap added, then giving it a light scrub with a soft toothbrush, and then rinsing and drying it.  I then glued the figure to a white-primed 1" fender washers with Aleene's Tacky glue, and then glued the washer-mounted figure to a tongue depressor with a couple drops of the Elmer's glue.
    I began by painting the ruins on the base with Americana "Neutral Grey".  I then painted her outfit with Crafters Edition "Navy Blue", and then her face and hands with Crafters Edition "Flesh".
     Next, I gave the ruins on the base a wash with GW "Badab Black" wash using a wet brush.   When this was dry, I painted the figure's boots, arm guards, pouches and belts with Black.  I then drybruhed all the blue and black parts with Folk Art "Settlers Blue".
   I worked on the ruins some more at this point, drybrushing them first with Crafters Acrylic "Storm Cloud Grey", and then with Folk Art "Platinum Grey".  Then I painted her hair with Anita's "Burnt Sienna", and the grips on her weapons with Americana "Asphaltum".  Next, I painted the skeleton head and hand with Americana "Buttermilk", and what appeared to be a sleeve and shoulder of a garment with Folk Art "Dapple Grey".    I then gave a wash to her head, hair, hands, and the skeleton and his partial garment, using GW "Agrax Earthshdae", using a wet brush.  I then painted her shoulder guards and the studded band on her boots with Ceramcoat "Metallic Pewter", and the blades on the two weapons with Folk Art "Gun Metal Grey".  Before I moved on to the highlighting, I gave her shoulder pads a quick wash with the "Badab Black".
         I then moved on to the highlights.  First, I drybrushed her hair with the base "Raw Sienna", then added highlights with Crafters Acrylic "Orange Spice".   I then painted her eyes, and gave her Americana "Shading Flesh" lips.  Afterwards, I highlighted her face and hands with the base "Flesh".  I then painted the band on her left arm with GW "Vermin Brown" and then highlighted it with Citadel "Snakebite Leather".  I highlighted the skeleton with Crafters Acrylic Light Antique White", and his partial outfit with Folk Art "Gray Green" .   I then highlighted all the metal parts with Folk Art "Silver Sterling".  Lastly, I painted the outer edge of the base "White", and added some "White" splotches here and there between the ruins.
      When everything had overnight to dry, I gave the figure a coat of Ceramcoat "Matte Varnish".  Later that afternoon I flocked the white areas with Woodland Scenics "Snow" flock.   The next day, I sprayed the figure with Testor's Dullcote.

    I'm really happy with how this figure turned out.  I think she will make a great edition to a Frostgrave warband.

Monday, December 14, 2015

IMEF's Nick Stone, Jazz Jenkins, and Erik Proudfoot: Figures 184-186 of 265

    This week I did three more of the IMEF Set; the Nick Stone, Jazz Jenkins, and Erik Proudfoot figures.  Readers may remember I just did the first of this set, Regge Van Zandt, last week as a test model.
      I prepped the figures in the usual way; soaking them in a dish of water with a couple drops of dish- soap added, then giving them a light scrub with a soft toothbrush, and then rinsing and drying them.  I then glued the figures to black-primed 1" fender washers with Aleene's Tacky glue, and then glued the washer-mounted figures to a tongue depressor with a couple drops of the Elmer's glue.
   I began by painting the figures with Ceramcoat "Territorial Beige".  I then painted their faces with  Americana "Shading Flesh"; and their gloves,  knee pads, one of the pouches at their waists, and their elbow pads with Americana "Asphaltum".
       I then painted some of the parts of their guns, and some of the items on the first figure's back, with Americana "Khaki Tan".   I also painted some of their pouches with Americana :Mississippi Mud".  I then did a camouflage pattern all over their armor as a repeated series of three small dots using first, Folk Art "Porcelain White", then Folk Art "Dark Brown". Next, I painted the goggles on the second two figures with Crafters Acrylic "Bright Yellow".
      I then gave the figure a wash with GW "Agrax Earthshade"wash using a wet brush.
          When the wash was dry, I drybrushed all the armor, and the guns with Americana "Buttermilk". I then painted the small insignia on their chest plates, and the head piece on the first figure, with Black, and then drybrushed all the Black with Folk Art "Settlers Blue".  I also painted a triangular insignia on each of their right shoulders with the "Bright Yellow"; and added small red dots with Crafters Edition "Christmas Red" to the top bump on the front of each of the guns, as well as the first figure's headpiece, to represent laser sights.    Next, I painted their eyes, and then did highlights on their face with the "Shading Flesh".  I then did highlights on all the gloves, knee and shoulder pads with Crafters Edition "Spice Brown".  Lastly, I painted their bases with Ceramcoat "Walnut".  I then decided to paint the metal plates sculpted into the bases as old rusty metal, on two of the figures; so added some splotches Crafters Edition "Spice Brown", and then some lighter splotches of  Accent "Golden Oxide" to give the impression of rust.  I finished by giving a very light drybrush of Folk Art "Gunmetal Grey" over the rusted metal parts.
          When everything had overnight to dry, I gave the figures a coat of Ceramcoat "Matte Varnish".  Then, when that was dry, I spread some white glue on the bases, and dunked them in a sand mixture.  When the sand mixture on the bases was dry, I painted the sand first with Americana "Charcoal Grey", then dry brushed it with GW "Khemri Brown", then Ceramcoat "Raw Sienna", and lastly Americana "Buttermilk".   The next day, I sprayed the figures with Testors Dullcote".
     I'm very pleased with how these next three figures in this set turned out.  I'm looking forward to completing the remaining two figures this week.

Figures 184-186: Complete

Thursday, December 10, 2015

Bones II Skeletons and Zombie

  This week I also finished  a couple of the Bones II Skeletons and one of the Zombies for use as wandering creatures in my Frostgrave games.
      I prepped the figures in the usual way; soaking them in a dish of water with a couple drops of dish- soap added, then giving them a light scrub with a soft toothbrush, and then rinsing and drying them.  I then glued the figures to white-primed 1" fender washers with Aleene's Tacky glue.  I then glued the bases of the figures to a tongue depressor with a couple drops of the Elmer's glue each.
     I began by painting both skeletons Black.  When the Black was dry, I drybrushed them first with Americana "Buttermilk", then with Crafters Acrylic "Light Antique White".
    I then painted the spear shaft and the shield with Americana "Mississippi Mud".  Next, I painted  some decoration on the shield with  Americana "True Blue" and then White, trying to make it look like a lot of the paint had chipped off the wood underneath.  I then gave the spear shaft and the shield a wash with GW "Agrax Earthshade" wash using a wet brush.  I then painted the swords, spear point and butt, and the straps on the shield with Americana Walnut".  I then added splotches of Crafters Edition "Spice Brown", and then some lighter splotches of  Accent "Golden Oxide" to the sword and spear point and butt to give the impression of rust.  I finished by giving a very light drybrush of Folk Art "Gunmetal Grey" over the rusted metal parts.  Lastly, I painted their rock-like bases with Americana "Neutral Grey", and then drybrushed them with Crafters Acrylic "Storm Cloud Grey", and lastly, a light drybrush with Folk Art "Platinum Grey".
       When everything had overnight to dry, I gave the figures a coat of Ceramcoat "Matte Varnish".  That afternoon I flocked the base with Woodland Scenics "Snow" flock.  The next day, I sprayed the figures with Testor's Dullcote.

    I'm pleased with how these skeletons turned out.  Nothing exciting, but good simple gaming figures.

    Next, I worked on the Zombie.
     I began by painting his skin with GW "Rotting Flesh".  I then painted his tunic with GW "Vermin Brown".  After that, I painted some of his wounds with Folk Art "Burgundy"
        When the paint had time to dry, I gave the entire figure a wash with GW "Agrax Earthshade".

    After the wash had time to dry, I highlighted the tunic with Crafters Edition "Orange Spice". I then painted eyes with Americana "Buttermilk". I then painted some of the other wounds, that had shown themselves after the wash, with Crafters Edition "Christmas Red".  
   Lastly, I painted his base White.  I then applied a little area of white glue to the base and sprinkled some sand on it.   When the glue was dry, I painted the sanded area with Ceramcoat Walnut. Then when it was dry, I drybrushed it with Folk Art "Medium Grey", then Folk Art "Barn Wood". Lastly, I painted a little area at the font of the base with GW "Ice Blue".  When everything had overnight to dry, I gave the figure a coat of Ceramcoat "Matte Varnish".  Then, the next morning, I flocked the white areas with Woodland Scenics "Snow" flock.  Later that afternoon I sprayed the figure with Testor's Dullcote.   When the Dullcote was dry,  I painted over the area I had painted with the "Ice Blue" with DecoArt "One Step Crackle" crackle finish paint to give the impression of ice. When it was dry, I drybrushed it lightly with White.

    I'm happy with how the Zombie turned out.  Like the Skeletons, a nice simple functional tabletop figure.

Monday, December 7, 2015

IMEF Marine, Reggie Van Zandt: Figure 183 of 265

    This week I started on the IMEF Marines set and painted the Gatling-gunner Reggie Van Zandt figure, to test how I wanted to paint the rest of the unit.  Since I had done the NOVA Corp soldiers in a desert style camo, I figured I would do these figures as well, so the two sets could be opponents in a game.
      I prepped the figure in the usual way; soaking it in a dish of water with a couple drops of dish- soap added, then giving it a light scrub with a soft toothbrush, and then rinsing and drying it.  I then glued the figure to a black-primed 1" fender washer with Aleene's Tacky glue, and then glued the washer-mounted figure to a tongue depressor with a couple drops of the Elmer's glue.
     I began by painting the entire figure with Ceramcoat "Territorial Beige".  I then painted his head with  Crafters Acrylic "Cinnamon Brown", and his gloves, the straps on the unit on his back, and the helmet gasket around his neck, with Americana "Asphaltum".
    I decided to also paint his knee and elbow pads with the "Asphaltum", and then painted the barrels of the gatling gun with Americana "Khaki Tan".    I then did a camouflage pattern all over his armor as a repeated series of three small dots using first, Folk Art "Porcelain White", then Folk Art "Dark Brown"
        Next, I gave the figure a wash with GW "Agrax Earthshade"wash using a wet brush.
      When the wash was dry, I drybrushed all the armor and the gun with Americana "Buttermilk".  I then painted the scarf on his head and the insignia on his armor's chest plate with Black, and highlighted them with Folk Art  "Settlers Blue".  I also painted an insignia on his right shoulder with Crafters Acrylic "Bright Yellow".  Next, I painted his eyes, and then did highlights on his face with Americana "Sable Brown". I then did highlights on the gloves, knee and shoulder pads with Crafters Edition "Spice Brown".  Lastly, I painted his integral base with Ceramcoat Walnut.  
      When everything had overnight to dry, I gave the figure a coat of Ceramcoat "Matte Varnish".  Then, when that was dry, I spread white glue all over the base, and dunked it in a sand mixture. When the sand mixture on the base was dry, I painted it first with Americana "Charcoal Grey", I then drybrushed it, in succession, with GW "Khemri Brown", Ceramcoat "Raw Sienna", and then the "Buttermilk".  I then glued on a small tuft of purple grass.  The next day, I sprayed the figure with Testor's Dullcote.
     I'm very pleased with how this figure turned out.   I think its a nice effective simple paint scheme.

Figure 183 of 265: Complete

Thursday, December 3, 2015

Town Guard (Anhurian) Swordsman: Bones II Figure

      This week I also completed the Town Guard Swordsman from the Bones II, Expansion 2.  I hadn't bought Expansion 2 during the Kickstarter, but I was able to get the Town Guard set from a friend, as I was keen to use them for Frostgrave soldiers.
      I prepped the figure in the usual way; soaking it in a dish of water with a couple drops of dish- soap added, then giving it a light scrub with a soft toothbrush, and then rinsing and drying it.  I then glued the figure to a white-primed 1" fender washers with Aleene's Tacky glue, and then glued the washer-mounted figure to a tongue depressor with a couple drops of the Elmer's glue.
       I began by painting the chainmail Black, and then drybrushing it with Ceramcoat "Metallic Pewter".
      I painted his face an hands with Americana "Shading Flesh".  Then I painted his pants with Citadel "Snakebite Leather", and his tunic with Americana "Cranberry Wine". I painted the cowl around his neck and head with Aleene's "Deep Khaki".
 Next, I painted his belts and straps, his helmet, and his sword grip  with Accent "Real Umber", and his shoes with Crafters Edition "Spice Brown". I then gave all the non-metallic parts a wash with GW Agrax Earthshade using a wet brush.  While the wash was drying, I painted the round parts on the front of his chainmail with  Ceramcoat "Bronze".
     When the wash was dry, I painted his eyes, and then highlighted his skin with the base "Shading Flesh".  His pants were highlighted with the base "Snakebite Leather", and his tunic with Folk Art "Burgundy".  His cowl I highlighted with the base "Deep Khaki".  I then painted his scabbard with the "Burgundy". I did  his shield with Crafters Edition "Christmas Red", and decorated it with Apple Barrel "Yellow".  I then painted his sword, helmet banding, and the rim of his shield with Folk Art "Gunmetal Grey", and then highlighted these parts with Folk Art "Silver Sterling".  I also use the "Silver Sterling to add highlights to his chainmail.
        Lastly, I painted his base White.  I then applied a little area of white glue to the base and sprinkled some sand on it.   When the glue was dry, I painted the sanded area with Ceramcoat Walnut. Then when it was dry, I drybrushed it with Folk Art "Medium Grey", then Folk Art "Barn Wood". When everything had overnight to dry, I gave the figure a coat of Ceramcoat "Matte Varnish".  Then, the next morning, I flocked the white areas with Woodland Scenics "Snow" flock.  Later that afternoon I sprayed the figure with Testor's Dullcote.
   A nice tabletop quality figure.  Nothing fancy about either his pose, or the paint job.