Showing posts with label Pulp. Show all posts

Monday, January 27, 2020

Hivewarden: Bones 4 Dreadmere Figure

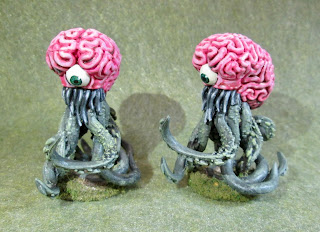
     This past week I painted a pair of the Hivewardens from the Bones 4 Dreadmere Expansion.  I saw these just as usable as Pulp Sci-Fi baddies as Fantasy creatures.
          I prepped the figures in the usual way, soaking them in a dish of water with a couple drops of dish-soap added, then giving them a light scrub with a soft toothbrush, and then rinsing and drying them.  I then glued them to 1.25" brown-primed fender washers with Aleene's Tacky glue.  I then glued the washers onto a tongue depressor with a couple drops of Elmer's white glue.
     I began by painting the main tentacles with Folk Art "Poppy Seed".  I then painted the brains with Crafter's Acrylic "Tutti Frutti", and the mouth tentacles with Americana "Charcoal".
     Next, I painted the backsides of the brains with Pathfinder MSP "Urgathoa Red", and then set the figures aside to dry for a while.  When I returned to working on them, I gave both the brains a coat of Citadel  "Reikland Fleshshade" wash.  When this wash was dry, I then gave all the tentacles a coat of Citadel "Nuln Oil" wash.
     When the final coat of wash was dry, I drybrushed the brains with some Reaper MSP "Brest Cancer Awareness Pink", and then went back with a brush and applied some direct highlights to the brain ridges.  Then I added a little Americana "Snow White" to the pink and did a little lighter drybrush.  Next,  I drybrushed the tentacles with Americana "Jade Green", and then a little Americana "Olive Green", and lastly some Americana "Margarita".  After that, I painted highlights on the mouth tentacles with some Americana "Grey Sky" mixed with some of the base "Charcoal"
       I then highlighted the backsides of the brains with Americana "Burgundy Wine".  Next, I painted the eyes with Americana "Bleached Sand".  I painted in irises with Accent "Forest Green", and then filled them in with Folk Art "Metallic Emerald Green", with some highlights using Folk Art Color Shift "Emerald Flash". Next, I added Ceramcoat "Black" pupils, and highlight dots with the "Snow White". Lastly, I painted the bases with Americana "Mississippi Mud".
     I let all the figures dry overnight and the next day I gave them a coat of Americana "DuraClear Matte" varnish.    Then, when  the varnish was dry, I used some white glue to flock the bases.  Another overnight dry, and I sprayed them with Testor's "Dullcote".   When the "Dullcote" was dry, I went back and redid the eyes, with a little Americana "DuraClear Gloss" varnish.


     Overall, I'm pretty pleased with how they came out.  There are mold lines that run around the equator of the brains, that were just terrible.  Normally I don't mess with mold lines to a big degree unless they are particularly obnoxious, but these really stood out; and being on the ridged surface of the brains they were almost impossible to deal with.  Also, the tentacles, being so intertwined as they are, were a real pain to paint and flock. Otherwise, these were fun figures to work on.

Monday, December 17, 2018

Psychologist: Bones 3 Figure

     This past week I finished working on the group of Pulp Chronoscope figures I got in a trade, and did the Psychologist, from the Bones 3 "Mythos Expansion: Part 3".
      I prepped the figure in the usual way; soaking it in a dish of water with a couple drops of dish-soap added, then giving it a light scrub with a soft toothbrush, and then rinsing and drying it.   I then glued the figure to a black-primed 1" fender washer with Aleene's Tacky glue, and then placed the figure in my painting grip. 
     I began by painting his head and hands with Crafter's Acrylic "Flesh".  I then painted his lab coat with Americana "Dove Grey", and his pants with Americana "Zinc".
     Next, I painted his shirt with Americana "Salem Blue", his tie with Ceramcoat "Opaque Red", and his hair with Americana "Light Cinnamon".  After everything had a chance to dry, I gave his head and hands a wash with Citadel  "Reikland Fleshshade".  When that was dry, I gave the rest of his body a wash with Citadel "Nuln Oil ".
     I then painted his eyes, and then the rims of his glasses with Ceramcoat "Black". After that, I highlighted his face and hands with the base "Flesh", his hair with Americana "Sable Brown", and  his tie with the base "Opaque Red".
   Next, I highlighted his shirt with Crafter's Acrylic "Cool Blue", and his lab coat with Americana "Snow White".   I then highlighted his pants with Crafter's Acrylic "Storm Cloud Grey", and painted his shoes with the "Black".   When the shoes were dry, I highlighted them with Citadel "The Fang". 
Lastly,  I  painted the figure's integral base with Americana "Bittersweet Chocolate".
     I let the figure dry overnight and the next day I gave it a coat of Americana "DuraClear Matte" varnish.    Then, when  the varnish was dry, I used some white glue to flock the base.  Another overnight dry, and I sprayed it with Testor's Dullcote".  After the Dullcote dried, I went back over the lens of the glasses with Americana "DuraClear Gloss Varnish".
     Well, I'm happy.  He was the perfect fast and simple figure to get done during a busy holiday week; and I don't think he looks too shabby.

Monday, December 3, 2018

Pulp Era Professor: Bones 3 Figure

  This past week I continued working on the group of Pulp Chronoscope figures I got in a trade, and did the Pulp Era Professor, from the Bones 3 "Mythos Expansion: Part 3".
       I prepped the figure in the usual way; soaking it in a dish of water with a couple drops of dish-soap added, then giving it a light scrub with a soft toothbrush, and then rinsing and drying it.   I then glued the figure to a black-primed 1" fender washer with Aleene's Tacky glue, and then placed the figure in my painting grip.   
      I decided I wanted to paint him in a tween suit, so went to Google and found one I liked.  I wasn't sure how to paint tweed though,  so I headed over to the Reaper forum to ask some advice: Tweed?  Armed with this information, I thought I might be able  to pull off something good enough for the game table.  However, I didn't want my professor to be quite as sharply dressed as the man in the example  photo, so I decided to make a few adjustments to the outfit, to make him look more "absent-minded".
      I began by painting his face and hands with Americana "Shading Flesh".  I then painted his suit with a mix of Ceramcoat "Territorial Beige" and  Vallejo Model Color "Brown Violet" .  After that, I painted his vest withAmericana "Avocado".
     Next, I painted his shirt with Americana "Dove Grey", and his bowtie with Accent "Golden Harvest".  I then painted the cover of his book with Apple Barrel "Apple Maroon", and the book's pages with Americana "Antique White". After that, I painted his shoes with Crafter's Acrylic Cinnamon Brown", and his hair with Americana "Neutral Grey".
      When everything was dry, I gave his face and hands a wash with Citadel  "Reikland Fleshshade" wash.  When that was dry, I gave the rest of his body a wash with Citadel "Agrax Earthshade",  and his hair a wash with Citadel "Nuln Oil ".    I then painted his eyes, and highlighted his face and hands with the base "Shading Flesh", mixed some Crafter's Acrylic "Flesh".  After that, I highlighted his hair with Americana "Grey Sky". 
     I then highlighted his shirt with Americana "Snow White", and highlighted his tie with Crafter's Acrylic "Daffodil Yellow".   After that, I highlighted his vest with Americana Jade Green" mixed with a little of the "Avocado" and dded highlights to his shoes with Americana "Sable Brown".  I then went back and did a check pattern on the vest with the "Daffodil Yellow.
     I now attempted my tweed effect.   Using Aleene's "Dusty Khaki", heavily thinned, I attempted a fine, light, crosshatch pattern on the jacket and pants.   I tried to do it a bit heavier on the highlights, and I didn't do any in the shadows.
     I wasn't happy with the results at all.  The crosshatching was much too heavy, and contrasty, and looked more like someone had scribbled on his jacket than a texture.  I also wanted to see if I could add the random black spots you see on tweed.   So, first I mixed some of Ceramcoat "Black" with a little of the "Dusty Khaki" to "grey" it just a little, and then heavily thinned it, and add some short random lines here and there across the whole suit.    When dry, I took some of the original "Brown Violet" and heavily thinned that, then applied it as a glaze over the whole suit to help tone down the cross hatching.  I ended up applying a couple layers before I was happy; but in the end got it to a place I was happy with.
     Lastly, I highlighted the book under his arm with some Folk Art "Burgundy", and applied some decoration and a title to it with Ceramcoat "Wedding Gold".   I then painted the figure's integral base with Americana "Bittersweet Chocolate".
     I let the figure dry overnight and the next day I gave it a coat of Americana "DuraClear Matte" varnish.    Then, when  the varnish was dry, I used some white glue to flock the base.  Another overnight dry, and I sprayed it with Testor's Dullcote".

     Well, I'm rather happy with how the tweed came out for a first attempt.    And I think the rest of the painting is good enough for the tabletop, so in general I'm please with the figure.  Like the rest of the Pulp figures I've painting in the last few weeks, this one too has a very odd pose; leaning back the way he is.

Monday, November 26, 2018

Ship Hand: Bones 3 Figure

  This past week I picked another easy one to paint.  With it being the Thanksgiving weekend, I was traveling; and I still have a number of other painting projects I'm trying to finish up before the holiday stuff gets really crazy.   So, following on the heels of the Ship Captain last week, I did the Ship Hand, from the Bones 3 "Mythos Expansion: Part 3" this week.  I didn't buy this expansion, but picked up this figure through a trade.
     I prepped the figure in the usual way; soaking it in a dish of water with a couple drops of dish-soap added, then giving it a light scrub with a soft toothbrush, and then rinsing and drying it.   I then glued the figure to a black-primed 1" fender washer with Aleene's Tacky glue, and then placed the figure in my painting grip.
      I began by painting his face and hands with Americana "Shading Flesh", and then painted his jacket with Crafter's Acrylic "Navy Blue", and his pants with Americana "Neutral Grey".
     Next, I painted his hair with Crafter's Acrylic "Cinnamon Brown", and his hat with Ceramcoat "Opaque Red".  I then painted his neckerchief with Apple Barrel "Apple Scotch Blue", his belaying pin with Americana "Light Cinnamon", and his shoes with Ceramcoat "Black".
    When everything was dry, I gave his face, hands, and hat a wash with Citadel  "Reikland Fleshshade" wash; and when that was dry, I gave the rest of him a wash with Citadel "Nuln Oil " wash.    I then painted his eyes, and highlighted his face and hands with the base "Shading Flesh", and some Crafter's Acrylic "Flesh".  After that, I highlighted his hat with Crafter's Acrylic "Orange Spice", and his hair with Americana "Sable Brown".
     I then highlighted his pants with Crafter's Acrylic "Storm Cloud Grey", and his jacket with Ceramcoat "Denim Blue".  Next, I highlighted his neckerchief with crafter's Acrylic "Cool Blue", the belaying pin with Ceramcoat "Territorial Beige", and his shoes with Americana "Zinc".
      Lastly, I painted the figure's integral base with Americana "Bittersweet Chocolate".
     I let the figure dry overnight and the next day I gave it a coat of Americana "DuraClear Matte" varnish.    Then, when  the varnish was dry, I used some white glue to flock the base.  Another overnight dry, and I sprayed it with Testor's Dullcote".

     I'm happy with this one too.  Like last week's Captain, he's nothing exciting; but will certainly work just fine on the tabletop.

Monday, November 19, 2018

Ship Captain: Bones 3 Figure

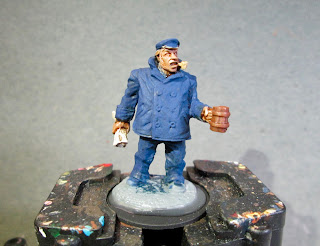
   This week I picked another easy one, as the holiday season time pressure has already started to some degree, and I have a number of other painting projects I'm trying to finish up before stuff gets really crazy.   So, I did the Ships Captain, from the Bones 3 "Mythos Expansion: Part 3".  I didn't buy this expansion, but picked up this figure through a trade.
     I prepped the figure in the usual way; soaking it in a dish of water with a couple drops of dish-soap added, then giving it a light scrub with a soft toothbrush, and then rinsing and drying it.   I then glued the figure to a black-primed 1" fender washer with Aleene's Tacky glue, and then placed the figure in my painting grip.
      I began by painting his face and hands with Reaper MSP "Tanned Skin", and then painted his clothing and hat with Crafter's Acrylic "Navy Blue".
      I then painted the rolled up map(?) in his hand with Americana "Bleached Sand", his mug with Americana "Light Cinnamon", and his pipe with Apple Barrel "Apple Maple Syrup".  (I decided it looked like a corncob pipe.)    When everything was dry, I gave his face and hands a wash with Citadel  "Reikland Fleshshade" wash; and when that was dry, I gave his map, mug, and pipe a wash with Citadel "Agrax Earthshade" wash.
     Next, when the washes were dry, I painted his hair with Americana "Zinc", his sweater collar with Americana "Neutral Grey", and his teeth with the "Bleached Sand".  I then painted his shoes, and the brim of his hat,  Ceramcoat "Black".   I let everything dry awhile again, and then gave his hat, hair, and clothing a wash with Citadel "Nuln Oil" wash.
     When the wash was dry,  I painted his eyes and highlighted his face with Raper MSP "Tanned Highlight".   I then highlighted his hair with Americana "Grey Sky".  Next, I highlighted his clothes and hat with Ceramcoat denim Blue", and then did the brim of his hat and shoes with the "Zinc".  I then highlighted his map with Crafter's Acrylic "Light Antique White", and his mug with Americana "Sable Brown".   After that, I went pack and painted in the holes in the pipe and mug with the "Black", and then painted his buttons, and the bands on the mug with Ceramcoat "Bronze".
     Lastly, I painted the figure's integral base with Americana "Bittersweet Chocolate".
     I let the figure dry overnight and the next day I gave it a coat of Americana "DuraClear Matte" varnish.    Then, when  the varnish was dry, I used some white glue to flock the base.  Another overnight dry, and I sprayed it with Testor's Dullcote".
     Well, there he is.  Nothing great, but a good tabletop-ready paint job.   Should have given his eyes more attention, but I was in a hurry to get him done.

Tuesday, September 12, 2017

Wild West Wizard of Oz Wicked Witch and Winged Monkey: Bones 3 Figures

     Sorry we're a day late... I ran out of time yesterday to finish up.   Anyhow, this past week I finished the last two figures from the Bones 3 Wild West Wizard of Oz set and did the Wicked Witch and the Winged Monkey minis.  I don't know what particularly makes this set Wild West; it seems to me it would fit in in any kind of Steampunk, VSF, Pulp, or Post-Apocalyptic setting.
      These figures were actually cast in the newer grey Bones material, and are a bit stiffer than normal Bones.
      To see the figures from this set that I have already finished, see: Tin Man, Scarecrow, Lion, and Dorothy & Toto.
       Once again, I tried to as best I could copy the look of the corresponding character from the Wizard of Oz movie.   What I found interesting about the Wicked Witch was that her outfit was entirely black from head to toe.

       I prepped the figures in the usual way; soaking them in a dish of water with a couple drops of dish-soap added, then giving them a light scrub with a soft toothbrush, and then rinsing and drying them.    I then glued the witch figure to a black-primed 1" fender washer , and the monkey to a black-primed 7/8" fender washer, with Aleene's Tacky glue. I then glued each washer-mounted figures to a tongue depressor with a couple drops of the Elmer's glue.
     I began by painting the witch's clothes entirely with Black. When dry, I drybrushed them with Folk Art "Medium Grey".
      I then painted her face and hands with Crafter's Acrylic "Wild Green".  After that I painted her broom handle with Ceramcoat  "Territorial Beige", and the broom straws with Americana "Sable Brown".
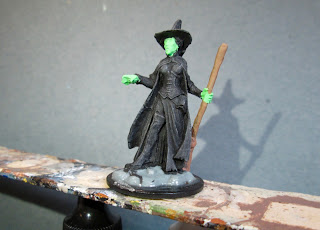
     When the face and hands had time enough to dry, I gave them a wash with Iron Wind Metals "Dark Green" ink.  When that was dry, I gave the broom handle and straws a wash with Citadel "Agrax Earthshade" wash.  I then added shadows under her yes by mixing a little of the "Wild Green" with some Black.  I also  applied a little Citadel "Nuln Oil" wash to between her lips to help define her slightly open mouth.   Next, I painted her eyes, and then highlighted her face and hands with the base "Wild Green". After that, I did some highlighting on her hair using Americana "Mississippi Mud", and then went back over or outfit and did specific highlighting on some of the clothing edges with the "Medium Grey" to help define them.   I then turned to her broom and did highlighting on the straw with Ceramcoat "Maple Sugar Tan". When that was done, I did a little crosshatch pattern between the two metal rings on the broom (like in the movie photo at the top) using Americana "Raw Umber".  I then painted the rings Black, and then went back over them with Ceramcoat "Metallic Silver".  Lastly, I painted her integral base with Americana "Charcoal Grey".
         When I was done painting the figure, I used some white glue to glue a mixture I made of some fine brown sand, and courser black sand to the base.  When this was dry, I drybrushed the sand and the figure's own base with Ceramcoat "Territorial Beige", and then with some Americana "Antique White".  When dry, I glued on some bits of grass tufts.
      I let the figure dry overnight and the next day I gave her a coat of Americana "DuraClear Matte" varnish.  Another overnight dry, and I sprayed it with Testor's Dullcote".

     I then worked on the Winged Monkey.  I wanted to try to imitate the bluish-grey fur, blue face, and grey wings of the movie monkey, except in a metallic look.   I began by painting him entirely in Black.
     Then, when the Black was dry, I made a mix of Folk Art Metallics "Gunmetal Grey" and Folk Art "Metallic Blue Sapphire", and used this to drybrush his body.  I then drybrushed his wings with the "Gunmetal Grey". I then added a little Folk Art Pearl "Aqua Moire" to the mix to lighten it, and painted highlights on his body.
     Next, I used Ceramcoat "Metallic Silver" to do highlights on his wings, and after that I painted his face with the just the plain "Metallic Blue Sapphire" and highlighted it with the "Aqua Moire".   I then tried to paint a bit of his jacket pattern (as seen in the movie photo at the top) on his shoulder pads and on his medallion.  I began by doing the base of the pattern in black, and then painted it with Americana "Dove Grey", leaving a little of the Black edge showing.  This was followed by doing the interior of the pattern with Ceramcoat "Opaque Red", making sure to leave the "Dove Grey", and Black edges show.
     Next I worked on his eyes and the grill work on his chest.  I painted his eye sockets and the grill slots with Iron Wind Metals "Red" ink. When the ink was dry, I painted the eyes and the slots with the "Opaque Red".  Afterwards, I painted the pupils and the very center of the slots with Reaper MSP "Golden Glow".   Finally, I painted his lips with the "Opaque Red", and then mixed in a little of the "Golden Glow" to do highlights.
     Then, like with the witch, I painted his integral base with Americana "Charcoal Grey".
         When I was done painting the figure, I used some white glue to glue a mixture I made of some fine brown sand, and courser black sand to the base.  When this was dry, I drybrushed the sand and the figure's own base with Ceramcoat "Territorial Beige", and then with some Americana "Antique White".  When dry, I glued on some bits of grass tufts.
      I let the figure dry overnight and the next day I gave him a coat of Americana "DuraClear Matte" varnish.  Another overnight dry, and I sprayed it with Testor's Dullcote".

     I like how the pair turned out.   Of all the set, I think these two fall closest to their movie counterparts in appearance.
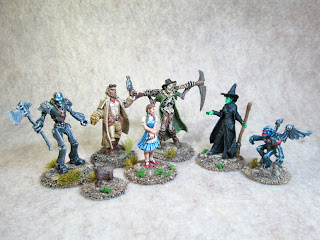
     And here's a look at the whole Wild West Wizard of Ox set, both heroes and villains...
     I think they all turned out really well, and make a pretty nice looking set of figures.

Monday, September 4, 2017

Wild West Wizard of Oz Dorothy and Toto: Bones 3 Figures

     This past week I continued on with the Wild West Wizard of Oz set from Bones 3,  and painted Dorothy & Toto.  I still have the Wicked Witch and Flying Monkey remaining.
     To see the figures from this set that I have already finished, see: Tin Man, Scarecrow, and Lion.
     I prepped the two figures in the usual way; soaking them in a dish of water with a couple drops of dish-soap added, then giving them a light scrub with a soft toothbrush, and then rinsing and drying them.    I then glued the Dorothy figure to a black-primed 1" fender washer, and Toto to a .75" black-primed fender washer, both with Aleene's Tacky glue. I then glued the washer-mounted figures to a tongue depressor with a couple drops of the Elmer's glue.
     I wanted to try to see if I could figure out a way to paint her dress so it looked like gingham; so I asked around if there was any trick to getting that look without doing the impossible of painting the tiny check pattern in scale with figure.  There didn't seem to be any real trick other than trying to paint it as checkered, or trying to use either blue dots on white, or white dots on blue.
     So I started off painting her skin with Apple Barrel "Apple Flesh".  I then painted her petticoat, apron, shirt, and socks, with Duncan "Slate Grey".  After that, I painted the dress with reaper MSP Bones "Tropical Blue", and then, when dry, I applied a wash with thinned Crafter's Acrylic "Navy Blue", paying particular attention to get it down in the folds of the dress.
     When the wash was dry, I carefully tried to apply the smallest White dot pattern I could to the dress.  That didn't look right, so i went back and tried adding small dots with the "Navy Blue" between the rows of White.
    I just wasn't happy, so I decided to scrap the idea of painting an actual gingham pattern, and just settle for a mid-blue dress.  So, feeling that the results of the dress with dots (as they appear in the photo above) was too dark, I gave the dress a thin wash of White.  This made it a little too light, so I went back and gave it a thin wash of the "Tropical Blue".  I was basically happy at this point so I took the opportunity to apply a wash of Citadel "Agrax Earthshade" wash to her face, arms, and legs, using a wet brush.  When the wash was dry, I went back and added some specific highlights to the dress with Crafter's Acrylic "Cool Blue".   I then painted highlights on her shirt, apron, and petticoat with White.  After that I painted her hair and Toto with Accent "Real Umber"
     Next, I applied highlights to her hair with Crafter's Edition "Spice Brown", and then Americana "Sable Brown".  I then went back and added hair ribbons with the "Tropical Blue" highlighted with the "Cool Blue".  Next, I painted her eyes and lips.  I discovered her face had some very slight casting errors in it, which I tried my best to hide when I highlighted the skin with some Crafter's Acrylic "Flesh".    I then painted the shoes with Folk Art "Deep Tomato Red", and the gun with Black.  After that, I went back over the shoes with DecoArt Dazzling Metallics "Festive Red", and then highlighted the gun with Folk Art Metallics "Gunmetal Grey"
    I then turned to toto, an gave him a light drybrush of Ceramcoat "Territorial Beige", after which I did a drybrush of Folk Art "Butter Pecan concentrating mainly on his back and head.  I then gave him Black eyes with tiny White highlight dots, and added a little hint of tongue wth Crafter's Acrylic "Tutti Frutti".   Lastly, I painted both figures bases with Americana "Charcoal Grey".
      Looking at the finished Dorothy, I realized her ruby slippers didn't really have the sparkle they needed.  My wife recommended red glitter nail-polish, which reminded me that I had bought a bottle of Folk Art Extreme Glitter "Hologram" (which is basically clear) paint somewhere along the way. I applied this and it really gave the shoes the extra sparkle I wanted.
     When I was done painting the figure, I used some white glue to glue a mixture I made of some fine brown sand, and courser black sand to the base.  When this was dry, I drybrushed the sand and the figure's own base with the "Territorial Beige", and then with some Americana "Antique White".  When dry, I glued on some bits of flock and grass tufts.
      I let the figure dry overnight and the next day I gave him a coat of Americana "DuraClear Matte" varnish.  Another overnight dry, and I sprayed it with Testor's Dullcote".  I found the Dullcote blunted the impact of the ruby slippers a little, so I went over them again with the "Hologram" glitter paint once more, and then hit them with a little Americana "DuraClear Gloss" Varnish.

     I really like how these figures turned out.  While I wish I could have achieved the gingham effect, I think just the plain blue dress gets the idea and "look" of the character across enough.
     And here is a look at the whole gang of heroes together...
     I'm pretty pleased with how the group looks together as a whole.

    And, I was lucky enough to already have had the opportunity to be using them as a gang in a game using the post-apocalyptic rules "This is Not a Test"
I added a figure (A Partizan give-away figure of George Stephenson) to be Professor Marvel "the Wizard".

A shot from during the game of Dorothy carefully peeking around a corner as the Lion backs her up.