Monday, September 29, 2014

Dragonman Warrior: Figure 116 of 265

This week I painted the Dragonman Warrior from the Fighters Set.  For some reason, as I looked at this figure, I saw it wearing a bronze-ish colored suit of armor. I thought it would be a nice match for the greenish color I planned to paint his "skin".  Once I decided that, it was easy for me to plan a whole green and yellow toned theme for his look.
      I did my preparation of this figure in the usual way; soaking it in a dish of water with a couple drops of dish soap added, then giving it a light scrub with a soft toothbrush, and then rinsing and drying.  I then glued the figure to a 1" black-primed fender washer with Aleene's Tacky glue, and glued the washer to a tongue depressor with a couple drops of Elmer's White Glue.
I began by painting black just the areas where he wore armor. When the black was dry, I gave it a heavy drybrushing with GW "Brazen Brass".
Next, I painted his head, hands, and feet with Americana "Avocado". Then I painted his "skirts" with Apple Barrel "Yellow".  I next painted the rim of the shield and the blank area on the face of it with Folk Art "Hunter Green". The wing design on the shield I painted with Folk Art "Golden Harvest"
I then painted his claws with Americana "Reindeer Moss Green" and his teeth with Americana "Buttermilk".  The back of his shield I painted Ceramcoat "Walnut", and the handle straps, as well as the sword grip I painted Americana "Asphaltum".  When all these colors had dried, I gave his face, hands, feet, "skirts", and the "wings on his shield, a wash with thinned Winsor-Newton "Peat Brown" Ink.
    When the ink was dry, I went back and added his eyes, using Americana "Moon Yellow" for his "whites", and black for the pupil. I then went back and added highlights to his face, hands and feet using the base "Avocado", and to his claws with the base "Reindeer Moss Green".  I highlighted his skirt with the base "Yellow" and then went back and added a little of the "Moon Yellow" to the "Yellow",  and did some lighter highlights. The wings on the shield I highlighted with the base "Golden Harvest", then I added a little of the "Moon Yellow" to the Golden Harvest as well, and did some finer highlights here too.
Next I painted his sword blade with Ceramcoat "Metallic Pewter", and the hilt with Ceramcoat "Bronze". While I had the "Bronze" out, I used some to add highlights to his armor, hitting the edges of plates and the rivets.  I then went back and added highlights to the sword blade with Folk Art "Silver Sterling". I gave the hilt a little wash with some of the thinned "Peat Brown" ink, and when it was dry, went back and added highlights to the hilt with Ceramcoat "14K Gold".   I used some f the "Walnut" to paint the ares of the base that were still white, and then I set the figure to dry.
     The next morning I gave it  coat of  Ceramcoat "Mate Varnish". Later that afternoon, I flocked the base.  The following day, I sprayed the figure with "Testor's Dullcote".

  I'm pleased with how the figure turned out.  I really like the sculpt, and the armor and the blade have some nice details that make it look appropriately non-human.   In the end I think the green and yellow scheme worked well on this figure.

Figure 116 of 265: Complete

Friday, September 26, 2014

Reaper Bones CAV Kickstarter Enters Final Day and a Half

Just a heads up for all you Bones fans, that the Reaper CAV (10mm Big Stompy Mechs) Kickstarter is in it's last day and a half, and will end tomorrow.  Now's the time to jump in and take part, as the core set has grown to a very nice deal.  Or, if you're like me and the big mechs are't you thing, get in to the Kickstarter just for the great deal on the 10mm tanks and other vehicles.

You can check it out here

Monday, September 22, 2014

Duke Gerard: Figure 115 of 265

     This week I started on the Fighters Set, and painted Duke Gerard. I thought I'd start with the simplest figure in the set, to get myself back in a fantasy mind frame after painting the remainder of the more realistic figures in the Zombie Humters Set earlier in the month.
      I did my preparation of this figure in the usual way; soaking it in a dish of water with a couple drops of dish soap added, then giving it a light scrub with a soft toothbrush, and then rinsing and drying.  I then glued the figure to a 1" black-primed fender washer with Aleene's Tacky glue, and glued the washer to a tongue depressor with a couple drops of Elmer's White Glue.
I started by painting all the armor black.  I then gave it a good drybrushing with Ceramcoat "Metallic Pewter".
     Next, I painted his waist cape, and the cloth hangings at his front and shoulders  with Anita's "Violet"and his shield and scabbard with GW "Liche Purple".
When the purple coats were dry, I gave all the cloth parts that I had painted with the "Violet" a wash with thinned Dark Blue ink. After the ink was good and dry, I went back and highlighted the cloth and the shield with the "Violet"
Now I painted his face with Americana "Shading Flesh", and his hair, and the grips on his swords, with Americana "Charcoal Grey".  I then painted his belt, and the back of the shield, with Ceramcoat "Walnut".
     I next painted the trim on his armor, and the hilts of the swords and base of the scabbard, with Ceramcoat "14k Gold".
After everything  had had time to dry, I went back and gave his head and the gold areas a wash with thinned GW "Agrax Earthshade"wash.  I then painted his eyes, and added highlights to his face with the "Shading Flesh".  I also highlighted the gold with the "14K Gold".  I then painted his sword blade with the "Metallic Pewter", and when it was dry, I highlighted the top portion of the blade, and his armor, with Folk Art "Silver Sterling".  Lastly I used some Americana "Dove Grey" to add some gray to his temples and some streaks in his hair to make him look more mature.
   I then hunted through all my old spare sheets of decals, and found a sheet of old Brettonian Knight ones.  I decided on a Pegasus design to match the wings decoration on the front of his armor, and applied it to the shield.  It tore a little while applying it, so I had to go and patch it up with white paint.
    I let the figure sit over night, and the next morning I gave it a coat of Ceramcoat "Matte Varnish".  Later that afternoon I flocked the base, and the following day I sprayed it with Testor's "Dullcote" spray varnish.

I pleased with how the figure turned out.  Even though it is not the most dynamic figure, it has a certain somber seriousness to it. And I think the purple and gold scheme helps bring out his royal bearing.

Figure 115 of 265: Complete

Monday, September 15, 2014

Bonnie: Figure 114 of 265

     This past week I completed Bonnie from the Zombie Hunters Set.  This finishes that set, and it joins the list of completed sets over on the right.
      I began my preparation of this figure in the usual way; soaking it in a dish of water with a couple drops of dish soap added, then giving it a light scrub with a soft toothbrush, and then rinsing and drying.  I then glued the figure to a 1" black-primed fender washer with Aleene's Tacky glue, and glued the washer to a tongue depressor with a couple drops of Elmer's White Glue.
  
Note: The red splash on her arm is just a sloppy drip from something else I was painting!
 I began the painting process by giving the whole figure a wash with very thinned black ink with just a pin head drop of dish soap in it.  This ink wash settles and dries into all the crevices and creases in the figure, and helps me to see all the sculpted detail, so I can keep my paint in the lines. :)  
   When the ink wash was good and dry,  I painted her skin with Americana "Mocha", then I painted her shorts with Aleene's "Deep Khaki", and her shirt with Americana "Khaki Tan".  Lastly, I painted her socks with Aleene's "Dusty Khaki".
 Then, I painted her boots, and belts with Ceramcoat "Walnut", and the stocks of the two guns on her back with Americana "Charcoal Grey".  Her hair I painted Accent "Real Umber".  The wraps on her wirsts I painted with GW "Camo Green"
At this point I gave the whole figure a wash with thinned Winsor-Newton "Peat Brown' ink.
When the ink was dry, I painted the guns in her hands, and the two in her shoulder holsters, black. I then painted her face, starting with her eyes; first with black sockets, then white "whites" ,and then black pupils.  Her lips I painted with Americana "Shading Flesh". I then highlighted all her skin with the base "Mocha". I now went back and did a light dry brush of the black guns with GW "Shadow Grey". Next, I gave all her clothing highlights with the base colors I had used.  Lastly, I painted her belt buckle and the butts of the two guns on her back with Ceramcoat "Metallic Pewter".
   I let the figure sit over night, and the next morning I gave it a coat of Ceramcoat "Matte Varnish".  Later that afternoon I flocked the base, and the following day I sprayed it with Testor's "Dullcote" spray varnish.
  Well, I'm not terribly happy with this figure.  I love the dynamic sculpt, but my color selection really made her look washed out.  I don't think the skin tone goes with the green oriented color scheme of her outfit at all.  The sculpting on her face also was odd.  As with many of the Bones figures, the nose was not fully cast. And her eyes were deeply slanted which, given my lack of painting skills, just turned out making the face look odd rather than mad or determined.

Figure 114 of 265: Complete

Thursday, September 11, 2014

New Reaper BONES CAV Kickstarter

I just wanted to let everyone know that Reaper is currently running another Bones Kickstarter, called "Reaper Miniatures CAV: Strike Operations".  It is designed to convert much of their Sci-Fi CAV (Combat Assault Vehicle)12mm (N Scale) line into BONES material.  The figures are mainly big stompy robot types, with (hopefully) a smattering of more conventional ground vehicles thrown in too.

For more information, see: Reaper CAV Kickstarter


Monday, September 8, 2014

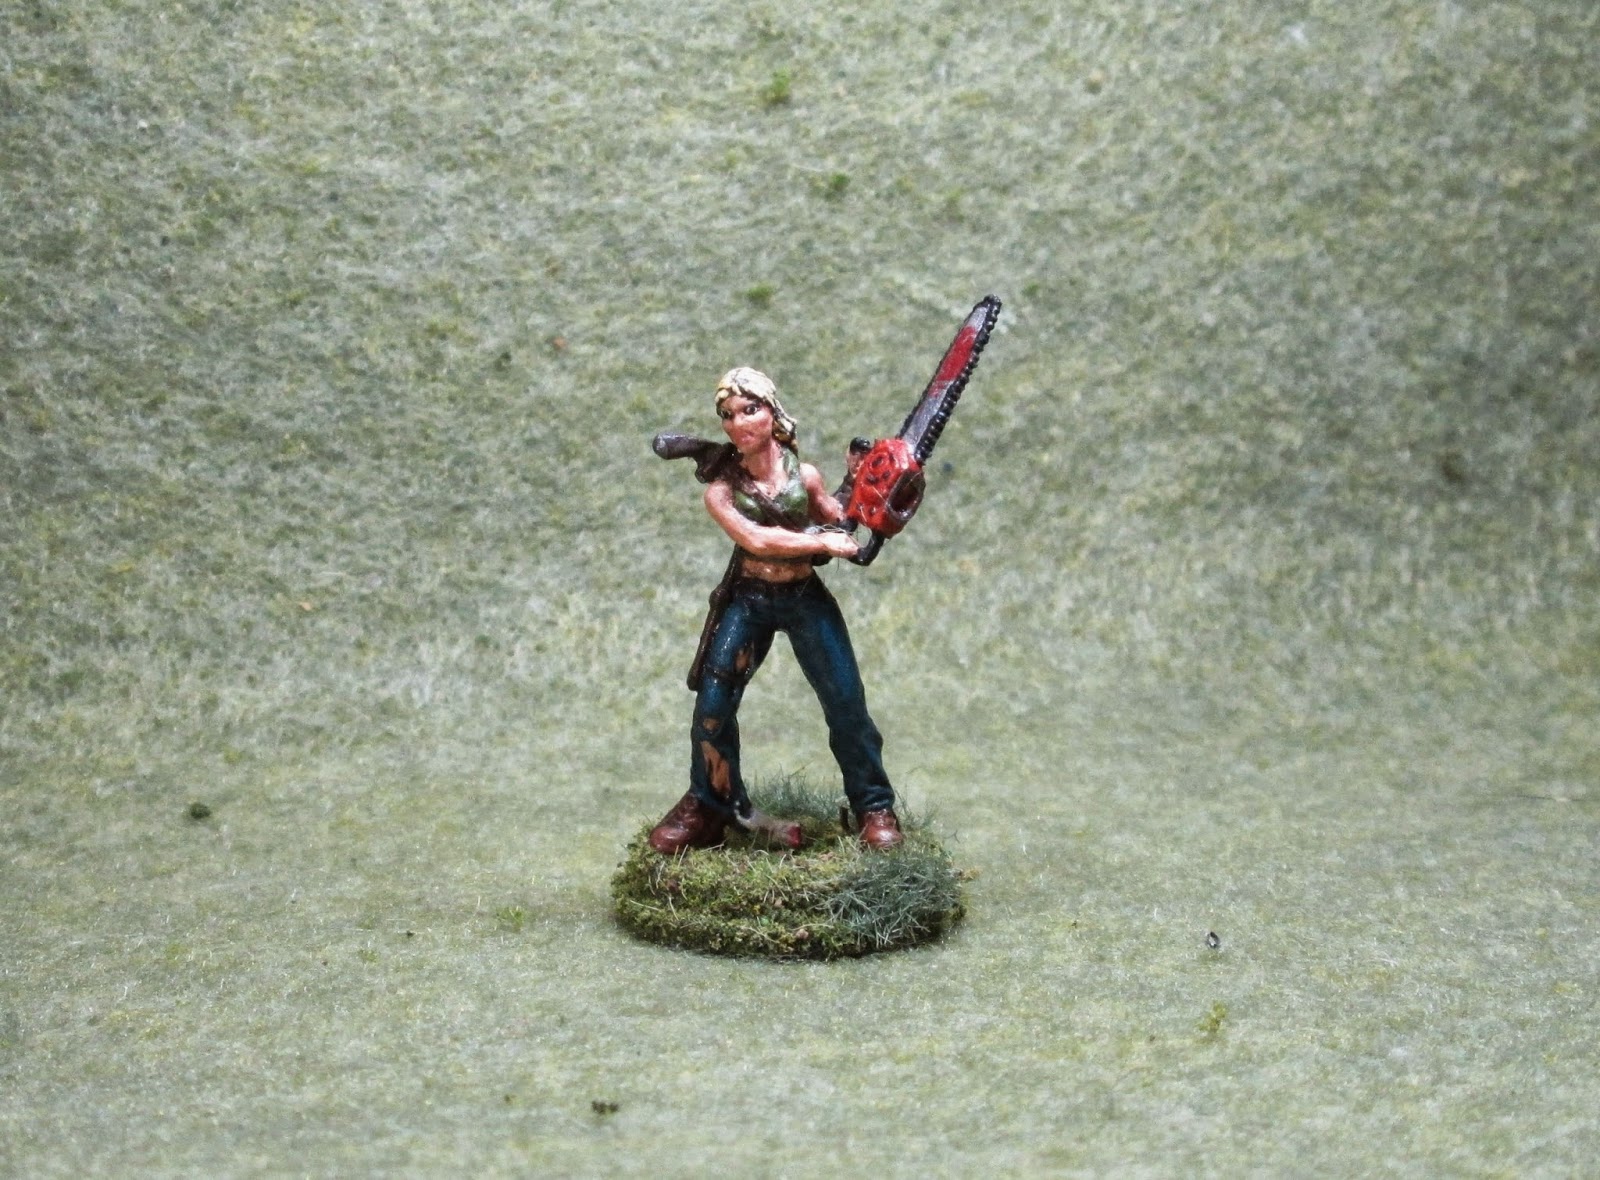
Berkeley, Zombie Survivor: Figure 113 of 265

This week I painted Berkeley, Zombie Survivor from the Zombie Hunters set. Since I am already half way though this set, I figured I'd just wrap it up this month.  I'll paint the last figure this week.
     I began my preparation of this figure in the usual way; soaking it in a dish of water with a couple drops of dish soap added, then giving it a light scrub with a soft toothbrush, and then rinsing and drying.  I then glued the figure to a 7/8" black-primed fender washer with Aleene's Tacky glue, and glued the washer to a tongue depressor with a couple drops of Elmer's White Glue.
   I began the painting process by giving the whole figure a wash with very thinned black ink with just a pin head drop of dish soap in it.  This ink wash settles and dries into all the crevices and creases in the figure, and helps me to see all the sculpted detail, so I can keep my paint in the lines. :)  
When the wash was dry, I started by painting all her skin with Apple Barrel "Flesh". I then painted her pants with Americana "Wedgwood Blue", and her shirt with Americana "Avocado".
Next, I painted her boots with DecoArt "Cinnamon Brown",  her belt and holsters with Americana "Asphaltum", and her hair and the weapon grips with Americana "Charcoal Grey". The chainsaw housing I painted GW "Blazing Orange", and the zombie arm gripping her pants cuff I painted GW "Rotting Flesh". I then added a splotch of Folk Art "True Burgundy" to the stump of the zombie arm.
When all of these base colors had had time to dry, I gave the whole figure a wash with thinned GW "Agrax Earthshade".
 When this wash was dry, I drybrushed her hair with Folk Art "Golden Harvest", then Americana "Moon Yelow, and lastly, Americana "Buttermilk".  I then painted in her eyes, doing shadows with black, then white "whites"and lastly black pupils. Next I did her lips with Americana "Shading Flesh".  I then added highlights to her face, arms, and midriff with the base "Flesh" color.  I also highlighted her jeans and shirt with those base colors as well.
     I then painted the blade of the chainsaw, and the butt of the shotgun with Ceramcoat "Metallic Pewter".  When this was dry, I painted the very edge of the saw-blade  with un-thinned black ink. I then added a splatter mark on the blade with the "True Burgundy". I also painted the chainsaw's handles black.  Lastly, I painted the figure's bare base with the "Cinnamon Brown" to help hide the white before flocking.
     When everything had dried overnight, I painted the figure with a coat of Ceramcoat "Matte Varnish".  I let this dry several hours and then flocked the base.  The next morning I sprayed the figure with Testor's Dullcote" spray paint.
          I think this figure turned out well.  It was rather a straight forward paint job.

Figure 113 of 265: Complete

Monday, September 1, 2014

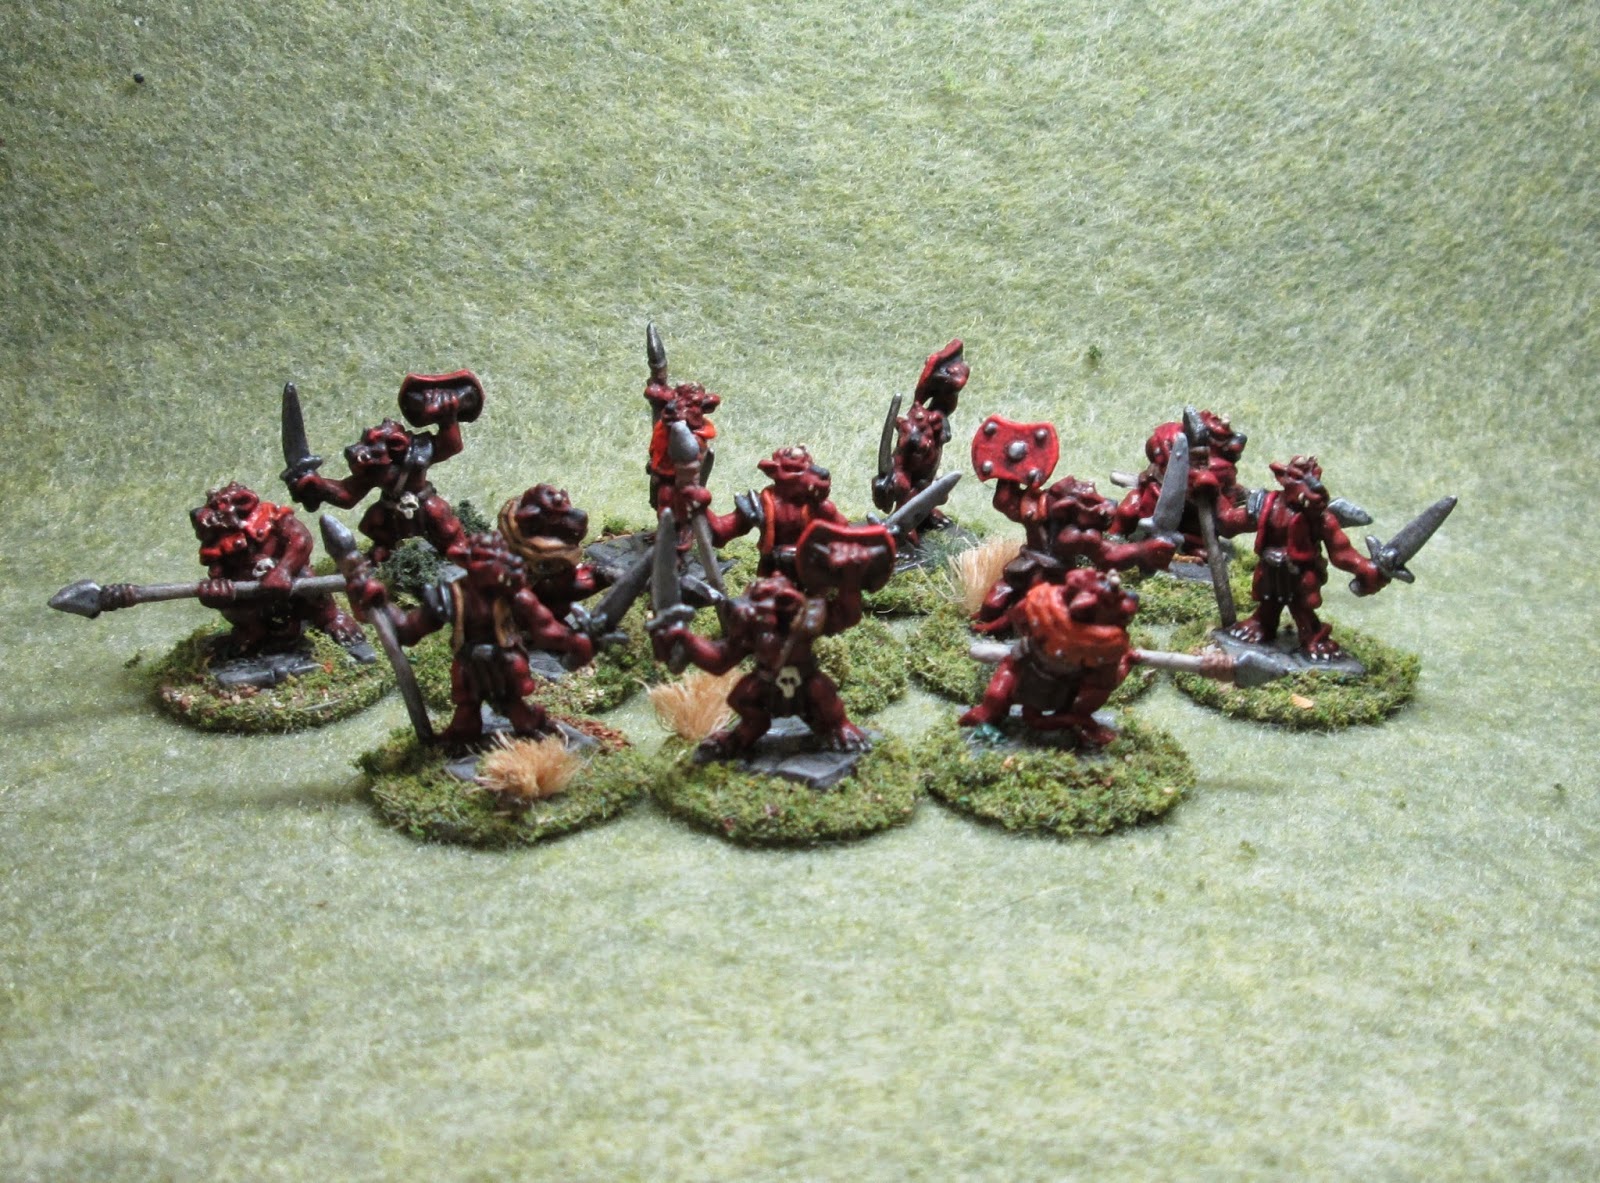
Last of the Kobolds: Figures 110-112 of 265

     This week, I finally got around to completing the last three of the Kobolds from the Dungeon Attack set; which have been hanging around the painting table collecting dust for a while now. With the completion of these, I have put the Dungeon Attack set to bed now, and it can go on the Completed Set list over on the right.  
     When I prepared these long ago, I had soaked them in some water with a little dish soap added, and then gave them a light scrub with a soft toothbrush and then rinsed them.  When dry, I had sprayed them with Krylon Flat Black Camouflage with Fusion spray paint, and when that was dry, I had glued them to black-primed 7/8" fender washers with Aleene's Tacky glue. I then glued the washers to a tongue depressor with a couple drops of Elmer's white glue.
     Before I began painting the first group of Kobolds, I had consulted my old trusty D & D Monster Manual, to see how they had described them.  The manual had said that they were, "...a very dark rusty brown, to a rusty black."    So,I had decided I wanted to go for the "rusty black" look and so far I had been happy with how this look had been turning out.  I started the usual way for the Kolbolds, by applying a coat of Folk Art "Barnyard Red" to the figures to get the "rusty" look.  Next,  I worked on their clothing, painting their loin cloths Accent "Real Umber", and the this time I did the rest of the clothing with Americana "Burnt Orange."
    Their assorted straps I painted with Americana "Mississippi Mud". The back of the shield I painted DecoArt Cinnamon Brown"; and the shield handle and any pouches they were wearing I painted Americana "Asphaltum".  For the front of the shield, I used Americana "Cadmium Red".   I then moved to painting the spear shafts Folk Art "Barn Wood", and the rope binding on the spears with Americana "Sable Brown".  I wrapped up the non-metallics on he figures by painting their horns with Americana "Khaki Tan", and  the skull belt buckles and their teeth and claws, with Americana "Buttermilk".
     Now I painted the stonework bases with Folk Art "Medium Gray", and I painted the little patches of vegetation on the Spear Kolbold's base with DecoArt "Forest Green".  Then, I did  the metal bits; sword, spear points, studs and buckle, with Ceramcoat "Metallic Pewter", and the armored shoulder pieces on the two with swords using Accent "Princely Pewter".
     After all the paint had a while to dry, I gave the figures a wash with thinned Vallejo "Black" ink. 
     I then went back and gave the figures' skin and clothing highlights with the base colors I had used. I then painted black noses on the Kobolds, and "Cadmium Red" dots for eyes.  I also used the "Buttermilk" to highlight their teeth.   The weapon edges I gave highlights with Folk Art "Silver Sterling".    After everything had time to dry thoroughly, I gave the figures a coat of Ceramcoat "Matte Varnish".  When this was dry, I flocked the bases.  After the bases had overnight to dry, I sprayed the figures with Testor's "Dullcote"
     So, that wraps up these little fellows.  Below is a shot of the whole clan ready for action. I think they make a fine little battle group.
     Figures 110-112: Complete