Before I left for the Fall-In wargame convention in Lancaster, PA last Friday, I finished up another of the Familiars set who's called, L'il Death.
I prepped the figure in the usual way; soaking it in a dish of water with a couple drops of dish-soap added, then giving it a light scrub with a soft toothbrush, and then rinsing and drying it. I then glued the figure to a white-primed .75" fender washer with Aleene's Tacky glue, and then glued the washer-mounted figure to a tongue depressor with a couple drops of the Elmer's glue.
I began by painting his robes Black, and then drybrushed them with Citadel 'The Fang".
Next, I painted his large bag with Americana "Bittersweet Chocolate", and the three items onhis back (scrolls?) with, top to bottom, Folk Art "Barn Wood", Americana "Buttermilk", and Americana "Zinc". I also used the "Buttermilk" to paint what looked like a scroll emerging fom his big bag. I then painted the handle of his weapon with Americana "Mississippi Mud".
I then painted the wrappings on his weapon with Folk Art "Grey Green", and the ropes securing the bundles on his back with Nicole's "Brown". I also used this color to paint the other object in the big sack he's carrying. After that, I painted his face and hands with Folk Art "Milkshake", and then painted his weapon's blade with Americana "Zinc".
Next, I painted the blade of his weapon wth Folk Art Metallics "Gunmetal Grey". Then, after everything had a chance to dry, I gave the weapon, the packs on h bag, and his bag and contents a wash with Citadel "Agrax Earthshade" wash using wet brush. When the wash was dry, I higlghted the wraps on his weapon's shaft with the base "Gray Green". I highlighted the 2 rolls/scrolls on top of his back with some Americana "Bleached Sand", and the bottom roll/scroll with Crafter's Acrylic "Storm Cloud Grey". I highlighted the ropes tying everything on his back with Americana "Terra Cotta". After that, I highlighted his face and hands with the base "Milkshake", and then painted his little fangs with White. I then did highlights on his weapon's blade with Folk Art "Silver Sterling". Laslty, I painted the base with a 50/50 mix of Americana "Neutral Grey" and Americana "Mississippi Mud".
For a quick paint job I'm relatively pleased. It certainly is an odd little figure, and it will be interesting to see if I ever find a use for it.
Figure 260 of 266: Complete
6 figures left.
My Efforts to Paint the Miniatures From the 1st, 2nd, 3rd, and 4th BONES Kickstarters!
Monday, November 7, 2016
Thursday, November 3, 2016
Balto Burrowell, Gnome Wizard: Figure 259 of 266, or the 3nd of 10 Figures Remaining
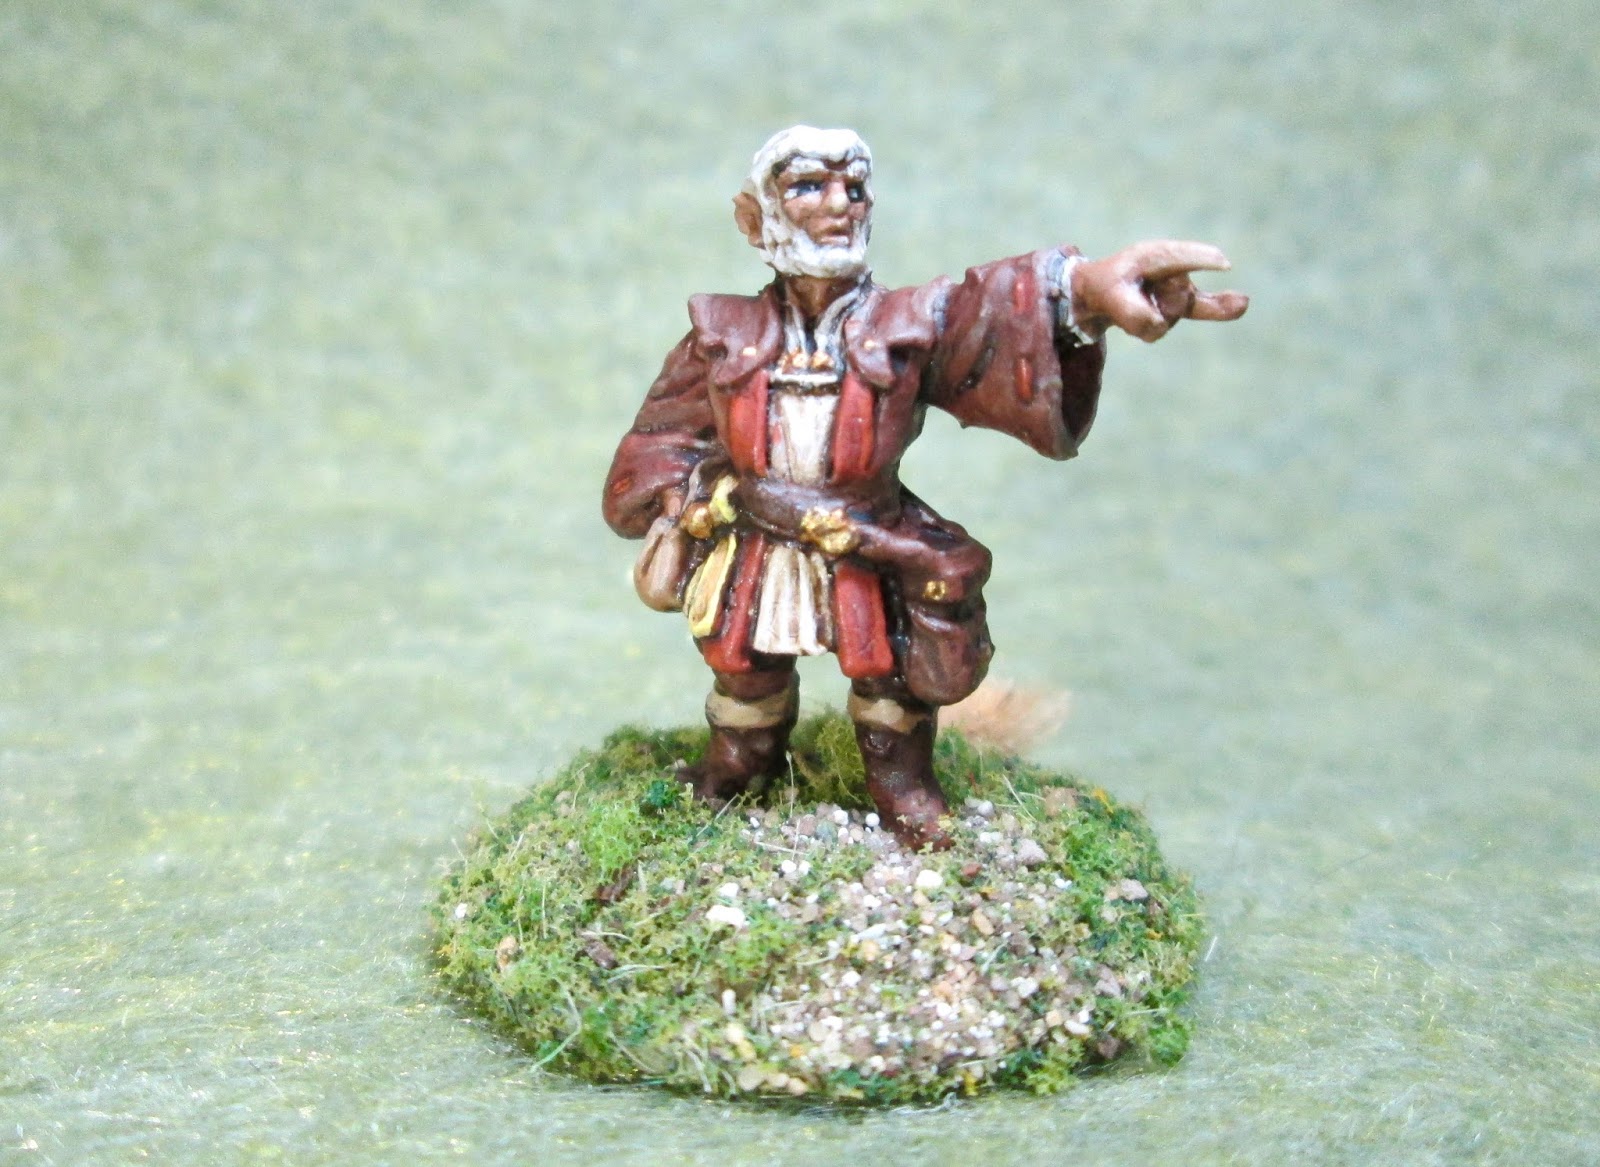
This week I finished up the remaining figure from the Half-Sized Heroes set: Balto Burrowell, Gnome Wizard. This set now joins the list of completed sets over on the right.
I prepped the figure in the usual way; soaking it in a dish of water with a couple drops of dish-soap added, then giving it a light scrub with a soft toothbrush, and then rinsing and drying it. I then glued the figure to a white-primed 1" fender washer with Aleene's Tacky glue, and then glued the washer-mounted figure to a tongue depressor with a couple drops of the Elmer's glue.
I began by giving the figure a wash with Reaper "Brown Liner" using a wet brush. This was to help bring out the details so I could see them better. Then, when the Liner was dry, I painted his face and hands with Americana "Sable Brown". After that I painted his shirt with Americana "Bleached Sand", and his coat and pants with Folk Art "Dark Brown".
Next, I painted his boots, belt, and large pouch with Accent "Real Umber"; and then painted his other pouch, and his boot tops, with Ceramcoat "Territorial Beige". After that, I painted the facings of his coat and the stitching in the sleeves with Apple Barrel "Burnt Sienna"; and I painted the sash around his belt on his right with Ceramcoat "Maple Sugar Tan".
I then painted his hair with Folk Art "Platinum Grey", and then when everything had a while to dry, I gave the entire figure a wash with Citadel "Agrax Earthshade" wash using a wet brush. When the wash was dry, I highlighted his hair with White, and then painted his eyes. After that, I highlighted his face and hands witha mix of the "Sable Brown" and Ameircana "Khaki Tan".
Next, I highlighted his shirt with Crafter's Acrylic "Light Antique White", and then highlighted his coat's facings with a mix of the "Burnt Sienna" and Crafter's Acrylic "Orange Spice". I then higlighted his coat with Americana "Mississippi Mud". After that, I highlighted his belts, bots and the large pouch with Crafter's Acrylic "Cinnamon Brown", and his small pouch and boot tops with Folk Art "Butter Pecan". I highlighted his small sash with Crafter's Acrylic "Daffodil Yellow".
I then painted some of the buttons on his clothing, his hair adornments, and some of the buckles n his belts and the fittings on his large pouch with Ceramcoat "Bronze". I then went back and highlighted these with Ceramcoat "14K Gold". Lastly, I painted his integral base with Ceramcoat "Walnut".
I let the figure dry all day, and before I went to bed I gave it a coat of Ceramcoat "Matte Varnish". The next morning I flocked the base, and later that afternoon I sprayed it with Testor's "Dullcote".
Well, with all the prep I had to do this week for the Fall-In wargame convention this coming weekend, this figure ended up being something of a rush-job. Nonetheless, I think he turned out pretty good. And I'm happy to see another figure set wrapped up.
Figure 259 of 266: Complete
7 figures left.
I prepped the figure in the usual way; soaking it in a dish of water with a couple drops of dish-soap added, then giving it a light scrub with a soft toothbrush, and then rinsing and drying it. I then glued the figure to a white-primed 1" fender washer with Aleene's Tacky glue, and then glued the washer-mounted figure to a tongue depressor with a couple drops of the Elmer's glue.
I began by giving the figure a wash with Reaper "Brown Liner" using a wet brush. This was to help bring out the details so I could see them better. Then, when the Liner was dry, I painted his face and hands with Americana "Sable Brown". After that I painted his shirt with Americana "Bleached Sand", and his coat and pants with Folk Art "Dark Brown".
Next, I painted his boots, belt, and large pouch with Accent "Real Umber"; and then painted his other pouch, and his boot tops, with Ceramcoat "Territorial Beige". After that, I painted the facings of his coat and the stitching in the sleeves with Apple Barrel "Burnt Sienna"; and I painted the sash around his belt on his right with Ceramcoat "Maple Sugar Tan".
I then painted his hair with Folk Art "Platinum Grey", and then when everything had a while to dry, I gave the entire figure a wash with Citadel "Agrax Earthshade" wash using a wet brush. When the wash was dry, I highlighted his hair with White, and then painted his eyes. After that, I highlighted his face and hands witha mix of the "Sable Brown" and Ameircana "Khaki Tan".
Next, I highlighted his shirt with Crafter's Acrylic "Light Antique White", and then highlighted his coat's facings with a mix of the "Burnt Sienna" and Crafter's Acrylic "Orange Spice". I then higlighted his coat with Americana "Mississippi Mud". After that, I highlighted his belts, bots and the large pouch with Crafter's Acrylic "Cinnamon Brown", and his small pouch and boot tops with Folk Art "Butter Pecan". I highlighted his small sash with Crafter's Acrylic "Daffodil Yellow".
I then painted some of the buttons on his clothing, his hair adornments, and some of the buckles n his belts and the fittings on his large pouch with Ceramcoat "Bronze". I then went back and highlighted these with Ceramcoat "14K Gold". Lastly, I painted his integral base with Ceramcoat "Walnut".
I let the figure dry all day, and before I went to bed I gave it a coat of Ceramcoat "Matte Varnish". The next morning I flocked the base, and later that afternoon I sprayed it with Testor's "Dullcote".
Well, with all the prep I had to do this week for the Fall-In wargame convention this coming weekend, this figure ended up being something of a rush-job. Nonetheless, I think he turned out pretty good. And I'm happy to see another figure set wrapped up.
Figure 259 of 266: Complete
7 figures left.
Monday, October 31, 2016
Elliwyn Heatherlark, Gnome Bard: Figure 258 of 266, or the 2nd of 10 Figures Remaining
Over the weekend I finished up Elliwyn Heatherlark, Gnome Bard, from the Half-Sized Heroes set. I have already painted a couple figures from this set before, so there are only this figure, and one more left to go in this set.
I prepped the figure in the usual way; soaking it in a dish of water with a couple drops of dish-soap added, then giving it a light scrub with a soft toothbrush, and then rinsing and drying it. I then glued the figure to a white-primed 1" fender washer with Aleene's Tacky glue, and then glued the washer-mounted figure to a tongue depressor with a couple drops of the Elmer's glue.
When the wash was dry, I highlighted her hair with White. I then painted her eyes, and then highlighted her face with Americana "Terra Cotta". Next, I mixed a little of the "Cinnamon Brown, and some Americana "Sable Brown", and highlighted her tabard. After that I painted her sword blade, and the back of her shield with Americana "Neutral Grey", and then painted the face of her shield with Ceramcoat "Opaque Red". I then painted the metal parts on her sword hilt, her horn, and her belt buckle with Apple Barrel "Apple Maple Syrup".
Next, I highlighted her leggings with a mix of the "Golden Oxide" and the "Apple Maple Syrup", and I highlighted her gloves and boot tops with Americana "Bleached Sand" I painted the shield straps with Folk Art "Dark Brown", and then used that color to highlight her boots, straps pouches and backpack. I noticed there was something sticking from her backpack at that point; I think it was possibly meant to be another horn, but I decided to paint it like a scroll (perhaps rolled up sheet music), so I painted it with some Americana "Buttermilk", and did some quick "Bleached Sand" highlights.
I then painted a musical note on her shield using Americana "Yellow", and highlighted with Crafter's Acrylic "Daffodil Yellow". After that, I went back and painted the sword hilt, horn, belt buckle, and the broach at her neck with Ceramcoat "Bronze" and then did highlights with Ceramcoat "14K Gold". Then I painted her sword blade, and the buckles on her backpack, with the "Gunmetal Grey", and highlighted with the "Silver Sterling". I went back and added gems to her belt and sword hilt using the "Opaque Red", and added little White highlights. Lastly, I painted her integral base with Ceramcoat "Walnut".
I let the figure dry over night and the next day I gave it a coat of Ceramcoat "Matte Varnish". When dry, I flocked the base. Another overnight dry, and I sprayed it with Testor's "Dullcote".
I like how she turned out, though I really don't think having a horn makes her particularly look like a bard to me. She looks more like a fighter in my opinion.
Figure 258 of 266: Complete
8 figures left.
I prepped the figure in the usual way; soaking it in a dish of water with a couple drops of dish-soap added, then giving it a light scrub with a soft toothbrush, and then rinsing and drying it. I then glued the figure to a white-primed 1" fender washer with Aleene's Tacky glue, and then glued the washer-mounted figure to a tongue depressor with a couple drops of the Elmer's glue.
I began by giving the figure a wash with Reaper "Brown Liner" using a wet brush. This was to help bring out the details so I could see them better. I then painted the chainmail with Black, and then drybrushed it with Folk Art Metallics "Gunmetal Grey". I then went back and drybrushed on some light highlights with Folk Art "Silver Sterling". Next, I painted her face with GW "Vermin Brown", and her leggings with Accent "Golden Oxide".
I then painted her tabard with Crafter's Acrylic "Cinnamon Brown", and the sleeves of her undershirt with Ceramcoat "Territorial Beige". After that, I painted her boots with Americana "Asphaltum".
Next, I used Americana "Raw Umber", to paint her straps, backpack, sword grip, and pouches. I then painted her gloves, and the fur trim on her boots, with Folk Art "Barn Wood". After that, I painted her hair with Folk Art "Platinum Grey". Then, after everything had a while to dry, I gave the figure a wash with Citadel "Agrax Earthshade" wash using a wet brush, and carefully avoiding the chainmail parts.When the wash was dry, I highlighted her hair with White. I then painted her eyes, and then highlighted her face with Americana "Terra Cotta". Next, I mixed a little of the "Cinnamon Brown, and some Americana "Sable Brown", and highlighted her tabard. After that I painted her sword blade, and the back of her shield with Americana "Neutral Grey", and then painted the face of her shield with Ceramcoat "Opaque Red". I then painted the metal parts on her sword hilt, her horn, and her belt buckle with Apple Barrel "Apple Maple Syrup".
Next, I highlighted her leggings with a mix of the "Golden Oxide" and the "Apple Maple Syrup", and I highlighted her gloves and boot tops with Americana "Bleached Sand" I painted the shield straps with Folk Art "Dark Brown", and then used that color to highlight her boots, straps pouches and backpack. I noticed there was something sticking from her backpack at that point; I think it was possibly meant to be another horn, but I decided to paint it like a scroll (perhaps rolled up sheet music), so I painted it with some Americana "Buttermilk", and did some quick "Bleached Sand" highlights.
I then painted a musical note on her shield using Americana "Yellow", and highlighted with Crafter's Acrylic "Daffodil Yellow". After that, I went back and painted the sword hilt, horn, belt buckle, and the broach at her neck with Ceramcoat "Bronze" and then did highlights with Ceramcoat "14K Gold". Then I painted her sword blade, and the buckles on her backpack, with the "Gunmetal Grey", and highlighted with the "Silver Sterling". I went back and added gems to her belt and sword hilt using the "Opaque Red", and added little White highlights. Lastly, I painted her integral base with Ceramcoat "Walnut".
I let the figure dry over night and the next day I gave it a coat of Ceramcoat "Matte Varnish". When dry, I flocked the base. Another overnight dry, and I sprayed it with Testor's "Dullcote".
I like how she turned out, though I really don't think having a horn makes her particularly look like a bard to me. She looks more like a fighter in my opinion.
Figure 258 of 266: Complete
8 figures left.
Thursday, October 27, 2016
Judas Bloodspire, Vampire: Figure 257 of 266: or the 1st of 10 Figures Remaining
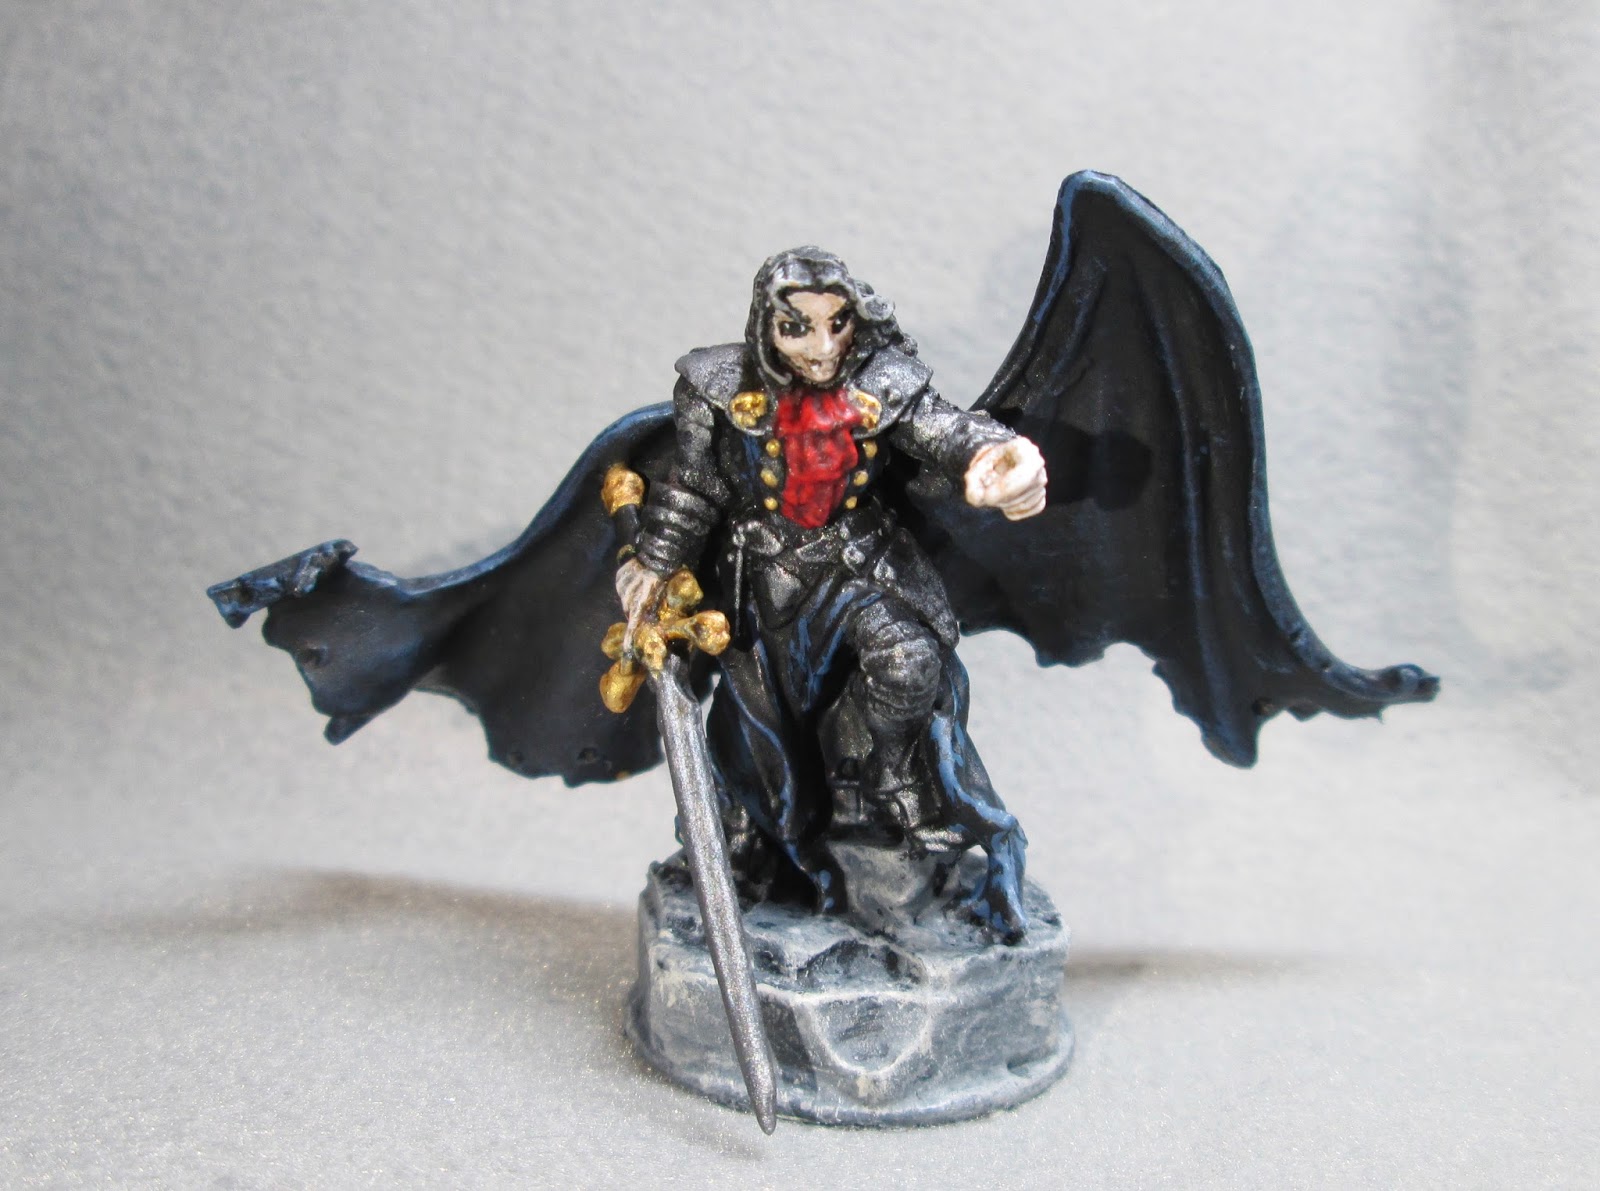
This week I finished up the Grave Danger set by painting the Judas Bloodspire, Vampire, figure. This set now joins the list of completed sets over on the right. Also, as noted in the title, this figure is the first of the final 10 countdown.
I prepped the figure in the usual way; soaking it in a dish of water with a couple drops of dish-soap added, then giving it a light scrub with a soft toothbrush, and then rinsing and drying it.
I noticed that with the way he was assembled, his sword fell lower than the actual base of the figure; so, rather than mess with removing the hand or arm and repositioning it, I grabbed a small plaster hex-shaped block I had, and after trimming his base down a little to fit, glued him to the top of it with some Aleene's Tacky glue. I then glued the hex to a white-primed 1" fender washer with Aleene's Tacky glue, and then glued the washer-mounted figure to a tongue depressor with a couple drops of the Elmer's glue. The inclusion of the small hex riser put the tip of the sword at the perfect height so that it won't hit the table surface.
I began by painting the figure entirely Black; and then when the Black was dry, I drybrushed the figure's armor with Folk Art Metallics "Gunmetal Grey". I then passed over the armor with a lighter drybrush of Folk Art "Silver Sterling".
Next, I painted his face and hands with Folk Art "Milkshake", and then painted his cravat with Ceramcoat "Black Cherry". I then repainted all his cloth garments, and his cape, with Black to cover any places where the metallic drybrushing had gone that wasn't armor.
I then gave his face and hands a wash with Citadel "Agrax Earthshade" wash. When the wash was dry, I drybrushed his hair with Americana "Neutral Grey", and did a little highlight with Folk Art "Platinum Grey". I then painted his eyes, and used White to paint his fangs. The fangs were't molded real well, so I went back and outlined them as best I could with a little of the "Milkshake mixed directly with the Agrax Earthshade" wash. I then highlighted his face and hands with some of the Milkshake mixed with white. Next, I highlighted his cravat with Ceramcoat "Opaque Red". I then drybrushed his garments and cape with Citadel "The Fang", going back and painting areas directly that I couldn't reach with the drybrushing..
Next, I painted his sword hilt, buttons, and the skull emblems on his shoulders with Apple Barrel "Apple Maple Syrup". I then gave the base a heavy drybrush with Americana "Zinc", followed by lighter drybrushes of Crafter's Acrylic "Storm Cloud Grey", and the "Platinum Grey". After that, I went back and painted the sword hilt, buttons, and skull emblems with Ceramcoat "14K Gold", and then highlighted it with Ceramcoat "Wedding Gold". Then I painted his sword blade with the "Gunmetal Grey", and highlighted it with the Silver Sterling".
When everything had overnight to dry, I gave the figure a coat of Ceramcoat "Matte Varnish" early the next morning. The next day I sprayed the figure with Testor's Dullcote.
I like how he turned out. I was worried he would be too monotone, but I think the red and the gold go a long way to provide visual interest.
Figure 257 of 266: Complete
9 figures left.
I prepped the figure in the usual way; soaking it in a dish of water with a couple drops of dish-soap added, then giving it a light scrub with a soft toothbrush, and then rinsing and drying it.
I noticed that with the way he was assembled, his sword fell lower than the actual base of the figure; so, rather than mess with removing the hand or arm and repositioning it, I grabbed a small plaster hex-shaped block I had, and after trimming his base down a little to fit, glued him to the top of it with some Aleene's Tacky glue. I then glued the hex to a white-primed 1" fender washer with Aleene's Tacky glue, and then glued the washer-mounted figure to a tongue depressor with a couple drops of the Elmer's glue. The inclusion of the small hex riser put the tip of the sword at the perfect height so that it won't hit the table surface.
I began by painting the figure entirely Black; and then when the Black was dry, I drybrushed the figure's armor with Folk Art Metallics "Gunmetal Grey". I then passed over the armor with a lighter drybrush of Folk Art "Silver Sterling".
Next, I painted his face and hands with Folk Art "Milkshake", and then painted his cravat with Ceramcoat "Black Cherry". I then repainted all his cloth garments, and his cape, with Black to cover any places where the metallic drybrushing had gone that wasn't armor.
I then gave his face and hands a wash with Citadel "Agrax Earthshade" wash. When the wash was dry, I drybrushed his hair with Americana "Neutral Grey", and did a little highlight with Folk Art "Platinum Grey". I then painted his eyes, and used White to paint his fangs. The fangs were't molded real well, so I went back and outlined them as best I could with a little of the "Milkshake mixed directly with the Agrax Earthshade" wash. I then highlighted his face and hands with some of the Milkshake mixed with white. Next, I highlighted his cravat with Ceramcoat "Opaque Red". I then drybrushed his garments and cape with Citadel "The Fang", going back and painting areas directly that I couldn't reach with the drybrushing..
Next, I painted his sword hilt, buttons, and the skull emblems on his shoulders with Apple Barrel "Apple Maple Syrup". I then gave the base a heavy drybrush with Americana "Zinc", followed by lighter drybrushes of Crafter's Acrylic "Storm Cloud Grey", and the "Platinum Grey". After that, I went back and painted the sword hilt, buttons, and skull emblems with Ceramcoat "14K Gold", and then highlighted it with Ceramcoat "Wedding Gold". Then I painted his sword blade with the "Gunmetal Grey", and highlighted it with the Silver Sterling".
When everything had overnight to dry, I gave the figure a coat of Ceramcoat "Matte Varnish" early the next morning. The next day I sprayed the figure with Testor's Dullcote.
I like how he turned out. I was worried he would be too monotone, but I think the red and the gold go a long way to provide visual interest.
Figure 257 of 266: Complete
9 figures left.
Monday, October 24, 2016
Griffon: Figure 256 of 266
Hello there, readers! Well, here we stand on the threshold of the final ten figures of this endeavor. This weekend I finished up figure 256, the Griffon figure from the single-figure Griffon set. That leaves just 10 figures left to paint. The remaining figures ended up being mostly a mix of the smallest and largest!
Now back to the matter at hand; the Griffon. I prepped the figure's parts in the usual way; soaking them in a dish of water with a couple drops of dish-soap added, then giving them a light scrub with a soft toothbrush, and then rinsing and drying them. When dry, I glued the wings on to the body using Gorilla Superglue. I then glued the figure to a black-primed 2" fender washer.
I began by painting the lion part of the figure a 50/50 mix of Ceramcoat "Territorial Beige" and Accent "Golden Harvest". I then painted the eagle parts with Americana "Raw Umber". Next, I painted the beak and front legs with the plain "Golden Harvest", and the end of the lion's tail with Americana "Asphaltum". I then drybrushed the underside of the wings with Americana "Mississippi Mud".
After all the paint had a while to dry, I came back and gave the entire figure a wash with Citadel "Agrax Earthshade" wash using a wet brush. When the wash was dry, I Painted his tongue with Apple Barrel "Burnt Sienna", and then gave it highlights with Americana "Shading Flesh".
Next, I drybrushed the underside of the wings with Folk Art "Barn Wood". I then drybrushed the tops of the wings and the upper eagle-part of the body, as well as the end of the tail, with Americana "Sable Brown". After that, I drybrushed the lion part of the body with Ceramcoat "Maple Sugar Tan".
I then highlighted the beak, front legs, and claws with Americana "Moon Yellow". I painted the eyes with Crafter's Acrylic "Cinnamon Brown", then gave them Black pupils and White highlights. Next, I drybrushed the tips of the wings, on top and underneath with Black, and also heavily drybrushed the end of the beak with Black as well. Lastly, I painted his integral base with Ceramcoat "Walnut".
I let the figure dry over night and the next day I gave it a coat of Ceramcoat "Matte Varnish". When dry, I flocked the base. Another overnight dry, and I sprayed it with Testor's "Dullcote".
I'm really happy how this figure turned out. Unlike the Owlbear I did last week, I really like the sculpt on this one. And, like the Owlbear, it was easy to paint.
Figure 256 of 266: Complete
![]() |
| The final 10 figures. |
I began by painting the lion part of the figure a 50/50 mix of Ceramcoat "Territorial Beige" and Accent "Golden Harvest". I then painted the eagle parts with Americana "Raw Umber". Next, I painted the beak and front legs with the plain "Golden Harvest", and the end of the lion's tail with Americana "Asphaltum". I then drybrushed the underside of the wings with Americana "Mississippi Mud".
After all the paint had a while to dry, I came back and gave the entire figure a wash with Citadel "Agrax Earthshade" wash using a wet brush. When the wash was dry, I Painted his tongue with Apple Barrel "Burnt Sienna", and then gave it highlights with Americana "Shading Flesh".
Next, I drybrushed the underside of the wings with Folk Art "Barn Wood". I then drybrushed the tops of the wings and the upper eagle-part of the body, as well as the end of the tail, with Americana "Sable Brown". After that, I drybrushed the lion part of the body with Ceramcoat "Maple Sugar Tan".
I then highlighted the beak, front legs, and claws with Americana "Moon Yellow". I painted the eyes with Crafter's Acrylic "Cinnamon Brown", then gave them Black pupils and White highlights. Next, I drybrushed the tips of the wings, on top and underneath with Black, and also heavily drybrushed the end of the beak with Black as well. Lastly, I painted his integral base with Ceramcoat "Walnut".
I let the figure dry over night and the next day I gave it a coat of Ceramcoat "Matte Varnish". When dry, I flocked the base. Another overnight dry, and I sprayed it with Testor's "Dullcote".
I'm really happy how this figure turned out. Unlike the Owlbear I did last week, I really like the sculpt on this one. And, like the Owlbear, it was easy to paint.
Figure 256 of 266: Complete
Thursday, October 20, 2016
Arrius, Skeletal Warrior: Figure 255 of 266
This week I finished up the Arrius, Skeletal Warrior, figure from the Grave Danger set. Just one more figure to go in that set at this point.
I prepped the figure in the usual way; soaking it in a dish of water with a couple drops of dish-soap added, then giving it a light scrub with a soft toothbrush, and then rinsing and drying it. I then glued the figure to a white-primed 1" fender washer with Aleene's Tacky glue, and then glued the washer-mounted figure to a tongue depressor with a couple drops of the Elmer's glue.
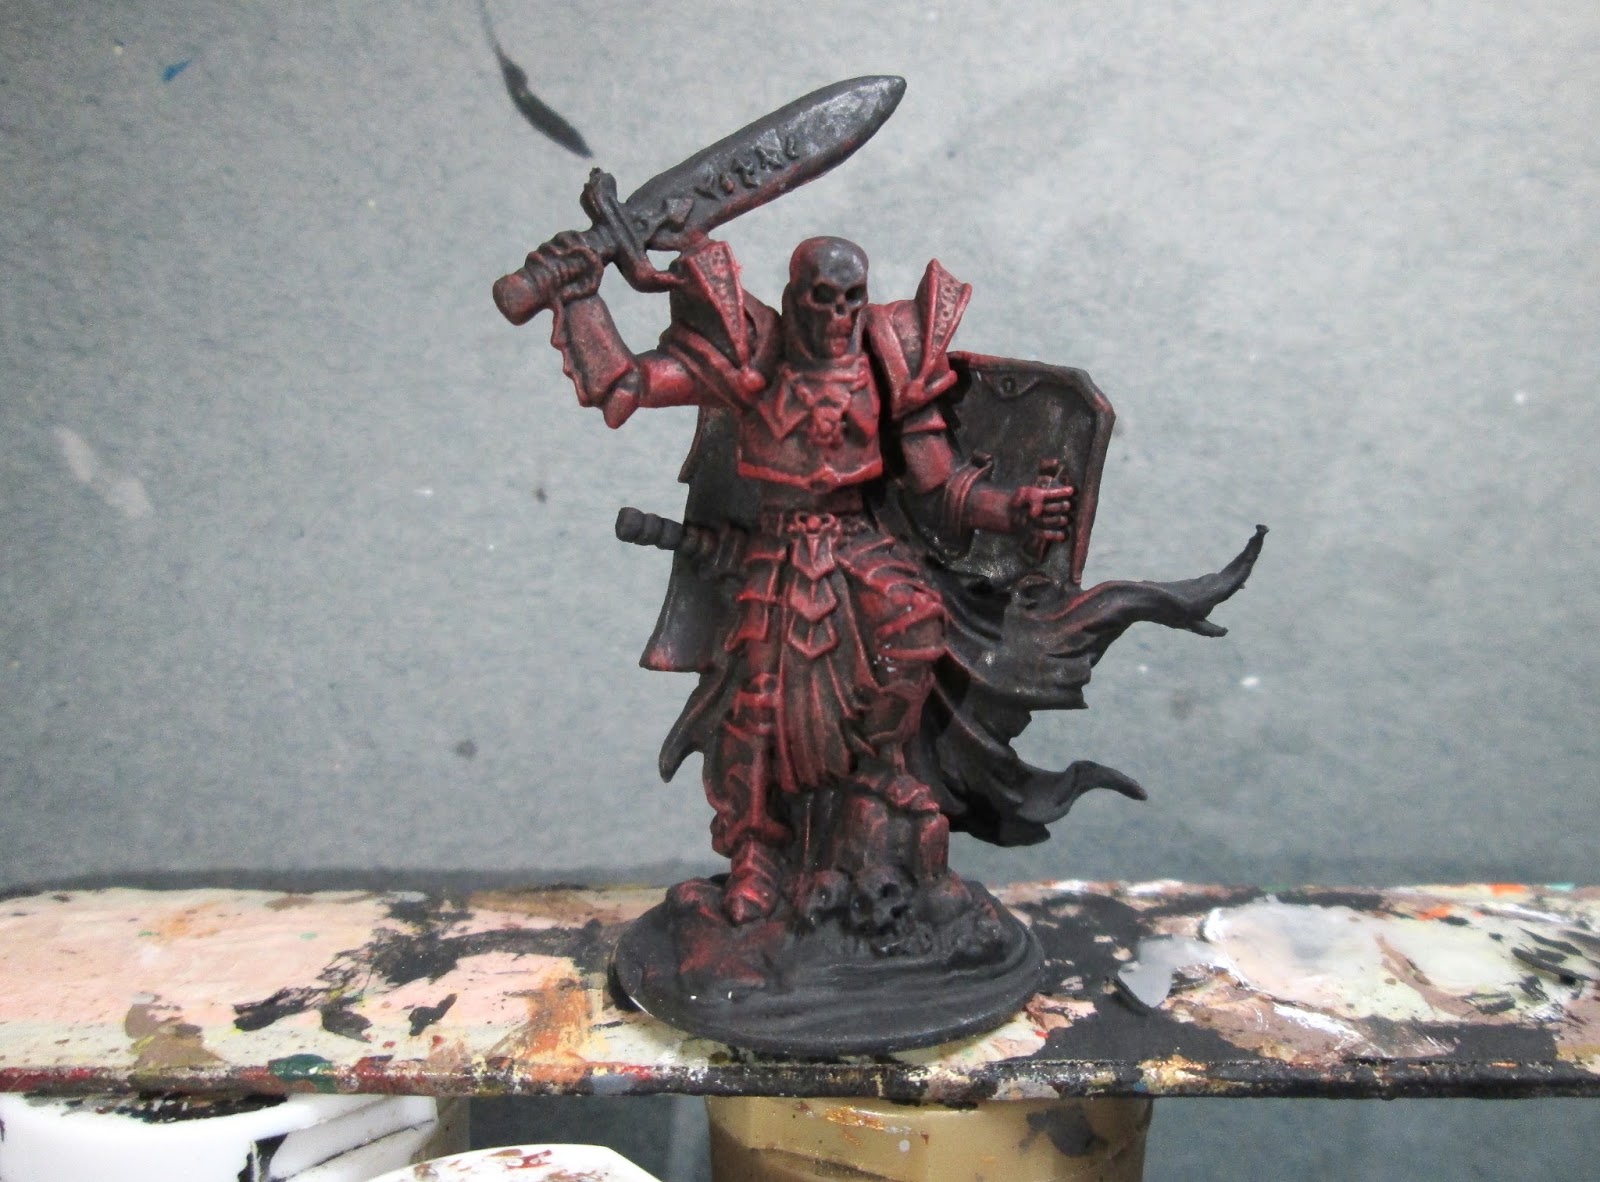
I then applied some slightly thinned Iron Wind Metals "Yellow" ink around the runes on the sword. When this was dry, I painted the runes with Apple Barrel "Lemon Chiffon", and then did highlights on the runes with White. While I was waiting for the ink to dry, I drybrushed his skull with Americana "Bleached Sand", and then Crafter's Acrylic "Light Antique White". I then touched up all the black areas that had got other colors on them, and then painted everything I planned to make metallic gold using Americana "Terra Cotta".
Next, I drybrushed all his clothing with Citadel "The Fang". I then gave the base a heavy drybrush with Americana "Zinc", followed by lighter drybrushes of Americana "Neutral Grey", and Folk Art "Platinum Grey". I painted the skulls on the base with Folk Art "Barn Wood", and drybrushed them with the "Bleached Sand", and added "Light Antique White" highlights. I then repainted all the parts I had painted with the "Terra Cotta", this time using Ceramcoat "Bronze". When the "Bronze" was dry, I gave it all a quick wash with some Citadel "Agrax Earthsahde" wash using a wet brush. I painted his eyes, using first Ceramcoat "Bright Red", and then Crafter's Acrylic "Daffodil Yellow". Lastly, I painted the little gem in his necklace using some of the "Bright Red", and "Dark Cherry" with White highlights.
When everything had overnight to dry, I gave the figure a coat of Ceramcoat "Matte Varnish" early the next morning. The next day I sprayed the figure with Testor's Dullcote. I then when back and put a little dab of Americana "DuraClear Gloss" Varnish on the gem in his necklace.
I kind of like how the red armor turned out. I wanted to do something different than the same old greyish/silver metal armor, and I think this worked pretty well as a kind of "Red Baron" or "Bloody Baron" character.
Figure 255 of 266: Complete
I prepped the figure in the usual way; soaking it in a dish of water with a couple drops of dish-soap added, then giving it a light scrub with a soft toothbrush, and then rinsing and drying it. I then glued the figure to a white-primed 1" fender washer with Aleene's Tacky glue, and then glued the washer-mounted figure to a tongue depressor with a couple drops of the Elmer's glue.
I began by painting the entire figure with Black. Then, when the Black was dry, I gave it a heavy drybrush of Ceramcoat "Black Cherry", followed by a drybrush coat of Ceramcoat "Opaque Red".
Next, I drybrushed his armor with DecoArt Dazzling Metallics "Festive Red". I followed that with lightly drybrushing the sword with Folk Art Metallics "Gunmetal Grey". I then painted his skull with Americana "Khaki Tan", and the sword grips with Americana "Bittersweet Chocolate".I then applied some slightly thinned Iron Wind Metals "Yellow" ink around the runes on the sword. When this was dry, I painted the runes with Apple Barrel "Lemon Chiffon", and then did highlights on the runes with White. While I was waiting for the ink to dry, I drybrushed his skull with Americana "Bleached Sand", and then Crafter's Acrylic "Light Antique White". I then touched up all the black areas that had got other colors on them, and then painted everything I planned to make metallic gold using Americana "Terra Cotta".
Next, I drybrushed all his clothing with Citadel "The Fang". I then gave the base a heavy drybrush with Americana "Zinc", followed by lighter drybrushes of Americana "Neutral Grey", and Folk Art "Platinum Grey". I painted the skulls on the base with Folk Art "Barn Wood", and drybrushed them with the "Bleached Sand", and added "Light Antique White" highlights. I then repainted all the parts I had painted with the "Terra Cotta", this time using Ceramcoat "Bronze". When the "Bronze" was dry, I gave it all a quick wash with some Citadel "Agrax Earthsahde" wash using a wet brush. I painted his eyes, using first Ceramcoat "Bright Red", and then Crafter's Acrylic "Daffodil Yellow". Lastly, I painted the little gem in his necklace using some of the "Bright Red", and "Dark Cherry" with White highlights.
When everything had overnight to dry, I gave the figure a coat of Ceramcoat "Matte Varnish" early the next morning. The next day I sprayed the figure with Testor's Dullcote. I then when back and put a little dab of Americana "DuraClear Gloss" Varnish on the gem in his necklace.
I kind of like how the red armor turned out. I wanted to do something different than the same old greyish/silver metal armor, and I think this worked pretty well as a kind of "Red Baron" or "Bloody Baron" character.
Figure 255 of 266: Complete
Monday, October 17, 2016
Owlbear: Figure 254 of 266
I took a break from working on the Grave Danger set this past week, and painted up the single-figure Owlbear set for today's post. Being a single-figure set, it now joins the list of completed sets, over on the right.
I forgot to take a picture of the figure before I started surgery on it, so I'm using the photo from the Reaper site. I was not a fan of how the figure was positioned with the whole body and head turned almost completely sideways. I thought it was a rather awkward pose.
So to fix this, I thought I would simply cut the figure above the ankle, and rotate the body in a more pleasing position. First though, I prepped the figure in the usual way; soaking it in a dish of water with a couple drops of dish- soap added, then giving it a light scrub with a soft toothbrush, and then rinsing and drying it.
Since his weight wouldn't be resting on his right claw anymore, I drilled holes in his ankle and leg, to insert a paperclip-wire pin to help hold the figure, which would now be supported by the single ankle point, in an upright position. I then glued the base to a 2" fender washer using Aleene's Tacky glue.
When the base glue was dry, I glued the leg and pin all back together with Gorilla superglue, and got ready to paint.
After the wash had dried, I drybrushed the darker outer part of the body with Crafter's Acrylic "Cinnamon Brown", and then Americana "Sable Brown". I then drybrushed the lighter underside parts with Ceramcoat "Maple Sugar Tan".
I then painted the outer edge of the eyes with Ceramcoat "Opaque Red", and then painted the inner part of the eye with Crafter's Acrylic "Pure Pumpkin". I finished the eyes by adding Black pupils. Next, I highlighted the tongue with Americana "Shading Flesh", and then highlighted the beak with Crafter's Edition "Bright Yellow". After that I highlighted the claws and talons with Folk Art "Gray Green", followed with lighter highlights using Folk Art "Porcelain White". Lastly, I painted his integral base with Ceramcoat "Walnut".
I let the figure dry over night and the next day I gave it a coat of Ceramcoat "Matte Varnish". When dry, I flocked the base. Another overnight dry, and I sprayed it with Testor's "Dullcote". When the "Dullcote" was dry, I went back and painted his eyes with Americana "DuraClear Gloss" Varnish.
I like how this figure turned out; and best of all, with no clothing, weapons, or accoutrements to paint, he went really quickly. :)
I forgot to take a picture of the figure before I started surgery on it, so I'm using the photo from the Reaper site. I was not a fan of how the figure was positioned with the whole body and head turned almost completely sideways. I thought it was a rather awkward pose.
So to fix this, I thought I would simply cut the figure above the ankle, and rotate the body in a more pleasing position. First though, I prepped the figure in the usual way; soaking it in a dish of water with a couple drops of dish- soap added, then giving it a light scrub with a soft toothbrush, and then rinsing and drying it.
Since his weight wouldn't be resting on his right claw anymore, I drilled holes in his ankle and leg, to insert a paperclip-wire pin to help hold the figure, which would now be supported by the single ankle point, in an upright position. I then glued the base to a 2" fender washer using Aleene's Tacky glue.
When the base glue was dry, I glued the leg and pin all back together with Gorilla superglue, and got ready to paint.
I began by painting the outer body, upper wings, and legs, all with Americana "Bittersweet Chocolate". I then painted the underbelly, and the underside of the wings, with Accent "Mustard Seed". After that, I painted the beak with Accent "Golden Harvest", and then painted the claws and talons with a 50/50 mix of the "Golden Harvest" and Americana "Neutral Grey".
I painted the tongue with Apple Barrel "Burnt Sienna"; and then when everything had a chance to dry for a while, I gave the entire figure a wash with Citadel "Agrax Earthsahde" using a wet brush.After the wash had dried, I drybrushed the darker outer part of the body with Crafter's Acrylic "Cinnamon Brown", and then Americana "Sable Brown". I then drybrushed the lighter underside parts with Ceramcoat "Maple Sugar Tan".
I then painted the outer edge of the eyes with Ceramcoat "Opaque Red", and then painted the inner part of the eye with Crafter's Acrylic "Pure Pumpkin". I finished the eyes by adding Black pupils. Next, I highlighted the tongue with Americana "Shading Flesh", and then highlighted the beak with Crafter's Edition "Bright Yellow". After that I highlighted the claws and talons with Folk Art "Gray Green", followed with lighter highlights using Folk Art "Porcelain White". Lastly, I painted his integral base with Ceramcoat "Walnut".
I let the figure dry over night and the next day I gave it a coat of Ceramcoat "Matte Varnish". When dry, I flocked the base. Another overnight dry, and I sprayed it with Testor's "Dullcote". When the "Dullcote" was dry, I went back and painted his eyes with Americana "DuraClear Gloss" Varnish.
I like how this figure turned out; and best of all, with no clothing, weapons, or accoutrements to paint, he went really quickly. :)
Subscribe to:
Posts (Atom)