Monday, August 15, 2016

Orc Hunters: Figures 234-237 of 266

   This past week I finished up the last four figures from the Orcpocalypse Add-On set; the Orc Hunter figures.  This set now joins the list of completed sets over on the right.
      I prepped these figures in the usual way,  washing them in some dish soap, lightly scrubbing them with a soft toothbrush,  and then letting them dry.  Then, like with the other figures from this set, I did  conversions to some of them.  Looking at the row below: The first orc had the right forearm from one of the Bones Gnolls added, and the left forearm from a GW Ogre. The second has had his hands drilled out and a cut-down GW lance added.  The third orc has had the sword blade from one of the previous Bones Orc conversions added in place of the original spear head.   The fourth orc is an untouched original, droopy spear and all.  Note that any hard plastic part I was using, I pre-primed with flat black spray paint before gluing it on.  Also, I used Gorilla Super Glue to affix all conversions.
       After the conversions were done, I glued the four onto black primed 1.25 inch fender washers using Aleene's Tacky glue.  I then glued them onto a tongue depressor, for ease of painting, using a couple drops of Elmer's white glue each.
   I began by painting them entirely Black; and then when the Black was dry, I drybrushed them entirely with Folk Art Metallics "Gunmetal Grey".
 I then painted their skin with with Aleene's "Deep Khaki".  Next, I painted their cloth "skirts" hanging under the chainmail: Orc one with Crafter's Acrylic "Orange Spice", Orc two with Americana "Neutral Grey", Orc three with Black, and Orc four with Folk Art  "Dapple Grey".
    Next, I painted the boots of the first two, and then belt and neck straps of the second two, with Americana "Raw Umber".   I then painted the belts and neck straps of the first two, and the boots of the second two, with Black.  After that, I painted all the forearms wraps and straps with Anita's "Burnt Sienna", and on the first Orc I painted the bones on his right forearm as well as his morning star's handle with FolkArt "Barn Wood". I then painted the cord holding the bones to his wrist guard using Ceramcoat "Territorial Beige".  I painted all the spear shafts with Crafter's Acrylic "Cinnamon Brown", and the streamer coming off the third Orc's spear with Reaper MSP Bones "Cinnamon Red". I painted all their teeth with Americana "Buttermilk".
     I let everything dry for a while, then I gave them all a complete wash with Citadel "Agrax Earthshade" wash using a wet brush.  When the wash was dry, I painted their eyes, using the "Buttermilk" for their "whites", and then I highlighted their teeth with Crafter's Acrylic "Light Antique White".
    Next, I highlighted their skin with some of the "Deep Khaki" mixed with a little Aleene's "Dusty Khaki".  I highlighted the tops of the spear shafts with Folk Art "Dark Brown".  I then worked on highlighting their "skirts": for Orc one I used the "Orange Spice" mixed with a little Americana "Tangerine", for Orc two I used Folk Art "Rock Gray", for Orc three I used Citadel "The Fang", and for Orc four I used some of the "Dapple Grey" mixed with a little Folk Art "Gray Green".  I highlighted the streamer hanging from the third Orc's spear using Folk Art "Deep Tomato Red".  On the first orc, I highlighted the bones on his wrist guard and morning star handle with Americana "Bleached Sand".  Finally, I went back and did highlights on all the metal using Folk Art "Silver Sterling".
     After everything had dried overnight, I gave the figures a coat of Ceramcoat "Matte Varnish" and, when dry, flocked their bases.  Another overnight dry, and I sprayed them with Testor's Dullcote".
      I'm happy how they turned out, and happy to have completed this big set.  Below is a picture of all the Orcs from the Bones I Core Set and the Orcpocalypse Set.

Thursday, August 11, 2016

Kalladrax: Bones I Dragon as Frostgrave Terrain Piece

   A while back I saw a thread on the Reaper Forum, where the poster was painting up his Kalladrax undead skeletal dragon to use as Frostgrave terrain; and I thought that it was a really cool idea, and I decided I wanted to do the same for my Frostgrave games as well.  So, I picked up a copy of Kalladrax on eBay and this past week I got started on the project.
   I prepped the figure in the usual way; soaking all the pieces in a large bowl of water with a couple drops of dish-soap added, then I gave them a light scrub with a soft toothbrush, and then rinsed and dried them.  I then glued the body, head, and legs together.  I also glued one of the tail sections to the spiked tail end.  The model comes with about 2' of tail in three sections, which I thought was way too long for my purposes; so I set the longest of the three sections aside to test painting schemes on.  Below you can see my experimentation.  I decided to go with the one on the left which was Anita's "Baby Blue", followed by a Citadel "Nuln Oil" shade wash. Then when the wash was dry, I drybrushed with Americana "Bleached Sand", Crafter's Acrylic "Light Antique White", and White.

      So I began by painting all the dragon's bones with Anita's "Baby Blue".
 I then gave everything a wash with Citadel "Nuln Oil" shade wash using a wet brush.
     I then began the drybrushing of the skeleton; first with the "Bleached Sand", then the "Light Antique White", and lastly plain White.
    I painted the dried and rotting wing remnants with Folk Art "Poppy Seed", and then painted the talons and tail spikes with Citadel "The Fang".  When everything was dry, I drybrushed the wings with Folk Art "Gray Green", and then with Folk Art "Celadon Green".  I then drybrushed the tail spikes and talons with Folk Art "Cloudy Day".

I used Black to paint the holes in the skull and in between the ribs.  I then painted the horns an claws with "The Fang", and drybrushed with "Cloudy Day".

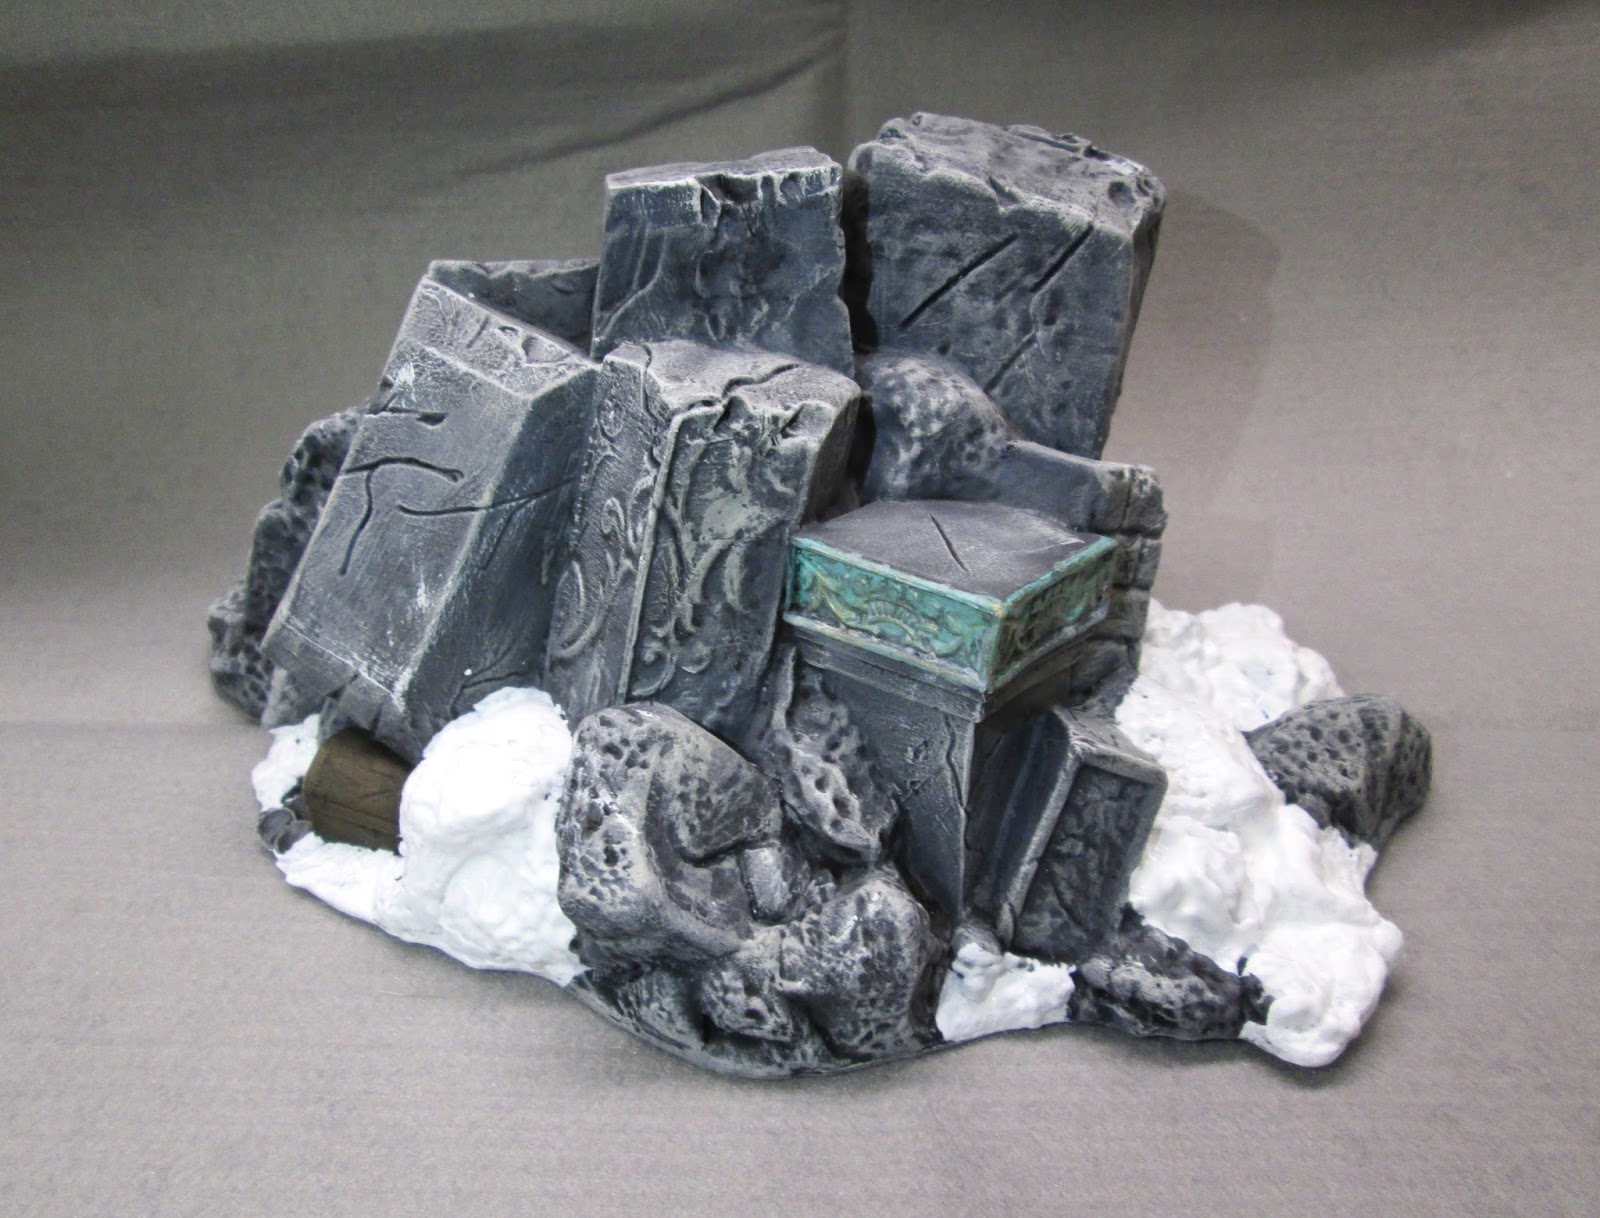
    I painted the stonework on the base with DecoArt Traditions "Dark Grey", and then painted the head, and the border on the pillar behind the head, with Ceramcoat "Turquoise".   The treasure chest I painted with DecoArt Traditions "Raw Umber".  When that all was dry, I gave everything a wash with Citadel "Nuln Oil" shade using a wet brush.
  When the wash was dry, I drybrushed the ruins with  Crafter's Acrylic "Storm Cloud Grey", and then Folk Art "Platinum Grey", and lastly some of the "Light Antique White".   Next, I gave the "bronze" pieces a wash with some of the "Celadon Green" which I heavily thinned.  When this wash was dry, I lightly drybrushed those sections with Ceramcoat "Bronze".


     Lastly, I painted everything with White that hadn't been painted yet (That is, all the "snow" areas).  When that was dry, I brushed the White areas with Elmer's white glue, and applied Woodlands Scenic "Snow Flock".
     I was concerned about the whole weight of the dragon being supported on two spindly legs, so I drilled a hole in the top of the ruins and inserted a small section of acrylic rod to help support the dragon's belly.
 I then glued all the parts together using Gorilla Super Glue.  I applied a few Water Effects icicles to the piece before I realized that I hadn't given it its final spray of Dullcote.  I will probably apply some more icicles once I do that, but the weather has been too humid here to do a lot of spraying lately.
(As always, you can click on any photo to see it larger.)


     I'm really happy with how this piece came out.  I think it will be quite the show-stopper when used as the centerpiece on my Frostgrave table at upcoming conventions.

Monday, August 8, 2016

Barnabus Frost, Pirate Captain: Figure 233 of 266

   This week I finished up the Pirates set by painting the Barnabus Frost, Pirate Captain, figure.  This set now joins the list of completed sets over on the right.
      I prepped the figure in the usual way; soaking it in a dish of water with a couple drops of dish-soap added, then I gave it a light scrub with a soft toothbrush, and then rinsed and dried it.  Next, I glued the figure to a black-primed 1" fender washer with Aleene's Tacky glue, and then glued the washer-mounted figure to a tongue depressor with a couple drops of the Elmer's glue.
    I started off by giving the entire figure a wash with thinned Reaper "Brown Liner".  When that was dry, I painted his face and hands with Americana "Shading Flesh".  I then painted his coat with Ceramcoat "Black Cherry", and his pants with Crafter's Acrylic "Bright Blue".
Next I painted the facings on his coat and his vest with Crafters Acrylic "Bright Yellow".  I then painted his boot tops with Americana "Terra Cotta",  and then his beard with Folk Art "Platinum Grey".  I used Crafter's Acrylic "Deep Red" to paint his sash, and then used Accent "Golden Harvest" to paint his compass case, key ring, and buckles.  Then I painted his pistol with Crafter's Acrylic "Cinnamon Brown".
I painted his compass case, key ring, and buckles with "Bronze".  Then, when everything had a while to dry, I gave the entire figure a wash with Citadel "Agrax Earthshade", using a wet brush.  When the wash was dry, I painted his boots, pouch, and belts with Black
     Next, I painted his eyes, and then highlighted his skin; first with the "Shading Flesh", and then with some of the "Shading Flesh" mixed with a little Crafter's Acrylic "Flesh". I then highlighted his hair and beard with the "Platinum Grey", and then with Crafter's Acrylic "Light Antique White".   I used Crafter's Acrylic "Daffodil Yellow" to highlight his facings and vest, and painted his sword blade with Americana "Neutral Grey".
     I then highlighted his coat with Americana "Burgundy Wine", and his pants with a mix of the "Bright Blue" and Crafter's Acrylic "Cool Blue".  Next, I highlighted his sash with Ceramcoat "Bright Red", and his boots, pouch and belts with Citadel "The Fang".   I then painted his sword with Folk Art Metallics "Gunmetal Grey".  While that was drying, I painted all his buttons with the "Bronze", then highlighted all the parts I had painted "Bronze" with Ceramcoat "14K Gold", and then did further highlights with Ceramcoat "Wedding Gold".  I then went back snd highlighted his sword with Folk Art Silver Sterling".  Lastly, I painted the entire  base with Americana "Mississippi Mud".
      After the figure had overnight to dry, I gave it a coat of Ceramcoat "Matte Varnish".   The next morning I sprayed the figure with Testor's Dullcote.
   I'm happy with how this old salty dog turned out.  And, happy to get another completed set under my belt.  Next up, I will be finishing the last four Orcpoclaypse figures, and then the remaining two Townsfolk figures.

Thursday, August 4, 2016

Derro Mage as Frostgrave Soothsayer Wizard: Bones 2 Figure

This week I finished up the Derro Mage from the Bones 2, Expansion 1,  Derro Set.  I plan to use him as a Soothsayer type wizard for Frostgrave.
      I prepped the figure in the usual way; soaking it in a dish of water with a couple drops of dish- soap added, then giving it a light scrub with a soft toothbrush, and then rinsing and drying it.  I then glued the figure to a white-primed 1" fender washer with Aleene's Tacky glue, and then glued the washer-mounted figure to a tongue depressor with a couple drops of the Elmer's glue.
     I then gave him a wash with Reaper "Grey Liner" using a wet brush.
      When the Liner was dry, I painted his hands, feet, and face with Americana "Shading Flesh".  I then painted his shirt with Crafter's Acrylic "Bright Blue".  Next, I painted the insides of the slots in his pants with Crafter's Acrylic "Bright Yellow", and then painted the outside parts of his pants with Ceramcoat "Black Cherry".
     I used the "Bright Yellow" again to paint his waist hanging, and then used Citadel "Snakebite Leather" to paint his breastplate.  After that, I painted the sleeve on his right arm with Folk Art "Poppy Seed", and then painted all the fur trim with Ceramcoat "Territorial Beige".  I then painted his belt and pouches with Americana "Bittersweet Chocolate", and then painted the frame holding the large "eye" on his chest, as well as his belt buckle and bracelet, with Accent "Mustard Seed".
     Next, I painted his hair with Folk Art "Platinum Grey", and then painted the "eye' on his chest with Crafter's Acrylic "Light Antique White".   After everything had a while to dry, I gave the entire figure a wash with Citadel "Agrax Earthshade" wash using a wet brush".   When the wash was dry, I painted his cape with Black.
     At this point I did the highlights on the hair using the base "Platinum Grey", and the "Light Antique White".  I then painted his eyes, and then highlighted his skin with the base "Shading Flesh", and the then the "Shading Flesh" with a little Crafter's Acrylic "Flesh" added to it to lighten it. Next, I highlighted the fur trim with Crafter's Edition "Taupe", and then highlighted his top with the "Bright Blue" with a little Crafter's Acrylic "Cool Blue" mixed in to lighten it.  I also highlighted his waist hanging using Crafter's Edition "Daffodil Yellow".
     Next, I highlighted his pants with Americana "Burgundy Wine", and then highlighted his cape with Citadel "The Fang".  I highlighted his belt and pouches with Crafter's Edition "Spice Brown".  I then worked on the eye, painting the iris first with Americana "Leaf Green", and then did a splotchy pattern on it with Folk Art "Metallic Emerald Green".  Next, I painted the pupil black, and then cleaned up the edges of the white of the eye with "Light Antique White".   I added a highlight with White.   I then repainted all the parts I had painted earlier with Mustard Seed", using Ceramcoat "Bronze", and then added highlights with Ceramcoat "14K Gold".  Lastly, I painted the figure's integral base White, and used the White to clean up any spattered paint on the washer base
      When everything had overnight to dry, I gave the figure a coat of Ceramcoat "Matte Varnish" early the next morning.  Midday, I flocked the white areas with Woodland Scenics "Snow" flock and the next day I sprayed the figure with Testor's Dullcote.
      I'm really pleased with how this fellow turned out.  I'm particularly proud of the big eye on his chest.   I think he and the Apprentice I finished earlier make a pretty good "odd couple" Soothsayer pair.

Tuesday, August 2, 2016

You've Come a Long Way, Baby: My First Painting Efforts to Now

  Over on the Reaper Forums, a member started a thread asking folks to post photos of their first figure they ever painted, and their most recent that they're proud of.  I thought that might be a good incentive for me to look back on how far I've come over the years.
    I began painting in the late 70's with 15mm Heritage ACW figures.  Sadly, I sold off that collection in the mid 80's, so I have no examples of my first figures.  However, shortly after starting with the Heritage 15mm figures, I started purchasing some of their 25mm Fantasy stuff, which corresponded with me getting into a D&D group in High School.   I do have a few of these still in my collections.  While the thief is a pretty straight forward  paint job, the knight must have been one of my first uses of a black wash.
Heritage Thief

Heritage Thief
     While, my painting had greatly improved over the intervening decades, I also thought it would be fun to look how far I've come in the three years since I started this blog.  Here are two from the first full month of painting the Bones 1 Kickstarter.


And here we are today.  There's not a lot of noticeable difference over the past three years.  A bit more attention to highlighting I think. And for humans, I think my faces have improved.

   I've been painting now for over 40 years, and still find there's room to grow and improve.  But that's part of the fun!

Monday, August 1, 2016

Finaela, Female Pirate: Figure 232 of 266

     This past week I got back to the Pirate set, and painted up the Finaela, Female Pirate, figure. That leaves just one more figure to go in this set.
     I prepped the figure in the usual way; soaking it in a dish of water with a couple drops of dish-soap added, then I gave it a light scrub with a soft toothbrush, and then rinsed and dried it.  Next, I glued the figure to a black-primed 1" fender washer with Aleene's Tacky glue, and then glued the washer-mounted figure to a tongue depressor with a couple drops of the Elmer's glue.
     As I mentioned in last week's, Mystic Theurge post, I recently purchased a Reaper "Liner Triad". Since I joined the Reaper Forums about a year ago, I found I was reading a lot of high praise for the Reaper brand of Liners, which are a kind of mix between an ink and a wash. From what I read, they are reported to be great as a kind of "primer" coat of Bones as they really show off a figure's details as well as shade the figure.  So, I finally broke down recently and ordered a triad of the Brown, Grey, and Blue.  I thought I would take this opportunity to try out the "Brown" Liner, so I gave the entire figure a wash with it using a wet brush.
     When the liner was dry, I painted the skin with GW "Elf Flesh".  I then painted the jacket with Americana "Leaf Green",  the pants with Nicole's "Brown", and the gauntlets with Americana "Bleached Sand".
     Next, I painted her hair with Americana 'Terra Cotta". Then I  painted the jacket facings and the bracelets on her left wrist with Accent "Golden Harvest".  After that I did her top with Folk Art "Platinum Grey", and the shield-like piece tucked in her front belt with Aleene's "Deep Khaki".  I then painted her boots and the sword grips with Americana "Raw Umber".
I painted the belts and pouches all with Americana "Bittersweet Chocolate", and then painted all the sword hilts, buckles, and the bracelets with Accent "Mustard Seed".  Next, I let everything dry for a while and then gave the entire figure a wash with GW Agrax Earthshade" using a wet brush.  When the wash was dry, I painted the sword blades and beer steins with Americana "Zinc", and the head scarf with Folk Art "Hunter Green".
I began the highlighting now, drybrushing her hair with Ceramcoat "Maple Sugar Tan", and then doing further highlights on the hair with Americana "Buttermilk".  Next, I painted her eyes and lips, then highlighted all her skin with the base "Elf Flesh", then added a little White to it to do further skin highlights.  I highlighted her top with the White. After that, I highlighted the jacket with Crafter's Acrylic "Holiday Green", then mixed a little Crafter's Acrylic "Wild Green" into the "Holiday Green" to do further jacket highlights.  Next up, I highlighted the jacker's facings and cuffs using Crater's Acrylic "Bright Yellow", and then Crafter's Acrylic "Daffodil Yellow" for further highlights.  I also highlighted the shield-like peice tucked in her belt with Aleene's "Dusty Khaki"
    Next, I highlighted the gauntlets with the base "Bleached Sand", and then highlighted her pants with Crater's Edition "Spice Brown".  I also highlighted the boots, belts, and pouches with Americana "Mississippi Mud".  I then repainted the head scarf with Folk Art "Metallic Emerald Green". I then mixed a little White into the "Metallic Emerald Green" to do highlights on the head scarf.   I then painted the sword blades, and beer steins with Folk Art Metallics "Gunmetal Grey", and the bracelets, buckles, and sword hilts all with Ceramcoat "Bronze".  Next, I went back and did highlights on the blades and steins with Folk Art "Silver Sterling" and on the bracelets, buckles, and sword hilts with Ceramcoat "Wedding Gold".   Lastly, I painted the entire  base with Americana "Mississippi Mud".
      After the figure had overnight to dry, I gave it a coat of Ceramcoat "Matte Varnish".   The next morning I sprayed the figure with Testor's Dullcote.

     I'm very pleased with how the figure turned out.   She'll make a good addition to the crew! 

Figure 232 of 266: Complete