Monday, July 29, 2013

Stone Golem and Battleguard Golem: Figures 11 & 12 of 265

Over the weekend I finished up two of the figures from the Golems set: the Stone Golem, and the Battleguard Golem.  I did my standard prep of washing in dish soap, and then gluing to  black-primered fender washers.  Then I glued them to a tongue depressor for painting. After I studied the figures a bit in preparation of painting, I decided that I wanted them to have a black primer coat, so I did a quick one by just painting on black craft paint with a paint brush.
For the Stone Golem I decided I didn't want to go the easy route and just drybrush the whole thing grey. So, I decided it might be interesting to do him as if made of marble, as marble is often used for statue carving. And then I thought it might be neat to add a second color of marble for his garment. So I decided on white marble for the body and green for the kilt.  I did a quick Google image search for white and green marble to set in my mind exactly how they are colored and striated .
   So, I began by giving the body of the Stone Golem a heavy drybrushing with Americana "Dove Grey", only leaving a the deepest fissures in the original black.  I then did a much lighter drybrushing with white.  After the drybrusing I took my finest tipped brush and began adding thin black striations, and mottling to the white surface to give that marble look.
  Afterward I repeated the process with the kilt; first with a heavy drybrush of  Americana "Forest Green", and then a lighter drybrushing with Americana leaf green.  I then added both white and some black striations as well as some dark splotches with Accent "Deep Forest Green."  My last step was to add some black dots to the eyes for pupils.
For the Battleguard Golem, I wanted to do a black and brass kind of "Steampunk" color scheme. So I began by giving he whole figure a light drybrush with Accent "Princely Pewter" just to give it a metallic sheen and add some highlights to the armor edges.  I then painted all the rivets and other small details with Ceramcoat "14K Gold" to look like polished brass. Finally, I painted the sword with Ceramcoat "Metallic Pewter" with details in the "14k Gold", and added GW "Chainmail" highlights to the blade's edges.  My last step was to paint little red dots for eyes, with tiny white specks as highlights in them to make them look either glowing or reflective..
After the figures were dry, I brushed on a protective coat with Cermacoat "Matte Varnish" and then flocked the bases.  This was followed with spraying both figures with Testor's Dull Cote
Here again, I am quite pleased with the results from quick and easy paint jobs. Both figures turned out looking as good as I cold have expected, and nether took  a whole lot of time to complete.
Figures 11 & 12: Complete

Thursday, July 25, 2013

My Test Orc: Figure 10 of 265

     Today we pass a mile marker on our journey by entering double digit figures, with this my 10th featured BONES on the blog. Considering the large number of Orcs I have, counting the ones in the Original 30 BONES,and the Orcapoclaypse set I ordered, I felt it was high time I figured out my paint scheme for them.  So, I selected one of the Orcs from the Original 30 set to be my test Orc.  He was also my first test with spray primering with Krylon Camouflage with Fusion Flat Black.  I sprayed him several weeks ago, soon after my Vampire box had arrived and he was still not tacky, so I felt it was safe to paint him as my test subject.
So, his prep was pretty standard; I washed in dish soap, then spray primered as mentioned above, then glued onto a black primed 1.25 inch fender washer using Aleene's Tacky glue. 
The first step I did in painting him was to give the whole figure a heavy drybrushing with Ceramcoat "Metallic Pewter".  I then painted his skin with Aleene's "Deep Khaki" and his tunic with Folk Art "Barn Red". All straps and the grip on his sword I did with Americana "Charcoal Grey" After all this had dried, I gave the entire figure a wash with GW "Devlan Mud" wash.
When the wash had dried, I added highlights to his skin using the original "Deep Khaki" mixed with a little Aleene's "Dusty Khaki, and to his tunic with the original "Barn Red" mixed with a little GW "Terracotta". I then painted the eyes and the teeth with  Americana "Buttermilk", going back and adding a black pupil in each eye. I also did another wash with "Devlan Mud" over the now-painted teeth. I also painted the boots black, and added a little GW "Codex Grey" highlighting on them. Finally I painted the sword with GW "Chainmail' and added some "Chainmail" highlights to the Orc's armor and chainmail. Lastly I added some GW "Mithril Silver" highlights to the sword edge.
After everything had dried overnight, I gave the figure a coat of Ceramcoat "Matte Varnish" and, when dry, flocked the base.  Another overnight dry, and I sprayed it with Testor's Dull Coat"

 I'm very pleased with how the figure turned out with what is, in reality, a very basic and easy paint job.  It is a testament to the sculpting that it responds so well to drybrushing and simple highlighting; resulting in a figure which I feel has a lot of character.  Now that I am happy with this test figure, I can start work on some of the other Orcs. Hopefully in groups of multiples.

Figure 10 of 265: Complete.

Monday, July 22, 2013

Zombie: Figure 9 of 265

Since I knew I would be away at Historicon all weekend (see previous post) I finished up a quick and easy figure last week before I left: the Zombie from the Original 30 BONES set.
After scrubbing with dish soap, and gluing to a black-primed fender washer, I applied just three colors of paint: Americana "Reindeer Moss Green" to the skin,  Americana "Khaki Tan" to the pants and black to the hair.  I then gave the whole thing a wash with Windsor Newton "Peat Brown' ink.  After this dried i added yellow pupil-less eyes, and some bloody gore on the hands mouth and spattered randomly across the body with Apple Barrel "Apple Maroon"with a couple highlights done with GW "Blood Red'
When completed, i brushed on a protective coat with Ceramcoat "Matte Varnish", and then flocked the base.  the final step was a coat of Testor's Dull Cote spray paint.
Very pleased with the outcome, and the ease and quickness with which the figure was completed.

Figure 9 of 265: Complete
 

Historicon 2013: A Change in the Numbers

This past weekend I went to Historicon 2013 in Fredericksburg, Virginia. I had a good time, but could have done without the 95-100 degree heat and high humidity.  I was surprised to see that Reaper had a booth in the delaers' hall, as, like the name of the con implies, the general tone of the convention is geared towards historical miniature's gaming, and pure fantasy dealers seldom find it worth their while.  Maybe it was because they had to bow out of Origins this year, that Reaper decided to come and showcase their wares at H-con.  They had all their BONES on display, and it was neat to see some of the larger models all assembled . But, what I found most fascinating was these two examples of what they had done with a couple of the translucent models; drilling out a bit of the underside, and gluing them to battery powered tea-lights. The fire demon had no paint, while the ghost had it's empty hood painted black, and a nicely detailed base. 
The effect was super cool, and I really want to copy it, but I do not like the tall  3/4 inch tea-light as a base.  I would love to find something thinner to use. Do they make thin tea-lights? I've got to do some thinking about this.
Also, I must announce a change to the figure count.  One of my friends wanted a second Griffon, so I offered to trade him mine, and in exchange I got a second  Female Storm Giant and Darkrasp the Death Priest. So the count is minus one and plus two for a total of one additional figure.

Thursday, July 18, 2013

Medusa: 8 of 264

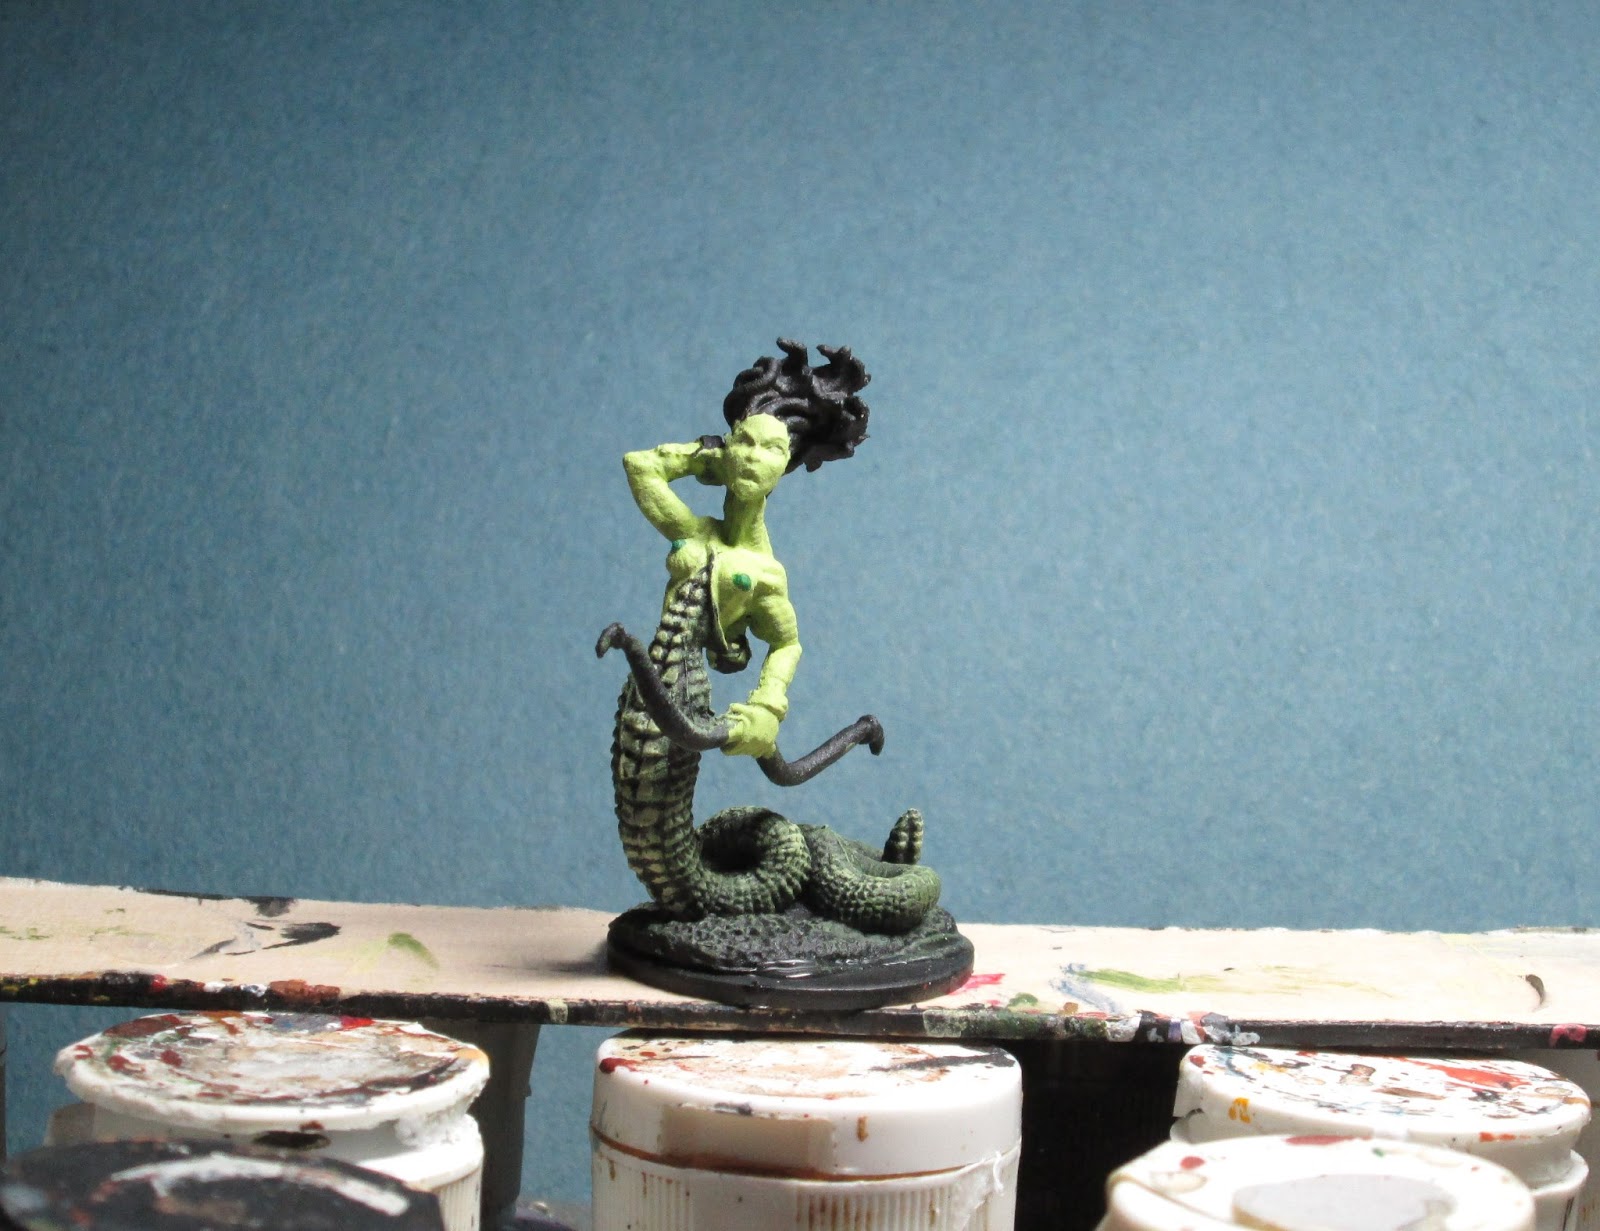
This week, amidst the hustle and bustle of getting ready for Historicon, I completed the Medusa figure from the Original 30 BONES set.  For prep, I washed in dish soap, and then  spray-primed it with Krylon Camouflage Flat Black with Fusion. Afterwards I glued it to a black primed fender washer.
I began by giving a heavy drybrush to the whole body with Accent 'Forest Green'. I then drybrushed the scale parts with Duncan 'Olive Green' followed by Americana 'Jade Green', going heavier with the 'Jade Green' on the rattle at the end of the tail, and the scales running down her front. I went back with a fine brush and touched up the scales further with the 'Jade Green', so they were clearly defined.
  Next I painted the flesh Americana 'Olive Green' and the nipples, Americana 'Leaf Green.' When done and dry, I gave the whole body a wash with GW 'Dark Green' Ink. When the ink was dry I went back and added highlights with the original colors.
I next worked on the hair, drybrushing it first with, Folk Art 'barnyard Red', and then a lighter drybrush with Americana 'Cadmium Red'. I then went back with a fine brush and added more brush applied highlights on the hair, making sure the color came down even with the head. Finally I added just a couple small highlights with GW 'Blazing Orange'.
I then painted the bow with GW 'Terracotta', and the quiver with Accent 'Mustard Seed'. This was followed up with   GW 'Blood Red' on the arrow feathers, and GW 'Brazen Brass' on the bow fittings. The bracelets were painted Ceramcoat '4K Gold'.  Then when all these bits were dry I gave them all a wash with GW 'Devlan Mud' Wash, and then went back and added highlights with the original colors. The eyes were painted Apple barrel 'Yellow' with black slit pupils. And I put a drop of 'Devlan Mud' wash in the mouth opening

I finished with a coat of Ceramcoat 'Matte Varnish', and then flocked the base.  Afterwards, I sprayed it with Testor's Dullcoat.  All in all, a nice 'Monster' figure.  I'm very pleased with how the red snake hair turned out.
Figure 8 of 264: Complete

Monday, July 15, 2013

Playing With Fire: 6 & 7 of 264

I thought I'd jump in and try and experiment with some of the translucent figures this time, so I washed two of the small fire elements in dish soap, and glued them to black-primed fender washers. The first one I worked on was the ball of fire, of which, for some reason, I forgot to take work-in-progress photos.  I began by washing in red ink, then when dry I washed in black ink, thinking it would give a good shadowy effect to the fire. I then, then the ink was dry, dry brushed a dark and light orange, and a dark and light yellow.  Overall I was disappointed how the black ink wash turned out, making the fire seem muddy and dull.
  So on the second one, I skipped the black ink wash, and washed just with red ink.
Then I did a drybrush with dark orange, and then a drybrush with light orange.
These were followed by a drybrush with dark yellow, and then light yellow.  On both figures, when the paint was dry, I coated them with brush applied Ceramcoat 'Matte Varnish'. Then when the varnish was dry, I flocked the bases, starting with a small circle of dried coffee grounds immediately around the fire, to give the impression of burnt soil or grass; and then I put an edge of regular green flocking around the perimeter of the base.
Below you can see both of the fire figures side by side..  Of the two, I think  like the one on the right, without the black ink, better. Though the other one does have a certain dark, oily fire quality about it.
Figures 6 & 7: Complete

Thursday, July 11, 2013

Galladon the Wizard of the Sea: 5 of 264

I returned this week to the last of the first three BONES I selected to begin this project with: Galladon the Wizard, show in the center of the photo below.  I must admit I had been putting this figure off because of the complicated nature of the sculpt, with it's many layered robes, big overhanging hat, and scroll. Unfortunately, this figure lived up to my worries, and was a very difficult figure to paint for a couple of reasons; first is the aforementioned large floppy hat which makes painting the back of the head and the shoulders very difficult, and secondly is the long beard which is not sculpted directly to the chest but actually hangs out a few millimeters from it. I assume the head was cast as a separate piece and glued to the body to allow such an undercut. Anyway, this large protruding beard, made painting the chest, belt, and his right arm very difficult.  None the less, I began; figuring the way to go was small steps. Working a little on the figure then switching to something else, and then coming back to it.
  Now, when I first glanced at this figure as I was sorting my Vampire Box, I thought he had a fish on his staff because of what I thought was a large tail fin.  So, as I had been mentally plotting my paint scheme for this figure I got in my head to do something ocean or sea related.  I already had thought out a palette of sea tones when, in studying the figure to plot my painting plan of attack, I noticed it was a dragon's head on his staff, not a fish.  I decided I wasn't going to let this stop me; and it did honestly look a lot like a fish, so I trimmed off a few of the more knobby looking horns on the dragon head, and tried to leave only what looked like fins. 
  I did no prep work on this figure other than gluing it onto a  black-primed fender washer.  I began, as I usually do with the flesh.  I painted his face and hands with Americana 'Shading Flesh' and then gave it a wash with Windsor Newton 'Peat Brown' ink.Then I did some highlights with the 'Shading Flesh' color again.  Next, I did his outer robe with  Apple Barrel 'Apple Blue Spruce' and his hooded cape with Apple Barrel 'Apple Scotch Blue'. When these had dried, I gave both a wash with Iron Wind Metals ' Deep Turquoise' ink,  and then went back and did highlights with the base colors with a little Americana 'Buttermilk' mixed in.  Next step was to do the under robe in Games Workshop 'Enchanted Blue',  followed by a wash of IWM "Dark Blue' ink. Afterwards I did some highlights with the 'Enchanted Blue' with some of the 'Apple Scotch Blue' mixed in.

With the robes done I began to work on the small parts of the figure.  I next did the hat and the band on the hooded cape with Americana 'Khaki Tan', followed by a wash of the 'Peat Brown' ink. Highlights were done with a mix of the 'Khaki Tan' and 'Buttermilk' drybrushed over the hat, and the raised areas of the band on the cape. Doing the bits that were too close to another color with a regular thin brush. The hat band was done the same as the hooded cape was.  The beard was done in GW 'Codex Grey' followed by a drybrush with GW 'Fortress Grey' and then a final light going over with  the 'Fortress Grey' with a bit of White mixed in.  I also painted the cuffs of the outer robe with GW 'Chainmail' doing highlights, as well as the buttons on the under robe, with GW 'Mithril Silver'.
The scroll was done with Folk Art 'Porcelain White' with a 'Peat brown ink wash, followed by a dry brush with the 'Porcelain White' with a bit of regular White mixed in.  The staff was done with Americana 'Mississippi Mud', followed by a drybrush of Folk Art 'Barn Wood' to try and give it a drift wood appearance.  The belt, pouch,  and shoe were done with Folk Art 'Navy Blue' followed by highlights painted on with GW 'Shadow Grey'. I then did the cloth tied around the staff with the same colors I had done the under robe. Finally I did the metal fittings on the staff with Delta Ceramcoat 'Metallic Copper', followed by a wash with GW 'Dark Green' ink to try and give it a corroded look. I also did some lettering on the cloth tied around the staff with the 'Metallic Copper' and did some lettering on the scroll with GW 'Enchanted Blue' and Black paint using a very thin brush.
When everything had dried overnight, I gave the figure a coat with Delta Ceramcoat 'Matte Varnish' as a first layer of protection. To carry through with the sea theme I used sand as a ground cover on the base, adding just a bit of flock around the outer edge to help it blend in with my green ground cloth.  I also glued on a tiny sea shell to complete the motif. Lastly, I gave everything a spray with Testor's Dullcoat.
Though a lot of work, I'm very pleased with how the figure came out.  And I think the sea themed colors look good on it.

Figure 5 of 264: Complete