Just wanted to let you all know that I caved, and went in on the Bones III Core Set. :-) I was planning to just go in for a dollar to pick and choose, but the inclusion of all the Lizardmen (I'm a sucker for Lizardmen; see my other blog for posts on the 10mm Lizardman Army I'm currently building), and the inclusion of the Yeti (Chill Out) stretch goal (which will go great with my winter-themed fantasy side-project) helped convince me to go in for the whole set.
I haven't been swayed by any of the buy-in add on sets yet though, but time will tell...
Here is a link to the Bones III Kickstarter
So who else has succumbed to the madness?? :-)
My Efforts to Paint the Miniatures From the 1st, 2nd, 3rd, and 4th BONES Kickstarters!
Thursday, July 9, 2015
Monday, July 6, 2015
Update! Reaper Bones III Kickstarter Begins Tomorrow
Just wanted to let you all know that the Reaper Bones III Kickstarter launches tomorrow! For more info, see the eReaper Website
Sorry, No Posts This Week
Just wanted to let my readers know that I won't be doing my usual Monday and Thursday posts this week. I have been busy with friends visiting this past week for the 4th of July holiday, and this week my wife and I are going to visit her folks for a couple days.
Tune in again next Monday, July 13th for my next completed figure.
Monday, June 29, 2015
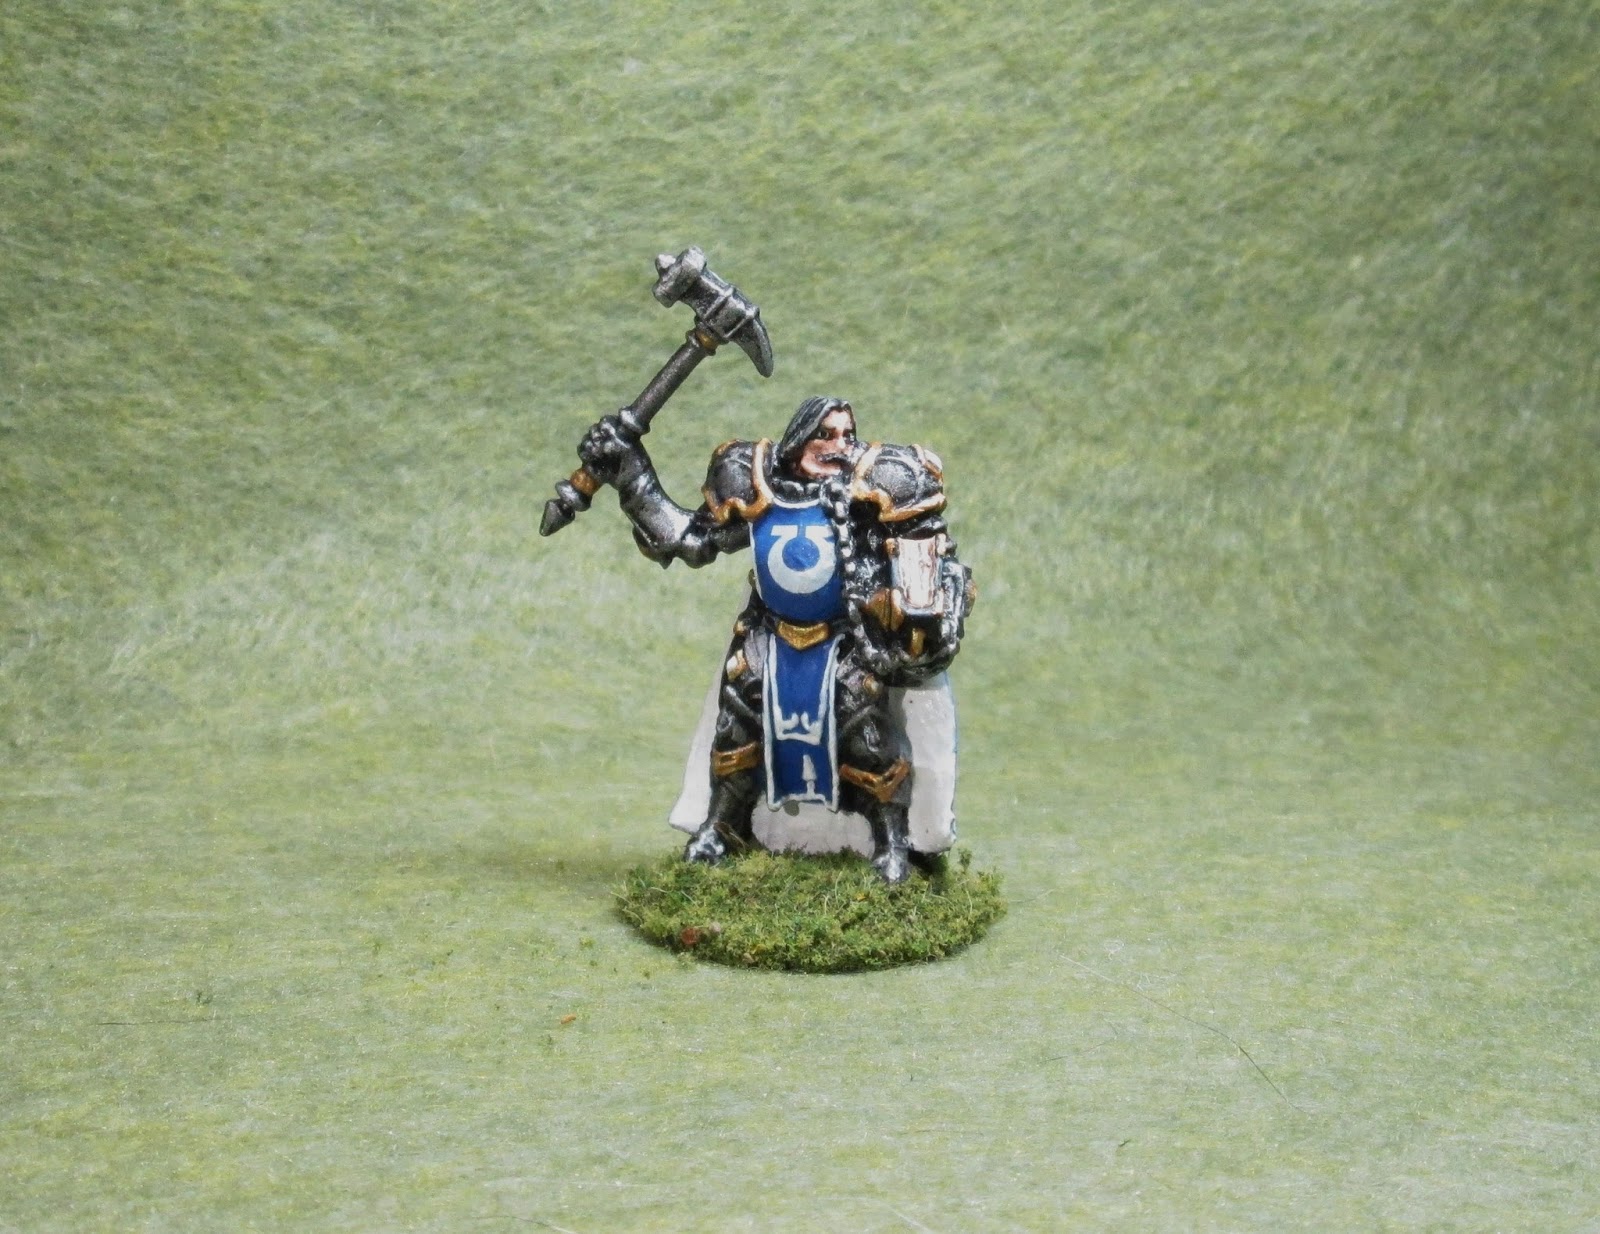
Halbarand, Cleric: Figure 159 of 265
This week I completed Halbarand, the Cleric from the Heroes set. Looking at this figure I was struck by his warhammer ;-) , and it automatically made me think of Games Workshop. This led to the idea of painting him to resemble a Space Marine in some fashion.
I prepped the figure in the usual way; soaking it in a dish of water with a couple drops of dish- soap added, then giving it a light scrub with a soft toothbrush, and then rinsing and drying. I then glued the figure to a 1" black-primed fender washer with Aleene's Tacky glue, and glued the washer to a tongue depressor with a couple drops of Elmer's White Glue.
I began by painting his armor Black, and when the Black was dry I drybrushed the figure with Ceramcoat "Metallic Pewter". I then went over this with a lighter drybrushing of Folk Art "Silver Sterling".
Next, I painted his surcoat and the outside of his cape with GW "Ultramarines Blue. I painted the lining of the cape with White. I painted his belt, scabbard and the cover of his book with Black, and the pages of the book with Americana "Buttermilk". His face I painted with DecoArt "Flesh".
After these color had had a chance to dry, I then gave his head and the book pages a wash with some Winsor-Newton "Peat Brown" ink using a wet brush. When the ink was dry, I painted his hair, mustache and eyebrows Black. When the Black had dried, I gave his hair a light drybrushing with some DecoArt "Storm Cloud Grey". I also used this color to add some highlights to his mustache and eyebrows. I then painted some of the decorative trim on his armor, warhammer, and the metal fittings on his book, with Cermacoat"Bronze". I also painted the letters "G. W." on the book cover with the "Bronze".
Next, I painted his eyes with Black sockets, White whites, and Black pupils. I then added highlights to his face with base "Flesh". I painted the decorative trim on his surcoat and cape with White, as well as some of the decorative "diamond" shaped elements on his armor. I added highlights to his cape and surcoat with some of the "Ultramarines Blue" mixed with a little White, and to the edge of the book cover with Folk Art "Settlers Blue". Then I went over all the parts I had painted with the Bronze and gave them highlights with Cermacoat "14K Gold". I finished up by going back over his armor and adding highlights with the "Silver Sterling". Lastly, I painted his white integral base with Cermacoat "Walnut".
After the figure had had a while to dry, I dug out some old Space Marine decals I had, cut out one of the Ultamarine insignia, and applied it to the front of his surcoat. I let the figure sit overnight, and the next morning I gave it a coat of Ceramcoat "Matte Varnish". Later that afternoon I flocked the base. The next day I sprayed the figure with Testor's Dullcote.
I'm really pleased with how he turned out. This isn't the greatest sculpt, as his head is kind of smooshed a bit, so doesn't look good at some angles, and was a little harder to paint than normal heads.
Figure 159 of 265: Complete
Thursday, June 25, 2015
Ice Troll: Bones II Figure
This week I also painted the Ice Troll from the Bones II "Expansion Set I". Being a denizen of the colder realms, I thought I'd do him up in a bluish color scheme.
I prepped the figure in the usual way; soaking it in a dish of water with a couple drops of dish- soap added, then giving it a light scrub with a soft toothbrush, and then rinsing and drying. I then glued the figure to a 2" white-primed fender washer with Aleene's Tacky glue. I didn't need to glue the washer to a tongue depressor, as the big 2" size gave me a good surface to hold onto while painting.
I began by painting his body with DecoArt "Cool Blue". I then painted the bumpy parts of his back with Folk Art "Settlers Blue, and his chest and abdomen with DecoArt "Light Antique White"
After these first three colors had dried, I gave the entire a figure a wash with Iron Wind Metals "Medium Blue Ink" using a wet brush, to help blend the colors together. When the ink was dry, I did a little drybrushing using the "Cool Blue" on his arms legs and head, the "Settlers Blue' on his back, and the "Light Antique White" on his chest and abdomen.. Next, I painted his claws with Folk Art Porcelain White" and the rock with DecoArt "Storm Cloud Grey". I also painted his nipples with the "Settlers Blue"
Next I painted his mouth with Americana "Shading Flesh", and then his teeth with Americana "Buttermilk". His loin cloth, and the horns on his back I painted with Americana "Zinc". I then painted the cloth under his belt with Folk Art "Dapple Grey". I painted his belt and any straps with Americana "Asphaltum". I painted all the metal armor bits with Accent "Princely Pewter", and the rings in his lip and ear with Ceramcoat "Bronze".
After these colors had had time to dry, I gave the entire figure a wash with GW "Badab Black" wash using a wet brush.
I then went back and painted highlights on his skin, using the "Cool Blue" on his arms legs and head, the "Settlers Blue' on his back, and the "Light Antique White" on his chest and abdomen. I painted his eyes with Apple Barrel "yellow", and added black pupils. I highlighted his tongue and gums with the base "Shading Flesh", and his teeth with the base "Buttermilk". I highlighted his claws with the base "Porcelain White".
Next, I highlighted his belt and straps with Folk Art "Dark Brown" His loincloth, and the horns on his back I highlighted with Folk Art "Medium Grey". The cloth under his belt I highlighted with the base "Dapple Grey". The rock I highlighted with the base "Storm Cloud Grey", and then did lighter highlights with Folk Art "Platinum Grey". I also drybrushed a little of the "Platinum Grey" over the fur on the backside of the loin cloth to help that stand out. I finished up with highlighting the metal armor with Ceramcoat "Metallic Pewter" followed by some lighter touches with Folk Art "Silver Sterling" along some of the edges. The ear and lip rings I highlighted with the base "Bronze". Lastly, I painted the troll's integral base White.
At this point I glued a couple small rocks on the front of the base, using Aleene's Tacky glue, to add some foreground composition. I then painted them using the same colors I had used on the rock in his hand.
When everything had overnight to dry, I gave the figure a coat of Ceramcoat "Matte Varnish". The next morning I flocked the base with Woodland Scenics "Snow" flock, and added a little bit of unraveled twine next to the rocks on the base to be dead grasses. Late that afternoon I sprayed the figure with Testor's Dullcote.
I'm pleased with how this fellow turned out, especially his face. The black wash made him a little dirtier looking than I had intended, but I think dirtier isn't necessarily a bad thing for a troll.
Monday, June 22, 2015
Mummy Lich: Figure 158 of 265
This week I wrapped up the Who's Your Mummy set, (see what I did there ;-) ), by painting the Mummy Lich figure. This set now joins the list of completed sets over on the right. I fell back on the same mummy method I used for the rest of the set for this figure as well. I saw this figure as some sort of ex-high ranking priestess, and I wanted to do her outfit in mainly white and gold.
I prepped the figure in the usual way; soaking it in a dish of water with a couple drops of dish- soap added, then giving it a light scrub with a soft toothbrush, and then rinsing and drying. I then glued the figure to a 1" black-primed fender washer with Aleene's Tacky glue, and glued the washer to a tongue depressor with a couple drops of Elmer's White Glue.
I began by painting any exposed skin with Folk Art "Poppy Seed". I then painted all the bandages, though I think these are more drapes than classic mummy bandages) on the figure with DecoArt "Light Antique White".
Next, I panted the blades on her back, collar piece, headdress, staff, jewelry, and front hangings at her waist, and any other assorted decorative adornments with Cermacoat "Bronze". I painted the scarab on her back, and what appeared to be a scarab shape on her belt with Folk Art "Metallic Emerald Green". I painted the back of the long front waist hanging with Aceent "Real Umber".
I decided to add a few more "Metallic Emerald Green" bits, and painted the egg shape on her head dress, and a small circular decoration on her staff. Next, I used Americana "True Blue" and Folk Art "Deep Tomato Red" to paint some of the sculpted-in decorations on the waist hangings as well as the staff head.
When all the paint had had time to dry, I gave the entire figure a wash with GW "Agrax Earthshade" wash, using a wet brush.
When the wash had had time to dry, I started work on the highlights. First, I added simple dot eyes with Americana "Olive Green". I then added a drop of Iron Wind Metals "Mid Green" Ink (which also, is almost a neon green)to each socket. This gave the eye sockets more of that glowing look.
I then highlighted the skin with the base "Poppy Seed", and then I took some Folk Art "Porcelain White" and highlighted the sutures down her front and gently drybrushed the teeth with this color to help define them better. I highlighted the drapings with the base "Light Antique White". I highlighted the blue areas with the base "True Blue", and the red parts with the base "Deep Tomato Red". All the ornamentations and decorations that I had painted with the "Bronze", I highlighted with Ceramcoat "14K Gold". Lastly, I painted the figure's white integral base with Ceramcoat Walnut.
After everything had overnight to dry, I gave the figure a coat of Ceramcoat "Matte Varnish". That afternoon I gave the base a coat of Elmer's white glue, and dunked it in a sand mixture. When the sand had dried, I gave it a coat of the "Walnut" paint that I had heavily thinned. When this was dry, I drybrushed the sand with first, Americana "Khaki Tan", an then Americana "Buttermilk". That evening I sprayed the figure with Testor's Dullcote.
I'm pleased with how the figure turned out, and I am happy to be done painting mummies for a while. :)
Figure 158 of 265; Complete
Thursday, June 18, 2015
Barrow Wardens: Bones II Figures
This week I also completed the three Barrow Warden figures from the Bones II, Expansion I set. In looking at the figures, and thinking about how I wanted to paint them, I got the idea of them being from the barrow they guarded, and the image of them being buried in their armor... I had the thought of how old rusted iron looks after it's laid around in the dirt for a while. So the idea hit me to paint them entirely in a decayed rusted scheme. Then I thought I wanted to do more than just give them plain skeletal heads, so I got the idea to give them some sort of magical looking green glow-y heads. I thought the brown rust, and the green heads would look good together.
So, with a plan in mind, I began. I prepped the figures in the usual way; soaking them in a dish of water with a couple drops of dish- soap added, then giving them a light scrub with a soft toothbrush, and then rinsing and drying. I then glued the figures to 1" black-primed fender washers with Aleene's Tacky glue, and glued the washers to a tongue depressor with a couple drops of Elmer's White Glue.
At this point, I used some Ceramcoat "Metallic Pewter", and ever-so-lightly drybrushed over the armor to give a hint of metallic sheen on the raised edges where the rust might have worn off a little. Next, I painted the ax handle, the backs of the two shields, and the "eye" of each shield where the wood showed through on the front, with Americana "Mississippi Mud". I painted the boots they all wear with Accent "Real Umber", and the drape the middle one is wearing I painted Black. I then went back to the shields and painted the raised portion of the skull on each one with Cermacoat "Bronze".
Next, I drybrushed the Black drape with some Folk Art "Settlers Blue" to add higlights. Then, I used the "Real Umber" again to paint the belt the center one is wearing as well as the straps on the backs of the shields. I painted the skulls, and their leg bones which show behind the armor next. First I painted the eye sockets Black, then I painted the skulls and leg bones with DecoArt "Citrus Green". I then took some Reaper "Surf Aqua" and dabbed some areas of corrosion on to the area of the shields that I had painted "Bronze". I decided the blade of sword with the runes on it was magical, and immune to decay, so I painted it with Folk Art "Metallic Emerald Green". Next, I went back and gave the skulls and leg bones a wash with Iron Wind Metals "Mid Green" ink using a wet brush, and being careful not to let any run onto the armor.
After everything had a while to dry, I gave the boots, ax handle, and the shields, a wash with GW "Badab Black" wash using a wet brush. I gave the runes sword a wash with Iron Wind Metals "Dark Green" ink using a wet brush. I then went back to the skulls and leg bones, where the ink was dry, and added highlights with the base "Citrus Green", I then added a little White to the "Citrus Green" and did some finer highlights. When the ink on the runes sword was dry I drybrushed the sword blade with some Folk Art "Silver Sterling" to bring out the runes and highlight the edges of the sword.
I let the figures sit all day, and that evening I gave them a coat of Ceramcoat "Matte Varnish". The next morning I flocked their bases, and late that afternoon I sprayed them with Testor's "Dullcote" spray varnish.
I'm really pleased with the results I got on these guys. It's the first time I painted an entire figure in rust, and I think on these Barrow Wardens the result is quite dramatic.
So, with a plan in mind, I began. I prepped the figures in the usual way; soaking them in a dish of water with a couple drops of dish- soap added, then giving them a light scrub with a soft toothbrush, and then rinsing and drying. I then glued the figures to 1" black-primed fender washers with Aleene's Tacky glue, and glued the washers to a tongue depressor with a couple drops of Elmer's White Glue.
I began by painting the entire figure with Ceramcoat "Walmut" I then took some Crafers Eidtion "Spice Brown", and with an old brush applied it lightly, with a stippling action, to the edges, and creases in the armor. Anywhere that moisture might sit and gather.
Next, I did the same with Accent "Golden Oxide", using an old brush, and a stippling motion, to the areas where the rust might be heaviest.At this point, I used some Ceramcoat "Metallic Pewter", and ever-so-lightly drybrushed over the armor to give a hint of metallic sheen on the raised edges where the rust might have worn off a little. Next, I painted the ax handle, the backs of the two shields, and the "eye" of each shield where the wood showed through on the front, with Americana "Mississippi Mud". I painted the boots they all wear with Accent "Real Umber", and the drape the middle one is wearing I painted Black. I then went back to the shields and painted the raised portion of the skull on each one with Cermacoat "Bronze".
Next, I drybrushed the Black drape with some Folk Art "Settlers Blue" to add higlights. Then, I used the "Real Umber" again to paint the belt the center one is wearing as well as the straps on the backs of the shields. I painted the skulls, and their leg bones which show behind the armor next. First I painted the eye sockets Black, then I painted the skulls and leg bones with DecoArt "Citrus Green". I then took some Reaper "Surf Aqua" and dabbed some areas of corrosion on to the area of the shields that I had painted "Bronze". I decided the blade of sword with the runes on it was magical, and immune to decay, so I painted it with Folk Art "Metallic Emerald Green". Next, I went back and gave the skulls and leg bones a wash with Iron Wind Metals "Mid Green" ink using a wet brush, and being careful not to let any run onto the armor.
After everything had a while to dry, I gave the boots, ax handle, and the shields, a wash with GW "Badab Black" wash using a wet brush. I gave the runes sword a wash with Iron Wind Metals "Dark Green" ink using a wet brush. I then went back to the skulls and leg bones, where the ink was dry, and added highlights with the base "Citrus Green", I then added a little White to the "Citrus Green" and did some finer highlights. When the ink on the runes sword was dry I drybrushed the sword blade with some Folk Art "Silver Sterling" to bring out the runes and highlight the edges of the sword.
I let the figures sit all day, and that evening I gave them a coat of Ceramcoat "Matte Varnish". The next morning I flocked their bases, and late that afternoon I sprayed them with Testor's "Dullcote" spray varnish.
I'm really pleased with the results I got on these guys. It's the first time I painted an entire figure in rust, and I think on these Barrow Wardens the result is quite dramatic.
Subscribe to:
Posts (Atom)