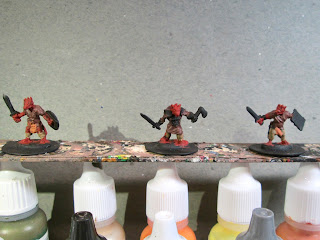
This past week I painted 3 of the six Kobolds from the Bones 3 Stoneskull Expansion set. The last time I painted Bones Kobolds as back in May of 2016, so I referred back to my past color schemes for these guys.
I prepped the figures in the usual way; soaking them in a dish of water with a couple drops of dish- soap added, then giving them a light scrub with a soft toothbrush, and then rinsing and drying them. I then glued the figures to 7/8" fender washers with Aleene's Tacky glue. I then glued the washers to a tongue depressor with a couple drops of the Elmer's glue each.
I began by painting the figures entirely Ceramcoat "Black". When the Black was dry, I painted their skin Folk Art "Barnyard Red". I then painted any pants of leggings with Reaper MSP "Olive Skin", and then painted any tunics/clothing with Folk Art "Dark Brown". After that, I painted loincloths, if they had one with Americana "Terra Cotta".
Next, I painted the armor on the central one with Citadel "Snakebite Leather", and the belts on all three with Americana "Sable Brown". I then painted the ax handles and the shield backs with Americana "Light Cinnamon", and then did the front of the shields with Folk Art " Deep Tomato Red". AFter that, I painted the glove on the central one with Americana "Mississippi Mud".
I then painted the metal work on the shields with the "Black", and then did the swords and axe heads with Folk Art Metallics "Gunmetal Grey". I let the figures dry for a while, and then gave them all a wash with Citadel "Nuln Oil" wash. As you might be able to tell, I applied the wash a little too heavily. The figures turned out so dark, I felt I could get away with highlighting by just using the base colors. So, when the wash was dry, I highlighted the figures' skin with the base color "Barnyard Red". I then painted black noses on the Kobolds, and Reaper MSP "Holly Berry" dots for eyes. I realized at this point that a couple of them had mouths open enough for the teeth to show, so I went back and painted them Crafter's Acrylic "Light Antique White". I then applied a little Citadel "Agrax Earthshade" over the teeth.
As I mentioned, highlighting the clothing and armor was done by just re-applying the base colors. I then highlighted the swords and axe heads with Ceramcoat "Metallic Silver". Lastly, I painted the entire base with Americana "Mississippi Mud".
I let the figures dry overnight and the next day I gave them a coat of Americana "DuraClear Matte" varnish. Then, when the varnish was dry, I used some white glue to flock the bases. Another overnight dry, and I sprayed them with Winsor & Newton Professional "Matt Varnish".
Well, there they are. I have to say, these were not great figures, and seem almost Bones 1 in their level of quality as opposed to Bones 3; with soft details, and a bit of flash. And I'm afraid I was rather uninspired to give them really top notch paint jobs. But, they are perfect for mixing in with all the other Kobolds I have assembled from the other Kickstarters, so will look just fine on the tabletop.
So, it looks like domestic shipping of Bones 4 will start next week... (fingers crossed) so there is a good chance my box could arrive sometime the following week (week of April 1st). My plan is to paint up the other three Kobolds that came in Stoneskull for next Monday, and after that I should be able to post an unboxing post; perhaps on Thursday the 4th or Monday the 8th; followed by my first Bones 4 painted figures!


Wow, that's quite some time since the last kobolds - it's great when you can refer back to previous colour schemes!
ReplyDeleteI'll be looking forward to that epic unboxing - I can't imagine to have such an enormous influx of miniatures at one time, that seems quite daunting.
Yes, it amazed me how long it had been since I painted the most recent prior to these. Heck, it amazes me when I think it was almost 6 years since I started this blog! As you say, it's been a great reference for going back and copying what I did on earlier figures.
DeleteI'm looking forward to it too. And, yes, it seems daunting from my perspective as well! :)
Nice modeling, Chris.
ReplyDeleteThanks, Jay!
DeleteNice. I've been doing some of my Kobold Mountain as well (sounds like a module doesn't it). I swapped some weapons around too. If I may, I'll link to my blog about them, feel free to delete. https://periodicpainting.blogspot.com/2018/07/5e-compliant-kobolds.html
ReplyDeleteThanks! Nice conversions you've done there! "Crisis at Kobold Mountain", an adventure for characters level 1-3! :-D
Delete