Before getting into today's blog entry, I wanted to take care of a little bit of bookkeeping. It always bothered me a little, after trading my "Bones I" Griffon figure away at Historicon '13 (See notations on figure total amounts on the top right column), that I wouldn't in fact end up painting all the "Bones I" Kickstarter figures; since I no longer owned that one figure. So, I finally rectified that problem over the holidays, and ordered a new Bones Griffon from Reaper. I am now adding this figure back into the count, so my new total for this blog will be 266 figures. These changes have been marked over in the top of the right hand column, and will be reflected in the figure countdown in each new figure article's title.
Now, back to our regularly scheduled blogging! :)
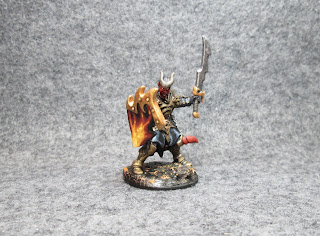
This week I continued to work on the Bedevilled set, and painted the Vaeloth, Hellborn Paladin figure. Since I did the ice-devil blue-themed paint scheme on last week's figure, I though I would go for a more conventional red fire-themed paint job on this week's.
I prepped the figure in the usual way; soaking it in a dish of water with a couple drops of dish- soap added, then giving it a light scrub with a soft toothbrush, and then rinsing and drying it. I then glued the figure to a black-primed 1" fender washer with Aleene's Tacky glue, and then glued the washer-mounted figure to a tongue depressor with a couple drops of the Elmer's glue.
I began by painting all the armor Black, and then when it was dry, drybrushing it with Ceramcoat "Bronze". I then drybrushed highlights with Cermacoat "14K Gold".
I then repainted the garments under the armor, and the wolfskin cape hanging on his back, using Black; to cover areas where the metallic drybrushing had gotten onto parts I didn't want it. Afterwards, I drybrushed the wolf skin with Americana "Neutral Grey", followed by Crafter's Acrylic "Storm Cloud Grey". I then added spot highlights with Folk Art "Platinum Grey". Next, I painted the Wolf's nose and the top of his muzzle with Black.
Next, I did highlights on all the black garments and straps using first GW "Shadow Grey", and then lighter highlights with Folk Art "Settler's Blue". I painted the shield Black, and then painted his head and tail with Reaper MSP Bones "Cinnamon Red".
I then went to work on the shield. I thought the shape of the shield's top was somewhat reminiscent of flames, so I wanted to carry that image through on the shield's motif itself. I began by painting the outer edge of the flames, almost filing the shield, using Folk Art "True Burgundy". I then worked inward towards the center of the flame with this succession of colors: Crafter's Acrylic "Deep Red", Crafter's Acrylic "Orange Spice", Crafter's Acrylic "Pure Pumpkin, Americana "Tangerine", Apple Barrel "Yellow", Crafter's Acrylic "Daffodil Yellow", and lastly a small center of White. While I had the "Pure Pumpkin open, I also used it to paint the figure's base.
My next step was to give the face and tail a wash with Winsor-Newton "Peat Brown" ink using a wet brush. I then painted his hair Black, and when it was dry, I drybrushed it with the "Shadow Grey", followed by the "Settlers Blue". After that, I painted his horns and the sword grip with Americana "Charcoal Grey", and did highlights on them both with Americana "Mississippi Mud". I then painted his eyes, giving them "Deep Red" pupils; and I also, at this time, painted the wolf's eyes with the "Deep Red" as well. I then painted the figure's teeth White, and did small highlight dots on the wolf's eyes with the White while I had it out. Next, I highlighted the figure's head and tail, first with Folk Art "Deep Tomato Red", and then some finer highlights with the "Orange Spice".
Next, I painted the sword blade with Folk Art "Gunmetal Grey". I then painted the top of the shield and the metal on the sword hilt with Ceramcoat "Bronze". I then went back and highlighted the sword blade with Folk Art "Silver Sterling", and then did highlights on the shield top and sword hilt with Cermacoat "14K Gold".
When everything had overnight to dry, I gave the figure a coat of Ceramcoat "Matte Varnish". Then, the following day, I sprayed the figure with Testor's Dullcote. Later that evening, I painted over the section of base I had earlier painted "Pure Pumpkin", with Distress "Black Soot" crackle paint. I also, while the crackle paint was still wet, put a piece of black gravel in the wet paint to look like a large chunk of volcanic rock. I set this aside for a day for the crackle paint to dry. When it had dried, I very lightly drybrushed it with the "Tangerine" paint.
I'm very pleased with how this fellow turned out, and especially like the effect the black crackle paint had over the bright orange paint on the base.
Figure 191 of 266: Complete


Cool shield!
ReplyDeleteThanks! It was a bit of work, but I think it paid off.
DeleteCool shield 2.0!
ReplyDeleteThanks! 2.0!
DeleteCool shield 2.0!
ReplyDelete