Monday, January 26, 2015

Aviriel Tellerion, Female Elf: Figure 134 of 265

     This week I completed another figure from the Elves set; Aviriel Tellerion, Female Elf; as I embark on the second half of my Bones Kickstarter figures.  Two more elves to go after this one.  Then I will either work on the Dwarves, or take a break from Fantasy for a while and work on some of the Sci-Fi figures.
      I prepped this figure in the usual way; soaking it in a dish of water with a couple drops of dish- soap added, then giving it a light scrub with a soft toothbrush, and then rinsing and drying.  I then glued the figure to a 1" black-primed fender washer with Aleene's Tacky glue, and glued the washer to a tongue depressor with a couple drops of Elmer's White Glue.   In thinking about how to paint this figure, I decided I would go for the traditional green-clothed  elf look.
     I began painting by giving her a wash with thinned black ink with a tiny pin-point drop of dish-soap added to help it flow into the crevices and help show the sculpting outlines. I then painted all her armor black, and then drybrushed it with Ceramcoat "Metallic Pewter"
     Next, I painted her pants Americana "Leaf Green", and her sleeves Americana "Olive Green".  I painted the shield and scabbard Americana "Forest Green", and the pair of hangings running down her back with Folk Heart "Hunter Green."
  I then painted her boots with Accent "Mustard Seed".  I decided to give her gloves, and painted them this color as well.  I painted the inside of her shield with GW "Vermin Brown", and the handle straps on it, as well as her belts, with DecoArt "Cinnamon Brown".  The face I painted with GW "Elf Flesh", and her hair with Crafters Edition "Spice Brown". I painted the trim on her back hangings with Apple Barrel "Yellow", I also used the "Yellow' to paint some runic symbols running down the hangings.
     At this step, I gave all the brown-ish parts (including her face) a wash with Winsor-Newton "Peat Brwon" Ink. I then worked on the metallics, painting her shield decoration, the wings on her breast plate, her scabbard trim, and the sword hilt with Ceramcoat "Bronze". I used the "Metallic Pewter" to paint the sword. 
      I now went back ,and added highlight  with Ceramcoat "14K Gold" to all the parts I had painted with the "Bronze".  I then used Folk Art "Silver Sterling" to add highlights to the armor and sword.
     I mixed a little of the "Olive Green" to the "Leaf Green' and added highlights to the pants and the shield edges. I used the base "Mustard Seed" to add highlights to the boots and gloves.  Next, I used Americana "Sable Brown" to add highlights to the hair, I then mixed a little Americana "Khaki Tan" into the "Sable Brown", and added a further level of hair highlights.   I then painted the eyes, first doing the sockets black, then adding whites and then black pupils.  I highlighted the face with the base "Elf Flesh", then added a little white to add an extra highlight to the bridge of the nose.  Lastly, I painted the white integral base with the "Cinnamon Brown". 
      I let the figure sit overnight, and the next morning I gave it a coat of Ceramcoat "Matte Varnish".  Later that afternoon I flocked the base.  The weather hasn't been good for spraying, so I wasn't able to apply the usual Testor's Dullcote before posting this entry; so you will notice a little extra sheen on the figure.
    I'm pleased with how the figure turned out.  I'm not a big fan of the sculpt, and I think the nice simple paint scheme did it justice.

Figure 134 of 265: Complete

Monday, January 19, 2015

Svetlana, Frost Giant Princess: Figure 133 of 265

     Hooray, and welcome to the half-way point painting celebration! :)  This week I completed figure 133, Svetlana the Frost Giant Princess from the Ice Giant King and Queen optional purchase set, which both puts me both at and over the half way mark in my 265 Bones figure painting journey.  It's all down hill from here!  I thought I'd try my hand at one of these larger figures as a way to mark this special occasion.
    I prepped this figure in the usual way; soaking both the parts (body and hand) in water with a bit of dish soap added, giving a gentle scrub with an old soft toothbrush, then rinsing and drying.  I then used Gorilla Super Glue gel to glue the hand holding the weapon to the arm socket; and when dry, glued the body to 2" black primed fender washer with Aleene's Tacky glue. The washer was large enough that I didn't feel it was necessary to take my usual step of gluing the washer to a tongue depressor for ease of handling.
       I then spent some time Googling Eskimo costumes to get some inspiration for painting this figure.
   I began by painting her skin with GW "Vermin Brown".  I then painted her pants Folk Art "Poppy Seed", and then painted her top, waist furs, wrist wrappings, boot fur trim, and face mask with Americana "Dove Grey".
Next, I painted her fur cape with Americana "Mississippi Mud".  Then I painted all the bone looking splints she has on her outfit, the skulls she is holding, her tooth necklace, and the jaws on the back end of her weapon, with Americana "Buttermilk". Her lower boots I painted Ceramcoat "Maple Sugar Tan", and the sole of the raised left foot I painted Ceramcoat "Raw Sienna".
 I now painted the various belts and straps on her outfit, and the ones wrapped around the skulls with Folk Art "Medium Grey". Then I painted the bottom third of her mask with  Folk Art "Barnyard Red", and the top third Folk Art "Settlers Blue". This pattern was based on an Eskimo mask I had seen while Googling Eskimo costumes. I also used the "Settlers Blue" to paint some of the decorations on her outfit.
   I worked now on finishing her weapon. I painted the blade with Folk Art "Porcelain White", and the shaft with Americana "Sable Brown".  I finished up with painting all the strapping on the weapon with Ceramcoat "Walnut". I then used some Ceramcoat "Metallic Pewter" to paint the rivets on the shaft, and the two bump-like protrusions on the mask by the mouth.
     After everything had had time to dry, I then gave the entire figure a wash with GW "Agrax Earthshade" wash.

    I now worked on the hair, first painting it black, and then drybrushing it with the "Settlers Blue". I then mixed in a little Anita's "Baby Blue" with the "Settlers Blue" to do some lighter highlights.  Next, I used the base "Mississippi Mud" to do drybrushed highlights to the cape.  I then mixed in some Americana "Khaki Tan" to the "Mississippi Mud" to do even lighter highlights. I mixed some white with the "Poppy Seed' and added some highlights to her pants.  For her skin, I added some Apple Barrel "Apple Flesh" to the "Vermin Brown" to paint on highlights.
      I now did highlighting on all the bones and teeth with some white mixed with the base "Buttermilk", and then a bit of just plain white. I also used the plain white to drybrush highlights on to all the white-ish fur clothing and trim.  I drybrushed the weapon's blade with the base "Porcelain White".  I added some highlights to the blue areas with the base "settlers Blue, and to the red part of the mask with the base "Barnyard Red."   Lastly, I added in the eye; first painting the mask's eye holes black, and then adding in smaller whites and then black pupils.
    I painted the washer and any unpainted parts of the figure's integral base all white. I let the figure sit overnight, and the next morning I gave it a coat of Ceramcoat "Matte Varnish".  Later that afternoon I flocked the base, using Woodland Scenics snow flocking, and added some dry grasses with a bit of unraveled twine and a bit of twig.  The next day I gave her a coat of Testor's "Dullcote" spray varnish.

  I'm really pleased with how she turned out.   I like how all the natural tones work together. I have included a picture of her below with the Elf wizard I completed last week to give a sense of her size.
Figure 133 of 265: Complete.  On to the second half!

Monday, January 12, 2015

Anirion, Wood Elf Wizard: Figure 132 of 265

First off, let me say "Happy New Year!" to all my readers.  Secondly, let me apologize for the two week delay in getting anything posted.  As I said on the 29th, I had a very busy holiday schedule, and then a stomach bug came along last weekend to squash any attempts to get something posted last Monday.  Anyhow, I've been back at the painting table now, and this week I finished up Anirion, the Wood Elf Wizard, from the Elves set.
     The completion of this figure puts me on the doorstep of the halfway mark, so be sure to tune in next week for my halfway mark celebration figure. :)
      I prepped this figure in the usual way; soaking in water with a bit of dish soap added, giving a gentle scrub with an old soft toothbrush, then rinsing and drying.  I then glued it to 1" fender washer with Aleene's Tacky glue, and then glued the washer to a tongue depressor with a couple small dabs of Elmer's white glue, for ease of handling during painting.
     I was still in the mind to do winter themed figures since the completion of my Snow Goblins in December, and I thought this Elf's cloak and robes would make him well suited for a winter paint scheme. So, I began by painting his outfit with Aleene's "Dark Grey". I then drybrushed over this with Duncan "Slate Grey"
I envisioned having his robes/cloak look like a snow storm in motion, so I took a very stiff brush dipped it in white paint, and then ran my thumb across is it to create a spatter pattern of white on the grey outfit.  The resulting spatter turned out a little rope-ier than I imagined, and some of the spatter dots came out a little more raised/thick than I had thought they would, but overall I was pleased with the outcome.
Next, I painted the edges of the cloak and sleeves with white.  I painted the staff with Folk Art "Barn Wood", and then the face and hands with GW "Elf Flesh".  Lastly, I painted the hair with Americana "Moon Yellow."
Next, I painted the fittings on the staff with Ceramcoat "Metallic Pewter", and the stone on top I painted with Americana "True Blue".  After the figure had some time to dry, I then gave a wash to the staff, hands, face and hair with slightly thinned Winsor-Newton "Peat Brown" Ink.
After this wash was dry, I went back and added highlights to the face and hands with the base "Elf Flesh".  I highlighted the hair with the base "Moon Yellow", and then did further highlights with Apple Barrel "Lemon Chiffon".  I added highlights to the stone on top the staff with white, and some white mixed with a little of the "True Blue."  Lastly, I added highlights to the metal bits with Folk Art "Silver Sterling".   My final step was to paint the base and washer with white.
      I let the figure sit overnight, and the next morning I gave it a coat of Ceramcoat "Matte Varnish".  Later that afternoon I flocked the base, using Woodland Scenics snow flocking, and added some dry grasses with a bit of unraveled twine.  The next day I gave him a coat of Testor's "Dullcote" spray varnish.

Over all, I'm very pleased with how the figure came out.  I think the cloak his the appropriate "swirling snow storm" look about it that I was hoping for.

Figure 132 of 265: Complete

Monday, December 29, 2014

No Figure This Week

I'm sorry, but I was making merry a little too much this week with friends and family, and I was unable to complete a figure for posting.  Hopefully, by next Monday I will have something ready to post.  I hope you all have a great New Year.  See you all in 2015!

Monday, December 22, 2014

Pathfinder Goblin Warchanter: Figure 131 of 265

     This week I painted the last of the Pathfinder Goblins "We Be Goblins" set: the Warchanter.  I have put a group photo of the gang down at the end of this post.  I will now be moving on to the Elves, and am also preparing a large figure for the upcoming halfway completion mark celebration, which I'll mark with Figure 133, (since Figure 132 would still be .5 short of halfway). So, now on to the figure...
      I prepped the figure in the usual way; soaking in water with a bit of dish soap added, giving a gentle scrub with an old soft toothbrush, then rinsing and drying.  I then glued it to 7/8" fender washers with Aleene's Tacky glue, and then glued the washer to a tongue depressor with a couple small dabs of Elmer's white glue, for ease of handling during painting.
    To begin with, I painted the skin with Anita's "Baby Blue".  When this was dry, I gave the skin areas a wash with thinned Iron Wind Metals "Blue Ink". (I forgot to take a photo before I started to paint the cloths, so excuse the color on her shirt!)
  When the ink wash was completely dry, I began painting the Goblin's outfit.  I started with painting her tunic with GW "Graveyard Earth". Then I painted her skirt with Apple Barrel "Rock Grey".  Next, I did her "armor" plates with Accent "Mustard Seed".  Her leggings I painted Ceramcoat "Mocha", and the legging hangings I painted Folk Art "Burgundy".
     Now I worked on some of the detail bits. First, I painted the hair on the Goblin with Folk Art "Medium Gray". I painted her teeth Americana "Buttermilk", and the skull and tusks(?) on her skirt, and the bones(?) in her hair, as well.  I painted her tongue with Americana "Wedgwood Blue".  Next, I painted the cord around her skirt and neck with Ceramcoat "Maple Sugar Tan".  Finally, I painted the whip with Crafters Edition "Spice Brown", and the sword and whip grips with Americana "Asphaltum".
    Next step was the metallics.  I painted the sword, and the balls on the whip's end, with Ceramcoat "Metallic Pewter".   I then painted the ball on the whip handle, hook on the sword hilt, her bracelets, and the chest decoration, with Folk Art "Metallic Blue Sapphire".  
     When everything had had time to dry, I went back and carefully applied GW "Agrax Earthshade" wash to all the parts that weren't blue skin.  I was as careful as I could be not to let it run onto the blue skin, except I applied small amounts to the eye sockets and mouth.
After the wash had had time to dry, I went back and added highlights.  I began by drybrushing her hair with white paint.  Then I highlighted the skin with the original "Baby Blue".  This allowed me to cover any mistakes where wash, or the drybrushed white had gotten onto the blue. Next, I added eyes with the "Buttermilk", and then added black pupils. I also used the "Buttermilk" to highlight the teeth and bones.  I highlighted the tongue with  a mix of the "Wedgwood" and the "Baby Blue". I painted the hair ties with the "Burgundy".  I then used the original clothing/armor colors to add highlights to all she were wearing.  Lastly, I highlighted the blade of the and sword , and balls on the whip, with Folk Art "Silver Sterling".   My final step was to paint the figure's base and washer with white.
      I let the Goblins sit overnight, and the next morning I gave them a coat of Ceramcoat "Matte Varnish".  Later that afternoon I flocked their bases, using Woodland Scenics snow flocking.   With all the Christmas prep going on around here at home, I only just finished it yesterday, so wasn't able to give it it's final Testor's Dullcote spray yet.  You'll notice it's a little shiny in the final photo below, my apologies for that.
  I like how she turned out. And, all together they make a nice little horde.

Figure 131: Complete

And let me take this opportunity to say, "Merry Christmas!" to everyone out there in blog land. :)
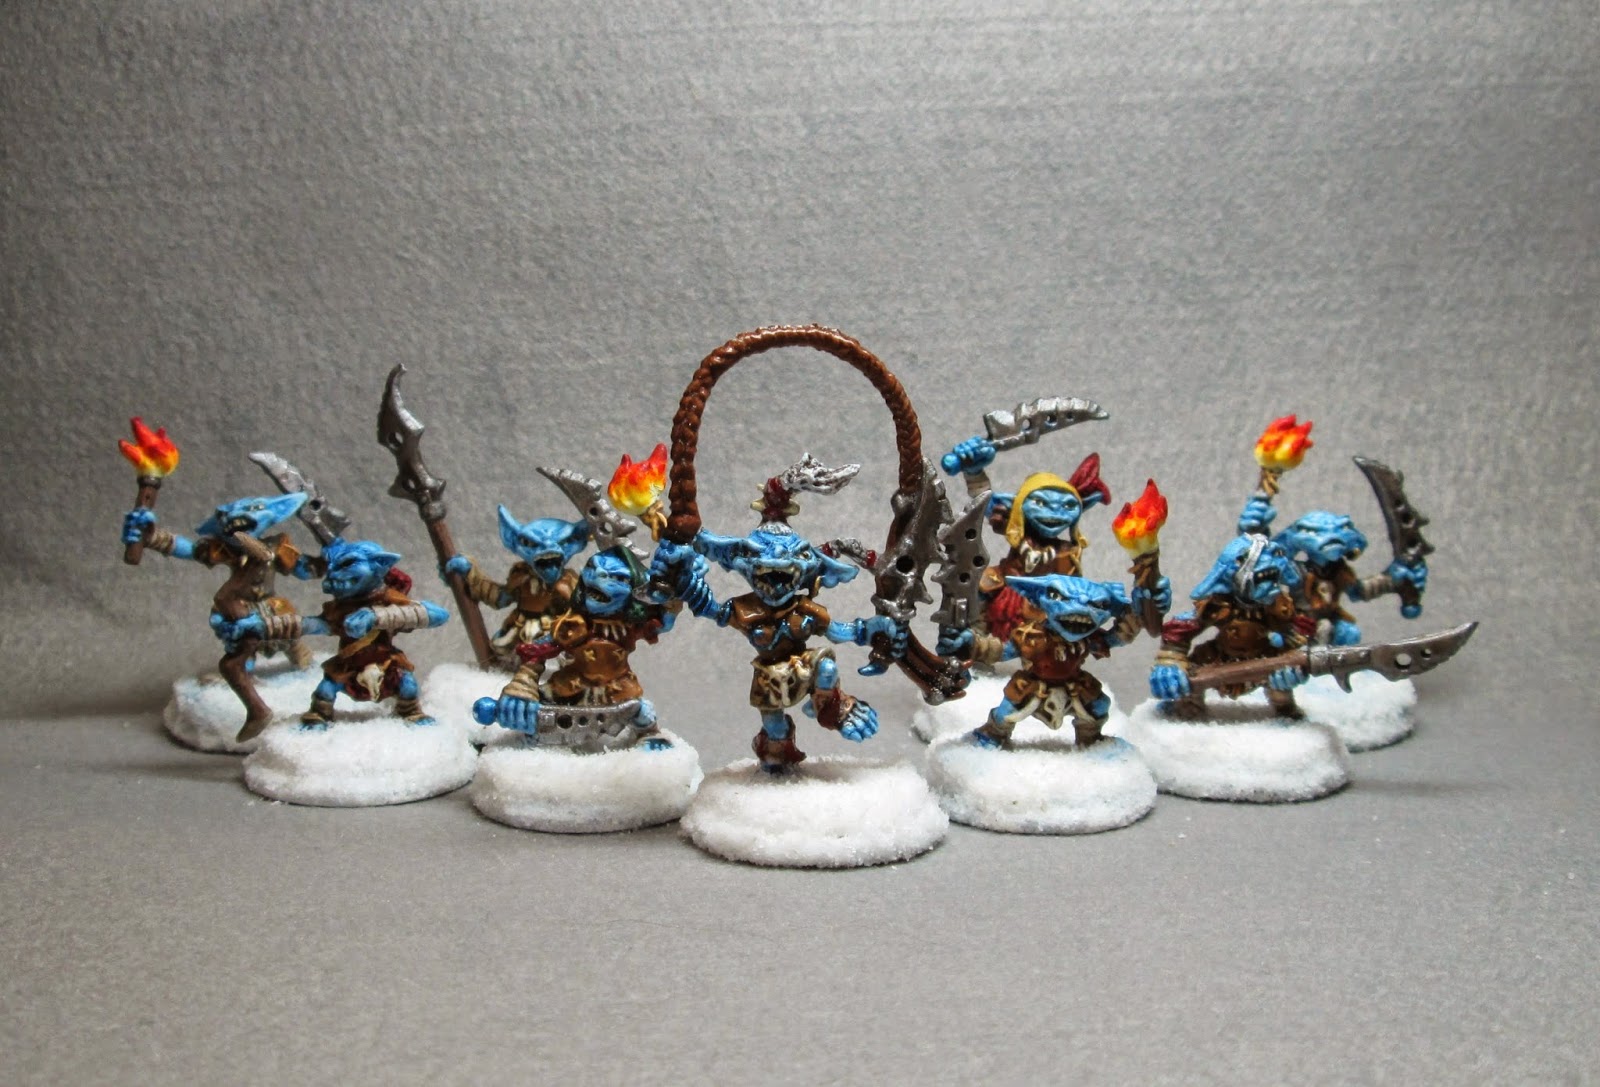
Here's the whole gang; as they'll look in a couple days caroling by torchlight on a snowy Christmas Eve! :)

Monday, December 15, 2014

Pathfinder Goblin Warriors: Figures 129 & 130 of 265

    This week I painted two more on the We Be Goblins! Pathfinder Goblins Set.  I prepped them in the usual way; soaking in water with a bit of dish soap added, giving a gentle scrub with an old soft toothbrush, then rinsing and drying.  I then glued them to 7/8" fender washers with Aleene's Tacky glue, and then glued the washers to a tongue depressor with a couple small dabs of Elmer's white glue, for ease of handling during painting.
     
     To begin with, I painted their skin with Anita's "Baby Blue".  When this was dry, I gave the skin areas a wash with thinned Iron Wind Metals "Blue Ink".
 When the ink wash was completely dry, I began painting the Goblins' outfits.  I started with painting their tunics with DecoArt "Cinnamon Brown". Then I painted their loin "hangings/skirts" with Folk Art "Barnyard Red".  Next, I did their "armor" plates, and the Archer's quiver, with Accent "Mustard Seed".  Their leggings I painted Folk Art "Butter Pecan", and their wrist wraps I painted Citadel Foundation "Dheneb Stone". 
     Now I worked on some of the detail bits. First, I painted the hat on the left-hand Goblin with Folk Art "Golden Harvest". I painted their teeth Americana "Buttermilk", and the assorted teeth  hanging around their necks I painted with the "Buttermilk" as well.  I also used the Buttermilk" to paint the skull on the Archer Goblin.  I painted the Archer's tongue with Americana "Wedgwood Blue".  Next, I painted the cords on the "armor" plates and hat, the quiver strap, and the necklace cords with Ceramcoat "Maple Sugar Tan".  I painted the feathers on the left-hand Goblin's hat with Folk Art "Burgundy" as well as the fletchings on the Archer's arrows, and the pouches they both have on their rear belts with Anita's "Burnt Sienna".  I painted the bow and the arrow shafts with Americana "Mississippi Mud", the tips of the bow with Folk Art "Barn Wood", and the sword grip with Americana "Asphaltum". Lastly, I painted the rock the left-hand Goblin has his foot on with Folk Art "Medium Grey"
I now painted the sword with Ceramcoat "Metallic Pewter".   I then painted the ball on the sword hilt with Folk Art "Metallic Blue Sapphire".  When everything had had time to dry, I went back and carefully applied GW "Agrax Earthshade" wash to all the parts that weren't blue skin.  I was as careful as I could be not to let it run onto the blue skin, except I applied small amounts to their eye sockets and mouths.
After the wash had had time to dry, I went back and added highlights.  I began by  highlighting the skin with the original "Baby Blue".  This allowed me to cover any mistakes where the wash had gotten onto the blue. Next, I added eyes with the "Buttermilk", and then added black pupils. I also used the "Buttermilk" to highlight the teeth and bones.  I highlighted the tongue with  a mix of the "Wedgwood" and the "Baby Blue".  I then used the original clothing/armor colors to add highlights to all they were wearing.  Lastly, I highlighted the blade of the sword with Folk Art "Silver Sterling".   My final step was to paint the figures' bases and washers with white.
      I let the Goblins sit overnight, and the next morning I gave them a coat of Ceramcoat "Matte Varnish".  Later that afternoon I flocked their bases, using Woodland Scenics snow flocking.  The next day I gave them a coat of Testor's "Dullcote" spray varnish. 
   Another two fine looking Goblins. Jut the one girl Goblin yet to go.

Figures 129 & 130: Complete

Monday, December 8, 2014

Norgol, Irongrave Knight: Figure 128 of 265

This week I finished up the BBEG set by painting Norgol, Irongrave Knight.  This set now joins the list of Completed Sets over on the right.
      I prepped this figure in the usual way; soaking it in a dish of water with a couple drops of dish soap added, then giving it a light scrub with a soft toothbrush, and then rinsing and drying.  I then glued the figure to a 1" black-primed fender washer with Aleene's Tacky glue, and glued the washer to a tongue depressor with a couple drops of Elmer's White Glue.
  I then painted him all black. I avoided the cloak's interior as best I could, but didn't worry too much if some black got on it.  When the black was dry, I went back over the figure and drybrushed throughly it with Ceramcoat "Metallic Pewter".
I then touched up anywhere the metallic drybrushing had gotten on the shoulder fur, or the cloak's exterior, with more black.  Next, I drybrushed the fur with Folk Art "Medium Grey", and then drybrushed the outer portion of the cloak with Duncan "Slate Blue". I then went back and touched up anywhere these colors had gotten on the armor with the "Metallic Pewter" color
My next step was to paint the cloak's interior lining with GW "Blood Red".  The ax handle I painted Americana "Mississippi Mud", and the belt I painted Ceramcoat "Walnut".
I then gave the cloak's lining, and the ax handle, a wash with thinned Winsor-Newton "Peat Brow" ink.  While this dried, I painted the skull on his chest armor and the one on his ax with Ceramcoat Bronze.  I then went back and added highlights to these with Ceramcoat "14K Gold". Lastly, I added highlights to the armor and the ax with Folk Art "Silver Sterling".   I then painted any exposed white on the figure's integral base with the "Walnut".  I intentionally did not highlight the red lining of the cloak since most of it hung in shadow, I felt it would look odd with highlighting.
     The next morning I gave it  coat of  Ceramcoat "Mate Varnish". Later that afternoon, I flocked the base.  The following day, I sprayed the figure with "Testor's Dullcote".
I'm very pleased with how this guy turned out for what was a very quick and simple paint job.  He's got a good menacing attitude about him.
This week, I get back to work on the Pathfinder Goblins.