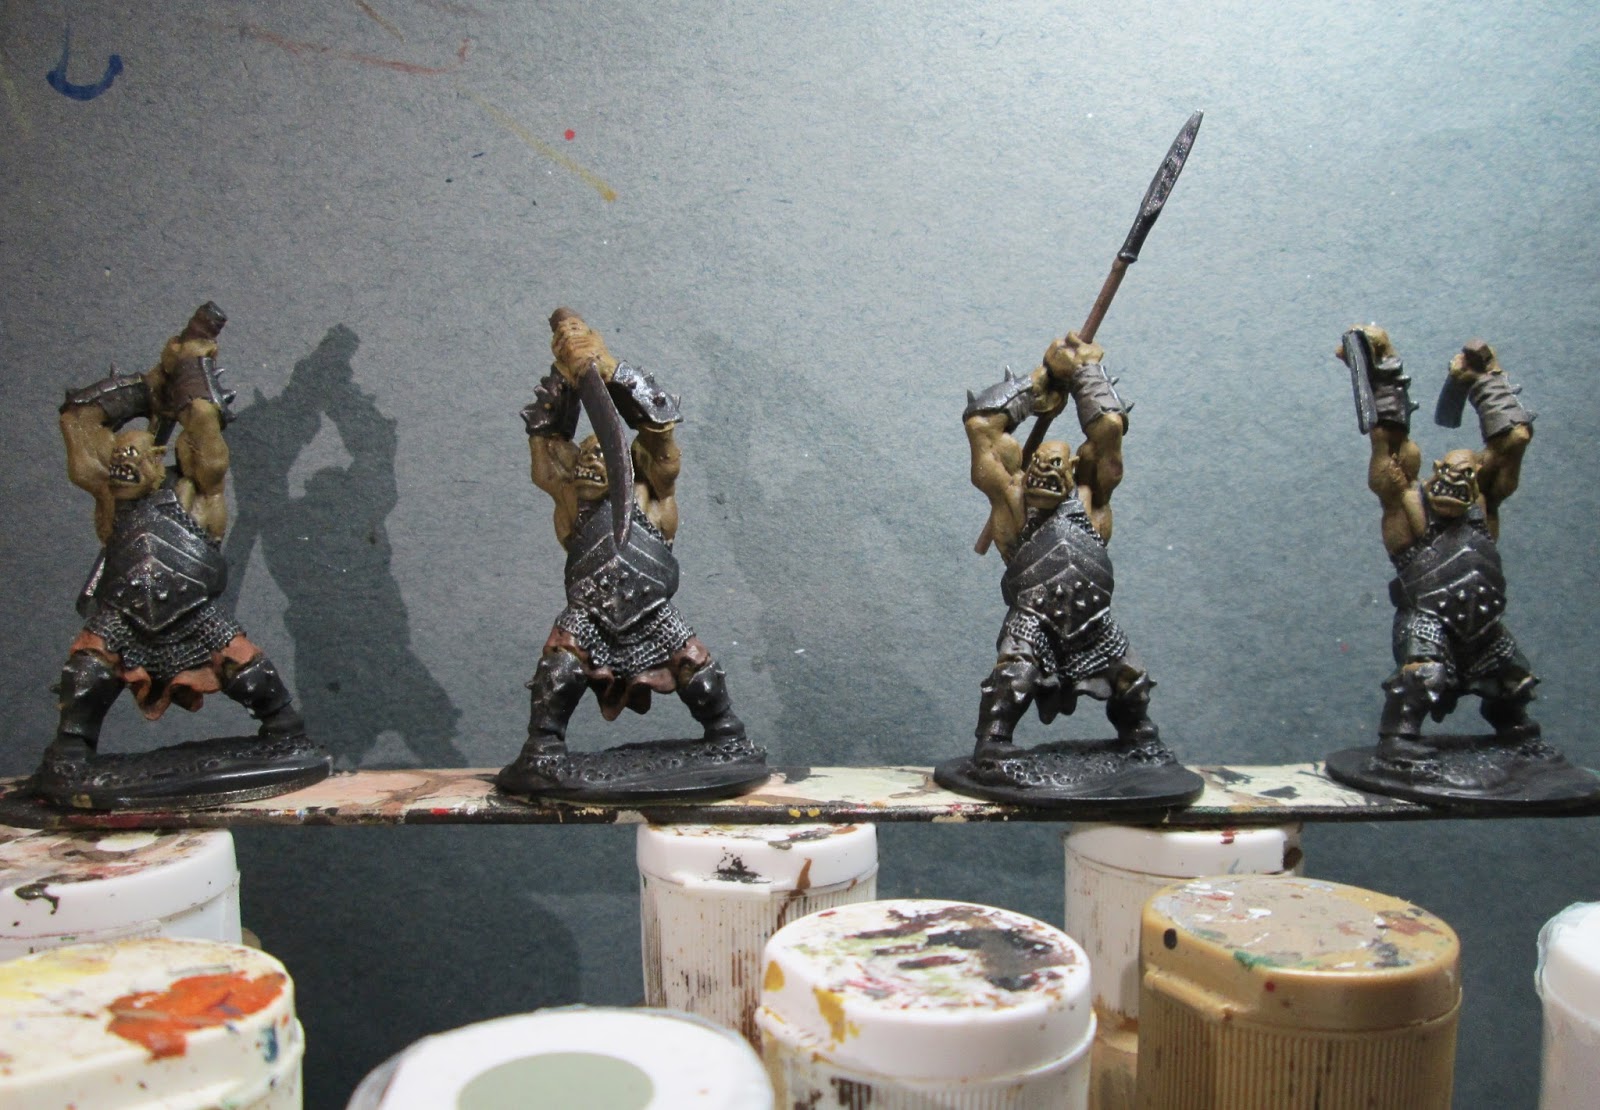
This week I finished up the Dog/Wolf figure from the Bones II Original Figures set. I chose to paint it up like a Wild Dog and base it for Frostgrave.
I prepped the figure in the usual way; soaking it in a dish of water with a couple drops of dish- soap added, then giving it a light scrub with a soft toothbrush, and then rinsing and drying it. I then glued the figure to a white-primed 1.25" fender washers with Aleene's Tacky glue, and then glued the washer-mounted figure to a tongue depressor with a couple drops of the Elmer's glue.
I bagn by painting his legs and underside with Americana "Terra Cotta". I then painted his upper body with Americana "Neutral Grey".
When these first colors of paint were dry, I gave the figure a wash with GW "Agrax Earthshade" wash using a wet brush. When the wash was dry, I drybrushed the figure with Folk Art "Barn Wood"
I then painted his muzzle, open mouth, and eyes Black. Next, I added tiny White pinpoint highlights to his eyes, and painted his teeth with Americana "Buttermilk". Then I added some highlights to his nose with the "Neutral Grey".
Lastly, I painted the base White. When everything had overnight to dry, I gave the figure a coat of Ceramcoat "Matte Varnish". Then, the next morning I flocked the base with Woodland Scenics "Snow" flock, and added some fiber grasses. Later that afternoon I sprayed the figure with Testor's Dullcote.
I'm pleased with how this puppy turned out. I think he has a nice feral look about him.
My Efforts to Paint the Miniatures From the 1st, 2nd, 3rd, and 4th BONES Kickstarters!
Thursday, March 17, 2016
Monday, March 14, 2016
Ghoul Queen: Figure 206 of 266
This past week I started working on the Necromancer set, and over the weekend I finished painting the Ghoul Queen figure from this set. I had previously modified this figure, removing one of the scabbards she originally came with. You can see the article I wrote about the conversion I did on her here: Ghoul Queen Conversion.
After I completed the conversion, I glued the figure to a white-primed 1" fender washers with Aleene's Tacky glue, and then glued the washer-mounted figure to a tongue depressor with a couple drops of the Elmer's glue.
I began by painting the figure entirely in Black. I then drybrushed her with Americana "Zinc". I then painted her skin with Folk Art "Milkshake"
When the "Milkshake" was dry, I gave it a wash with GW "Agrax Earthshade" wash using a wet brush. I then painted her various belts, straps, and cords with Folk Art "Hunter Green". Next, I painted the bone adornments on her sleeves, headdress, and on her scabbard with a mix of Americana "Buttermilk and Americana "Mississippi Mud". I then painted all the parts I planned to make gold, with Americana "Terra Cotta".
I then highlighted all the "Hunter Green" areas with first, Americana "Forest Green", and then Americana "Leaf Green". I followed that with highlighting all the bone adornments with first the "Buttermilk", and then some Crafter's Edition "Light Antique White". Next, I painted the all the "Terra Cotta" parts with Ceramcoat "Bronze".
My next step was to highlight her hair with a mix of the "Zinc" and some Folk Art "Cloudy Day". I then painted her eyes, and used some of the "Hunter Green" to apply eye shadow. Next, I highlighted her skin with first the "Milkshake", and then the "Light Antique White". I used Crafter's Acrylic "Storm Cloud Grey" to do some specific highlights on her dress, and then I did the final metallic highlights with Ceramcoat "14K Gold".
I painted the base White, and when dry I applied a small area of white glue to the base and glued on some course sand. When the glue was dry, I painted the sand Black, then drybrushed the sand with the "Zinc", followed with Folk Art "Platinum Grey". When everything had overnight to dry, I gave the figure a coat of Ceramcoat "Matte Varnish" early the next morning. Midday, I flocked the white areas with Woodland Scenics "Snow" flock and late that afternoon I sprayed the figure with Testor's Dullcote.
I'm very happy with how she turned out. I think she has the right hangs-around-with-the-dead look about her. :) In retrospect, I think she would have been further improved if, during her surgery, I had removed that big crab-claw ornamentation behind her head. It's a redundancy with the bone hair adornments she already has.
Figure 206 of 266: Complete. 60 more to go.
After I completed the conversion, I glued the figure to a white-primed 1" fender washers with Aleene's Tacky glue, and then glued the washer-mounted figure to a tongue depressor with a couple drops of the Elmer's glue.
I began by painting the figure entirely in Black. I then drybrushed her with Americana "Zinc". I then painted her skin with Folk Art "Milkshake"
When the "Milkshake" was dry, I gave it a wash with GW "Agrax Earthshade" wash using a wet brush. I then painted her various belts, straps, and cords with Folk Art "Hunter Green". Next, I painted the bone adornments on her sleeves, headdress, and on her scabbard with a mix of Americana "Buttermilk and Americana "Mississippi Mud". I then painted all the parts I planned to make gold, with Americana "Terra Cotta".
I then highlighted all the "Hunter Green" areas with first, Americana "Forest Green", and then Americana "Leaf Green". I followed that with highlighting all the bone adornments with first the "Buttermilk", and then some Crafter's Edition "Light Antique White". Next, I painted the all the "Terra Cotta" parts with Ceramcoat "Bronze".
My next step was to highlight her hair with a mix of the "Zinc" and some Folk Art "Cloudy Day". I then painted her eyes, and used some of the "Hunter Green" to apply eye shadow. Next, I highlighted her skin with first the "Milkshake", and then the "Light Antique White". I used Crafter's Acrylic "Storm Cloud Grey" to do some specific highlights on her dress, and then I did the final metallic highlights with Ceramcoat "14K Gold".
I painted the base White, and when dry I applied a small area of white glue to the base and glued on some course sand. When the glue was dry, I painted the sand Black, then drybrushed the sand with the "Zinc", followed with Folk Art "Platinum Grey". When everything had overnight to dry, I gave the figure a coat of Ceramcoat "Matte Varnish" early the next morning. Midday, I flocked the white areas with Woodland Scenics "Snow" flock and late that afternoon I sprayed the figure with Testor's Dullcote.
I'm very happy with how she turned out. I think she has the right hangs-around-with-the-dead look about her. :) In retrospect, I think she would have been further improved if, during her surgery, I had removed that big crab-claw ornamentation behind her head. It's a redundancy with the bone hair adornments she already has.
Figure 206 of 266: Complete. 60 more to go.
Friday, March 11, 2016
Reaper CAV Bones Kickstarter Boxes Arrive
I'm happy to report that my shipments from Reaper's CAV: Strike Operations Kickstarter arrived this week! I happily spent that night sorting through all my goodies. :)
I didn't go in for a lot of the big stompy robots, as I was more interested in getting a bunch of the well-priced 10mm tanks and other vehicles for a set of Sci_Fi rules we will be working on based on our popular "Look, Sarge, No Charts" system.
So, you can expect to see the occasional tank or two, as well as a couple of the big stompy robots, to show up here; since they are made from the Bones material, so fall under the jurisdiction of this blog. :).
I didn't go in for a lot of the big stompy robots, as I was more interested in getting a bunch of the well-priced 10mm tanks and other vehicles for a set of Sci_Fi rules we will be working on based on our popular "Look, Sarge, No Charts" system.
So, you can expect to see the occasional tank or two, as well as a couple of the big stompy robots, to show up here; since they are made from the Bones material, so fall under the jurisdiction of this blog. :).
Thursday, March 10, 2016
Bones II: Bear
This week I painted the Bear figure from the Bones II Original Figures set. I chose to paint it up like a Black Bear and base it for Frostgrave.
I prepped the figure in the usual way; soaking it in a dish of water with a couple drops of dish- soap added, then giving it a light scrub with a soft toothbrush, and then rinsing and drying it. I then glued the figure to a white-primed 1" fender washers with Aleene's Tacky glue, and then glued the washer-mounted figure to a tongue depressor with a couple drops of the Elmer's glue.
I began by painting the entire figure Black. I then drybrushed it with Accent "Real Umber" and then a lighter drybrush with Apple Barrel "Burnt Sienna".
I felt it was still missing the sheen on the fur that bears have, so I drybrushed the high points with Crafter's Acrylic "Storm Cloud Grey".
I then painted the muzzle with Americana "Terra Cotta", and the paw pads with a mix of Americana "Mississippi Mud" and a little Black. I then painted his nose and eyes Black, and then outlined his nostrils with the "Storm Cloud Grey". I also added tiny White pinpoint highlights to his eyes, and touched his teeth with a little Americana "Buttermilk".
Lastly, I painted the base White. When everything had overnight to dry, I gave the figure a coat of Ceramcoat "Matte Varnish". Then, the next morning I flocked the base with Woodland Scenics "Snow" flock, and then glued on a stick to look like a log. I then painted the top of the log with White, and while the paint was wet, sprinkled a little of the ""Snow" flock on it. Later that afternoon I sprayed the figure with Testor's Dullcote.
I think he turned out looking pretty good. Beware the unwary wanderer in the Frozen City!
I prepped the figure in the usual way; soaking it in a dish of water with a couple drops of dish- soap added, then giving it a light scrub with a soft toothbrush, and then rinsing and drying it. I then glued the figure to a white-primed 1" fender washers with Aleene's Tacky glue, and then glued the washer-mounted figure to a tongue depressor with a couple drops of the Elmer's glue.
I began by painting the entire figure Black. I then drybrushed it with Accent "Real Umber" and then a lighter drybrush with Apple Barrel "Burnt Sienna".
I felt it was still missing the sheen on the fur that bears have, so I drybrushed the high points with Crafter's Acrylic "Storm Cloud Grey".
I then painted the muzzle with Americana "Terra Cotta", and the paw pads with a mix of Americana "Mississippi Mud" and a little Black. I then painted his nose and eyes Black, and then outlined his nostrils with the "Storm Cloud Grey". I also added tiny White pinpoint highlights to his eyes, and touched his teeth with a little Americana "Buttermilk".
Lastly, I painted the base White. When everything had overnight to dry, I gave the figure a coat of Ceramcoat "Matte Varnish". Then, the next morning I flocked the base with Woodland Scenics "Snow" flock, and then glued on a stick to look like a log. I then painted the top of the log with White, and while the paint was wet, sprinkled a little of the ""Snow" flock on it. Later that afternoon I sprayed the figure with Testor's Dullcote.
I think he turned out looking pretty good. Beware the unwary wanderer in the Frozen City!
Monday, March 7, 2016
Orc Berserkers: Figures 202-205 of 266
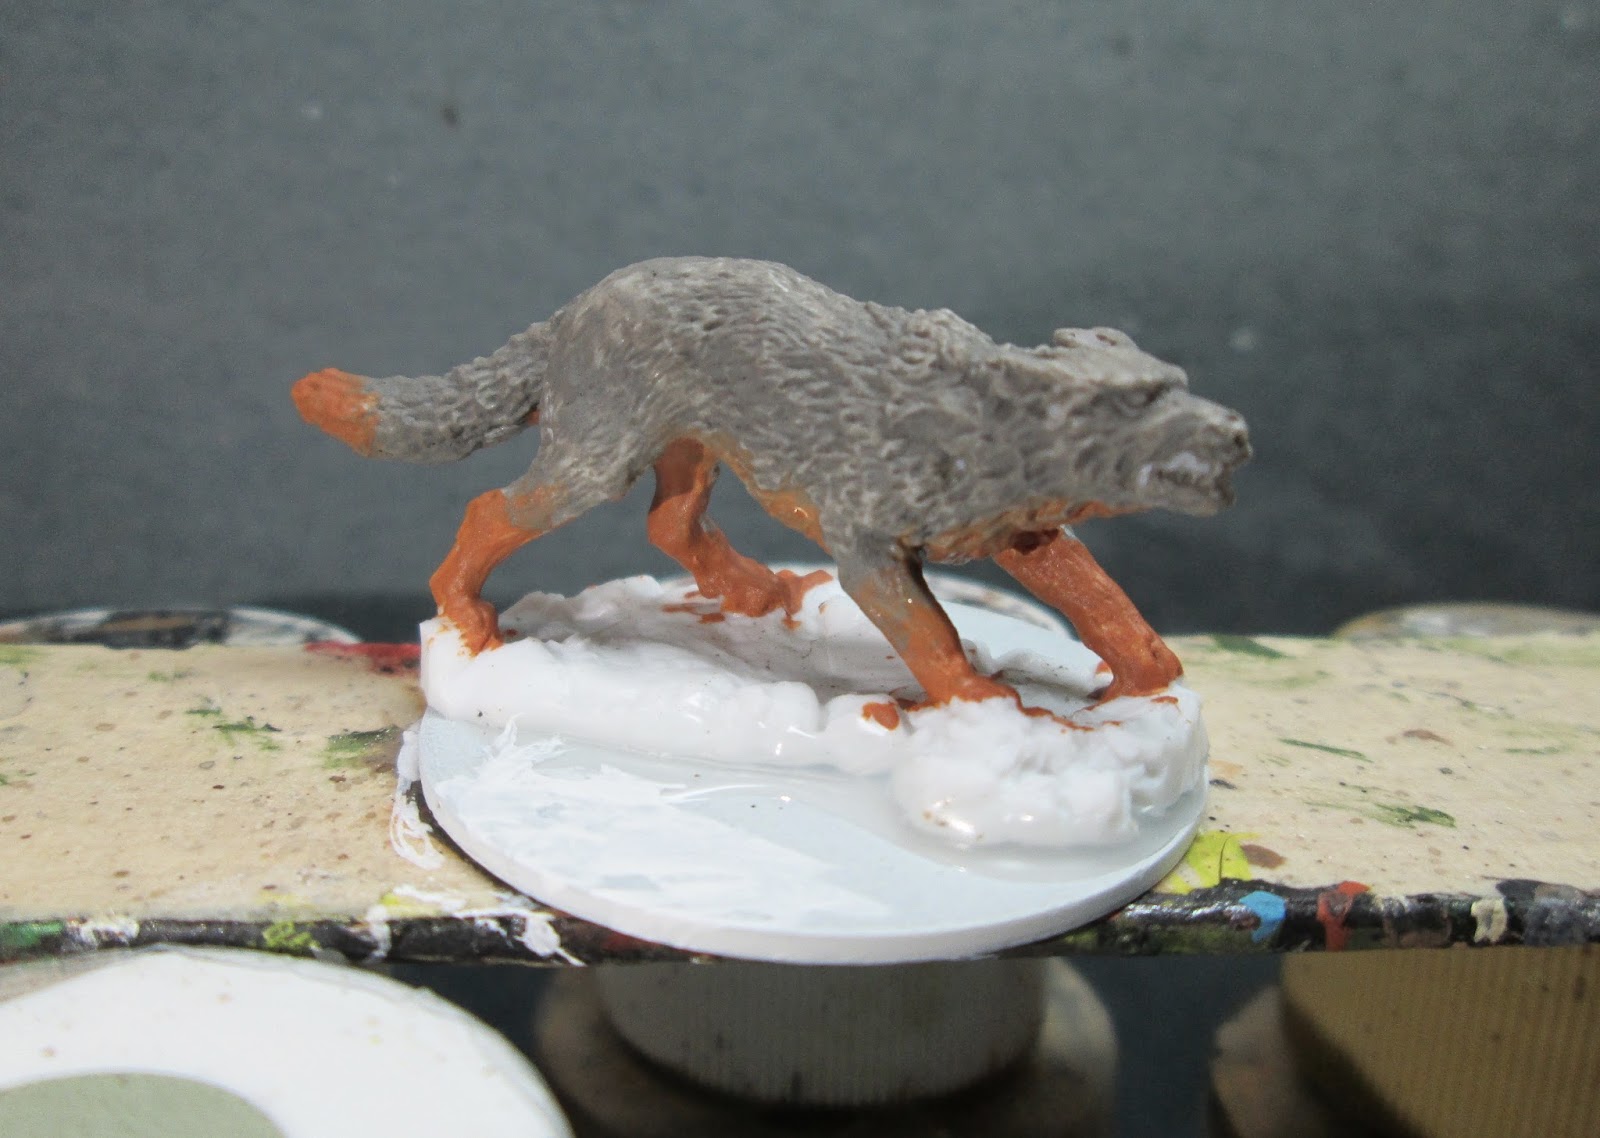
This past weekend, I finished up the four Orc Berserker figures from the Orcpocalypse add-on set. As with the group of Orc Marauders (from the same set) that I finished recently, I tried to do minor conversions to each one to give them a little individuality.
I prepped these figures in the usual way, washing them in some dish soap, lightly scrubbing them with a soft toothbrush, and then letting them dry. I then did the conversions to them using Gorilla superglue gel. Looking at the row below; The first orc is untouched. The second has had his hands flipped around and repositioned opposite of the way they were so the sword now is in front of the orc. I also replaced the sword blade with one from one of the Orc Stalker figures. The third orc has had the sword removed, his hands drilled out, and a toothpick spear-shaft inserted. I borrowed the spearhead from one of the Orc Hunter figures. The fourth orc, has had his forearms removed and replaced with a pair from one f the Orc Stalker figures.
After the conversions were done, I glued the four onto black primed 1.25 inch fender washers using Aleene's Tacky glue. I then glued them onto a tongue depressor, for ease of painting, using a couple drops of Elmer's white glue each.
I began by painting them entirely Black; and then when the Black was dry, I drybrushed them entirely with Folk Art Metallics "Gunmetal Grey". I then passed over them with a lighter drybrush of Folk Art Metallics "Silver Sterling".
I then painted their skin with with Aleene's "Deep Khaki". Next, I painted their cloth "skirts" hanging under the chainmail: Orc one with Americana "Terra Cotta", Orc two with Nicole's "Brown", Orc three with Americana "Zinc", and Orc four with Apple Barrel "Apple Black Green". I painted the grips on all the swords with the "Asphaltum", and the spear shaft with Americana "Mississippi Mud". I then painted the wrist guard wraps on the first two orcs with the "Asphaltum", and the second two with Americana "Charcoal Grey". Then, I painted their teeth with Americana "Buttermilk".
After everything had a chance to dry, I gave all four figures a complete wash with GW "Agrax Earthshade" wash using a wet brush. When the wash was dry, I painted their boots, belts, and straps wit Black. I hen painted their eyes with the "Buttermilk", and gave them black pupils.
I then did highlights to their skin using the original "Deep Khaki", then mixed a little of the "Deep Khaki" with Aleene's "Dusty Khaki" to do lighter highlights. After that, I did highlights on their "skirts", using the base color for Orcs one and two, Americana "Neutral Grey" for Orc three, and Folk Art "Hunter Green" for Orc four. Next, I did highlights on the wristguard wraps using the "Mississippi Mud", and on their boots, belts, and straps using the "Zinc". Lastly, I did highlights on all the metal bits using Folk Art "Silver Sterling".
After everything had dried overnight, I gave the figures a coat of Ceramcoat "Matte Varnish" and, when dry, flocked their bases. Another overnight dry, and I sprayed them with Testor's Dullcote".
I'm really happy how this guys turned out! I think they ended up really looking like individuals.
Figures 202-205: Complete
I prepped these figures in the usual way, washing them in some dish soap, lightly scrubbing them with a soft toothbrush, and then letting them dry. I then did the conversions to them using Gorilla superglue gel. Looking at the row below; The first orc is untouched. The second has had his hands flipped around and repositioned opposite of the way they were so the sword now is in front of the orc. I also replaced the sword blade with one from one of the Orc Stalker figures. The third orc has had the sword removed, his hands drilled out, and a toothpick spear-shaft inserted. I borrowed the spearhead from one of the Orc Hunter figures. The fourth orc, has had his forearms removed and replaced with a pair from one f the Orc Stalker figures.
After the conversions were done, I glued the four onto black primed 1.25 inch fender washers using Aleene's Tacky glue. I then glued them onto a tongue depressor, for ease of painting, using a couple drops of Elmer's white glue each.
I began by painting them entirely Black; and then when the Black was dry, I drybrushed them entirely with Folk Art Metallics "Gunmetal Grey". I then passed over them with a lighter drybrush of Folk Art Metallics "Silver Sterling".
I then painted their skin with with Aleene's "Deep Khaki". Next, I painted their cloth "skirts" hanging under the chainmail: Orc one with Americana "Terra Cotta", Orc two with Nicole's "Brown", Orc three with Americana "Zinc", and Orc four with Apple Barrel "Apple Black Green". I painted the grips on all the swords with the "Asphaltum", and the spear shaft with Americana "Mississippi Mud". I then painted the wrist guard wraps on the first two orcs with the "Asphaltum", and the second two with Americana "Charcoal Grey". Then, I painted their teeth with Americana "Buttermilk".
After everything had a chance to dry, I gave all four figures a complete wash with GW "Agrax Earthshade" wash using a wet brush. When the wash was dry, I painted their boots, belts, and straps wit Black. I hen painted their eyes with the "Buttermilk", and gave them black pupils.
I then did highlights to their skin using the original "Deep Khaki", then mixed a little of the "Deep Khaki" with Aleene's "Dusty Khaki" to do lighter highlights. After that, I did highlights on their "skirts", using the base color for Orcs one and two, Americana "Neutral Grey" for Orc three, and Folk Art "Hunter Green" for Orc four. Next, I did highlights on the wristguard wraps using the "Mississippi Mud", and on their boots, belts, and straps using the "Zinc". Lastly, I did highlights on all the metal bits using Folk Art "Silver Sterling".
After everything had dried overnight, I gave the figures a coat of Ceramcoat "Matte Varnish" and, when dry, flocked their bases. Another overnight dry, and I sprayed them with Testor's Dullcote".
I'm really happy how this guys turned out! I think they ended up really looking like individuals.
Figures 202-205: Complete
Thursday, March 3, 2016
Bones II: Snow Leopard
This week I finished up the big cat figure from the Bones II Original Figures set. I chose to paint it up like a Snow Leopard for Frostgrave.
I prepped the figure in the usual way; soaking it in a dish of water with a couple drops of dish- soap added, then giving it a light scrub with a soft toothbrush, and then rinsing and drying it. I then glued the figure to a white-primed 1.25" fender washers with Aleene's Tacky glue, and then glued the washer-mounted figure to a tongue depressor with a couple drops of the Elmer's glue.
I began by painting the figure with Folk Art "Platinum Grey". When that was dry, I gave the figure a wash with GW "Badab Black" wash using a wet brush.
When the wash was dry, I drybrushed the figure with the base "Platinum Grey", and then drybrushed the underside areas with Crafter's Acrylic "Light Antique White", followed with a lighter drybrushing of the underside areas with plain White.
I then painted spots on the figure with Black and used Americana "Mississippi Mud" to paint the centers of the spots. Next, I did his eyes using Crafter's Acrylic "Tropical Blue" with Black pupils, and the nose with a mix of Crafter's Acrylic "Tutti Frutti" and a little of the "Mississippi Mud".
Lastly, I painted the base White. I then glued on a couple bits of gravel. When the glue was dry, I painted the gravel Black, then drybrushed it with Americana "Neutral Grey", then did a lighter drybrush with the "Platinum Grey". When everything had overnight to dry, I gave the figure a coat of Ceramcoat "Matte Varnish". Then, the next morning I flocked the white areas with Woodland Scenics "Snow" flock. Later that afternoon I sprayed the figure with Testor's Dullcote.
I'm very happy with how this snow leopard turned out. It ended up being a quick and easy paint.
I prepped the figure in the usual way; soaking it in a dish of water with a couple drops of dish- soap added, then giving it a light scrub with a soft toothbrush, and then rinsing and drying it. I then glued the figure to a white-primed 1.25" fender washers with Aleene's Tacky glue, and then glued the washer-mounted figure to a tongue depressor with a couple drops of the Elmer's glue.
I began by painting the figure with Folk Art "Platinum Grey". When that was dry, I gave the figure a wash with GW "Badab Black" wash using a wet brush.
When the wash was dry, I drybrushed the figure with the base "Platinum Grey", and then drybrushed the underside areas with Crafter's Acrylic "Light Antique White", followed with a lighter drybrushing of the underside areas with plain White.
I then painted spots on the figure with Black and used Americana "Mississippi Mud" to paint the centers of the spots. Next, I did his eyes using Crafter's Acrylic "Tropical Blue" with Black pupils, and the nose with a mix of Crafter's Acrylic "Tutti Frutti" and a little of the "Mississippi Mud".
Lastly, I painted the base White. I then glued on a couple bits of gravel. When the glue was dry, I painted the gravel Black, then drybrushed it with Americana "Neutral Grey", then did a lighter drybrush with the "Platinum Grey". When everything had overnight to dry, I gave the figure a coat of Ceramcoat "Matte Varnish". Then, the next morning I flocked the white areas with Woodland Scenics "Snow" flock. Later that afternoon I sprayed the figure with Testor's Dullcote.
I'm very happy with how this snow leopard turned out. It ended up being a quick and easy paint.
Tuesday, March 1, 2016
Bones I "Ghoul Queen" Quick and Simple Conversion
I wanted to add a couple properly snow based necromancers to my Frostgrave collection, so I looked through the Bones I Necromancers set and selected two, one of which was the Ghoul Queen. I figure she will make a good apprentice for my Necromancer warband. As I studied the figure, I was bothered by the fact that she seemed to be wearing two scabbards, one with a sword and the other empty. I thought the empty scabbard looked kind of useless and redundant, so decided I would reduce her scabbard count down to one, and make it one that had a sword in it.
Now, the easy thing to do would have been to remove the top sword, which is a glued on addition anyway, cut the hilt off and then glued the hilt to the empty scabbard. But the scabbard on her back is the cooler one with the bone additions, so some more intensive surgery would be necessary.
First thing I did was use my hobby knife to pry the bone-scabbard sword off her back
Next, I very carefully cut the empty scabbard below the lower attachment ring, and then sliced it off the back of her dress. I then took the bone-scabbard sword, and cut it into four pieces, hilt, center section, lower section, and the little pin knob that fit into the hole in her back.
After the surgery, it was a simple matter to glue the lower half of the bone-scabbard in place, then attach the hilt, and secure the cords hanging from it to the empty scabbard piece that remained below her right hand. I then glued the pin knob into the hole in her back and when it was dry, I sliced it down to be even with her back.
I'm really pleased with how this conversion turned out. In my opinion, it makes the figure look much more streamlined and less busy.
Now, the easy thing to do would have been to remove the top sword, which is a glued on addition anyway, cut the hilt off and then glued the hilt to the empty scabbard. But the scabbard on her back is the cooler one with the bone additions, so some more intensive surgery would be necessary.
First thing I did was use my hobby knife to pry the bone-scabbard sword off her back
Next, I very carefully cut the empty scabbard below the lower attachment ring, and then sliced it off the back of her dress. I then took the bone-scabbard sword, and cut it into four pieces, hilt, center section, lower section, and the little pin knob that fit into the hole in her back.
After the surgery, it was a simple matter to glue the lower half of the bone-scabbard in place, then attach the hilt, and secure the cords hanging from it to the empty scabbard piece that remained below her right hand. I then glued the pin knob into the hole in her back and when it was dry, I sliced it down to be even with her back.
I'm really pleased with how this conversion turned out. In my opinion, it makes the figure look much more streamlined and less busy.
I won't be able to paint this figure for a couple weeks, I have orcs queued up in front of it; but I certainly am looking forward to it.
Subscribe to:
Posts (Atom)