 |
| Straight from the Bones 3 Kickstarter shipping box. |
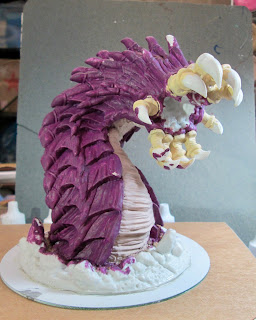
I then used some regular white glue to glue some coarse sand onto the area of the base where the body of Gormaw joins it. This was to help hide the joint, and to make the area when the body is emerging from the ground look a little more rough and churned.
I looked back on my blog, and it was back sometime before July 30, 2018 that I actually applied the first paint to Goremaw, and posted a photo in a "miscellaneous" post here called: Project Avalanche.
Anyhow, at that point, I had just applied a first coat of Anita's "Violet" to the body. I later followed up by painting his underside with Folk Art "Milkshake". I then mixed a little of the "Violet" and "Milkshake" together and painted the area along the edges where the scales and underside meet to help give a natural blending to where the two colors meet on the body. After that, I painted the base of the teeth with Americana "Antique White".
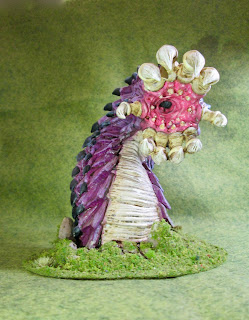
Next, I painted the open mouth with Crafter's Acrylic "Tutti Frutti". Here again, I mixed some of the "Violet" and "Tutti Frutti" together to blend the area where the two colors meet on the body, to help make it look more natural. I then painted the teeth themselves with Americana "Bleached Sand", and the spine hooks on the body with Ceramcoat "Black".
Then, I painted the base with Americana "Mississippi Mud". I let everything dry for awhile, and then I went back and applied some Citadel "Reikland Fleshshade" wash to the inside of the mouth. When that was dry, I applied Citadel "Agrax Earthshade" wash to the rest of the body and the base. Another drying period, and I came back and applied Citadel 'Nuln Oil" to the very center of the mouth, and to the undersides of all the body armor plate joints.
When all the washes were good and dry, I started the highlighting. I began with the body armor plates, drybrushing them with a mix of the base "Violet", Apple Barrel "Apple Lavender", and just for the heck of it, some Folk Art Color Shift "Purple Flash" thrown in. Next, I gave the underbelly a drybrushing with the base "Milkshake"; and then a little of the "Milkshake with some Americana "Snow White" added. After that, I highlighted the spine hooks with Citadel "The Fang".Next, I worked on the mouth; first highlighting the inner maw with a mix of the base "Tutti Frutti", and some Apple Barrel "Apple Light Pink". Then I used a little of just the "Apple Light Pink". I then highlighted the base of the teeth with Americana "Buttermilk", and the teeth themselves with Crafter's Acrylic Light Antique White".
I then turned to the base, drybrushing it first with Ceramcoat "Territorial Beige", and then with Folk Art "Butter Pecan". I then gave it a very light drybrush with the "Bleached Sand". Then, looking at it, I felt the cracks between the chunks of earth did not have enough shadow in them from the "Agrax Earthshade" wash to look like really deep fissures; so I went in and applied Reaper MSP "Brown Liner" directly in all the crevices.
I let the figure dry overnight and the next day I gave it a coat of Americana "DuraClear Matte" varnish. Then, when the varnish was dry, I used some white glue to flock the base, trying just to apply it to the tops of the chunks of ground, and not in any of the fissures. Another overnight dry, and I sprayed the beast with Testor's Dullcote". When the Dullcote was dry, I repainted the inside of his mouth with Americana "DuraClear Gloss Varnish".
I'm really happy with how this big fellow came out; and I'm glad to have him done before I get more big figures in Bones 4. Often these large figures seem like such a hurdle, but this turned out to be a really easy figure to complete. The only challenge was spraying the Dullcote and hitting all the deep crevices in the armor plating. Even now I can see areas where in the deep down recesses it's still a little shiny.


Really great to see that model finished. It's always great to finish up a project that had collected dust in halv-painted state! The idea of a CD for the base is great as well!
ReplyDeleteThanks, XE! Yes, there was a great sense of completion when it was no longer staring at me, making me feel guilty. :) The wider CD gives it a good deal of stability, considering it's height.
DeleteGreat mini, great paint job!
ReplyDeleteThanks, Joe! While I can take credit for the paint job, Reaper gets the credit for the mini. :)
DeleteBrilliant, a classic Purple Worm. I must get mine done, and am borrowing your idea of a CD base. I've used them for terrain items before, but never minis (if that's the right term for such a monster).
ReplyDeleteThank you, misterc! Yes, the CD certainly helps with the stability of the piece. And I agree "mini" just doesn't seem correct for this. :)
DeleteGreat work! The shiny inside bits are just the ichor of the beast, nothing to worry about. Unlike the adventurer party that encounters this guy, they will have a lot to worry about!
ReplyDeleteThanks, Lasgunpacker! Lol...
DeleteLooks fantastic
ReplyDeleteThanks, WQRobb!
Delete