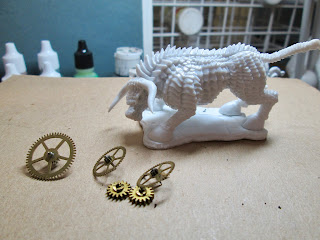
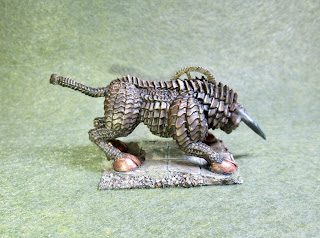
This past week I took a break from Gnolls and Beastmen, and painted the Brass Bull from the Bully for You set. I thought this figure was so plain that I wanted to fancy it somehow; and I got the idea of making it look more like a clockwork bull by adding some old watch gears I had in my bits cabinet.
I prepped the figure in the usual way; soaking it in a dish of water with a couple drops of dish-soap added, then giving it a light scrub with a soft toothbrush, and then rinsing and drying it.
I had plans to add several of the gears to the figure; one as the main gear coming from the back, and a set emerging from each of the shoulders and thighs; but in the end I just went with the main drive gear coming out of the back. The way the body is angled and bent, I didn't feel confident enough about adding all the gears and having them end up looking like part of the same machinery, and not just random assorted gears angled this way and that. Sometimes simplest is best.
So I cut a slot in his back between his shoulders, and then cut the gear roughly in half, so it would nest down in the slot. I then superglued it in place. When the modification was done, I then glued the figure to a black-primed 1.5"x 2" steel base with Aleene's Tacky glue.
I began by painting the entire figure with Americana "Bittersweet Chocolate", and the figure's base with Americana "Charcoal Grey"
Next, I drybrushed the entire figure with Ceramcoat "Bronze". I then painted the horns with Folk Art Metallics "Gunmetal Grey", and the hooves with Ceramcoat "Copper".
When everything was dry, I gave the entire figure a wash with Citadel "Nuln Oil" wash using a wet brush".
Then, when the wash was dry, I drybrushed the body with Ceramcoat "14k Gold". I then highlighted the horns with Ceramcoat "Metallic Silver", and the hooves with the base "Copper". I mixed a little of the "Metallic Silver" with the "14K Gold", and did some spot highlighting on the sprockets of the gear in an effort to make them look more worn.
Next, I painted the eyes with Ceramcoat "Opaque Red", and used this color to add drybrushed reflections around the eye socket and on the horns. Next, I added inner highlights to the eyes with Crafter's Acrylic "Pure Pumpkin", and then Reaper MSP "Golden Glow" for the inner pinpoint of light in the eye.
When I was done painting the figure, I used some white glue to glue a little sand to the base. When this was dry, I painted the sand with the "Charcoal Grey", and when the paint was dry, I drybrushed the base with some of the "Territorial Beige", then some of the "Antique White", and lastly Americana "Bleached Sand".
I let the figure dry overnight and the next day I gave him a coat of Americana "DuraClear Matte" varnish. Another overnight dry, and I sprayed him with Testor's Dullcote".
I'm happy with how he turned out, though I think I probably should have gone a little brighter with the brass to get the contrast between the plates to look a little better. Ideally I should have hand-painted in each plate's shadow, and highlighted each plate's edge, instead of relying on washes and drybrushing; but it's a gaming model after all, and for that purpose I think it looks just fine.


I think it looks great, and a nice thing about a relatively simple but solid model like this is that you can do it with washes as you have or you could really get in there with edge highlights and either way still looks great.
ReplyDeleteThank you, Lasgunpacker!
Delete