Sorry we're a day late... I ran out of time yesterday to finish up. Anyhow, this past week I finished the last two figures from the Bones 3
Wild West Wizard of Oz set and did the Wicked Witch and the Winged Monkey minis. I don't know what particularly makes this set Wild West; it seems to me it would fit in in any kind of Steampunk, VSF, Pulp, or Post-Apocalyptic setting.
These figures were actually cast in the newer grey Bones material, and are a bit stiffer than normal Bones.
To see the figures from this set that I have already finished, see:
Tin Man,
Scarecrow,
Lion, and
Dorothy & Toto.
Once again, I tried to as best I could copy the look of the corresponding character from the Wizard of Oz movie. What I found interesting about the Wicked Witch was that her outfit was entirely black from head to toe.
I prepped the figures in the usual way; soaking them in a dish of water with a couple drops of dish-soap added, then giving them a light scrub with a soft toothbrush, and then rinsing and drying them. I then glued the witch figure to a black-primed 1" fender washer , and the monkey to a black-primed 7/8" fender washer, with Aleene's Tacky glue. I then glued each washer-mounted figures to a tongue depressor with a couple drops of the Elmer's glue.
I began by painting the witch's clothes entirely with Black. When dry, I drybrushed them with Folk Art "Medium Grey".
I then painted her face and hands with Crafter's Acrylic "Wild Green". After that I painted her broom handle with Ceramcoat "Territorial Beige", and the broom straws with Americana "Sable Brown".
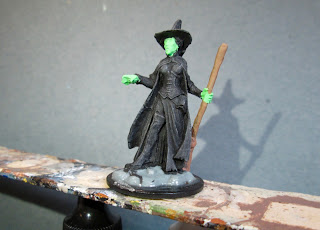
When the face and hands had time enough to dry, I gave them a wash with Iron Wind Metals "Dark Green" ink. When that was dry, I gave the broom handle and straws a wash with Citadel "Agrax Earthshade" wash. I then added shadows under her yes by mixing a little of the "Wild Green" with some Black. I also applied a little Citadel "Nuln Oil" wash to between her lips to help define her slightly open mouth. Next, I painted her eyes, and then highlighted her face and hands with the base "Wild Green". After that, I did some highlighting on her hair using Americana "Mississippi Mud", and then went back over or outfit and did specific highlighting on some of the clothing edges with the "Medium Grey" to help define them. I then turned to her broom and did highlighting on the straw with Ceramcoat "Maple Sugar Tan". When that was done, I did a little crosshatch pattern between the two metal rings on the broom (like in the movie photo at the top) using Americana "Raw Umber". I then painted the rings Black, and then went back over them with Ceramcoat "Metallic Silver". Lastly, I painted her integral base with Americana "Charcoal Grey".
When I was done painting the figure, I used some white glue to glue a mixture I made of some fine brown sand, and courser black sand to the base. When this was dry, I drybrushed the sand and the figure's own base with Ceramcoat "Territorial Beige", and then with some Americana "Antique White". When dry, I glued on some bits of grass tufts.
I let the figure dry overnight and the next day I gave her a coat of Americana "DuraClear Matte" varnish. Another overnight dry, and I sprayed it with Testor's Dullcote".
I then worked on the Winged Monkey. I wanted to try to imitate the bluish-grey fur, blue face, and grey wings of the movie monkey, except in a metallic look. I began by painting him entirely in Black.
Then, when the Black was dry, I made a mix of Folk Art Metallics "Gunmetal Grey" and Folk Art "Metallic Blue Sapphire", and used this to drybrush his body. I then drybrushed his wings with the "Gunmetal Grey". I then added a little Folk Art Pearl "Aqua Moire" to the mix to lighten it, and painted highlights on his body.
Next, I used Ceramcoat "Metallic Silver" to do highlights on his wings, and after that I painted his face with the just the plain "Metallic Blue Sapphire" and highlighted it with the "Aqua Moire". I then tried to paint a bit of his jacket pattern (as seen in the movie photo at the top) on his shoulder pads and on his medallion. I began by doing the base of the pattern in black, and then painted it with Americana "Dove Grey", leaving a little of the Black edge showing. This was followed by doing the interior of the pattern with Ceramcoat "Opaque Red", making sure to leave the "Dove Grey", and Black edges show.
Next I worked on his eyes and the grill work on his chest. I painted his eye sockets and the grill slots with Iron Wind Metals "Red" ink. When the ink was dry, I painted the eyes and the slots with the "Opaque Red". Afterwards, I painted the pupils and the very center of the slots with Reaper MSP "Golden Glow". Finally, I painted his lips with the "Opaque Red", and then mixed in a little of the "Golden Glow" to do highlights.
Then, like with the witch, I painted his integral base with Americana "Charcoal Grey".
When I was done painting the figure, I used some white glue to glue a mixture I made of some fine brown sand, and courser black sand to the base. When this was dry, I drybrushed the sand and the figure's own base with Ceramcoat "Territorial Beige", and then with some Americana "Antique White". When dry, I glued on some bits of grass tufts.
I let the figure dry overnight and the next day I gave him a coat of Americana "DuraClear Matte" varnish. Another overnight dry, and I sprayed it with Testor's Dullcote".
I like how the pair turned out. Of all the set, I think these two fall closest to their movie counterparts in appearance.
And here's a look at the whole
Wild West Wizard of Ox set, both heroes and villains...
I think they all turned out really well, and make a pretty nice looking set of figures.


Very nice. From Kansas to Oz to ??????: what a team this group would make if a space-storm swooped them all up and placed them down in another world!
ReplyDeleteThanks, Jay! One of the things I really like abut this group is their unlimited versatility! :)
DeleteAll I can say is WOW!!! I just stumbled on your blog and it is a treasure! I just started down the "Bones" road as of today, with my first one! Thanks for such a comprehensive work! John
ReplyDeleteThanks for the kind words regarding my blog, JohnnyRockets! And congrats on entering the wonderful world of Bones miniatures! :)
DeleteDid you get in on the recent Reaper Bones 4 Kickstarter? Lots of amazing great deals on hundreds of Bones minis:
https://www.kickstarter.com/projects/1513061270/reaper-miniatures-bones-4-mr-bones-epic-adventure
I just wanted to add that even if you didn't get in on the Bones 4 Kickstarter while it was live, you can still sign up as a late backer here: https://www.reapermini.com/Bones4
Delete