Showing posts with label Christmas. Show all posts

Monday, December 20, 2021

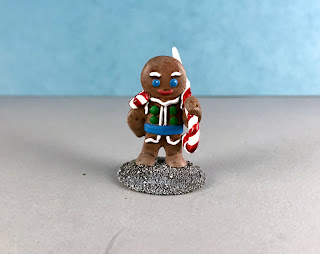
Gingerbread Knight: Christmas 2021 Promo Figure

     The past two week I worked on the Gingerbread Knight, which was a Bones USA promo figure that came in this year's Reaper Christmas Sampler.  With all that was going on with preparation for Christmas, I thought this would be a fast and fun figure to work on.
        I prepped the figure in the usual way, soaking the parts (comes with the left arm as a separate piece) in a dish of water with a couple drops of dish-soap added, then giving them a light scrub with a soft toothbrush, and then rinsing and drying them.  I then glued the arm to the body using Gorilla superglue gel. Next, I glued the figure to a 1" primed metal washer, using Aleene's Tacky Glue.  I glued the washer to a tongue depressor with a couple drops of Elmer's School Glue. 
     I tried to take the easy route first and use Citadel Contrast paint for the gingerbread.  So I gave the figure a base coat of Ceramcoat "White"; and when dry, I mixed some Citadel Contrast "Fyreslayer Flesh" and Citadel Contrast "Snakebite Leather" together and painted it on the figure.  When dry, I was sad to see that it came out very mottled.  I had hoped it wouldn't, but knew in the back of my mind that it probably would.  Oh, well; I tried.
     I then started over, painting directly over the Contrast paint, with a mix of Folk Art "Teddy Bear Brown" and a little Accent "Mustard Seed".  When dry, I gave the entire figure a coat of Citadel Shade "Agrax Earhdahde".  I let that dry, and then drybrushed the figure with some Reaper MSP "Ginger Cookie", because I just had to.  :) 
     Next, I painted all the icing decorations, as well as his epaulette and candy cane, with Americana "Snow White"  I let that dry, and then did his eyes and belt with a mix of Reaper MSP "Ultramarine Blue" and  Crafter's Acrylic "Tropical Blue".  Then I painted his mouth a mix of Folk Art "Tomato Red" and Crafter's Acrylic "Tutti Frutti".  After that, I painted his buttons with Crafter's Acrylic "Holiday Green".
     I then painted the stripes on the candy cane and epaulette with some Citadel Contrast "Blood Angels Red" in hopes it would give it a bit of a translucent look. When it was dry, I touched up all the white parts of the icing with Reaper MSP "Peppermint White".  Again, becuase I felt I just had to. :) Lastly I painted the entire base with Americana "Zinc". 
      I let the figure dry overnight and the next day I gave him a coat of Americana "DuraClear Matte" varnish.  Then when the varnish was dry, I used some white glue to glue some sand onto the base.  When this was dry I  painted it with Citadel Contrast "Basilicanum Grey".  When that was dry,  I drybrushed the sand withAmericana "Grey Sky".  Another overnight dry, and I sprayed the figures with Testor's Dullcote".   Afterwards, I went back and painted the epaulette and candy cane with some Americana "DuraClear Gloss" varnish.


     I'm pleased with how this fun figure turned out. It was just the perfect simple sculpt to tackle in the busy weeks leading up to Christmas.

Monday, January 6, 2020

Sophie the Sage Christmas Ornament Project: Bones 3 Figure

     Happy New Year everyone!  Sorry for the brief hiatus, but the holidays turned out to be crazy busy.  Anyway, I'm back at it now, and wanted to show off a project I did over the month of December: a Christmas ornament based on the Sophie the Sage figure from the Bones 3 Core Set.
     I had actually started planning this project in the Fall of 2018, but events overtook my time, and it never moved past the planning and thinking stage, as well as purchasing the ornament I wanted to use.  This year however I was determined to get it done in time for Christmas to give as a gift to my wife, who is an avid reader and book enthusiast.
      My plan was to make a scene of a wizard reading in her chamber, with books, etc. piled around the place.  I started with the Sophie figure and a circular plaster dungeon terrain piece I had.  I had assembled the figure without the wings, as I wanted the figure to just be a human, and not a succubus.
      I quickly realized I'd need some walls for a backdrop; which I constructed out of cork scraps, and added some window frames made from coffee stirrers.  I then cut the figure off her base, and drilled a hole in the bottom of her gown, and a corresponding hole into the plaster disc.  Next, I superglued a length of paperclip wire into the figure.  After that, I used some greenstuff to fill the slot in her back where the wings were supposed to go.
I framed up the walls using more bits of coffee stirrers and some balsa wood.   When I was satisfied, I glued it to the plaster base with Aleene's Tacky glue.
      I had of course washed the figure  before I had started assembly; soaking it in a dish of water with a couple drops of dish-soap added, then giving it a light scrub with a soft toothbrush, and then rinsing and drying it.  And I had used Gorilla Superglue Gel to assemble the two parts.   It was now time to begin the painting.
      I began by painting her skin with Reaper MSP "Tanned Skin", and her dress with Reaper MSP "Christmas Wreath".  I then painted her staff with Americana "Light Cinnamon", and the book cover with Pathfinder MSP "Urgathoa Red"
      Next, I painted her hair with Americana "Asphaltum, and her belt and pouches with Accent "Real Umber".  After that, I painted the book pages with Americana "Bleached Sand", and the top of her staff with Crafter's Acrylic "Wild Green".
     I then painted the wands in her wand case an assortment of browns, and the book mark with some Crafter's Acrylic "Daffodil Yellow".  After that, I painted her jewelry and the corners of the book with Folk Art "Brushed Metal "Brushed Bronze", and then let the figure dry for a while.  When I resumed working on the figure, I gave her skin a coat of Citadel "Reikland Fleshshade" wash; and when that was dry, I gave her book, pouches and staff a coat of "Citadel Agrax Earthsahde" wash.
  
     When the washes were dry, I painted her eyes and mouth, and then highlighted her skin with Reaper MSP "Tanned Highlight".  I then highlighted her hair with Americana "Sable Brown", and Americana "Fawn". After that, I highlighted her dress using first Apple Barrel "Apple Christmas Green", and then Americana "Festive Green".
     Interspersed with working on the figure, I had primed the walls and base with Krylon Grey Primer, and when dry, I drybrushed the stones with Americana "Neutral Grey", and then painted the walls with Crafter's Acrylic "Light Antique White".
     I finished painting the figure, highlighting the pouches with Nicole's "Brown", and the staff with Americana "Khaki Tan".  I also highlighted the book cover with Americana "Burgundy Wine", and the bookmark with the base "Daffodil Yellow".  After that, I highlighted the book pages with Americana "Snow White', and then painted text on them with Reaper MSP "Holly Berry", and Ceramcoat "Black".    I highlighted her jewelry and the corners of the book with Ceramcoat "Wedding Gold", and then painted the top of her staff with a mix of Folk Art Color Shift "Green Flash", and Folk Art Color Shift "Emerald Flash".    I let the figure dry overnight and the next day I gave it a coat of Americana "DuraClear Matte" varnish. 
    I then quickly painted up the pile of books, bottle, and goblet that came with the model, as well as a small stack of books from the Wizkids Wizards Room set.  In addition, I painted up a pair of cats that came with a Dark Sword figure (I forget the name), to look like our two cats.   After drying overnight, these all got their coat of the "DuraClear Matte" varnish as well. 
    I completed the base by painting the wood work on the walls with Americana "Charcoal Grey", and adding a small rug cut from an old tobacco flannel.   The final step was to plot out an arrangement I liked, and then glue it all down.
    Once everything was glued into place, I glued the base into the ornament bottom cap using E6000 glue, and when dry, screwed on the ornament dome.

     I'm really happy with how it all turned out, and my wife loved her unique gift.

Tuesday, December 25, 2018

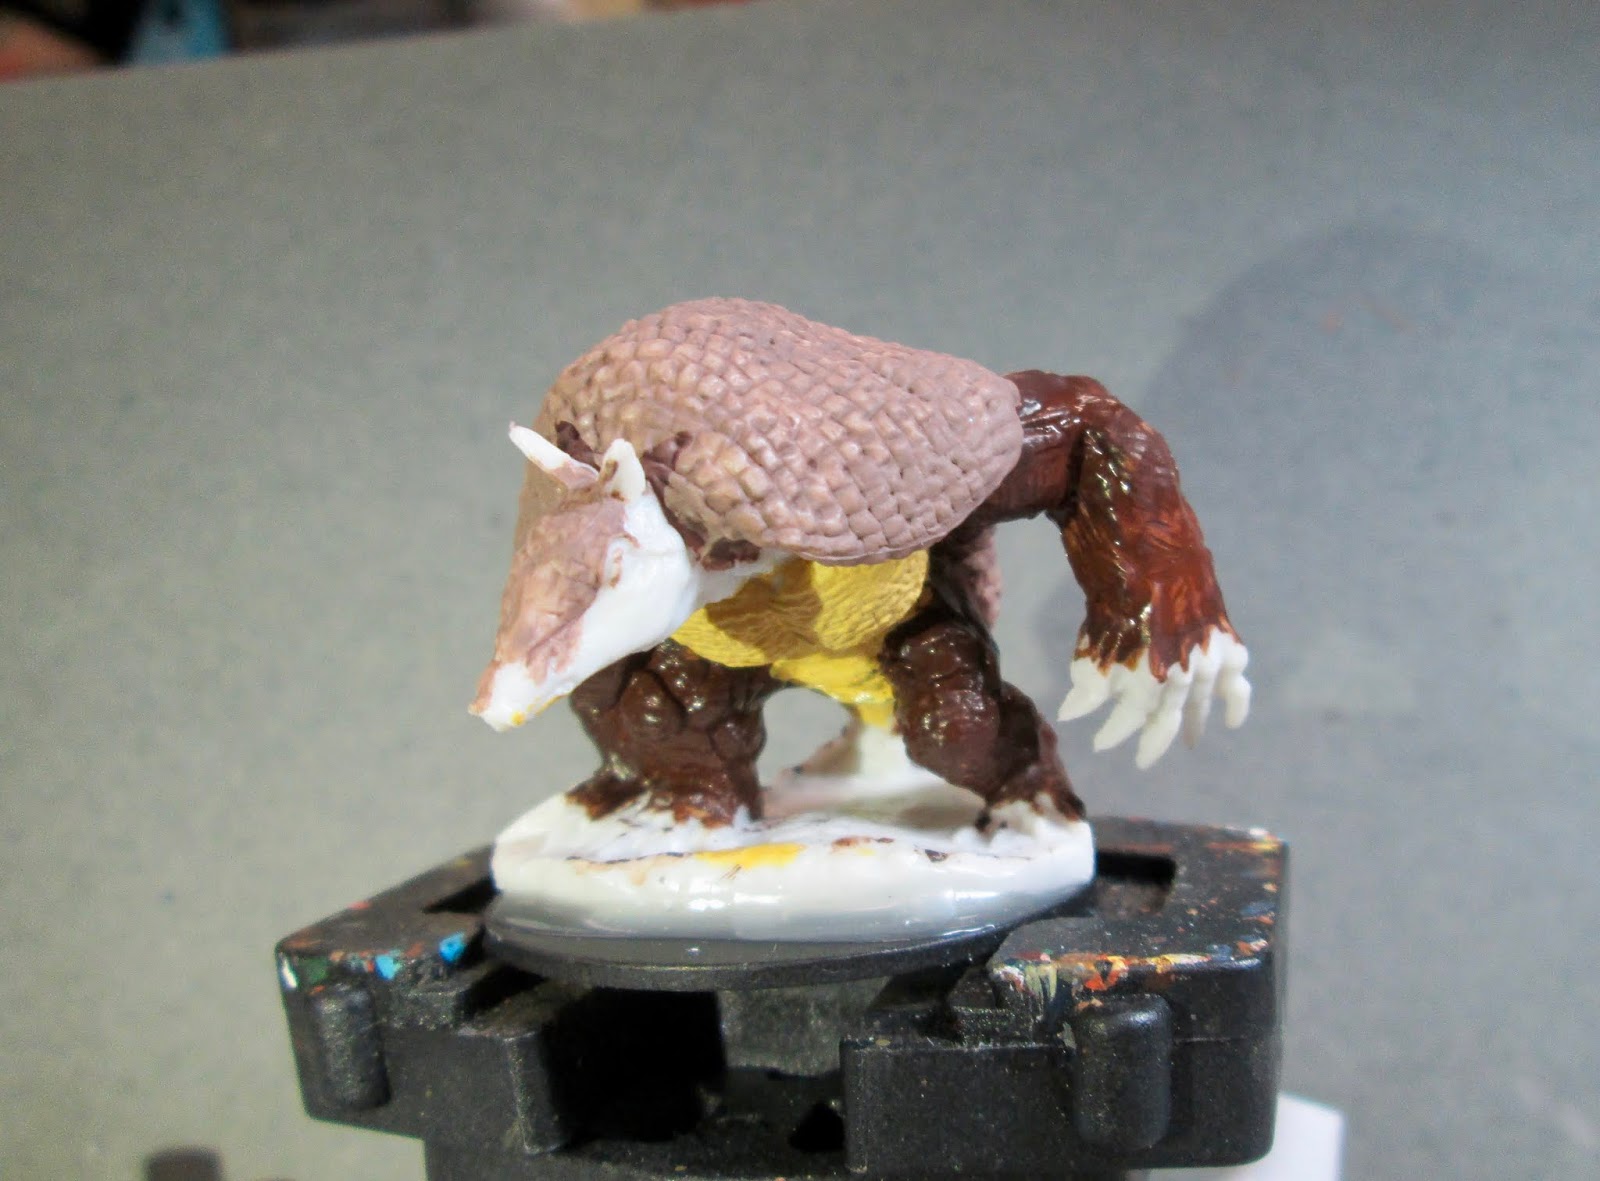
Were-armadillo: Bones 3 Figure, as the Holiday Armadillo!

      [Edit: I meant to publish this yesterday (Monday the 24th), but got so caught up in Christmas Eve activities, I totally forgot.  Now that Christmasing has quieted down for a moment, I thought I'd take the opportunity to get it on the blog. Enjoy and Merry Christmas!)
     This past week I  once again mined my Bones backlog for something quick and simple that I could squeeze in painting among the usual pre-Christmas chaos.  I also, wanted something I could give a Holiday or Winter spin, and thus I landed on the Were-armadillo figure from the Bones 3 Stoneskull Expansion, which I thought would make a pretty good "Holiday Armadillo".
     For those of you who weren't regular watchers of the 80s-90's sitcom "Friends", the Holiday Armadillo is a character made up by one of the show regulars, named Ross, in one of the Holiday episodes.  Ross wants to teach his son, who is half Jewish, about Hanukkah instead of focusing on the Christmas holiday as is usually the case.  In the end though, Ross gives in to his son's desire for Santa to visit, and tries to rent a Santa costume, only to find out there are none available. In a desperate move, he settles for an Armadillo costume, and comes up with the story that he's the Holiday Armadillo, Santa's half-Jewish friend and assistant.  This leads to a great opportunity for Ross to talk about Jewish traditions with his son.
     In subsequent years, the Holiday Armadillo has taken on a bit of a life of its own, and a quick Google search reveals all sorts of T-shirts and ornaments available for purchase, as well as a generous assortment of memes.
   My goal was to try and copy, as best I could, the coloration of the costume.
      I prepped the figure in the usual way; soaking it in a dish of water with a couple drops of dish-soap added, then giving it a light scrub with a soft toothbrush, and then rinsing and drying it.   I then, after clipping the edges of the figure's integral base to make it smaller,  glued the figure to a black-primed 1.5" fender washer with Aleene's Tacky glue, and then placed the figure in my painting grip.
     I began by painting his back armor with Americana "Mississippi Mud", and then his chest plates with Accent "Golden Harvest".  After that, I painted his legas and arms with Accent "Real Umber".
     I then decided to repaint the middle back armor section with Folk Art "Teddy Bear Brown", and .  used the same color to paint his tail.  Afterwards, I painted his face and hands with Anita's "Burnt Sienna" and then painted his claws and nose with Americana "Bleached Sand".
    Then, after everything had overnight to dry, I gave the entire figure a coat of Citadel "Agrax Earthshade" wash.  When the wash was dry, I drybrushed is upper and lower back armor, as well as the small bit of armor on his head with Crafter's Acrylic "Storm Cloud Grey", and then a little Folk Art "Platinum Grey".   I then painted the eyes ceramcoat "Black", and highlighted his face and hands with a mix f the base "Burnt Sienna", and some Crafter's Acrylic "Orange Spice".
     Next, I highlighted the middle section of back armor with a mix of the "Storm Cloud Grey and Americana "Khaki Tan", and then highlighted his underbelly with Crafter's Acrylic "Daffodil Yellow".  After that, I highlighted his arms and legs with a drybrush of Americana "Neutral Grey" mixed with Americana "Light Cinnamon", and highlighted his claws and nose with the base "Bleached Sand".  I wrapped things up by highlighting his tail with the "Khaki Tan".
     Lastly, I painted the base with Ceramcoat "Snow White".
     I let the figure sit overnight, and the next morning I gave it a coat of Americana "DuraClear Matte" varnish.   Later that afternoon I flocked the base using Woodland Scenics snow flocking.  Another overnight dry, and I sprayed them with Testor's Dullcote".


   I'm happy with how this fellow turned out.  The yellow should have been a little paler to truly match the costume; and seeing the final photos, I see I need to go back and add some tiny reflection dots to the eyes, but overall I think I came pretty close.

Thursday, May 12, 2016

Pathfinder Goblins as Santa's Elves, Part II: Bonus "Bones I" KS Figures Post

  Readers may remember that last week I posted a test paint of one of the Pathfinder Goblin Pyros as a Christmas Elf.  Well, this week I painted up three more Pathfinder Goblins as Christmas Elves to complete the Thief contingent for my Santa themed Enchanter warband for Frostgrave.
      I prepped the figures in the usual way; soaking them in a dish of water with a couple drops of dish- soap added, then giving them a light scrub with a soft toothbrush, and then rinsing and drying them.  I took one of the torch-wielding ones and sliced off the torch flush with the hand, drilled out the hand, and inserted a piece of bent paperclip wire to represent a candy cane.   I then glued each figure to a white-primed 1" fender washers with Aleene's Tacky glue.  I then glued the washers to a tongue depressor with a couple drops of the Elmer's glue each.
 Like with my test figure, since the goblins/elfs had bear feet,  I used a glob of the Tacky glue on the front of each foot to help obscure the toe delineations.
     I began by painting the faces and hands with Crafter's Acrylic "Flesh".
    I then painted the clothing and armor with Americana "Forest Green",  Crafter's Acrylic "Wild Green", and Crafter's Acrylic "Deep Red"; alternating which items I used each color on as I went down the line of figures, trying not to use the same color on the same area for each goblin. I also used the "Deep Red" to paint the feathers on the first goblin's hat.
     Next, I painted the shoes with Nicole's "Brown", and the torch and sword grips with Americana "Dark Chocolate".  I also painted the candy cane with White.   I painted their little pouches with Ceramcoat "Territorial Beige". Then I painted the rocks the first and third goblins are standing on using Americana "Zinc".
     Next, I applied a wash to the figures using GW "Agrax Earthshade" wash with a wet brush.    When the wash was dry, I painted the eyes; and then used some Black to paint the inside of the open mouths.  Then I used White to paint the teeth  I then used the original "Flesh " to highlight the hands and face.  I mixed some Crafter's Acrylic "Tutti Frutti"  with some of the "Flesh",  and applied pink highlights to the cheeks and nose. I used Crafter's Acrylic "Christmas Red" to paint the stripes on the candy cane.
   I then worked on highlighting their clothing and armor.   I used the original "Wild Green" mixed with some White to highlight the part I had painted "Wild Green'.  I used Crafter's Acrylic "Holiday Green" mixed with a little of the "Wild Green" to highlight the parts I had painted  "Forest Green".  And Crafter's Acrylic "Christmas Red" mixed with a tiny bit of the "Tutti Fruity" to highlight the parts I had painted "Deep Red".  
    Next, I painted the swords with Crafter's Acrylic "Storm Cloud Grey" and used Black to paint in the holes in the swords.  I then used a little GW "Badab Black" wash on the area where the rivets connect the sword to their grips.  Next, I used Americana "Zinc" to paint all the areas of stitching on their armor.   I then painted the little balls on their sword grips: the first one I did with the "Holiday Green", the second with Crafter's Edition "Purple Passion",  and the third with Crafter's Acrylic "Bright Blue".
I used White to highlight the forearm wrappings. Then I used Americana "Sable Brown" to add highlights to the shoes and Americana "Khaki Tan" to do highlights on the pouchs around back.  I then painted the cross stitching on the hat, and the ribbon on the torch with the "Deep Red".  Then I went back and highlighted the cross stitching on the hat, and the ribbon on the torch, with the "Christmas Red".    Next, I painted the swords with Folk Art Metallics "Gunmetal Grey".  I then used Folk Art Metallics "Silver Sterling" to highlight the swords, and the stitching on the armor (I wanted it to look like maybe it was tinsel).   Then I used Folk Art Metallics "Emerald Green" to overpaint the ball at the end of the first sword, Folk Art Metallics "Blue Sapphire" for the second, and Folk Art Metallics "Amethyst" for the third.   I followed this with adding a couple White highlights to each ball.
    Lastly, I worked on the flame on the torch.  I started by painting the base of the flame, and the very tips of the flame,  with Black.  I then worked from the flame's base, upwards, using: Crafter's Acrylic "Daffodil Yellow", Crafter's Acrylic "Pure Pumpkin", the "Christmas Red", and then some Ceramcoat "Black Cherry".  I applied these colors in fast succession so the paint would still be wet with each successive color allowing me to blend them together.  After this, I wrapped things up by painting the figures' bases with White.
     When everything had overnight to dry, I gave the figures a coat of Ceramcoat "Matte Varnish" early the next morning.  Midday, I flocked the white areas with Woodland Scenics "Snow" flock and late that afternoon I sprayed the figures with Testor's Dullcote.

    I am really happy with how this little band of Christmas elves turned out.  Not everybody is cut out to work in the toy workshop, and these fellows seem just right for helping Santa with his more dangerous missions. :)

Thursday, May 5, 2016

Pathfinder Goblin Pyro as Christmas Elf: Bonus "Bones 1" KS Figure Post

   This week I experimented with painting up one of the Pathfinder Goblin Pyros from the We Be Goblins set, that was part of the Bones I Kickstarter; to see how it would look painted up as one of Santa's Elves for my Santa themed Enchanter warband for Frostgrave.   I had already officially painted these figures previously, but had picked up a few more of them along the way because they're such fun figures.
    I had planned a while back that I wanted to use Christmas elves to represent the four Thieves I had added to my Santa the Enchanter's warband; and had originally prepped four of the Victory Force Miniatures, Unarmed Christmas Elves to use in this role.  Then over on the Reaper forum, forum member Pippin suggested I possibly use Goblinsto represnt Santa's elves.  The idea buzzed around in my head for awhile, as I wasn't totally happy with the Victory Force Elves.  I felt they looked a little too Elf-On-The-Shelf modern.  So, I thought I'd do this test on the Pathfinder Goblin kind of as a proof-of-concept as to whether using them for Christmas Elves would work.
    I prepped the figure in the usual way; soaking for a few hours in water with a bit of dish soap added, giving a gentle scrub with an old soft toothbrush, then rinsing and drying.  I then glued it to 1" white-primed fender washers with Aleene's Tacky glue, and then glued the washer to a tongue depressor with a couple small dabs of Elmer's white glue, for ease of handling during painting.
     I realized the goblin/elf had bear feet, but I wanted it to have shoes; so I used a glob of the Tacky glue on the front of each foot to help obscure the toe delineations.
     I began by painting the face and hands with Crafter's Acrylic "Flesh".   I then painted the outer clothing Americana "Forest Green", and the leggings, undershirt, and hat with Crafter's Acrylic "Wild Green".
   Next, I painted the armor with Crafter's Acrylic "Deep Red".  I then painted the sword, and the feather on the sleeve, with Crafter's Acrylic "Storm Cloud Grey", and the torch handle with Nicole's "Brown".   The wrappings on the forearms I painted with Folk Art "Platinum Grey".  I painted the little pouch around back with Ceramcoat "Territorial Beige".
    I decided at this point to paint the shoes with the "Brown" I had used on the torch handle, so I went back and repainted the torch handle with Americana "Raw Umber".  I then applied a wash to the entire figure using GW "Agrax Earthshade" wash with a wet brush.   I also used some Black to paint in the holes in the sword, and the open mouth.    When the wash was dry, I painted the eyes, and used White to paint the teeth  I then used the original "Flesh " to highlight the hands and face.
     When the wash was dry, I highlighted the  hat, undershirt and leggings with the original "Wild Green".  I then highlighted the outer clothing with Crafter's Acrylic "Holiday Green", and the armor with Crafter's Acrylic "Christmas Red".    I used White to highlight the forearm wrappings and the feather.  Then I used Americana "Sable Brown" to add highlights to the shoes and Americana "Khaki Tan" to do highlights on the pouch around back.  I then painted the cross stitching on the hat, and the ribbon on the torch with the "Deep Red", and then did the cross stitching on the armor with Americana "Zinc".  Then I went back and highlighted the cross stitching on the hat, and the ribbon on the torch, with the "Christmas Red".  I also used this color to paint the ball at the end of the sword handle.   Next, I painted the sword with Folk Art Metallics "Gunmetal Grey".  I then used Folk Art Metallics "Silver Sterling" to highlight the sword, and the stitching on the armor (I wanted it to look like maybe it was tinsel).   Then I used Dazzling Metallics "Festive Red" to overpaint the ball at the end of sword, and added a couple White highlights.
    Lastly, I worked on the flame on the torch.  I started by painting the base of the flame, and the very tips of the flame,  with Black.  I then worked from the flame's base, upwards, using: Crafter's Acrylic "Daffodil Yellow", Crafter's Acrylic "Pure Pumpkin", the "Christmas Red", and then some Ceramcoat "Black Cherry".  I applied these colors in fast succession so the paint would still be wet with each successive color allowing me to blend them together.
     The figure was all but done now, though as I looked at it I felt the face was a bit too pale and ashen colored and needed a bit more life in it.  So I mixed some Crafter's Acrylic "Tutti Frutti"  with some of the "Flesh",  and applied pink highlights to the cheeks and nose.  After this, I wrapped things up by painting the figure's base with White.
     When everything had overnight to dry, I gave the figure a coat of Ceramcoat "Matte Varnish" early the next morning.  Midday, I flocked the white areas with Woodland Scenics "Snow" flock and late that afternoon I sprayed the figure with Testor's Dullcote.

    I have to say that I'm really pleased with how this figure turned out, and I think the idea of using these fellows for Santa's Elves is going to be a winner.  Even as I type, I have three more prepped and awaiting painting.

Monday, December 21, 2015

Darkrasp, Evil Priest to Santa Claus Conversion: Figure 187 of 265

    Back at Historicon of 2013, I traded my Bones Griffon to a friend for a couple of his figures, including the Darkrasp, Evil Priest from the Dark Heroes set. (You can see these changes to the count total on the list at the upper right of this blog.) When I had first seen this figure, back when my Kickstarter had arrived, something about its appearance read "Santa Claus" to me; especially with the long "list" he holds in his left hand, obviously containing the names of those who'd been naughty.  So, when I had the chance to get an extra one, I took it; with the thought of some day converting it into a Santa Claus figure.  Well, with the onset of my Frostgrave addiction, that day finally rolled around; as I decided I wanted to make a Santa themed warband, and I selected this fellow to lead it. And, given the season of the year, it seemed the perfect time to paint him.
     First,  I prepped the figure in the usual way; soaking it in a dish of water with a couple drops of dish- soap added, then giving it a light scrub with a soft toothbrush, and then rinsing and drying it.  I then had to make some changes to the figure to move him a little closer to Santa, and a little further from Evil Priest. I began by cutting off the blade and skull top of his scythe, turning it into more of a wizard's staff.  I then glued a small piece of lead shot to the end to make it resemble a stylized North Pole.   Next, I cut the bone-like ends off of the roll his scroll is wrapped around.  Lastly, I took some Tacky glue and layered it onto the front of the scroll in an effort to lessen the appearance of the runes that are carved into it, as my plan was to list "naughty" names on it.   I then glued the figure to a white-primed 1" fender washers with Aleene's Tacky glue, and then glued the washer-mounted figure to a tongue depressor with a couple drops of the Elmer's glue. I finished the prep with painting the little round shot on the end of his staff with some clear metal primer.
      I began by painting his entire outfit with Apple Barrel "Apple Blue Spruce"  I then painted his face and hands with Americana "Shading Flesh", and his scroll with Americana "Buttermilk".
     I wasn't happy with the look at this point, as I felt the all-green outfit didn't read Santa enough.  I had chosen the green because I planned to paint his staff in a series of red and white stripes, and I thought that if I painted his outfit red too, the staff might get lost visually.  At that point I made the decision to try a red outfit anyway, so repainted his robes with Apple Barrel "Apple Maroon", and left his cape and hood the original color.  I then painted the shadows on the robe with Americana "Cranberry Wine", and did highlights with Americana "Burgundy Wine".  These highlights really didn't show enough, so I mixed some Crafters Acrylic "Tutti Fruitti" (a bubblegum pink color)  with the "Burgundy Wine" to lighten it.   I then gave his face, hands, and his scroll a wash with GW "Agrax Earhshade" wash using a wet brush.
     Next, I did highlights on his cape and hood with some of the "Apple Blue Spruce" mixed with the much lighter, Folk Art "Gray Green".  Then, I painted the borders on his hood and sleeve cuffs, as well as the white stripes on his staff and the ball at the top,  with Folk Art "Platinum Grey".   I then highlighted all these with White.  I next painted his beard and the object hanging from his front chain (which I planned to paint as a lantern) with Americana "Neutral Grey".   Afterwards, I painted the red stripes on his staff with Crafters Acrylic "Christmas Red".
     I highlighted the red stripes on the staff by mixing a little of the "Tutti Fruitti " with the "Christmas Red".  I then painted the ball on the top of the staff with Folk Art Extreme Glitter "Hologram", in attempt to give it a snow-globe appearance.  Next, I highlighted his beard with Crafters Acrylic "Storm Cloud Grey", and then some of the "Platinum Grey".  I painted his eyes, then highlighted his face and hands with the original "Shading Flesh".  I then mixed a little of the "Burgundy Wine" into the "Shading Flesh" to give him, "a nose like a cherry". Next, I painted the roll his scroll list is wrapped on with some Crafters Acrylic "Cinnamon Brown", and then highlighted the scroll list itself with some Crafters Acrylic "Light Antique White". I then used a ultra-fine point permanent marker to to write "Naughty", and a list of "names" on the scroll. I moved now to the lantern, painting a small glowing circle with White, then painting around this small White area with Apple Barrel "Yellow", and further around this "Yellow" with Crafters Acrylic "Pure Pumpkin.  I then mixed some of the "Pure Pumpkin" with the "Neutral Grey" to try and blend it into the shadowy area of the lantern.
      I then painted  all his chains, and the top and bottom of the lantern, with Ceramcoat "Bronze", then went back and highlighted these with Ceramcoat "14K Gold". I then gave the top and bottom of the lantern a light wash with some GW "Badab Black" wash using a wet brush, to help define them a little better.  Lastly, I used White to  paint the base, especially anywhere that I had accidentally gotten other colors.
      When everything had overnight to dry, I gave the figure a coat of Ceramcoat "Matte Varnish".  Then, the next morning, I flocked the base with Woodland Scenics "Snow" flock.  Later that afternoon I sprayed the figure with Testor's Dullcote.

   I'm very happy with how this figure turned out.  I think it really makes for a unique and fierce looking Santa, and will be perfect for my Frostgrave collection.

Figure 187 of 265: Complete