Monday, December 29, 2014
No Figure This Week
I'm sorry, but I was making merry a little too much this week with friends and family, and I was unable to complete a figure for posting. Hopefully, by next Monday I will have something ready to post. I hope you all have a great New Year. See you all in 2015!
Monday, December 22, 2014
Pathfinder Goblin Warchanter: Figure 131 of 265
This week I painted the last of the Pathfinder Goblins "We Be Goblins" set: the Warchanter. I have put a group photo of the gang down at the end of this post. I will now be moving on to the Elves, and am also preparing a large figure for the upcoming halfway completion mark celebration, which I'll mark with Figure 133, (since Figure 132 would still be .5 short of halfway). So, now on to the figure...
I prepped the figure in the usual way; soaking in water with a bit of dish soap added, giving a gentle scrub with an old soft toothbrush, then rinsing and drying. I then glued it to 7/8" fender washers with Aleene's Tacky glue, and then glued the washer to a tongue depressor with a couple small dabs of Elmer's white glue, for ease of handling during painting.
 To begin with, I painted the skin with Anita's "Baby Blue". When this was dry, I gave the skin areas a wash with thinned Iron Wind Metals "Blue Ink". (I forgot to take a photo before I started to paint the cloths, so excuse the color on her shirt!)
 When the ink wash was completely dry, I began painting the Goblin's outfit. I started with painting her tunic with GW "Graveyard Earth". Then I painted her skirt with Apple Barrel "Rock Grey". Next, I did her "armor" plates with Accent "Mustard Seed". Her leggings I painted Ceramcoat "Mocha", and the legging hangings I painted Folk Art "Burgundy".
Now I worked on some of the detail bits. First, I painted the hair on the Goblin with Folk Art "Medium Gray". I painted her teeth Americana "Buttermilk", and the skull and tusks(?) on her skirt, and the bones(?) in her hair, as well. I painted her tongue with Americana "Wedgwood Blue". Next, I painted the cord around her skirt and neck with Ceramcoat "Maple Sugar Tan". Finally, I painted the whip with Crafters Edition "Spice Brown", and the sword and whip grips with Americana "Asphaltum".
Next step was the metallics. I painted the sword, and the balls on the whip's end, with Ceramcoat "Metallic Pewter". I then painted the ball on the whip handle, hook on the sword hilt, her bracelets, and the chest decoration, with Folk Art "Metallic Blue Sapphire".
 When everything had had time to dry, I went back and carefully applied GW "Agrax Earthshade" wash to all the parts that weren't blue skin. I was as careful as I could be not to let it run onto the blue skin, except I applied small amounts to the eye sockets and mouth.
 After the wash had had time to dry, I went back and added highlights. I began by drybrushing her hair with white paint. Then I highlighted the skin with the original "Baby Blue". This allowed me to cover any mistakes where wash, or the drybrushed white had gotten onto the blue. Next, I added eyes with the "Buttermilk", and then added black pupils. I also used the "Buttermilk" to highlight the teeth and bones. I highlighted the tongue with a mix of the "Wedgwood" and the "Baby Blue". I painted the hair ties with the "Burgundy". I then used the original clothing/armor colors to add highlights to all she were wearing. Lastly, I highlighted the blade of the and sword , and balls on the whip, with Folk Art "Silver Sterling". My final step was to paint the figure's base and washer with white.
I let the Goblins sit overnight, and the next morning I gave them a coat of Ceramcoat "Matte Varnish". Later that afternoon I flocked their bases, using Woodland Scenics snow flocking. With all the Christmas prep going on around here at home, I only just finished it yesterday, so wasn't able to give it it's final Testor's Dullcote spray yet. You'll notice it's a little shiny in the final photo below, my apologies for that.
 I like how she turned out. And, all together they make a nice little horde.
Figure 131: Complete
And let me take this opportunity to say, "Merry Christmas!" to everyone out there in blog land. :)
I prepped the figure in the usual way; soaking in water with a bit of dish soap added, giving a gentle scrub with an old soft toothbrush, then rinsing and drying. I then glued it to 7/8" fender washers with Aleene's Tacky glue, and then glued the washer to a tongue depressor with a couple small dabs of Elmer's white glue, for ease of handling during painting.
Now I worked on some of the detail bits. First, I painted the hair on the Goblin with Folk Art "Medium Gray". I painted her teeth Americana "Buttermilk", and the skull and tusks(?) on her skirt, and the bones(?) in her hair, as well. I painted her tongue with Americana "Wedgwood Blue". Next, I painted the cord around her skirt and neck with Ceramcoat "Maple Sugar Tan". Finally, I painted the whip with Crafters Edition "Spice Brown", and the sword and whip grips with Americana "Asphaltum".
Next step was the metallics. I painted the sword, and the balls on the whip's end, with Ceramcoat "Metallic Pewter". I then painted the ball on the whip handle, hook on the sword hilt, her bracelets, and the chest decoration, with Folk Art "Metallic Blue Sapphire".
I let the Goblins sit overnight, and the next morning I gave them a coat of Ceramcoat "Matte Varnish". Later that afternoon I flocked their bases, using Woodland Scenics snow flocking. With all the Christmas prep going on around here at home, I only just finished it yesterday, so wasn't able to give it it's final Testor's Dullcote spray yet. You'll notice it's a little shiny in the final photo below, my apologies for that.
Figure 131: Complete
And let me take this opportunity to say, "Merry Christmas!" to everyone out there in blog land. :)
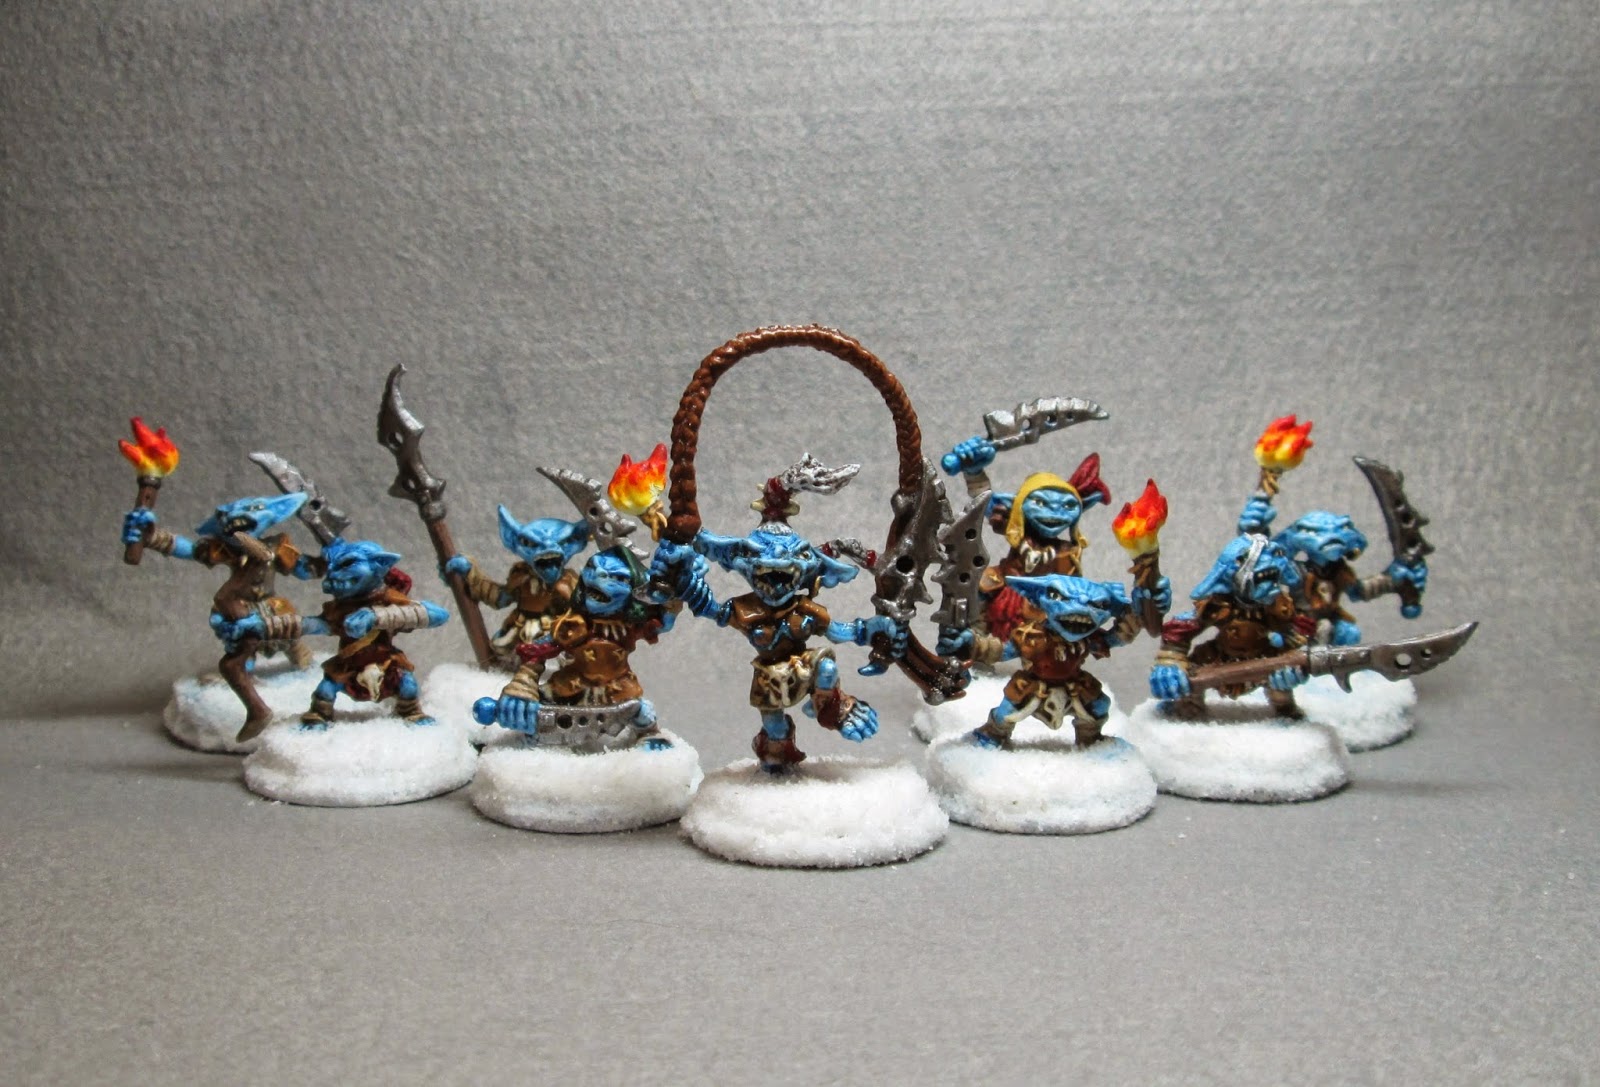 |
| Here's the whole gang; as they'll look in a couple days caroling by torchlight on a snowy Christmas Eve! :) |
Monday, December 15, 2014
Pathfinder Goblin Warriors: Figures 129 & 130 of 265
This week I painted two more on the We Be Goblins! Pathfinder Goblins Set. I prepped them in the usual way; soaking in water with a bit of dish soap added, giving a gentle scrub with an old soft toothbrush, then rinsing and drying. I then glued them to 7/8" fender washers with Aleene's Tacky glue, and then glued the washers to a tongue depressor with a couple small dabs of Elmer's white glue, for ease of handling during painting.
 To begin with, I painted their skin with Anita's "Baby Blue". When this was dry, I gave the skin areas a wash with thinned Iron Wind Metals "Blue Ink".
 When the ink wash was completely dry, I began painting the Goblins' outfits. I started with painting their tunics with DecoArt "Cinnamon Brown". Then I painted their loin "hangings/skirts" with Folk Art "Barnyard Red". Next, I did their "armor" plates, and the Archer's quiver, with Accent "Mustard Seed". Their leggings I painted Folk Art "Butter Pecan", and their wrist wraps I painted Citadel Foundation "Dheneb Stone".
Now I worked on some of the detail bits. First, I painted the hat on the left-hand Goblin with Folk Art "Golden Harvest". I painted their teeth Americana "Buttermilk", and the assorted teeth hanging around their necks I painted with the "Buttermilk" as well. I also used the Buttermilk" to paint the skull on the Archer Goblin. I painted the Archer's tongue with Americana "Wedgwood Blue". Next, I painted the cords on the "armor" plates and hat, the quiver strap, and the necklace cords with Ceramcoat "Maple Sugar Tan". I painted the feathers on the left-hand Goblin's hat with Folk Art "Burgundy" as well as the fletchings on the Archer's arrows, and the pouches they both have on their rear belts with Anita's "Burnt Sienna". I painted the bow and the arrow shafts with Americana "Mississippi Mud", the tips of the bow with Folk Art "Barn Wood", and the sword grip with Americana "Asphaltum". Lastly, I painted the rock the left-hand Goblin has his foot on with Folk Art "Medium Grey"
 I now painted the sword with Ceramcoat "Metallic Pewter". I then painted the ball on the sword hilt with Folk Art "Metallic Blue Sapphire". When everything had had time to dry, I went back and carefully applied GW "Agrax Earthshade" wash to all the parts that weren't blue skin. I was as careful as I could be not to let it run onto the blue skin, except I applied small amounts to their eye sockets and mouths.
 After the wash had had time to dry, I went back and added highlights. I began by highlighting the skin with the original "Baby Blue". This allowed me to cover any mistakes where the wash had gotten onto the blue. Next, I added eyes with the "Buttermilk", and then added black pupils. I also used the "Buttermilk" to highlight the teeth and bones. I highlighted the tongue with a mix of the "Wedgwood" and the "Baby Blue". I then used the original clothing/armor colors to add highlights to all they were wearing. Lastly, I highlighted the blade of the sword with Folk Art "Silver Sterling". My final step was to paint the figures' bases and washers with white.
I let the Goblins sit overnight, and the next morning I gave them a coat of Ceramcoat "Matte Varnish". Later that afternoon I flocked their bases, using Woodland Scenics snow flocking. The next day I gave them a coat of Testor's "Dullcote" spray varnish.
 Another two fine looking Goblins. Jut the one girl Goblin yet to go.
Figures 129 & 130: Complete
Now I worked on some of the detail bits. First, I painted the hat on the left-hand Goblin with Folk Art "Golden Harvest". I painted their teeth Americana "Buttermilk", and the assorted teeth hanging around their necks I painted with the "Buttermilk" as well. I also used the Buttermilk" to paint the skull on the Archer Goblin. I painted the Archer's tongue with Americana "Wedgwood Blue". Next, I painted the cords on the "armor" plates and hat, the quiver strap, and the necklace cords with Ceramcoat "Maple Sugar Tan". I painted the feathers on the left-hand Goblin's hat with Folk Art "Burgundy" as well as the fletchings on the Archer's arrows, and the pouches they both have on their rear belts with Anita's "Burnt Sienna". I painted the bow and the arrow shafts with Americana "Mississippi Mud", the tips of the bow with Folk Art "Barn Wood", and the sword grip with Americana "Asphaltum". Lastly, I painted the rock the left-hand Goblin has his foot on with Folk Art "Medium Grey"
I let the Goblins sit overnight, and the next morning I gave them a coat of Ceramcoat "Matte Varnish". Later that afternoon I flocked their bases, using Woodland Scenics snow flocking. The next day I gave them a coat of Testor's "Dullcote" spray varnish.
Figures 129 & 130: Complete
Monday, December 8, 2014
Norgol, Irongrave Knight: Figure 128 of 265
This week I finished up the BBEG set by painting Norgol, Irongrave Knight. This set now joins the list of Completed Sets over on the right.
I prepped this figure in the usual way; soaking it in a dish of water with a couple drops of dish soap added, then giving it a light scrub with a soft toothbrush, and then rinsing and drying. I then glued the figure to a 1" black-primed fender washer with Aleene's Tacky glue, and glued the washer to a tongue depressor with a couple drops of Elmer's White Glue.
 I then painted him all black. I avoided the cloak's interior as best I could, but didn't worry too much if some black got on it. When the black was dry, I went back over the figure and drybrushed throughly it with Ceramcoat "Metallic Pewter".
 I then touched up anywhere the metallic drybrushing had gotten on the shoulder fur, or the cloak's exterior, with more black. Next, I drybrushed the fur with Folk Art "Medium Grey", and then drybrushed the outer portion of the cloak with Duncan "Slate Blue". I then went back and touched up anywhere these colors had gotten on the armor with the "Metallic Pewter" color
 My next step was to paint the cloak's interior lining with GW "Blood Red". The ax handle I painted Americana "Mississippi Mud", and the belt I painted Ceramcoat "Walnut".
 I then gave the cloak's lining, and the ax handle, a wash with thinned Winsor-Newton "Peat Brow" ink. While this dried, I painted the skull on his chest armor and the one on his ax with Ceramcoat Bronze. I then went back and added highlights to these with Ceramcoat "14K Gold". Lastly, I added highlights to the armor and the ax with Folk Art "Silver Sterling". I then painted any exposed white on the figure's integral base with the "Walnut". I intentionally did not highlight the red lining of the cloak since most of it hung in shadow, I felt it would look odd with highlighting.
The next morning I gave it coat of Ceramcoat "Mate Varnish". Later that afternoon, I flocked the base. The following day, I sprayed the figure with "Testor's Dullcote".
 I'm very pleased with how this guy turned out for what was a very quick and simple paint job. He's got a good menacing attitude about him.
This week, I get back to work on the Pathfinder Goblins.
I prepped this figure in the usual way; soaking it in a dish of water with a couple drops of dish soap added, then giving it a light scrub with a soft toothbrush, and then rinsing and drying. I then glued the figure to a 1" black-primed fender washer with Aleene's Tacky glue, and glued the washer to a tongue depressor with a couple drops of Elmer's White Glue.
The next morning I gave it coat of Ceramcoat "Mate Varnish". Later that afternoon, I flocked the base. The following day, I sprayed the figure with "Testor's Dullcote".
This week, I get back to work on the Pathfinder Goblins.
Monday, December 1, 2014
Pathfinder Goblin Warriors: Figures 126 & 127 of 265
This week I worked some more on the We Be Goblins! Pathfinder Goblins Set, painting two of the warriors. I prepped them in the usual way; soaking in water with a bit of dish soap added, giving a gentle scrub with an old soft toothbrush, then rinsing and drying. I then glued them to 7/8" fender washers with Aleene's Tacky glue, and then glued the washers to a tongue depressor with a couple small dabs of Elmer's white glue, for ease of handling during painting.
To begin with, I painted their skin with Anita's "Baby Blue". When this was dry, I gave the skin areas a wash with thinned Iron Wind Metals "Blue Ink".
 When the ink wash was completely dry, I began painting the Goblins' outfits. I started with painting their tunics with Aleene's "Deep Khaki". Then I painted their loin "hangings/skirts" with GW "Snakebite Leather". Next, I did their "armor" plates with Accent "Mustard Seed". Their leggings I painted Citadel Foundation "Dheneb Stone", and their wrist wraps I painted Folk Art "Butter Pecan".
Now I worked on some of the detail bits. First, I painted the hair on both the Goblins with Folk Art "Medium Gray". I painted their teeth Americana "Buttermilk", and the assorted teeth hanging around their necks I painted with the "Buttermilk" as well. I also used the Buttermilk" to paint the skull and tusks(?) on the left-hand Goblin. I painted their tongues with Americana "Wedgwood Blue". Next, I painted the cords on the "armor" plates, and the necklace cords with Ceramcoat "Maple Sugar Tan". I painted the feathers on the right-hand Goblin's arms with Folk Art "Burgundy", and the pouches they both have on their rear belts with Anita's "Burnt Sienna". Finally, I painted the spear shafts with Americana "Mississippi Mud", and the sword grip with Americana "Asphaltum".
 I now painted the spear-heads, and the sword with Ceramcoat "Metallic Pewter". I then painted the ball on the sword hilt with Folk Art "Metallic Blue Sapphire". When everything had had time to dry, I went back and carefully applied GW "Agrax Earthshade" wash to all the parts that weren't blue skin. I was as careful as I could be not to let it run onto the blue skin, except I applied small amounts to their eye sockets and mouths.
 After the wash had had time to dry, I went back and added highlights. I began by drybrushing their hair with white paint. Then I highlighted the skin with the original "Baby Blue". This allowed me to cover any mistakes where wash, or the drybrushed white had gotten onto the blue. Next, I added eyes with the "Buttermilk", and then added black pupils. I also used the "Buttermilk" to highlight the teeth and bones. I highlighted the tongues with a mix of the "Wedgwood" and the "Baby Blue". I painted the hair tie on the left-hand Goblin with the "Burgundy". I then used the original clothing/armor colors to add highlights to all they were wearing. Lastly, I highlighted the blades of their spears and sword with Folk Art "Silver Sterling". My final step was to paint the figures' bases and washers with white.
I let the Goblins sit overnight, and the next morning I gave them a coat of Ceramcoat "Matte Varnish". Later that afternoon I flocked their bases, using Woodland Scenics snow flocking. The next day I gave them a coat of Testor's "Dullcote" spray varnish.
 I'm again pleased with how these fellows turned out. Three more to go.
Figures 126 & 127: Complete
To begin with, I painted their skin with Anita's "Baby Blue". When this was dry, I gave the skin areas a wash with thinned Iron Wind Metals "Blue Ink".
Now I worked on some of the detail bits. First, I painted the hair on both the Goblins with Folk Art "Medium Gray". I painted their teeth Americana "Buttermilk", and the assorted teeth hanging around their necks I painted with the "Buttermilk" as well. I also used the Buttermilk" to paint the skull and tusks(?) on the left-hand Goblin. I painted their tongues with Americana "Wedgwood Blue". Next, I painted the cords on the "armor" plates, and the necklace cords with Ceramcoat "Maple Sugar Tan". I painted the feathers on the right-hand Goblin's arms with Folk Art "Burgundy", and the pouches they both have on their rear belts with Anita's "Burnt Sienna". Finally, I painted the spear shafts with Americana "Mississippi Mud", and the sword grip with Americana "Asphaltum".
I let the Goblins sit overnight, and the next morning I gave them a coat of Ceramcoat "Matte Varnish". Later that afternoon I flocked their bases, using Woodland Scenics snow flocking. The next day I gave them a coat of Testor's "Dullcote" spray varnish.
Figures 126 & 127: Complete
Monday, November 24, 2014
Shaeress, Dark Elf Queen: Figure 125 of 265
This week I took a break from painting Goblins, and instead worked on Shaeress, the Dark Elf Queen, from the BBEG set. I hadn't looked up this figure in Reaper's webstore before I painted it, (I feel seeing painted examples of a figure before I myself paint it, has the potential to sway my own ideas on color scheme.) so I didn't know she was a Dark Elf. If I had, I might have chosen a different color scheme, and gone for a more Drow look to her skin and features. As it was, I wasn't sure what I was dealing with when I first studied this figure. She seemed to be in finery that was torn and tattered (The best I could guess from the sculpting. This is another one of those figures that I sometimes had no idea what I was looking at on the figure.) So, I imagine that she was some sort of Elf princess that had fallen under a dark influence (So I wasn't too far off). Now, I find my go-to palette when painting Bad Guys, is more often than not, red and/or black. So, with this figure I decided I wanted to do something different, so I thought I would go for a kind of sickly, swampy, green look. This color scheme would also fit into my mental idea that she was some sort of fallen elf.
I prepped this figure in the usual way; soaking it in a dish of water with a couple drops of dish soap added, then giving it a light scrub with a soft toothbrush, and then rinsing and drying. I then glued the figure to a 1" black-primed fender washer with Aleene's Tacky glue, and glued the washer to a tongue depressor with a couple drops of Elmer's White Glue. I began painting by giving her a wash with thinned black ink with a tiny pin-point drop of dishsoap added to help it flow into the crevices and help show the sculpting outlines.
 I then painted her skin with Folk Art "Milkshake". Next I panted her stockings and sleeves with Americana "Olive Green", and her skirts(?) with Accent "Forest Green".
 My next step was to paint her armor, hair-ornament, and shoes with GW "Brazen Brass. There were two straps on her left wrist that I painted Apple Barrel "Apple Black Green". I let all this dry, and then gave the entire figure a wash with GW "Agrax Earthshade" wash.
 After the wash had time to dry, I came back and painted her hair black. When the hair was dry, I gave it a light drybrushing with Duncan "Slate Blue" to add highlights. I then added eyes (white with black pupils), and lips with Folk Art "Burgundy". I then highlighted the skin with the base "Milkshake". Next, I highlighted the sleeves and stockings with the base "Olive Green", and the skirts and wrist straps with Americana "Forest Green" (A slightly lighter shade than the original Accent "Forest Green" I had used.). Finishing up, I added highlights to the armor with Ceramcoat "Bronze". Lastly, I painted the white areas of the figure's integral base with Americana "Asphaltum" to hide the white Bones material before flocking.
I let the figure sit overnight, and the next morning I gave it a coat of Ceramcoat "Matte Varnish". Later that afternoon I flocked the base, and the next day I sprayed it with Testor's "Dullcote" spray varnish.
 I'm generally pleased with the figure. I didn't particularly love this figure (I found trying to figure out the details of her outfit frustrating) so I just did a quick and simple paint job on it.
Figure 125 of 265: Complete
I prepped this figure in the usual way; soaking it in a dish of water with a couple drops of dish soap added, then giving it a light scrub with a soft toothbrush, and then rinsing and drying. I then glued the figure to a 1" black-primed fender washer with Aleene's Tacky glue, and glued the washer to a tongue depressor with a couple drops of Elmer's White Glue. I began painting by giving her a wash with thinned black ink with a tiny pin-point drop of dishsoap added to help it flow into the crevices and help show the sculpting outlines.
I let the figure sit overnight, and the next morning I gave it a coat of Ceramcoat "Matte Varnish". Later that afternoon I flocked the base, and the next day I sprayed it with Testor's "Dullcote" spray varnish.
Figure 125 of 265: Complete
Monday, November 17, 2014
More Pathfinder Goblin Pyros: Figures 123 & 124 of 265
This week I worked some more on the We Be Goblins! Pathfinder Goblins Set. I prepped them in the usual way; soaking in water with a bit of dish soap added, giving a gentle scrub with an old soft toothbrush, then rinsing and drying. I then glued them to 7/8" fender washers with Aleene's Tacky glue, and then glued the washers to a tongue depressor with a couple small dabs of Elmer's white glue, for ease of handling during painting.
To begin with, I painted their skin with Anita's "Baby Blue". When this was dry, I gave the skin areas a wash with thinned Iron Wind Metals "Blue Ink".
 When the ink wash was completely dry, I began painting the Goblins' outfits. I started with painting their tunics with GW "Vermin Brown". Then I painted their loin "hangings" with Folk Art "Gray Green". Next, I did their "armor" plates with Accent "Mustard Seed". Their leggings I painted Folk Art "Barn Wood", and their wrist wraps I painted Americana "Khaki Tan".
Now I worked on some of the detail bits. First, I painted the hat on the left-hand Goblin with Apple Barrel "Apple Black Green". I painted their teeth Americana "Buttermilk", and what I assumed was teeth hanging around their necks I painted with the "Buttermilk" as well. I also used the Buttermilk" to paint the skull and tusks (?) on he right hand Goblin. Next, I painted the cords on the "armor" plates, and the necklace cords with Ceramcoat "Maple Sugar Tan". I painted the feather on the left-hand Goblin's arm with Folk Art "Burgundy", and the pouches they both have on their rear belts with Anita's "Burnt Sienna". Finally, I painted the torch handles with Americana "Mississippi Mud", and the sword grips with Americana "Asphaltum".
 I now painted the swords with Ceramcoat "Metallic Pewter". I then painted the balls on the sword hilts with Folk Art "Metallic Blue Sapphire". When everything had had time to dry, I went back and carefully applied GW "Agrax Earthshade" wash to all the parts that weren't blue skin. I was as careful as I could be not to let it run onto the blue skin, except I applied small amounts to their eye sockets and mouths.
 After the wash had had time to dry, I went back and added highlights. I began by highlighting the skin with the original "Baby Blue". This allowed me to cover any mistakes where wash had gotten onto the blue. Next, I added eyes with the "Buttermilk", and then added black pupils. I then used the original clothing/armor colors to add highlights to all they were wearing. I highlighted the hat with Americana "Forest Green". I highlighted the blades of their swords with Folk Art "Silver Sterling". Lastly I painted the torch flames beginning with Apple Barrel "Lemon Chiffon at the bottom, and then Americana "Tangerine", and then Ceramcoat "Bright Red". lastly I added some dabs of the "Burgundy" at the very tips of the flames. My final step was to paint the figures' bases and washers with white.
I let the Goblins sit overnight, and the next morning I gave them a coat of Ceramcoat "Matte Varnish". Later that afternoon I flocked their bases, using Woodland Scenics snow flocking. Unfortunately, it's been really cold here recently, so I wasn't able to find time to spray them outdoors with Testor's "Dullcote" spray varnish yet. You'll notice they're a little shiney in the last picture.
 I'm again pleased with how these fellows turned out. Five more to go.
Figures 123 & 124: Complete
Now I worked on some of the detail bits. First, I painted the hat on the left-hand Goblin with Apple Barrel "Apple Black Green". I painted their teeth Americana "Buttermilk", and what I assumed was teeth hanging around their necks I painted with the "Buttermilk" as well. I also used the Buttermilk" to paint the skull and tusks (?) on he right hand Goblin. Next, I painted the cords on the "armor" plates, and the necklace cords with Ceramcoat "Maple Sugar Tan". I painted the feather on the left-hand Goblin's arm with Folk Art "Burgundy", and the pouches they both have on their rear belts with Anita's "Burnt Sienna". Finally, I painted the torch handles with Americana "Mississippi Mud", and the sword grips with Americana "Asphaltum".
I let the Goblins sit overnight, and the next morning I gave them a coat of Ceramcoat "Matte Varnish". Later that afternoon I flocked their bases, using Woodland Scenics snow flocking. Unfortunately, it's been really cold here recently, so I wasn't able to find time to spray them outdoors with Testor's "Dullcote" spray varnish yet. You'll notice they're a little shiney in the last picture.
Figures 123 & 124: Complete
Monday, November 10, 2014
No New Figure Today
Due to my preparing for, and attending, Fall-In this past week, I was unable to complete any figures to post. Tune in again here next week for another completed Bones figure. For those that are interested, here are some photos I took at Fall-In: Fall-In Photos

Monday, November 3, 2014
Pathfinder Goblin Pyros: Figure 121 & 122 of 265
This week I took a break from the BBEG Set, and worked a bit on the We Be Goblins! Pathfinder Goblins Set. As I get closer to the halfway mark on this project, I wanted some quick little figures that I could paint in groups to help move my numbers along. :)
As the weather here has turned chilly, it put my mind to a long-time desire I've had to do some winter specific figures for use on snowy terrain. Since I had already painted the other Goblin set in this Kickstarter normally, I thought these Goblins might be fun to do as some sort of Snow Goblins.
I prepped them in the usual way; soaking in water with a bit of dish soap added, giving a gentle scrub with an old soft toothbrush, then rinsing and drying. I then glued them to 7/8" fender washers with Aleene's Tacky glue, and then glued the washers to a tongue depressor with a couple small dabs of Elmer's white glue, for ease of handling during painting.
 To begin with, I painted their skin with Anita's "Baby Blue". When this was dry, I gave the skin areas a wash with thinned Iron Wind Metals "Blue Ink".
 When the ink wash was completely dry, I began painting the Goblins' outfits. I started with painting their tunics with Folk Art "Medium Grey". Then I painted their loin "hangings" with Folk Art "Dapple Gray". Next, I did their "armor" plates with Accent "Mustard Seed". Their leggings I painted Americana "Khaki Tan", and their wrist wraps I painted Folk Art "Barn Wood".
Now I worked on some of the detail bits. I painted their teeth Americana "Buttermilk", and what I assumed was teeth hanging around their necks (it might have been fringe...I'm not sure) I painted with the "Buttermilk" as well. I also used the Buttermilk" to paint the skulls on the right hand Goblin. Next, I painted the cords on the "armor" plates, and the necklace cords with Ceramcoat "Maple Sugar Tan". I painted the upper arm wrap on the right-hand Goblin with Folk Art "Burgundy". Finally, I painted the torch handles with Americana "Mississippi Mud", the sword grips with Americana "Asphaltum", and the rock the left-hand Goblin is standing on with the "Medium grey"..
 I now painted the swords with Ceramcoat "Metallic Pewter", as well as the ring around the top of the left-hand Goblin's torch. I then painted the balls on the sword hilts and the coin-like things on the right-hand Goblin's wrist wrap, with Folk Art "Metallic Blue Sapphire". When everything had had time to dry, I went back and carefully applied GW "Agrax Earthshade" wash to all the parts that weren't blue skin. I was as careful as I could be not to let it run onto the blue skin, except I applied small amounts to their eye sockets and mouths.
 After the wash had had time to dry, I went back and added highlights. I began by highlighting the skin with the original "Baby Blue". This allowed me to cover any mistakes where wash had gotten onto the blue. Next, I added eyes with the "Buttermilk", and then added black pupils. I then used the original clothing/armor colors to add highlights to all they were wearing. I highlighted the blades of their swords with Folk Art "Silver Sterling". Lastly I painted the torch flames beginning with Apple Barrel "Lemon Chiffon at the bottom, and then Americana "Tangerine", and then Ceramcoat "Bright Red". lastly I added some dabs of the "Burgundy" at the very tips of the flames. My final step was to paint the figures' bases with the "Baby Blue", thinking the blue color would look neat under the snow flocking I planned to use.
I let the Goblins sit overnight, and the next morning I gave them a coat of Ceramcoat "Matte Varnish". Later that afternoon I flocked their bases, using Woodland Scenics snow flocking. Unfortunately, this was not as opaque as I hoped, and a lot of the blue undercoat color showed through. I tried over-painting a lot of the now-flocked areas with white paint, and reflocked them. The next day I sprayed ithem with Testor's "Dullcote" spray varnish.
 I'm pleased with how these fellows turned out. I think the general winter tones really make the torch flames pop. Now on to their 7 friends.
Figures 121 & 122: Complete
As the weather here has turned chilly, it put my mind to a long-time desire I've had to do some winter specific figures for use on snowy terrain. Since I had already painted the other Goblin set in this Kickstarter normally, I thought these Goblins might be fun to do as some sort of Snow Goblins.
I prepped them in the usual way; soaking in water with a bit of dish soap added, giving a gentle scrub with an old soft toothbrush, then rinsing and drying. I then glued them to 7/8" fender washers with Aleene's Tacky glue, and then glued the washers to a tongue depressor with a couple small dabs of Elmer's white glue, for ease of handling during painting.
Now I worked on some of the detail bits. I painted their teeth Americana "Buttermilk", and what I assumed was teeth hanging around their necks (it might have been fringe...I'm not sure) I painted with the "Buttermilk" as well. I also used the Buttermilk" to paint the skulls on the right hand Goblin. Next, I painted the cords on the "armor" plates, and the necklace cords with Ceramcoat "Maple Sugar Tan". I painted the upper arm wrap on the right-hand Goblin with Folk Art "Burgundy". Finally, I painted the torch handles with Americana "Mississippi Mud", the sword grips with Americana "Asphaltum", and the rock the left-hand Goblin is standing on with the "Medium grey"..
I let the Goblins sit overnight, and the next morning I gave them a coat of Ceramcoat "Matte Varnish". Later that afternoon I flocked their bases, using Woodland Scenics snow flocking. Unfortunately, this was not as opaque as I hoped, and a lot of the blue undercoat color showed through. I tried over-painting a lot of the now-flocked areas with white paint, and reflocked them. The next day I sprayed ithem with Testor's "Dullcote" spray varnish.
Figures 121 & 122: Complete
Thursday, October 30, 2014
Another "Song of Blades and Heroes" Battle Day
My friend Rob Dean came over to my warroom this past Saturday for a couple games of "Song of Blades and Heroes" using our Bones figures. I had set up the table with a little ford crossing a meandering creek in the shadow of an old Elven watchtower.
For my initial force I picked an all-human group consisting of; Magic User, Leader, Barbarian, Warrior, Elite Archer, Heavy Infantry, thief, and another Warrior. Rob had a group of Orcs with a Leader, supported by a pair of Orc Archers and some Giant Rats.
As the game started, I rushed for the hill where the old watchtower stood to get my Elite Archer and Magic user into good positions The Heavy Infantry tagged along to act as a bodyguard. The rest of my forced moved to my right, to cross the creek a little up from the ford. Meanwhile, Rob marched his Orcs towards the ford in an attempt to quickly cross it, while his archers and rats moved to thwart my attempted flanking maneuver. First blood came when my archer scored a lucky kill at maximum range on one of the Orcs approaching the ford.
 As Rob's first Orcs splashed across the ford, I turned my two Warriors back from their flanking maneuver to try and halt the Orcs before they got any further. Hopefully stopping them while they were still slowed down crossing the ford. Quickly, a swirling melee developed at the ford.
We both threw more troops at the ford, though I continued to advance my Barbarian around the flank. Rob used his Rats to counter this move, and despite their reluctance to follow orders, two of the Giant Rats eventually made contact with my Barbarian and caused a Gruesome Death. Luckily, hardly anyone was around to witness it, so there was little lasting effect for my side. While my Archer remained on the hill, trying to take pot shots at the Rats who had killed the Barbarian, my Magic User moved down to get in better range of the ford bringing the Heavy Infantryman along with him.
In the end, the Orcs' lower Quality told, and I was able to wear them down one by one, while only losing my Thief and Barbarian in the process. After Rob's Orc's dropped below 50%, causing several of the survivors to run a ways down the road, we called it a game.
For the second game we rolled for a scenario, and got the Place of Power result. So, we quickly reset the table, removing the Elven Watchtower and the river. In the Watchtower's place I put out the Bones Sarcophagus and threw some Armorcast cemetery walls around it. We decided it must be a powerful magician's grave, which inspired my to pull out my Bones High Wizard statue to put up by the sarcophagus. After a quick rearrangement of the woods, we were set to go.
I picked a more mixed-race adventuring party for this game, featuring: a Halfling Warrior (not a Bones figure), Halfling Wisewoman, a Dragonman (I used the Hyenaman stats), Human Warrior, Human Leader, Fire Elemental, Elf Sneak, and Elf Elite Archer. Rob used what I call his "invincible force", since I have yet to beat it in a number of games now.It consists of an assortment of human types; including a Leader, Warriors, Barbarian, Archers, and Magic user
Things got off to bad start for me as on the first turn Rob did a group activation and successfully rolled 3 dice, allowing most of his force to run and gain the Place of Power before I had even picked up a die. I did my best to rush my force forward before Rob's force could get settled.
With their Quality 4 and 5, the Halflings proved to be useless, especially after I had had to rush my Leader forward to throw more bodies into the fray. I have yet to have success with low quality troops. Even my high quality troops preformed poorly on this outing. My Elite Elf Archer couldn't hit anything, and my brave Dragonman was knocked down with the first blow he received; and on the following turn was dispatched Gruesomely, causing many of my forces' survivors, who had rushed forward to help the Dragonman, to recoil backwards a move or two.
It wasn't long before I was worn down to below half; as the dice were unkind and I could not get any coordinated attack put together. With Rob's forces well entrenched in the walled Place of Power, at this point we called it a game.
Another good gaming day, and a nice victory for each of us. We both still struggle to find the correct way to use low Quality troops to advantage. Hopefully we can have a rematch soon.
For my initial force I picked an all-human group consisting of; Magic User, Leader, Barbarian, Warrior, Elite Archer, Heavy Infantry, thief, and another Warrior. Rob had a group of Orcs with a Leader, supported by a pair of Orc Archers and some Giant Rats.
 |
| Team Human L to R, (Front row): Magic User, Leader, Barbarian, Warrior, Elite Archer, Heavy Infantry, (Back row) Thief, and another Warrior |
 |
| The battle at the ford begins. I rush one of my Warriors up to block a crossing Orc, and Rob counters with another Orc, I then move my other Warrior up to support. |
In the end, the Orcs' lower Quality told, and I was able to wear them down one by one, while only losing my Thief and Barbarian in the process. After Rob's Orc's dropped below 50%, causing several of the survivors to run a ways down the road, we called it a game.
 |
| The scene near the end. With a powerful force still at my disposal, and the Orcs badly worn down, The Orc Leader calls for a retreat. |
I picked a more mixed-race adventuring party for this game, featuring: a Halfling Warrior (not a Bones figure), Halfling Wisewoman, a Dragonman (I used the Hyenaman stats), Human Warrior, Human Leader, Fire Elemental, Elf Sneak, and Elf Elite Archer. Rob used what I call his "invincible force", since I have yet to beat it in a number of games now.It consists of an assortment of human types; including a Leader, Warriors, Barbarian, Archers, and Magic user
 |
| My team: (front row) Halfling Warrior (not a Bones figure), Halfling Wisewoman, (Back Row) a Dragonman (I used the Hyenaman stats), Human Warrior, Human Leader, Fire Elemental, Elf Sneak, and Elf Elite Archer |
 |
| My Elite Elf Archer takes up position in the woods, as my Dragonman and Warrior rush bravely forward. |
 |
| My Dragonman falls, as the rest of my force tries to move up to help him. In the lower left of the photo, my Elf Sneak has taken position to charge out at an opportune moment. A moment which never comes. |
Another good gaming day, and a nice victory for each of us. We both still struggle to find the correct way to use low Quality troops to advantage. Hopefully we can have a rematch soon.
Monday, October 27, 2014
Kavorgh, Orc Warboss: Figure 120 of 265
This week I painted Kavorgh, Orc Warboss from the BBEG set. I had done a number of Bones Orcs before from the 30 New Bones set, so I had a pretty good plan for how I was going to go about painting this guy.
 I prepped this figure in the usual way; soaking it in a dish of water with a couple drops of dish soap added, then giving it a light scrub with a soft toothbrush, and then rinsing and drying. I then glued the figure to a 1.25" black-primed fender washer with Aleene's Tacky glue, and glued the washer to a tongue depressor with a couple drops of Elmer's White Glue.
I then painted him all black. When the black was dry, I went back over the figure and drybrushed all the metal parts, except the ax, with Ceramcoat "Metallic Pewter".
 I then repainted black any areas of the fur garments that had gotten the "Metallic Pewter" on them, and then drybrushed the upper fur garments with Folk Art "Medium Grey". I and then painted the lower garment with Americana "Asphaltum", and when dry, drybrushed it with Americana "Khaki Tan".
 Next, I realized I had forgotten to drybrush the metal bits on the front of his shield, so I went back and drybrushed it with the "Metallic Pewter". Then, I painted all his skin with Aleene's "Deep Khaki". I followed this with painting his undershirt Folk Art "Deep Tomato Red". I then used a variety of my browns, red-browns, and mustard-browns to paint his many haphazard garments and straps. His main shirt, with the metal plates sewn on it, I painted with the "Asphaltum", and the big wide belt he wears, as well as the back of the shield, I painted with the Americana "Charcoal Grey". I painted the border around the shield with Folk Art "True Burgundy". The ax handle I painted Americana "Mississippi Mud".
 I then painted all the hands tacked on his shield using a variety of flesh tones. The bone and one of the paper or cloth scraps I painted with Americana "Buttermilk. While I had this out, I also painted his teeth with it. I finished up by painting the hair and other fragments nailed on the shield. When everything was dry, I gave the whole figure a wash with thinned GW "Agrax Earthshade" wash.
 After the wash had a good long time to dry, I went back and added in his eyes using the "Buttermilk" with black pupils added. I then highlighted his skin with the original "Deep Khaki", and then mixed a little lighter Aleene's "Dusty Khaki" into it to add some lighter skin highlights. I highlighter his garments with their original colors, and the same with the shield and the stuff nailed to it. The bone on the shield I used some white to highlight. Lastly, I used the "Metallic Pewter" to paint the metal parts of the ax. I then went back and highlighted the edges of the ax head with Folk Art "Silver Sterling".
I let the figure sit overnight, and the next morning I gave it a coat of Ceramcoat "Matte Varnish". Later that afternoon I flocked the base, and the next day I sprayed it with Testor's "Dullcote" spray varnish.

 I'm pleased with how this fellow came out. He will be a nice commander for to my Bones orc horde.
I played another pair of "Song of Blades and Heroes" games using my Bones figures this past weekend; so I hope to have the battle reports posted on Thursday. So tune in then!
Figure 120 of 265: Complete
I then painted him all black. When the black was dry, I went back over the figure and drybrushed all the metal parts, except the ax, with Ceramcoat "Metallic Pewter".
I let the figure sit overnight, and the next morning I gave it a coat of Ceramcoat "Matte Varnish". Later that afternoon I flocked the base, and the next day I sprayed it with Testor's "Dullcote" spray varnish.
I played another pair of "Song of Blades and Heroes" games using my Bones figures this past weekend; so I hope to have the battle reports posted on Thursday. So tune in then!
Figure 120 of 265: Complete
Monday, October 20, 2014
Virina, Female Demon: Figure 119 of 265
This week I painted Virina, the female demon, from the BBEG (Big Bad Evil Guys) set. As I pondered how I was going to paint her, I got in my head to do her in all black, and then I thought it might be neat to give her bright red hair to contrast with the black body. I then happened to see a picture of some pumpkinhead figures someone had painted and had done cool fire-glowing eye effects on the jack-o-lantern heads; and the idea came to me that perhaps instead of doing plain red hair, it might be cool to try and paint the hair like glowing fire. Since I have 200-some Bones figures to paint, the opportunity to do experimenting with stuff like this is one of the things I like.
 I prepped this figure in the usual way; soaking it in a dish of water with a couple drops of dish soap added, then giving it a light scrub with a soft toothbrush, and then rinsing and drying. I then glued the figure to a 1" black-primed fender washer with Aleene's Tacky glue, and glued the washer to a tongue depressor with a couple drops of Elmer's White Glue.
I then painted her all black, doing my best to avoid the hair.
 Next, I gave the whole body a drybrushing with Duncan "Slate Blue" to add highlights to the black body and wings. Her hooves and horns I drybrushed with Folk Art "Medium Grey".
 I then painted her hair Apple Barrel "Lemon Chiffon".
 I then carefully drybrushed over the "Lemon Chiffon with first, Americana "Tangerine", and then Ceramcoat "Bright Red".
 And, lastly, I went over the hair with Apple Barrel "Apple Maroon". I then painted the ring on her hair, first with Ceramcoat "Bronze, and then added highlights with Ceramcoat "14K Gold". Next I tried to add reflected light from the hair onto her shoulders, chest, arms, tail, wings, and face by lightly drybrushing them with the "Tangerine" Finally, I added eyes with the "Lemon Chiffon" and then added black pupils, and then touched up any exposed white areas of her integral base with the black.
The next morning I gave it the figure coat of Ceramcoat "Matte Varnish". Later in the afternoon I flocked the base, and the next day I sprayed it with Testor's "Dullcote" spray varnish.
 Well, I like it, but I'm not totally happy with the figure, I think the black body turned out looking cool, but I don't know if the hair effect really works, and I still need to work on my relected light effects, as I think they came off heavy-handed.
Figure 119 of 265: Complete
I then painted her all black, doing my best to avoid the hair.
The next morning I gave it the figure coat of Ceramcoat "Matte Varnish". Later in the afternoon I flocked the base, and the next day I sprayed it with Testor's "Dullcote" spray varnish.
Figure 119 of 265: Complete
Subscribe to:
Posts (Atom)