Monday, August 29, 2016

Mangu Timur and Ragnaros, Evil Warrior: Figures 240 & 241 of 266

  This past week I dove into the Dark Heroes set and painted the two knights, Mangu Timur and Ragnaros, Evil Warrior, from that set. Since the way I planned to paint them was so similar I figured I'd just do them at the same time.  I'm also happy to have reached the 240's; it makes my goal seem that much closer. :)
     I prepped the figures in the usual way; soaking them in a dish of water with a couple drops of dish- soap added, then giving them a light scrub with a soft toothbrush, and then rinsing and drying them.  I then glued Mangu Timur to a black primed 1" fender washer, and Ragnaros to a 1.25" black-primed fender washer.  I then glued the washers to a tongue depressor with a couple drops of Elmer's glue each.
     I began by painting both figures Black.  I then drybrushed the figure with Accent "Princely Pewter", followed by a light highlight drybrushing with Folk Art "Silver Sterling".
     I then painting the waist hangings and shield on the Mangu Timur with Apple Barrel "Apple Black Green".  I then moved to Ragnaros and painted all the decorative skulls and his shield with Ceramcoat "Opaque Red".  I then painted his horns with Folk Art "Barnyard Red".   Next, I went back to Mangu Timur and painted the decorative details on his waist hangings, shield, as well as the hilt of his sword with Ceramcoat "Raw Sienna".
     I then repainted the parts I had painted with the "Raw Sienna", this time using Ceramcoat "Bronze".  I also repainted all the red skulls on Ragnaros using Dazzling Metallics "Festive Red".  I let the paint dry for a while, after which I gave a wash with Citadel "Nuln Oil" wash using a wet brush to the parts I had just painted with the "Apple Black Green", "Bronze", Opaque Red", "Barnyard Red", and "Festive Red".
          When the wash was dry, I began work on the highlights.  I started on Mangu Timur, highlighting his waist hangings and shield with Apple Barrel "Apple Blue Spruce".  I then highlighted all the parts I had painted "Bronze", using Ceramcoat "14K Gold".  I highlighted his sword with Silver Sterling", and when it was dry, I applied a wash down the center of the sword with Iron Wind Metals "Mid Green" ink using a wet brush.
     I then turned to Ragnaros.  I bean by highlighting his horns with the base "Barnyard Red", and then mixed a little Americana "Terra Cotta" in it to highlight the ends of the horns.  Next, I Highlighted his shield with Americana "Cadmium Red".  I panted the back of his loin hanging, and the claws on his shield with Black, and then added highlights to the Black with Citadel "The Fang".   While I had the Black out, I also painted his sword, an the sword grips on both figures.  Next, I highlighted the skulls I had painted the metallic "Festive Red", using a mix of the "Festive Red" and Americana "Tangerine".   I then repainted his word with Folk Art Metallics "Gunmetal Grey", and then highlighted it with the "Silver Sterling".
     While I had the "Silver Sterling" out, I added specific highlights on each figure where I felt they were needed, then I let everything dry over night.  The next day I gave the figures a coat of Ceramcoat "Matte Varnish" and, when dry, flocked their bases.  Another overnight dry, and I sprayed them with Testor's Dullcote".


    I'm pleased with how these two knights turned out.   I didn't attempt anything too fancy on them, just did them up for tabletop use.

Thursday, August 25, 2016

Mashaaf, Great Old One: Bones II Figure

  A few months ago I began working on the Mashaaf, Great Old One, add-on figure from Bones II, and had gotten as far as washing it, assembling it, and spraying it with a base coat.  It had then sat gathering dust, waiting for me to find inspiration to complete it.  Then, with the successful competition of my Kaladrax figure a couple weeks ago, I felt emboldened to bite the bullet and finish this figure up as well.
   When purchasing this figure I had some vague idea of using it for my Pulp mash-up Space1889/John Carter of Mars games, so I pictured in some sort of tan,bron,reddish type of color scheme.  However, i didn't want to limit it to just Mars, so I wanted to tone the base colors down so they might just as well blend in with any desert setting.
    I prepped the figure in the usual way; soaking all the pieces it in a bowl of water with a couple drops of dish-soap added, then I gave them all a light scrub with a soft toothbrush, and then rinsed and dried them.  I then assembled the figure using Gorilla superglue.   Next, I  used Aleene's Tacky glue to glue the base to a n old CD.
    When everything was dry, I used masking tape to taped off the area of the base where the figure was going to be glued, and taped the underside of the figure where it sat on the base as well.
     I then sprayed both the base and the figure itself with Krylon Camouflage with Fusion "Khaki".  This left the model a little tacky, but I knew from having  used this to paint some of my CAV that once I painted over the tacky basecoat, it would be fine.
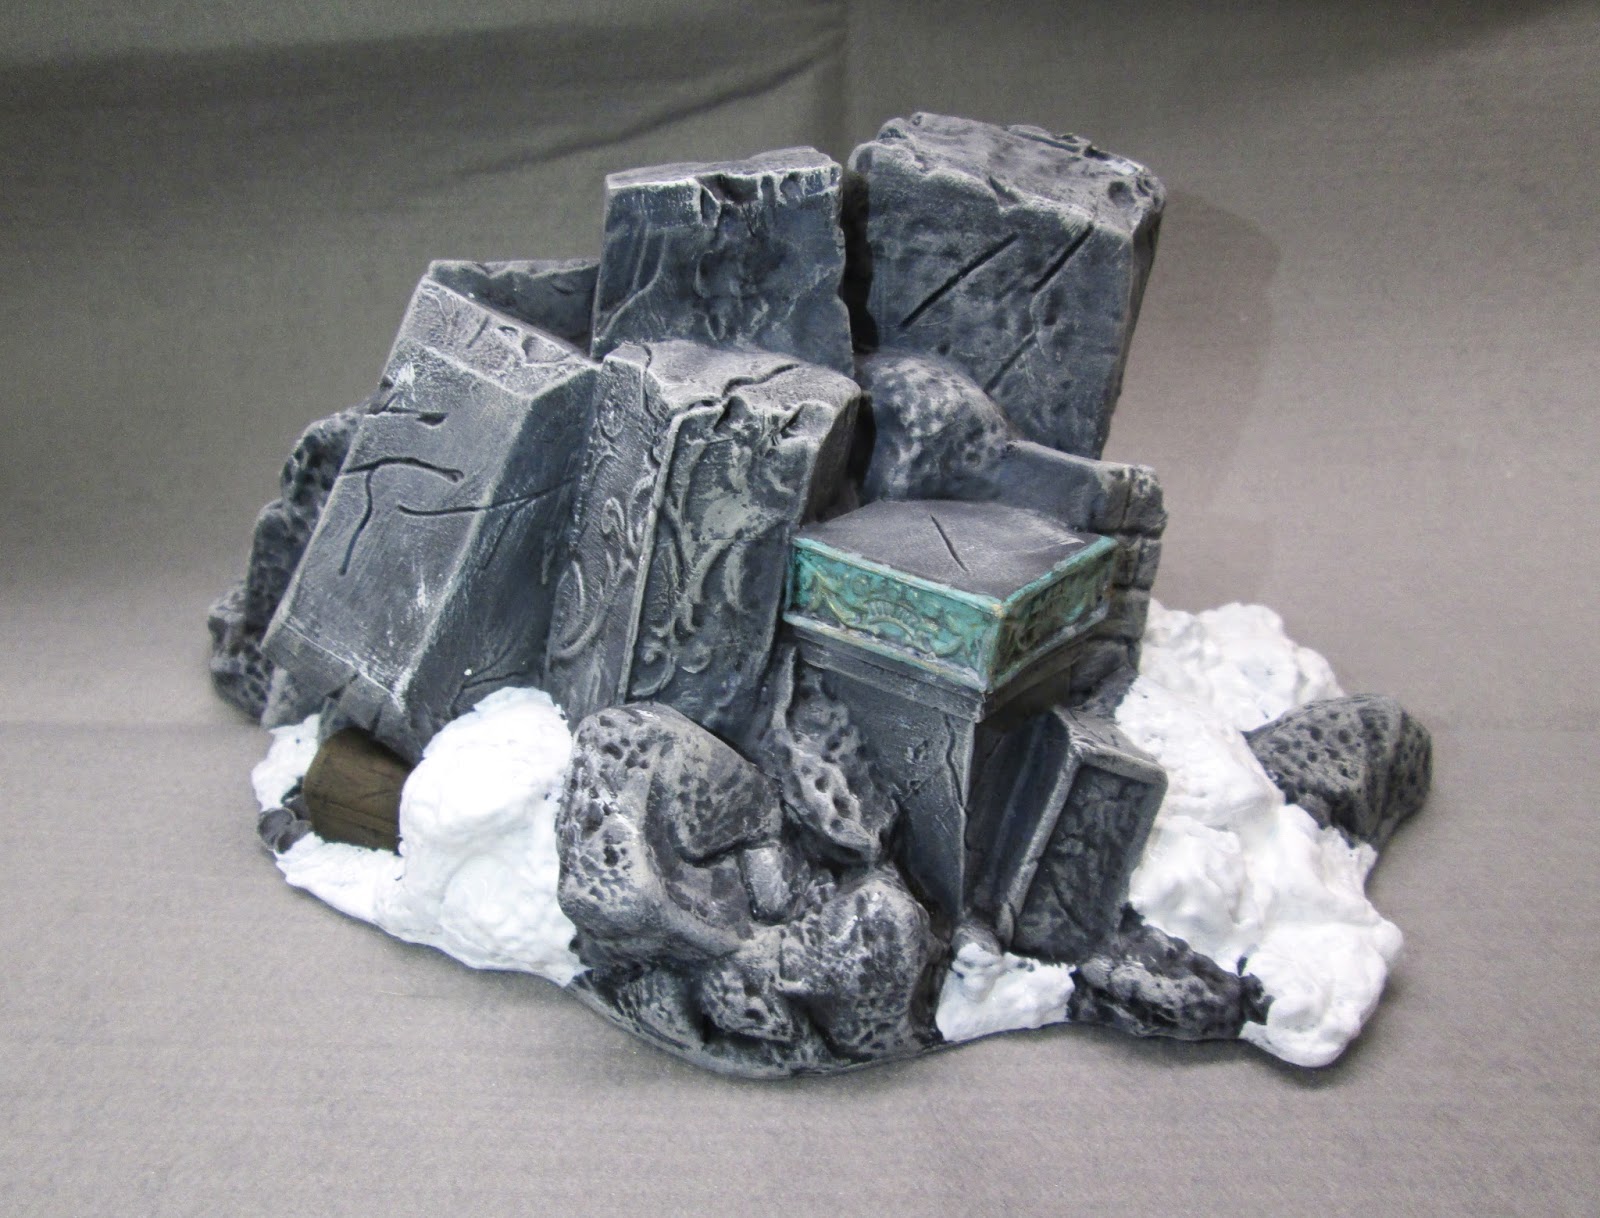
   I then began easing into the project by painting the base.  I felt if I could establish a color palette I liked on the base, it would help me decide which direction to take the figure.  I painted various mottled areas using Folk Art "Baryard Red", Americana Terra Cotta, and Ceramcoat "Territorial Beige"; applying one color right after the other while they were still wet so they would lend together a bit.
When these colors were dry, I applied some white glue to the areas that were the plain surface of the CD, and then sprinkled the glue with a mix of regular course sand, and a reddish-orange decorative sand.   When that was dry, I gave the entire base a wash with Citadel "Agrax Earthshade" wash using a wet brush.
   When the wash was dry, I drybrushed the base with Americana Shading FLesh", Folk Art "Butter Pecan", Folk Art "Almond Parfait", and lastly, Americana "Bleached Sand".
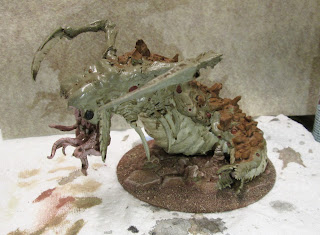
    I then started work on the big worm itself.  First, I painted the underbelly with the "Bleached Sand".  I then painted the crusty rock-like bumps on its back with the "Terra Cotta", and the pustule like citcles running alng the sides with the "Barnyard Red".
     Next, I painted the two large scythe-like talons, as well as the little ones running down the side with Folk Art "Gray Green" .  I also used this color to pint the two blade-like protrusions on each side of the mouth, and the four covering its little anus.   I then painted the tentacles and mouth with Apple Barrel "Apple Light Pink", and his eyes with Black.  I also used the Black to paint the very back of his mouth, blending it with a little of the "Apple Light Pink" to try and create the illusion of a receding hole down his gullet. I folllowed this with painting the teeth with Americana "Buttermilk"
    At this point I deiced to go ahead and glue it to the base, as I was having trouble holding it and either wearing off the dry paint, or putting my fingers in areas where it was still wet.   Once the glue had a while to dry, I gave the entire figure a wash with the "Agrax Earthshade" using a wet brush.
     When the wash was dry, I began the final drybrushing of the highlights.  I drybrushed his back with a mix of Accent "Golden Oxide" and the "Buttermilk", and then drybrushed the bulk of the body with a mix of Americana "Khaki Tan" and Crafter's Acrylic "Light Antique White".   I then mixed a bit of the "Barnyard Red", and the "Apple Light Pink", and used that to paint highlights on the pustules. I highlighted the mouth and tentacles with a mix of the "Apple Light Pink" and the "Light Antique White"; and the highlighted the talons, and the mouth and anus blades,  with a mix of the original "Gray Green", and the "Light Antique White".  I also highlighted the teeth with the "Light Antique White".  Lastly, I used White to add tiny reflective dots to the eyes.
     After the figure had overnight to dry, I gave it a coat of Ceramcoat "Matte Varnish".   The next morning I sprayed the figure with Testor's Dullcote.  
John Carter and Dejah Thoris battle a strange creature from the Barsoomian wastes.
     Note: the colors appear a little washed out in these photos.  I think it may have been the lighting I used, or the fact that the background cloth was relatively dark.


     I'm really happy with how this big fella came out; and have an increased confidence in tackling these big miniatures.  Which is good considering I have a number of them coming up in the not-too-distant future in the Bones I painting queue.

Monday, August 22, 2016

Undertaker and Oswald the Overladen: Figures 238 & 239 of 266

This past weekend I finished up the Townsfolk set by painting both the Undertaker, and Oswald the Overladen, figures.  This set now joins the list of Completed Sets over on the right.
     I prepped the figures in the usual way; soaking them in a dish of water with a couple drops of dish- soap added, then giving them a light scrub with a soft toothbrush, and then rinsing and drying them.  I then glued Oswald to a white-primed 1" fender washers with Aleene's Tacky glue (as I planned to use him for Frostgrave as a "Pack Mule" type soldier as introduced in The Thaw of the Lich Lord supplement), and the Undertaker to a black primed 1" fender washer.  I then glued the washers to a pair of tongue depressors with a couple drops of the Elmer's glue each.
     I started with the Undertaker.
     I began by painting the figure entirely with Black.  I then drybrushed it with Citadel "The Fang", and then did lighter drybrushed highlights with Folk Art "Cloudy Day". I then painted his face with Folk Art "Milkshake".
     Next, I painted his gloves with Nicole's "Brown", his socks with Americana "Neutral Grey", and the shovel handle with Folk Art "Barnwood".   I then applied some Iron Wind Metals "Yellow" ink to the panes of his lantern.  When that was dry, I added a little Iron Wind Metals "Orange" ink around the edges of the panes.
    I then painted some Citadel "Agrax Earthshade" wash on his face, gloves, and shovel handle using a wet brush.   When the wash was dry, I painted his eyes.  I also painted some rust on his shovel handle and head using  first Americana "Raw Umber", and then some thinned Crafter's Edition "Spice Brown".  While I had the "Spice Brown" out, I used it to highlight his gloves.
     Next, I did highlights on his face with the "Milkshake", and then finished off the rust effects by adding some thinned Ceramcoat "Raw Sienna". AFter that, I lightly drybrushed the head of the shovel with Folk Art Metallics "Gunmetal Grey".  I then used Crafter's Acrylic "Daffodil Yellow" to highlight the eyes in the lantern's skulls, and then I used it to do a light drybrushing down the figure's front to create a simple Object Source Lighting (OSL) effect.
          I let the figure sit all day, and that evening I gave it a coat of Ceramcoat "Matte Varnish".  The next morning I flocked his base with a mix of sand and dried coffee grounds; and when the Oswald figure was finished, I sprayed them both with Testor's Dullcote.


     Next, I painted Oswald the Overburden.
    I began by giving the figure a wash with thinned Reaper "Grey Liner" to help delineate all the things he had packed on him.
     I then used the "Milkshake to paint his face, Folk Art "Grey Green" to paint his shirt, and the "Brown to paint his jacket.  I then painted the collar with Americana "Terra Cotta", and his pants with the "Neutral Grey".
     Next, I painted his hat with Reaper MSP Bones "Cinnamon Red", and then painted his boot with Crafter's Acrylic "Cinnamon Brown".  I painted his gloves with Americana "Zinc", and then painted the large pouch hanging at his waist in the front with Ceramcoat "Territorial Beige".
     I then began to paint all the various objects hanging from poor Oswald.  I didn't keep track of what colors, as I was grabbing them here and there from my painting table.
     After I was done, I gave the entire figure a wash with Citadel "Agrax Earthshade" wash using a wet brush.  When the wash was dry, I painted in his eyes and then highlighted his face with the "Milkshake".
     I highlighted his hat with Americana "Cadmium Red", and his shirt with the original Grey "Green".  Next, I highlighted his collar with Accent "Golden Oxide", his jacket and boots with Americana "Sable Brown".  I then highlighted his gloves and his pants with Folk Art "Rock Grey".  I did a little highlighting on the various objects he's carrying, but mostly  I let the wash suffice to add contrast.   Lastly, I painted his base White.
     When everything had overnight to dry, I gave the figure a coat of Ceramcoat "Matte Varnish" early the next morning.  Midday, I flocked the white areas with Woodland Scenics "Snow" flock and the next morning I sprayed the figure with Testor's Dullcote.
     I'm happy how these two figures turned out, and am happy to have another set under my belt.  Next up is the Dark Heroes set.  I'm going to try and start posting Bones 1 figures on both Monday and Thursday in effort to really push through these last remaining few sets before the year ends.

Thursday, August 18, 2016

Michelle, Female Human Ranger

   I ordered this figure a while back to round out an order from Reaper to qualify for the free shipping.  With the death of my Treasure Hunter Jack2 in last months Frostgrave game, it was time to paint up a new one; so I grabbed this one to use.
  The first thing I did was trim down the sword in her left hand, so it resembled a dagger a little bit more; thus better fitting the official Treasure Hunter description.  I then prepped the figure in the usual way; soaking it in a dish of water with a couple drops of dish- soap added, then giving it a light scrub with a soft toothbrush, and then rinsing and drying it.  I then glued the figure to a white-primed 1" fender washer with Aleene's Tacky glue, and then glued the washer-mounted figure to a tongue depressor with a couple drops of the Elmer's glue.
     I then gave her a wash with Reaper "Grey Liner" using a wet brush to help me see all the pieces of her outfit better.
   I began painting by doing her face with GW "Bronze Flesh".  I then painted her tunic with Ceramcoat "Black Cherry", and her under-shirt with Crafter's Acrylic "Bright Blue".
     Next, I painted her leather armor with Citadel "Snakebite Leather", and painted on gloves using Folk Art "Dapple Gray".
   At this point I started to feel that she might need a little something extra to sell the idea of being a treasure hunter, so I took one of the rope coils from the Frostgrave Soldiers boxed set from North Star, and sprayed it with flat white spray paint.   I then filed away an area of paint on her left hip, and used super glue to glue the rope coil in place.
    I painted the rope coil with Folk Art "Butter Pecan", and after it had a while to dry, I gave the whole figure a wash with Citadel "Agrax Earthshade" wash using a wet brush.  When the wash was dry, I painted her cape with Crafter's Acrylic "Navy Blue" and her hair with Black.  I let the cape dry a bit, and then I gave it a wash with Citadel "Nuln Oil" wash using a wet brush.  I then painted her eyes.
After her eyes, I painted her lips with a mix of GW Vermin Brown, Americana "Shading Flesh", the "Bronze Flesh", and Crafter's Acrylic "Flesh".  I  then highlighted her skin with a mix of the "Bronze Flesh" and "Flesh".  Next, I highlighted her hair with Citadel "The Fang", and then did lighter highlights with FolkArt "Cloudy Day".   I highlighted her cape with Americana "True Blue", and then highlighted her under-shirt with a mix of the "Bright Blue" and "White".  After that I highlighted her tunic with Americana Cranberry Wine", and then added a little Crafter's Acrylic "Tutti Frutti" to the "Cranberry Wine" to do lighter highlights.  Next, I highlighted the rope coil using a mix of Americana "Khaki Tan", and Americana "Bleached Sand".  Then I highlighted her leather armor using a mix of the base "Snakebite Leather", and Ceramcoat "Maple Sugar Tan", and did her gloves using a mix of the "Dapple Gray" and Folk Art "Gray Green".  Then I painted both her sword and dagger with Americana "Zinc".  When dry, I painted them again with Folk Art Metallics "Gunmetal Grey", and also used this color to paint all the buttons on her cape.  I then highlighted the sword, dagger, and buttons with Folk Art "Silver Sterling".
     Lastly, I painted the figures base with White.  When everything had overnight to dry, I gave the figure a coat of Ceramcoat "Matte Varnish" early the next morning.  Midday, I flocked the white areas with Woodland Scenics "Snow" flock and the next day I sprayed the figure with Testor's Dullcote.
   
     I'm happy with how my new warband member came out, but a bit surprised at how similar her skin tone ended up looking to her leather armor.  Considering I used totally different paints, both base coat and highlights, it is an unexpected, and unfortunate, close match.

Monday, August 15, 2016

Orc Hunters: Figures 234-237 of 266

   This past week I finished up the last four figures from the Orcpocalypse Add-On set; the Orc Hunter figures.  This set now joins the list of completed sets over on the right.
      I prepped these figures in the usual way,  washing them in some dish soap, lightly scrubbing them with a soft toothbrush,  and then letting them dry.  Then, like with the other figures from this set, I did  conversions to some of them.  Looking at the row below: The first orc had the right forearm from one of the Bones Gnolls added, and the left forearm from a GW Ogre. The second has had his hands drilled out and a cut-down GW lance added.  The third orc has had the sword blade from one of the previous Bones Orc conversions added in place of the original spear head.   The fourth orc is an untouched original, droopy spear and all.  Note that any hard plastic part I was using, I pre-primed with flat black spray paint before gluing it on.  Also, I used Gorilla Super Glue to affix all conversions.
       After the conversions were done, I glued the four onto black primed 1.25 inch fender washers using Aleene's Tacky glue.  I then glued them onto a tongue depressor, for ease of painting, using a couple drops of Elmer's white glue each.
   I began by painting them entirely Black; and then when the Black was dry, I drybrushed them entirely with Folk Art Metallics "Gunmetal Grey".
 I then painted their skin with with Aleene's "Deep Khaki".  Next, I painted their cloth "skirts" hanging under the chainmail: Orc one with Crafter's Acrylic "Orange Spice", Orc two with Americana "Neutral Grey", Orc three with Black, and Orc four with Folk Art  "Dapple Grey".
    Next, I painted the boots of the first two, and then belt and neck straps of the second two, with Americana "Raw Umber".   I then painted the belts and neck straps of the first two, and the boots of the second two, with Black.  After that, I painted all the forearms wraps and straps with Anita's "Burnt Sienna", and on the first Orc I painted the bones on his right forearm as well as his morning star's handle with FolkArt "Barn Wood". I then painted the cord holding the bones to his wrist guard using Ceramcoat "Territorial Beige".  I painted all the spear shafts with Crafter's Acrylic "Cinnamon Brown", and the streamer coming off the third Orc's spear with Reaper MSP Bones "Cinnamon Red". I painted all their teeth with Americana "Buttermilk".
     I let everything dry for a while, then I gave them all a complete wash with Citadel "Agrax Earthshade" wash using a wet brush.  When the wash was dry, I painted their eyes, using the "Buttermilk" for their "whites", and then I highlighted their teeth with Crafter's Acrylic "Light Antique White".
    Next, I highlighted their skin with some of the "Deep Khaki" mixed with a little Aleene's "Dusty Khaki".  I highlighted the tops of the spear shafts with Folk Art "Dark Brown".  I then worked on highlighting their "skirts": for Orc one I used the "Orange Spice" mixed with a little Americana "Tangerine", for Orc two I used Folk Art "Rock Gray", for Orc three I used Citadel "The Fang", and for Orc four I used some of the "Dapple Grey" mixed with a little Folk Art "Gray Green".  I highlighted the streamer hanging from the third Orc's spear using Folk Art "Deep Tomato Red".  On the first orc, I highlighted the bones on his wrist guard and morning star handle with Americana "Bleached Sand".  Finally, I went back and did highlights on all the metal using Folk Art "Silver Sterling".
     After everything had dried overnight, I gave the figures a coat of Ceramcoat "Matte Varnish" and, when dry, flocked their bases.  Another overnight dry, and I sprayed them with Testor's Dullcote".
      I'm happy how they turned out, and happy to have completed this big set.  Below is a picture of all the Orcs from the Bones I Core Set and the Orcpocalypse Set.

Thursday, August 11, 2016

Kalladrax: Bones I Dragon as Frostgrave Terrain Piece

   A while back I saw a thread on the Reaper Forum, where the poster was painting up his Kalladrax undead skeletal dragon to use as Frostgrave terrain; and I thought that it was a really cool idea, and I decided I wanted to do the same for my Frostgrave games as well.  So, I picked up a copy of Kalladrax on eBay and this past week I got started on the project.
   I prepped the figure in the usual way; soaking all the pieces in a large bowl of water with a couple drops of dish-soap added, then I gave them a light scrub with a soft toothbrush, and then rinsed and dried them.  I then glued the body, head, and legs together.  I also glued one of the tail sections to the spiked tail end.  The model comes with about 2' of tail in three sections, which I thought was way too long for my purposes; so I set the longest of the three sections aside to test painting schemes on.  Below you can see my experimentation.  I decided to go with the one on the left which was Anita's "Baby Blue", followed by a Citadel "Nuln Oil" shade wash. Then when the wash was dry, I drybrushed with Americana "Bleached Sand", Crafter's Acrylic "Light Antique White", and White.

      So I began by painting all the dragon's bones with Anita's "Baby Blue".
 I then gave everything a wash with Citadel "Nuln Oil" shade wash using a wet brush.
     I then began the drybrushing of the skeleton; first with the "Bleached Sand", then the "Light Antique White", and lastly plain White.
    I painted the dried and rotting wing remnants with Folk Art "Poppy Seed", and then painted the talons and tail spikes with Citadel "The Fang".  When everything was dry, I drybrushed the wings with Folk Art "Gray Green", and then with Folk Art "Celadon Green".  I then drybrushed the tail spikes and talons with Folk Art "Cloudy Day".

I used Black to paint the holes in the skull and in between the ribs.  I then painted the horns an claws with "The Fang", and drybrushed with "Cloudy Day".

    I painted the stonework on the base with DecoArt Traditions "Dark Grey", and then painted the head, and the border on the pillar behind the head, with Ceramcoat "Turquoise".   The treasure chest I painted with DecoArt Traditions "Raw Umber".  When that all was dry, I gave everything a wash with Citadel "Nuln Oil" shade using a wet brush.
  When the wash was dry, I drybrushed the ruins with  Crafter's Acrylic "Storm Cloud Grey", and then Folk Art "Platinum Grey", and lastly some of the "Light Antique White".   Next, I gave the "bronze" pieces a wash with some of the "Celadon Green" which I heavily thinned.  When this wash was dry, I lightly drybrushed those sections with Ceramcoat "Bronze".


     Lastly, I painted everything with White that hadn't been painted yet (That is, all the "snow" areas).  When that was dry, I brushed the White areas with Elmer's white glue, and applied Woodlands Scenic "Snow Flock".
     I was concerned about the whole weight of the dragon being supported on two spindly legs, so I drilled a hole in the top of the ruins and inserted a small section of acrylic rod to help support the dragon's belly.
 I then glued all the parts together using Gorilla Super Glue.  I applied a few Water Effects icicles to the piece before I realized that I hadn't given it its final spray of Dullcote.  I will probably apply some more icicles once I do that, but the weather has been too humid here to do a lot of spraying lately.
(As always, you can click on any photo to see it larger.)


     I'm really happy with how this piece came out.  I think it will be quite the show-stopper when used as the centerpiece on my Frostgrave table at upcoming conventions.