Monday, August 31, 2020

Rockmaw: Bones 4 Darkreach Figure

      This past week I painted the "Rockmaw" from the Bones 4 Darkreach Expansion. 
      I prepped the "Rockmaw" in the usual way, soaking the pieces in a dish of water with a couple drops of dish-soap added; then giving the pieces a light scrub with a soft toothbrush, and then rinsing and drying everything.  I then glued the arms and mouth into place using Gorilla Superglue gel. I then glued the figure to a brown-primed 1.5" fender washer using Aleene's Tacky glue, and then glued the washer to the top of a large pill bottle with a couple drops of Elmers white glue.
     As I was prepping this figure I became aware of some really unfortunate mold line issues, where the lines ran directly down the center of legs perpendicular to the ridges sculpted into the legs.  This would make completely removing these lines a laborious task, one I wasn't willing to undertake.  So I did the best I could to scrape them down a little, then I got on with the panting. 

     I began by painting the figure entirely with Ceramcoat "Charcoal".   When that was dry, I drybrushed the entire figure with Folk Art "Dapple Grey".  I ended up applying the drybrushing too heavily, obscuring the ride deffiniton on the legs, so I went back and gave the entire figure a coat of  Citadel "Nuln Oil" wash to redefine the ridges.
     When the wash was dry, I re-applied the "Dapple Grey" drybrushing to the whole figure.  I then gave a lighter drybrushing of  Americana "Jade Green" to the figure.  After that, I painted the claws and toenails with Folk Art "GrayGreen", the teeth with Americana "Antique White", and the eyes with  Crafter's Acrylic "Daffodil Yellow".  I then went back and directly painted the center of each leg ridge, and some of the bumps on the body and arms, with the "Jade Green", to give each a brighter central highlight.
    Next, after everything had dried a while, I gave the claws and toenails a coat of the "Nuln Oil" wash, and then gave the teeth a coat of Citadel "Agrax Earthshade" wash.  After that, I used some Reaper MSP "Grey Liner" to outline the eyes and help define them.
     When the washes and liner were dry, I highlighted the claws and toenails with the base "Gray Green", and then mixed in a little Americana "Dove Grey" to give a lighter highlight.  I then highlighted the teeth with the base "Antique White", and blended up to some "Americana "Bleached Sand" at the top of each tooth. After that, I painted Ceramcoat "Black" pupils in each eye and added an Americana "Snow White" reflective dot in each eye.   
     I let the figure dry overnight and the next day I gave it a coat of Americana "DuraClear Matte" varnish. I then used some white glue to glue some fine sand to the base.  When the sand was dry, I painted it with a coat of Americana "Charcoal Grey". When this was dry, I drybrushed the sand with the "Mississippi Mud", and then with some Apple Barrel "Rock Grey"; lastly I drybrushed it with a little Americana "Dove Grey".
      Another overnight dry, and I sprayed the figure with Testor's Dullcote". When the "Dullcote" was dry, I went back and repainted the eyes with a little Americana "DuraClear Gloss" varnish.


     I'm happy with how this beastie turned out, despite the mold-line issue.  The shape and textures made it an interesting challenge over the usual humanoid shaped monster.

Monday, August 24, 2020

Phase Cat: Bones 4 Darkreach Figure

     This past week I painted the "Phase Cat" translucent figure from the Bones 4 Darkreach Expansion.
      I prepped the figure in the usual way, soaking it in a dish of water with a couple drops of dish-soap added, then giving it a light scrub with a soft toothbrush, and then rinsing and drying it.  I then glued the figure to a brown-primed 1.5" fender washer with Aleene's Tacky glue, and then glued the figure to a tongue depressor with a couple drops of Elmer's glue.
     When I set out to paint his figure, my plan was to try and give it a black wash to provide shadows and still retain some of the purple translucency.   So, first thing I did was paint the entire thing with Americana "DuraClear Matte" varnish to give the wash something to cling to.  I then got the idea to try my Citadel Contrast paint to see if that would work to give a thicker  covering yet still pool enough into the recesses and recede enough from the high points to give me the effect I was looking for.  The initial coat ended up giving an uneven covering and dried really splotchy, not really flowing well over the matte varnish coat.  I tried applying a second coat which didn't improve things much.  Also, by that time the figure was really dark and virtually opaque over most of its body.  So, at that point I just threw in the towel and painted the whole thing, except the ends of the tentacles (which I had left bare to begin with), using Ceramcoat "Black", abandoning the hope of making the whole thing partially transparent.
     Next, I applied a wash to end of the tentacles using Iron Wind Metals "Purple" Ink.   I then did a drybrushing over the body and tentacle shanks using Crafter's Acrylic "Purple Passion".  I also used the color directly to paint on some highlights more directly on the head, claws, and where the tentacles meet the body. Next, I mixed the "purple Passion" with a lighter purple from a Reaper MSP S"sample" bottle I have, and repeated the process.  Lastly, I hand applied some point highlights using Apple Barrel "Apple Lavender". I also drybrushed a little of this over the end tentacle pads (which were dry by this time). 
        I then painted his eyes with Crafter's Acrylic "Daffodil Yellow", and gave them "Black" pupils.   After that, I painted his tongue with Crafter's Acrylic "African Violet", then painted his teeth with  Americana "Bleached Sand".  And, lastly, I painted his base with Americana "Mississippi Mud". 
         I let the figure dry overnight and the next day I gave it a coat of Americana "DuraClear Matte" varnish.    Then, when  the varnish was dry, I used some white glue to flock the base.  Another overnight dry, and I sprayed it with Testor's "Dullcote". 


     Well, there it is.   I'm not too thrilled with how it turned out, but in the end the figure just didn't inspire me.

Monday, August 17, 2020

Goblin Champion: Bones 4 Figure

     This past week I took a break from working on Darkreach and painted the "Goblin Champion" from the Bones 4 Goblin Heroes set.  I had plans of painting all three of the Goblins for the Goblins Heroes set at the same time, so I had prepped  the figures in the usual way, soaking them in a dish of water with a couple drops of dish-soap added, then giving them a light scrub with a soft toothbrush, and then rinsing and drying them. I then had glued them to 1" brown-primed fender washers with Aleene's Tacky glue.  I then had glued the washers onto a tongue depressor with a couple drops of Elmer's white glue.
       I already painted the Goblin Bodyguard from this trio recently, and as I mentioned in that article, I had began by painting all their exposed skin areas with Citadel Contrast "Snakebite Leather".  Then, as I was studying them, I had realized  they really weren't similar enough to paint as a group, and so I popped them off the tongue depressor.   I now had reattached the Champion to a pill bottle with some blue tac.  After that, I painted his kilt? with Pathfinder MSP "Urgathoa Red", his boots with Citadel Contrast "Wyldwood",and his neck piece with Americana "Antique Gold".
     Next, I painted his pouch with Americana "Charcoal Grey", and his wrist guards with Americana "Light Cinnamon".  After that, I painted his blanket roll with Crafter's Acrylic "Forrest Green", and the leather wrap on his sword blade with Americana"Terra Cotta".
     I then painted his belt with Folk Art "Dark Brown", and the bone hanging from it with Americana "Antique White".  After that, I  painted his sword and and belt buckle with Americana "Zinc", and the ties on his blanket roll with Americana "Sable Brown".  I went back then and repainted his sword and belt buckle with Folk Art Metallics "Gunmetal Grey".
     I let the figure dry for a while, and then gave all the clothing, accessories, and weapons a coat of Citadel "Agrax Earthshade" wash.  When the wash was dry,  I painted his eyes.  After that, since I felt his skin had come out rather splotchy from using the Contrast Paint on it, I tried blending it a bit with some Accent Golden Oxide.  I then used some Apple Barrel "Maple Sugar Tan" mixed with the "Golden Oxide". to highlight his skin.      After that, I painted his hair with Cermacoat "Black", and then highlighted it with, first, Ceramcoat "Charcoal", and then a little Americana "Zinc".
      Next, I highlighted his kilt with Reaper MSP HD "Rusty Red", and then highlighted his neck piece with Americana "Primary Yellow".   I followed by highlighting the wrap around his sword blade with Accent "Mustard Seed", and I highlighted his pouch with Folk Art "Dark Brown".  After that, I highlighted his wrist guards with Americana "Light Cinnamon".
     I then highlighted his belt with Ceramcoat "Territorial Beige", and the bone hanging from it with Americana "Bleached Sand".   Next, I highlighted his blanket roll with Americana "Jade Green", and the ropes tying it with Americana "Khaki Tan". I wrapped things up by highlighting his sword and belt buckle with Ceramcoat "Metallic Silver".   Lastly, I painted his base with the "Mississippi Mud".
         I let the figure dry overnight and the next day I gave it a coat of Americana "DuraClear Matte" varnish.    Then, when  the varnish was dry, I used some white glue to flock the base.  Another overnight dry, and I sprayed it with Testor's "Dullcote".

     I'm happy with how this guy turned out.  I love his expression, disheveled shock of hair,  and gesture of defiance.

Monday, August 10, 2020

Dark Elf Wizard: Bones 4 Darkreach Figure

     This past week I painted the "Dark Elf Wizard" from the Bones 4 Darkreach Expansion.  This is the last of the Dark Elf figures I had left to do from this expansion.
      I prepped the figure in the usual way, soaking it in a dish of water with a couple drops of dish-soap added, then giving it a light scrub with a soft toothbrush, and then rinsing and drying it.  I then glued the figure to a brown-primed 1" fender washer with Aleene's Tacky glue, and then placed the figure in my painting grip.
(I forgot to take a photo before I started painting, so here is the one from the Reaper online store.)

     I began by painting the wizard's armor with Ceramcoat "Black".  When dry, I drybrushed the armor with Folk Art Color Shift "Black Flash".   When the "Black Flash" was dry,  I went over it again with a drybrush of  "Folk Art "Pure Gold".  After that I painted the face and hands with Reaper MSP "Dark Elf Skin".
     Next, I painted his under-robes with Crafter's Acrylic "Storm Cloud Grey", and then his over-robes and the outer layer of his cape with the "Black".  After that, I painted the triangular panels on the front of his robes with Reaper MSP "Coal Black", and then the lining of his cape with Americana "Festive Green"
     I then painted his staff with Accent "Midnight Blue", and his hair with Americana "Grey Sky".  I followed that with painting his scroll holder, the fittings on his staff, and the decorations on the front panel of his robes with Americana "Antique Gold", and then the skull in the staff with Americana "Bleached Sand".   I then painted a spiderweb pattern on his under-robes using the "Black", and then went over it with Apple Barrel "Apple Lavender" leaving black edges to form an outline.  I felt it looked too pink, so I went over it again with Anita's "Violet"to try and make it look more purple.
     I still wasn't happy, and felt it was just too light in color, and combined with the green looked more merry than sinister.  So, I changed direction and tried Reaper MSP "Fresh Blood" for the webbing.  That looked much better, but I felt the red gave him a bit of a Christmasy looked when combined with the green.  So I returned to the idea of purple again, this time trying my darkest purple, Crafter's Acrylic "African Violet".  The black outlining was lost with the dark purple, but I finally felt it was looking like I wanted it to.   To finish up the base painting, I went over all the parts I had painted with the "Antique Gold" using Folk Art Brushed Metal "Brushed Bronze".
     I let the figure dry for a while, and then gave the entire thing a coat of Citadel "Nuln Oil" wash. Then, when the wash was dry, I painted the eyes, then highlighted the face, and hands, with the base "Dark Elf Skin", and some Reaper MSP "Dark Elf Highlight". 
         Next, I highlighted the under-robe with the "Grey Sky", and then went over the spiderweb pattern with some Folk Art Color Shift "Purple Flash".  After that, I highlighted the lining of the cape with Nicole's "Neon Green", and highlighted the over robes with Ceramcoat "Charcoal" and some Amricana "Zinc".
     I then highlighted the triangular panels on the front of the outfit, as well as the belt and pouches, using a mix of Ceramcoat "Denim Blue", Folk Art "Cloudy Day", and a little Crafter's Acrylic "Cool Blue".  Next, I moved around the outer part of the cape, and highlighted that with a mix of Apple Barrel "Apple Black Green", and the "Leaf Green". With the cape done, I highlighted the hair using Americana "Snow White".  
    After that, I highlighted the staff with Crafter's Acrylic "Navy Blue", and then highlighted the skull with Crafter's Acrylic "Light Antique White".  I moved to the metal parts of the figure next, highlighting them with Folk Art "Pure Gold", and Ceramcoat "Wedding Gold".  
     I wrapped things up by painting the large ring hanging from his belt with Folk Art "Metallic Amethyst".  I then attempted a glowing effect on the skull's eyes using the "Neon Green" and the "Snow White".  Lastly, I painted the entire base with Americana "Mississippi Mud".
      I let the figure dry overnight and the next day I gave it a coat of Americana "DuraClear Matte" varnish. I then used some white glue to glue some fine sand to the base.  When the sand was dry, I painted it with a coat of Americana "Charcoal Grey". When this was dry, I drybrushed the sand with the "Mississippi Mud", and then with some Apple Barrel "Rock Grey"; lastly I drybrushed it with a little Americana "Dove Grey".
      Another overnight dry, and I sprayed the figure with Testor's Dullcote".

          I'm pleased with how he turned out; and in the end, after a few false starts,  I'm happy with how the web pattern on his under-robe looks.  

     Here's a look at the whole group of Dark Elves from the Darkreach Expansion.

Monday, August 3, 2020

Deep Gnome Scout, and Deep Gnome Cleric: Bones 4 Darkreach Figures

     This past week I painted the "Deep Gnome Scout", and "Deep Gnome Cleric", from the Bones 4 Darkreach Expansion.  These were the last two of the Deep Gnomes from Darkreach Expansion that I had left to paint.
    I prepped the figures in the usual way, soaking the parts in a dish of water with a couple drops of dish-soap added, then giving them a light scrub with a soft toothbrush, and then rinsing and drying them. I then glued them to 7/8" brown-primed fender washers with Aleene's Tacky glue.  I then glued the washers onto a tongue depressor with a couple drops of Elmer's white glue.
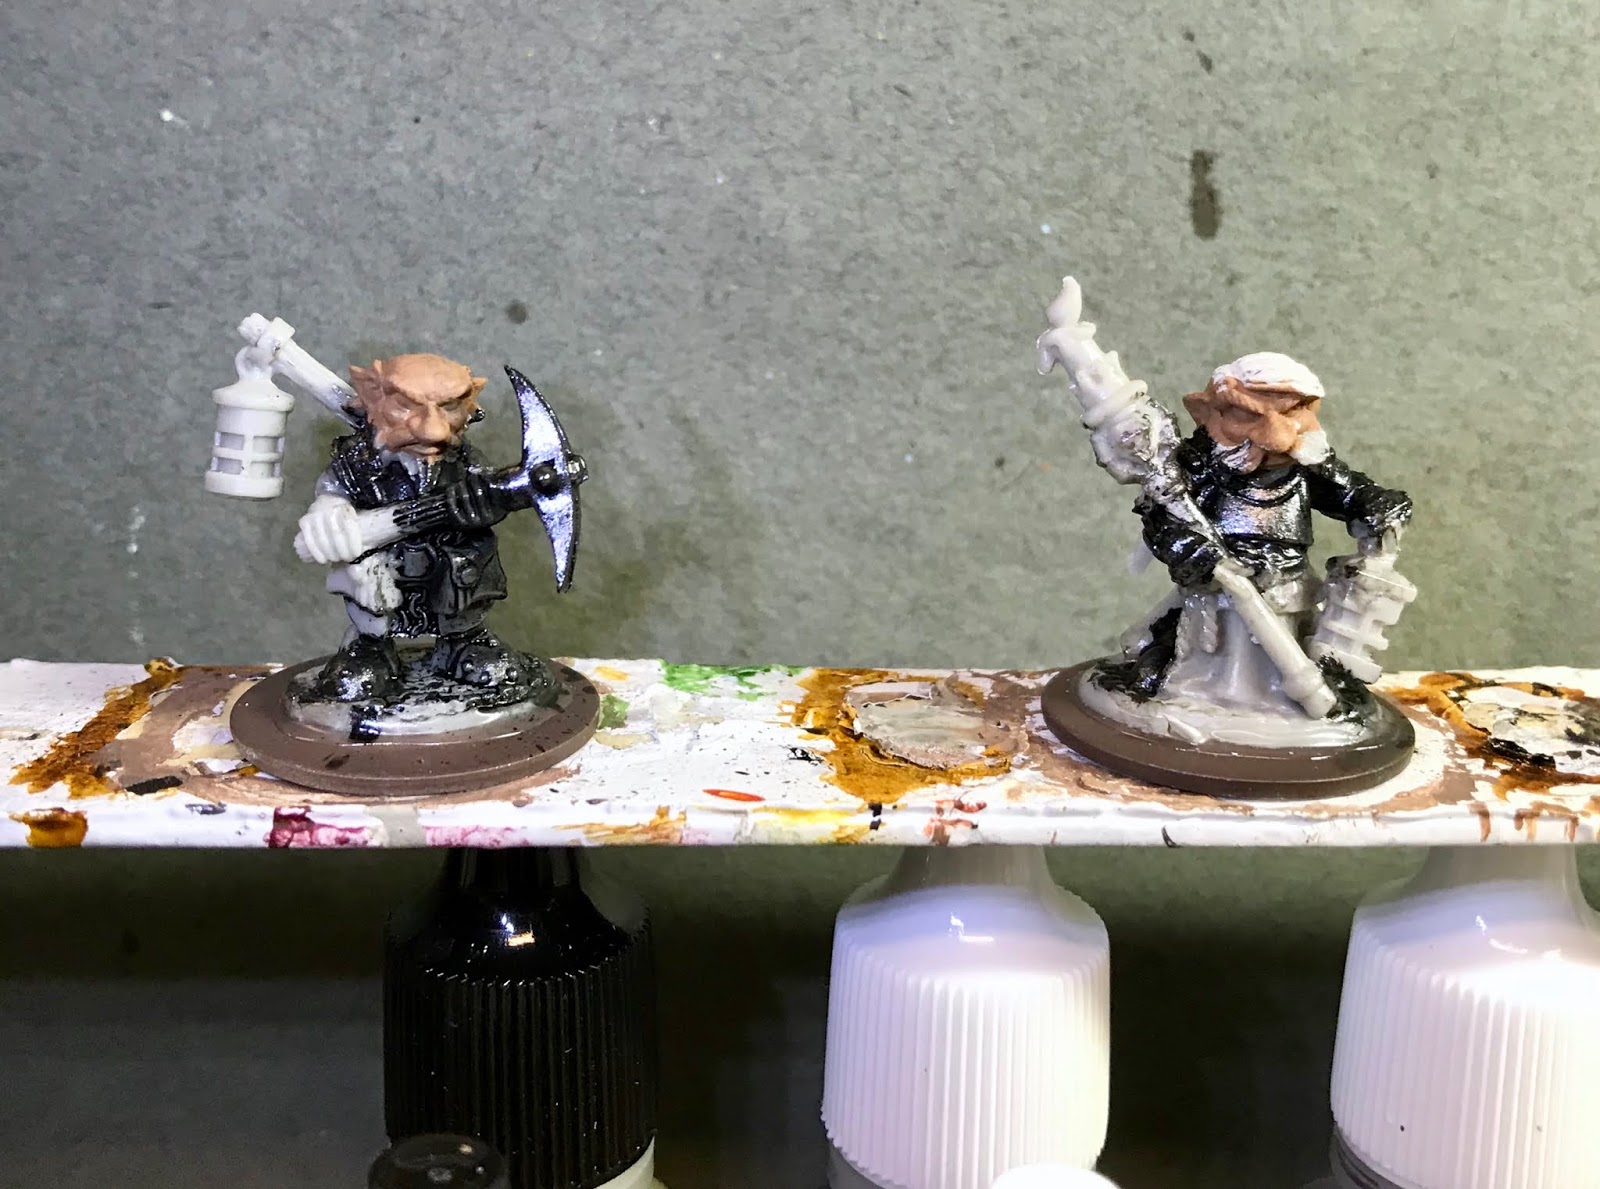
     I thought I'd try some quick brush-on zenithal priming on these guys, since they both had light sources, so I grabbed my Ceramcoat "Black".  I studied how the light from the Scout's lantern hit, and attempted to paint the shadow side with the "black".    I went to do it with the Cleric figure, but realized he had a light source on both sides, so was basically fully lit.
    I began by painting the figures armored area with the Ceramcoat "Black".  When the Black was dry, I drybrushed the armor with Folk Art Metallics "Gunmetal Grey".  I then painted their heads with Americana "Sable Brown".
     Next, I painted the Scout's tunic and the Cleric's under robe with Reaper MSP HD "Umber Brown", and I painted the Cleric's top shirt with Reaper MSP "Cinnamon Red".  I then painted both their gauntlets with Reaper MSP HD "Golden Brown", and I used the same color to paint the Cleric's lantern and the metal fittings on his candle holder.  After that, I painted their hair with Americana "Grey Sky".
   I then painted their belts and pouches with Reaper MSP "Turkey Brown",  and did the handles of their axes, as well as the pole holding the Scout's lantern, with Americana "Light Cinnamon Brown". Next, I painted the Scout's Lantern, and the Cleric's axe head with Americana "Zinc".   After that, I painted the Cleric's ropes with Americana "Fawn", his candle with Americana "Bleached Sand", and the gem in his candle holder with Reaper MSP "Fresh Blood".
     Next,  I painted the Scout's lantern, and the Cleric's axe head, with Folk Art Metallics "Gunmetal Grey", and did the Cleric's lantern and the metal bits on his candle holder with  Folk Art Brushed Metal "Brushed Bronze".  I let the figures dry for a while. and then gave their faces and ears a coat of Citadel "Reikland Fleshshade" wash.  When that wash was dry, I gave their clothes and weapon handles a coat of Citadel "Agrax Earthshade".  Another drying break and then I finished the washes by giving a coat of Citadel "Nuln Oil" wash to their hair, armor, and weapon heads.  When all the washes were dry, I painted their eyes, and then highlighted their skin with a mix of the base "Sable Brown", and Americana "Fawn".
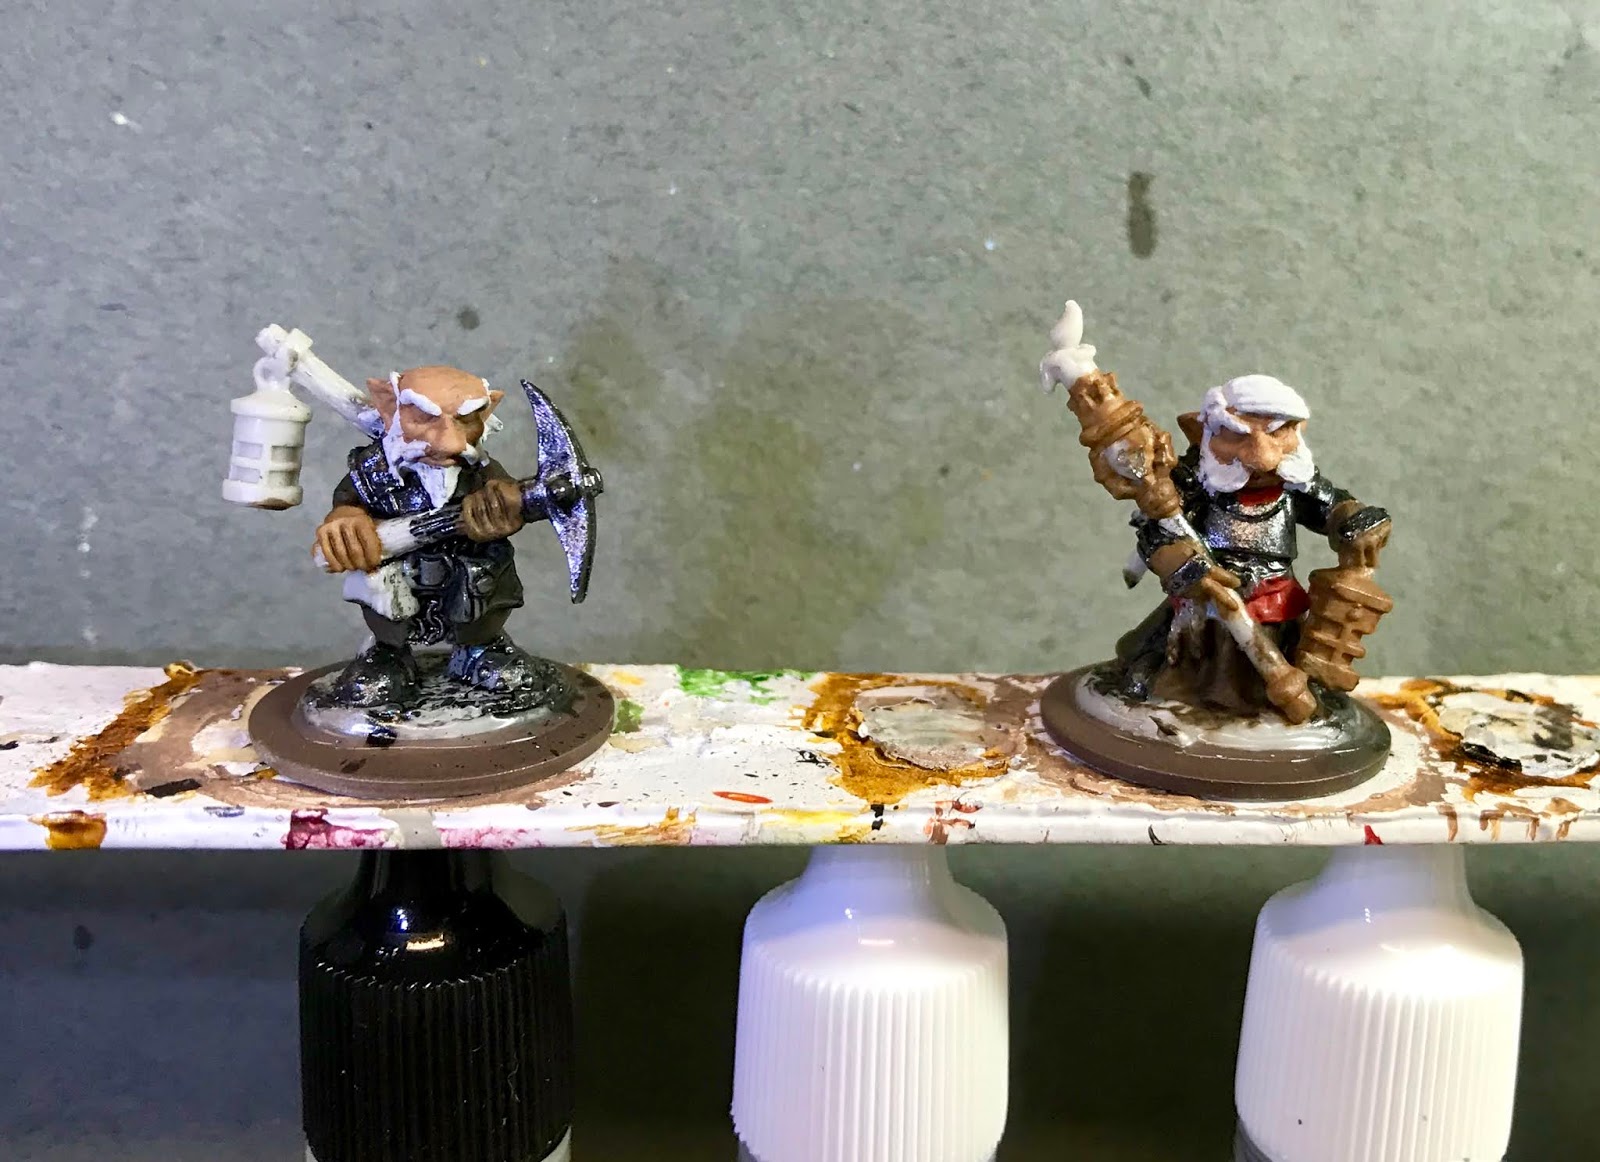
     I then highlighted their hair with Americana "Snow White", and then highlighted the Scout's tunic and the Cleric's under robe with Crafter's Acrylic "Cinnamon Brown".  After that, I highlighted the Cleric's top shirt with Reaper MSP HD "Rusty Red", their pouches and belts with Ceramcoat "Territorial Beige, and their gauntlets with Folk Art "Butter Pecan".
     Next,   I highlighted the Cleric's rope with the "Bleached Sand", and highlighted all the wood handles with Reaper MSP "Tanned Shadow".  I then highlighted the candle holder with Citadel "The Fang", and the candle with Crafter's Acrylic "Light Antique White".    After that, I worked on the metals, highlighting the Cleric's lantern, and the metal fittings on the candle holder, with DecoArt Dazzling Metallics "Bright Brass"; and highlighting the Scout's lantern, and all the armor and weapons, with Ceramcoat "Metallic Silver". 
     I then worked on the OSL, first painting the panes of the lanterns with Reaper MSP "Golden Glow".  I then used this color to drybrush and directly paint some reflective light onto the parts of the figures where I felt the light shown most directly.  Turning back to the light panes, I painted central hot spots in each paint using the "Snow White".  I felt they looked too washed out, and not vibrant enough, so I went back over each pane with some thinned Reaper MSP "Clear Yellow".  I liked that better, so I repeated adding the "Snow White" hot spots.    I then painted the candle, starting with a base of the "GoldenGlow", I then worked toward the flame tip, using first Reaper MSP "Hearth Fire", and then Reaper MSP "Holly Berry".  Lastly, I added highlights to the facet of the gemstone in the candle holder with a mix of the White and the some Reaper MSP "Holly Berry" .  I wrapped things up by painted both their  bases with Americana "Mississippi Mud".
      I let the figures dry overnight and the next day I gave them a coat of Americana "DuraClear Matte" varnish. I then used some white glue to glue some fine sand to their bases.  When the sand was dry, I painted it with a coat of Americana "Charcoal Grey". When this was dry, I drybrushed the sand with the "Mississippi Mud", and then with some Apple Barrel "Rock Grey"; lastly I drybrushed it with a little Americana "Dove Grey".
      Another overnight dry, and I sprayed the figures with Testor's Dullcote".  When the "Dullcote" was dry, I went back and repainted the gem with a little Americana "DuraClear Gloss" varnish.

     I'm really happy with how these to fellows turned out.   I'm not sure the initial attempt at a quick brush-on zenithal priming on these guys had any real effect in the end, but it was fun to try.  The OSL was quick and haphazard (I don't have the patience to do a real serious attempt), but in the end I think it gets the idea across.  
     And here's a shot of all the Bones 4 Deep Gnomes together.  I think they make a really nice group of characters.