Monday, January 27, 2020

Hivewarden: Bones 4 Dreadmere Figure

     This past week I painted a pair of the Hivewardens from the Bones 4 Dreadmere Expansion.  I saw these just as usable as Pulp Sci-Fi baddies as Fantasy creatures.
          I prepped the figures in the usual way, soaking them in a dish of water with a couple drops of dish-soap added, then giving them a light scrub with a soft toothbrush, and then rinsing and drying them.  I then glued them to 1.25" brown-primed fender washers with Aleene's Tacky glue.  I then glued the washers onto a tongue depressor with a couple drops of Elmer's white glue.
     I began by painting the main tentacles with Folk Art "Poppy Seed".  I then painted the brains with Crafter's Acrylic "Tutti Frutti", and the mouth tentacles with Americana "Charcoal".
     Next, I painted the backsides of the brains with Pathfinder MSP "Urgathoa Red", and then set the figures aside to dry for a while.  When I returned to working on them, I gave both the brains a coat of Citadel  "Reikland Fleshshade" wash.  When this wash was dry, I then gave all the tentacles a coat of Citadel "Nuln Oil" wash.
     When the final coat of wash was dry, I drybrushed the brains with some Reaper MSP "Brest Cancer Awareness Pink", and then went back with a brush and applied some direct highlights to the brain ridges.  Then I added a little Americana "Snow White" to the pink and did a little lighter drybrush.  Next,  I drybrushed the tentacles with Americana "Jade Green", and then a little Americana "Olive Green", and lastly some Americana "Margarita".  After that, I painted highlights on the mouth tentacles with some Americana "Grey Sky" mixed with some of the base "Charcoal"
       I then highlighted the backsides of the brains with Americana "Burgundy Wine".  Next, I painted the eyes with Americana "Bleached Sand".  I painted in irises with Accent "Forest Green", and then filled them in with Folk Art "Metallic Emerald Green", with some highlights using Folk Art Color Shift "Emerald Flash". Next, I added Ceramcoat "Black" pupils, and highlight dots with the "Snow White". Lastly, I painted the bases with Americana "Mississippi Mud".
     I let all the figures dry overnight and the next day I gave them a coat of Americana "DuraClear Matte" varnish.    Then, when  the varnish was dry, I used some white glue to flock the bases.  Another overnight dry, and I sprayed them with Testor's "Dullcote".   When the "Dullcote" was dry, I went back and redid the eyes, with a little Americana "DuraClear Gloss" varnish.


     Overall, I'm pretty pleased with how they came out.  There are mold lines that run around the equator of the brains, that were just terrible.  Normally I don't mess with mold lines to a big degree unless they are particularly obnoxious, but these really stood out; and being on the ridged surface of the brains they were almost impossible to deal with.  Also, the tentacles, being so intertwined as they are, were a real pain to paint and flock. Otherwise, these were fun figures to work on.

Monday, January 20, 2020

Dreadmere Mercenary: Bones 4 Dreadmere Figure with Citadel Contrast Paint

   This past week I painted one of the Dreadmere Mercenary figures from the Bones 4 Dreadmere Expansion.  For Christmas, a friend gave me a set of the new Citadel Contrast Paints, and I thought this figure with its plain and simple outfit would be a good one to try them out on. 
     I prepped the figure in the usual way, soaking it in a dish of water with a couple drops of dish-soap added, then giving it a light scrub with a soft toothbrush, and then rinsing and drying it.  I then glued the figure to a brown-primed 1" fender washer with Aleene's Tacky glue, and then placed the figure in my painting grip.
     It was my understanding that the Contrast Paint worked best over a primer coat, so I began by painting the figure with Ceramcoat "White".
     When the figure was dry, I painted the face and hands with Citadel Contrast "Guilliman Flesh". I then painted his pants with Citadel Contrast "Aggaros Dunes" and his tunic with  Citadel Contrast "Creed Camo".
     Next,  I painted his coat with  Citadel Contrast "Basilicanum Grey", and his boots and belt with  Citadel Contrast "Wyldwood".  After that, I painted his pouch with  Citadel Contrast 'Snakebite Leather", and the scabbard on his back with Citadel Contrast "Talassar Blue".
     I then painted his hair with Citadel Contrast "Skeleton Horde".  After that I did some work with my regular paints, painting the scabbard belt in his hand with Americana "Light Cinnamon", and the grip of the sword with Americana "Asphaltum".  I also painted the metal fittings on the sword and scabbard with Americana "Zinc".
     Next, I painted his eyes; and afterwards painted the buckles, clasps on his tunic and metal fittings on the sword and scabbard, all with Folk Art Metallics "Gunmetal Grey".  I then put a little Citadel Agrax Earthshade" wash on the scabbard belt, and after that I highlighted the metal bits with some Citadel "Mithril Silver".   Lastly, I painted his base with Americana "Mississippi Mud".
         I let the figure dry overnight and the next day I gave it a coat of Americana "DuraClear Matte" varnish.    Then, when  the varnish was dry, I used some white glue to flock the base.  Another overnight dry, and I sprayed it with Testor's "Dullcote".

     Hmmm...   I think it's okay, but I am not immediately won over.   I find the results to be splotchy and lacking the true, defined, shadows and highlights that my usual; painted base coat, dark wash, and painted highlights, method gives.  And maybe it's the colors I had to work with, but the figure looks tonally all the same mid range; I don't get a real sense of light and dark colors.
     That all being said, I think the figure came out looking perfectly serviceable as a gaming figure. And I want to experiment more with the Contrast Paint on different things like terrain and monsters.
     I will also say, that simultaneously with this figure, I was also using these paints on some mass-unit based figures,  and I think this is where these paints may shine.  The figures below were all Contrast Paint except the blue jackets, red facings, and the metal bits, and I think here is where this paint might find their purpose.  They made painting this assembly-line type of figure really easy to do; and grouped together on bases like this, where your eyes see the unit and not the individual, I think the paints really work to give a good fast and easy result.


Monday, January 13, 2020

Serena, Dreadmere Rogue: Bones 4 Dreadmere Figure

   This past week I painted Serena, Dreadmere Rogue, from the Bones 4 Dreadmere Expansion.   I prepped the figure in the usual way, soaking it in a dish of water with a couple drops of dish-soap added, then giving it a light scrub with a soft toothbrush, and then rinsing and drying it.  I then glued the figure to a black-primed 1" fender washer with Aleene's Tacky glue, and then placed the figure in my painting grip.
     I began by painting her face with Reaper MSP "Olive Skin", and then painted her arms and legs with Reaper MSP "Coal Black".  After that I painted her cape and hood with Accent "Midnight Blue".
     Next, I painted her tabard, gloves, and the blades of her weapons with Americana "Zinc".  I then painted her boots, belt, pouch, and the grips of her weapons with Ceramcoat "Black".  After that, I painted the little bags on her belt with Americana "Charcoal Grey", and then did some borders on her tabard with Reaper MSP "Fresh Blood".   I then did the rock she has her left foot on with Americana "Neutral Grey", and splotched it with a little Folk Art "Dapple Gray".
      I finished the base coating by painting the weapon blades with Folk Art  Metallics "Gunmetal Grey.  Then, after everything had a while to dry, I gave her face a coat of Citadel "Reikland Fleshshade" wash.  When that was dry, I gave the rest of the figure a coat of Citadel "Nuln Oil" Wash".  When the washes were dry, I painted her eyes, and then highlighted her face with Reaper MSP "Olive Highlight".
     Next, I highlighted her sleeves and legs with Citadel "The Fang", and highlighted her tabard and gloves with a mix of the base "Zinc" and some Americana "Grey Sky".  I then highlighted her cape with Americana "Wedgewood Blue", and highlighted the borders on her tabard with Reaper MSP "Holly Berry".
I finished up the highlights by doing her boots, belt, pouch, and grips with Folk Art "Medium Grey", and then the little bags on her belt with Americana "Mississippi Mud". I then highlighted her blades with Citadel "Mithril Silver".  Lastly, I painted the entire base with the "Mississippi Mud".
         I let the figure dry overnight and the next day I gave it a coat of Americana "DuraClear Matte" varnish.    Then, when  the varnish was dry, I used some white glue to flock the base.  Another overnight dry, and I sprayed it with Testor's "Dullcote".


     I'm really happy with this one.  The face and eyes, being mostly covered, were a challenge; but in the end I think they turned out ok.

Monday, January 6, 2020

Sophie the Sage Christmas Ornament Project: Bones 3 Figure

     Happy New Year everyone!  Sorry for the brief hiatus, but the holidays turned out to be crazy busy.  Anyway, I'm back at it now, and wanted to show off a project I did over the month of December: a Christmas ornament based on the Sophie the Sage figure from the Bones 3 Core Set.
     I had actually started planning this project in the Fall of 2018, but events overtook my time, and it never moved past the planning and thinking stage, as well as purchasing the ornament I wanted to use.  This year however I was determined to get it done in time for Christmas to give as a gift to my wife, who is an avid reader and book enthusiast.
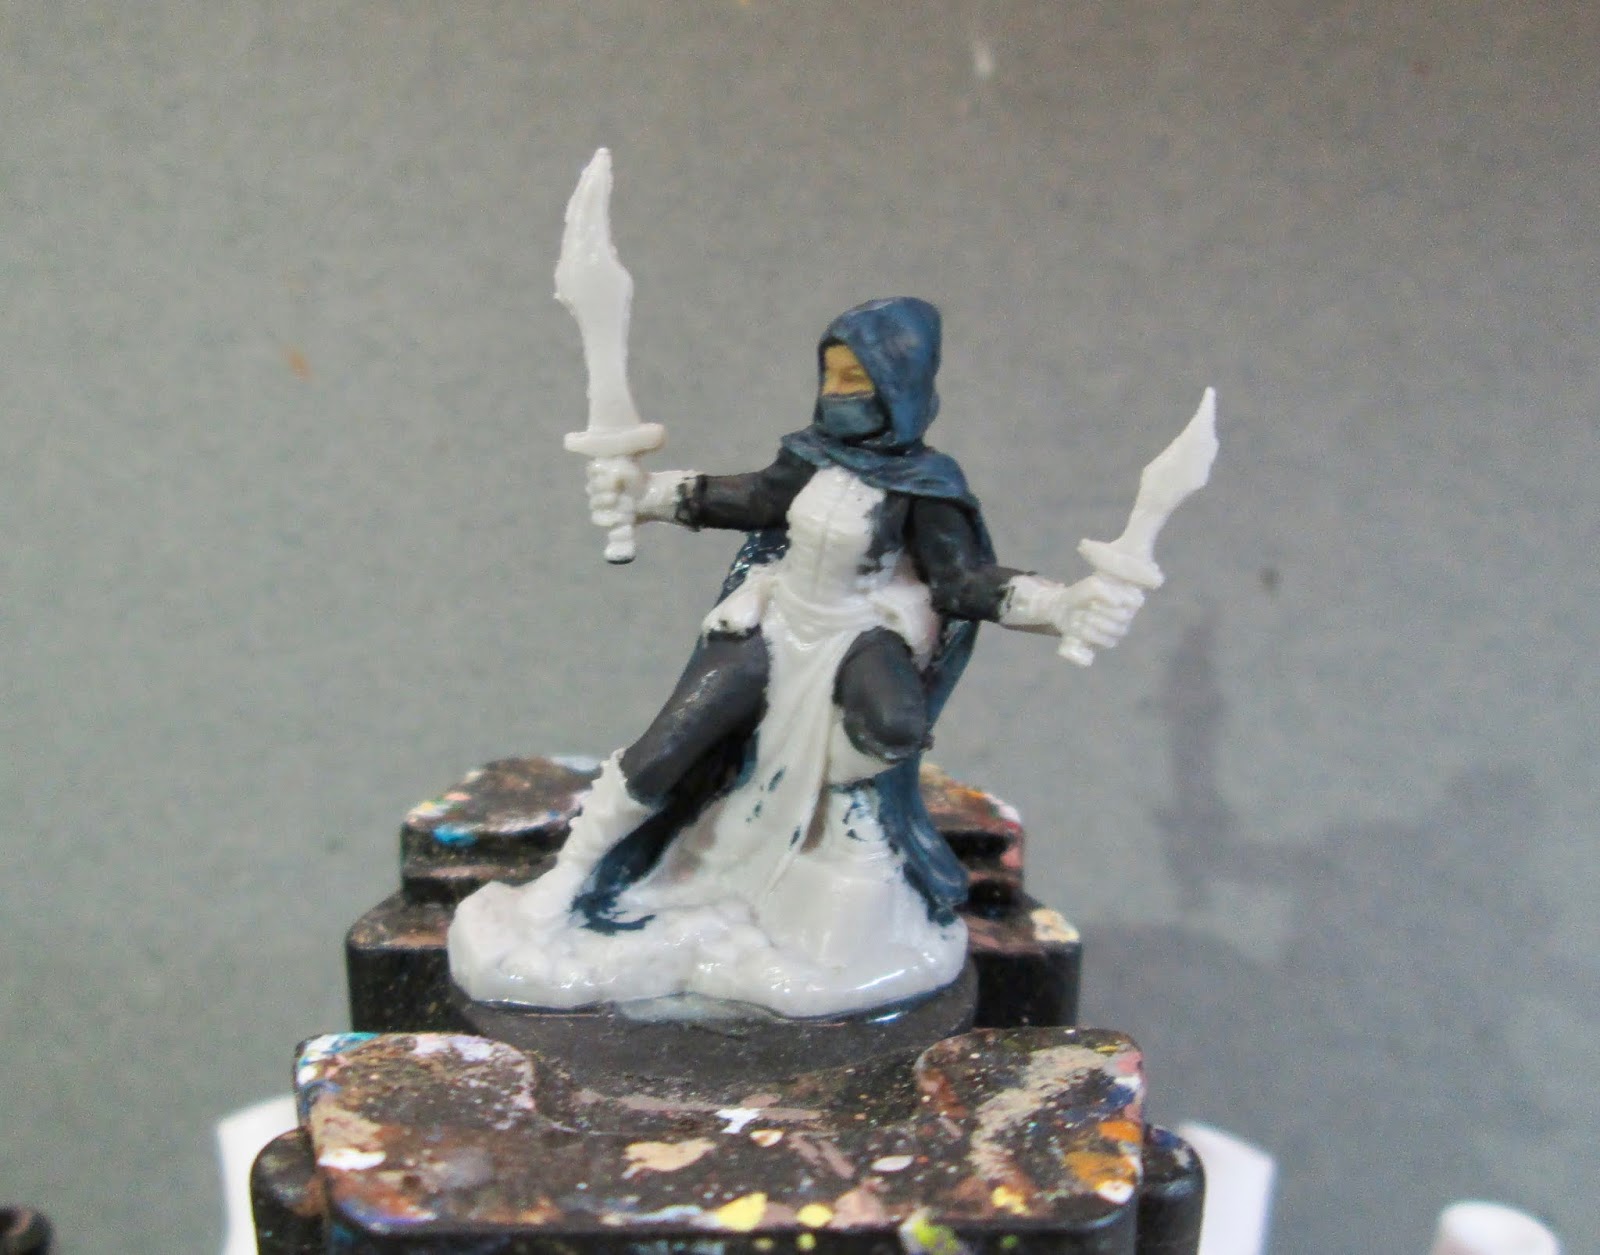
      My plan was to make a scene of a wizard reading in her chamber, with books, etc. piled around the place.  I started with the Sophie figure and a circular plaster dungeon terrain piece I had.  I had assembled the figure without the wings, as I wanted the figure to just be a human, and not a succubus.
      I quickly realized I'd need some walls for a backdrop; which I constructed out of cork scraps, and added some window frames made from coffee stirrers.  I then cut the figure off her base, and drilled a hole in the bottom of her gown, and a corresponding hole into the plaster disc.  Next, I superglued a length of paperclip wire into the figure.  After that, I used some greenstuff to fill the slot in her back where the wings were supposed to go.
I framed up the walls using more bits of coffee stirrers and some balsa wood.   When I was satisfied, I glued it to the plaster base with Aleene's Tacky glue.
      I had of course washed the figure  before I had started assembly; soaking it in a dish of water with a couple drops of dish-soap added, then giving it a light scrub with a soft toothbrush, and then rinsing and drying it.  And I had used Gorilla Superglue Gel to assemble the two parts.   It was now time to begin the painting.
      I began by painting her skin with Reaper MSP "Tanned Skin", and her dress with Reaper MSP "Christmas Wreath".  I then painted her staff with Americana "Light Cinnamon", and the book cover with Pathfinder MSP "Urgathoa Red"
      Next, I painted her hair with Americana "Asphaltum, and her belt and pouches with Accent "Real Umber".  After that, I painted the book pages with Americana "Bleached Sand", and the top of her staff with Crafter's Acrylic "Wild Green".
     I then painted the wands in her wand case an assortment of browns, and the book mark with some Crafter's Acrylic "Daffodil Yellow".  After that, I painted her jewelry and the corners of the book with Folk Art "Brushed Metal "Brushed Bronze", and then let the figure dry for a while.  When I resumed working on the figure, I gave her skin a coat of Citadel "Reikland Fleshshade" wash; and when that was dry, I gave her book, pouches and staff a coat of "Citadel Agrax Earthsahde" wash.
  
     When the washes were dry, I painted her eyes and mouth, and then highlighted her skin with Reaper MSP "Tanned Highlight".  I then highlighted her hair with Americana "Sable Brown", and Americana "Fawn". After that, I highlighted her dress using first Apple Barrel "Apple Christmas Green", and then Americana "Festive Green".
     Interspersed with working on the figure, I had primed the walls and base with Krylon Grey Primer, and when dry, I drybrushed the stones with Americana "Neutral Grey", and then painted the walls with Crafter's Acrylic "Light Antique White".
     I finished painting the figure, highlighting the pouches with Nicole's "Brown", and the staff with Americana "Khaki Tan".  I also highlighted the book cover with Americana "Burgundy Wine", and the bookmark with the base "Daffodil Yellow".  After that, I highlighted the book pages with Americana "Snow White', and then painted text on them with Reaper MSP "Holly Berry", and Ceramcoat "Black".    I highlighted her jewelry and the corners of the book with Ceramcoat "Wedding Gold", and then painted the top of her staff with a mix of Folk Art Color Shift "Green Flash", and Folk Art Color Shift "Emerald Flash".    I let the figure dry overnight and the next day I gave it a coat of Americana "DuraClear Matte" varnish. 
    I then quickly painted up the pile of books, bottle, and goblet that came with the model, as well as a small stack of books from the Wizkids Wizards Room set.  In addition, I painted up a pair of cats that came with a Dark Sword figure (I forget the name), to look like our two cats.   After drying overnight, these all got their coat of the "DuraClear Matte" varnish as well. 
    I completed the base by painting the wood work on the walls with Americana "Charcoal Grey", and adding a small rug cut from an old tobacco flannel.   The final step was to plot out an arrangement I liked, and then glue it all down.
    Once everything was glued into place, I glued the base into the ornament bottom cap using E6000 glue, and when dry, screwed on the ornament dome.

     I'm really happy with how it all turned out, and my wife loved her unique gift.