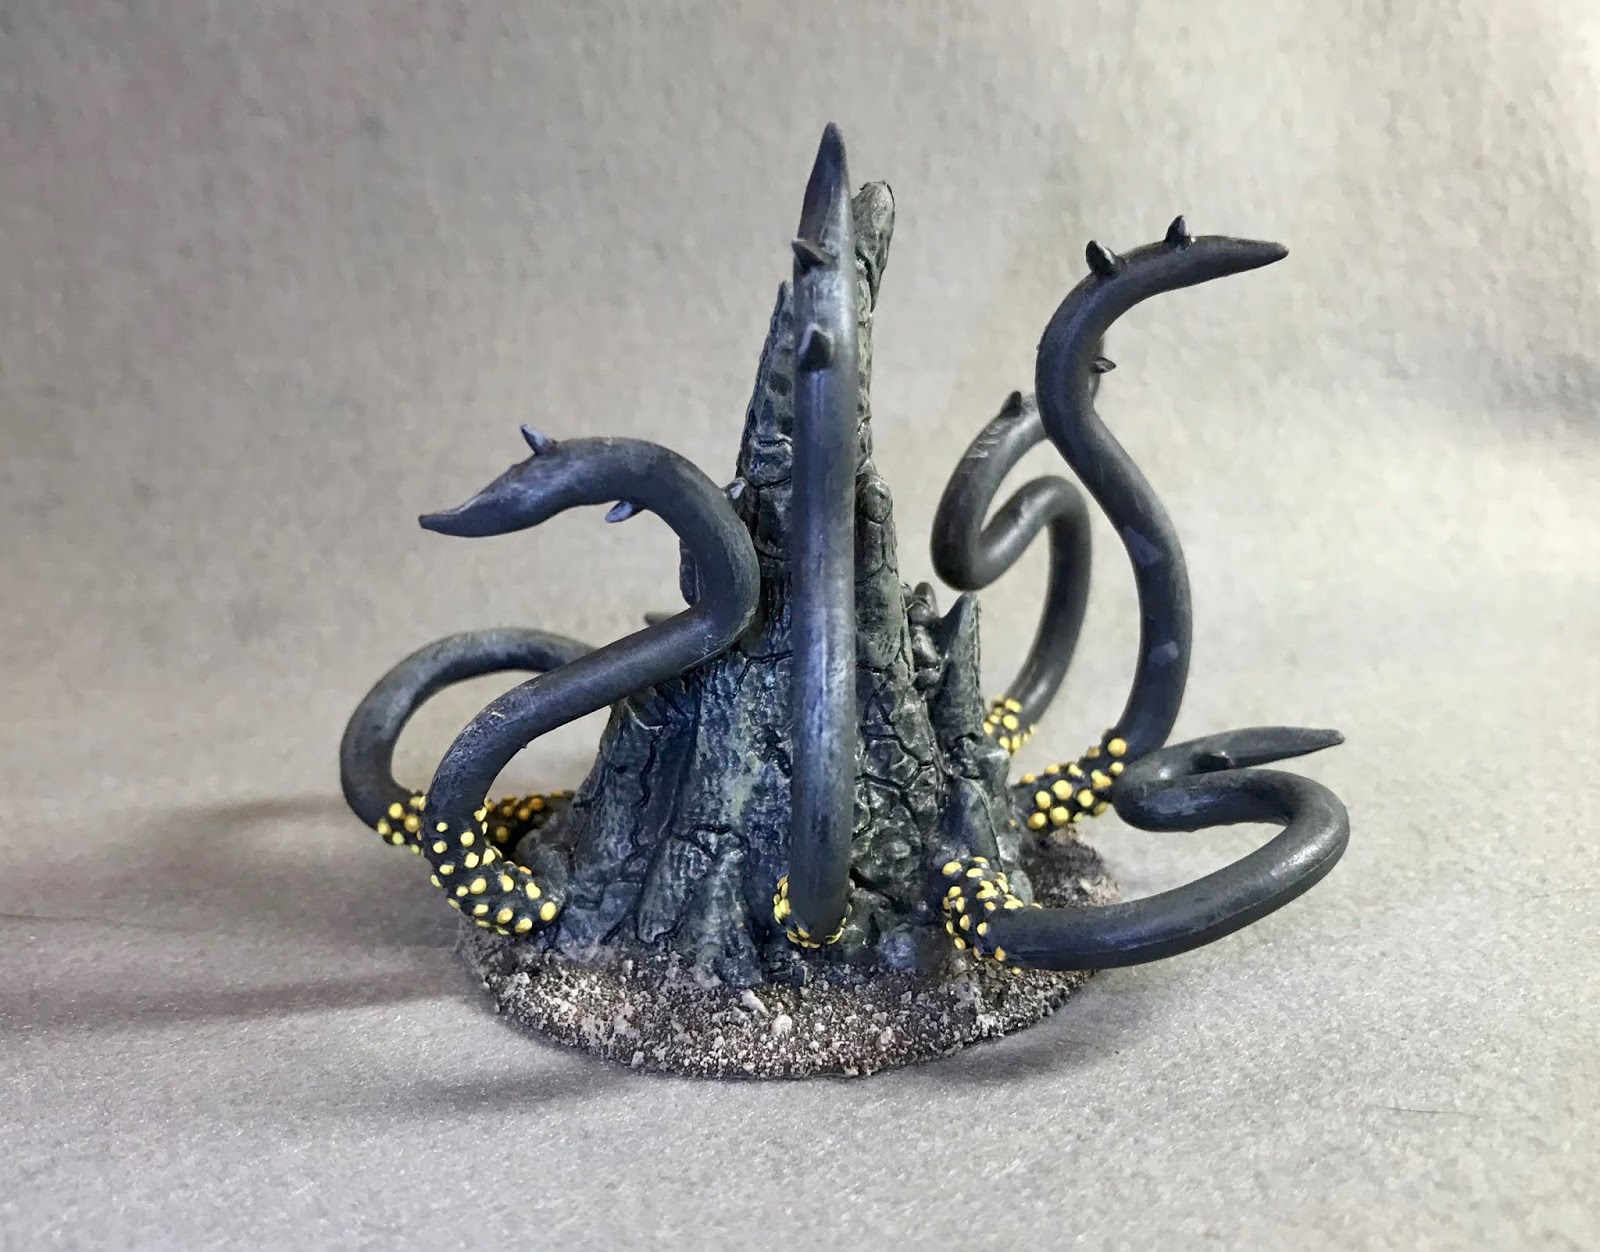
This past week I painted the "Stone Lurker" from the Bones 4 Darkreach Expansion.
I prepped the "Stone Lurker" in the usual way, soaking the pieces in a dish of water with a couple drops of dish-soap added; then giving the pieces a light scrub with a soft toothbrush, and then rinsing and drying everything. I then glued the two halves of the Lurker together, and then glued in the tentacles, using Gorilla Superglue gel. I then glued the figure to a black-primed 2" fender washer using Aleene's Tacky glue, and then glued the washer to the top of a large pill bottle with a couple drops of Elmers white glue.
As I then considered how I was going to tackle this figure, I realized I probably wanted to apply a sand coat to the base at this point instead of at the end, so I could better blend the coloring of the ground and the Lurker as I was painting.
So I then used some white glue to glue some mixed sand to the base. When the sand was dry, I painted it with a coat of Americana "Charcoal Grey". I then painted the Lurker with Ceramcoat "Charcoal", and tried to blend it into the "Charcoal Grey" on the base. After that, I painted the inside of the mouth with Ceramcoat "Black".
Next, I gave the entire figure a coat of Citadel "Nuln Oil" wash, and then let it dry for a while. When dry, I made a mix of the "Charcoal", and a little Crafter's Acrylic "Bright Yellow", and drybrushed the figure. I added a bit more of the "Bright Yellow", and then drybrushed again.
I then mixed some Americana "Zinc", and Crafter's Acrylic "Daffodil Yellow" together and did a further highlighting drybrush. I added a little more of the "Daffodil Yellow", and did one more level of drybrushing. After that, I used the "Daffodil Yellow" to paint the eyes, and then drybrushed the inside of mouth with Apple Barrel "Apple Maroon". I followed that by painting the "teeth" with Reaper MSP "Coal Black", and use this color to paint the enters of the eyes as well.
I decided I still wanted some slightly lighter highlights on the figure, so mixed some Americana "Grey Sky" with some of the "Daffodil Yellow" and tried painting some more specific highlights along the edges of the mouth and around the eyes. After that, I used some of the "Grey Sky" to paint shiny highlights on the teeth in a tempt to make them look like obsidian. Next I painted all the dots on the tentacles with Americana "Antique Gold" and then went around and highlighted them with the "Daffodil Yellow". I wrapped things up by painting the thorns on the tentacles with Ceramcoat "Black", and then highlighting them with Crafter's Acrylic "Storm Cloud Grey".
Next, I worked on the base, drybrushing the sand with Americana "Mississippi Mud", and then with some Apple Barrel "Rock Grey"; lastly I drybrushed it with a little Americana "Dove Grey".
I let the figure dry overnight and the next day I gave it a coat of Americana "DuraClear Matte" varnish. Another overnight dry, and I sprayed the figure with Testor's Dullcote". When the "Dullcote" was dry, I went back and repainted the "teeth" with a little Americana "DuraClear Gloss" varnish.
I'm really happy with how this guy turned out. For a monster that's basically a rock, it has a good bit of character.
My Efforts to Paint the Miniatures From the 1st, 2nd, 3rd, and 4th BONES Kickstarters!
Monday, July 27, 2020
Monday, July 20, 2020
Dark Elf Elite: Bones 4 Darkreach Figure
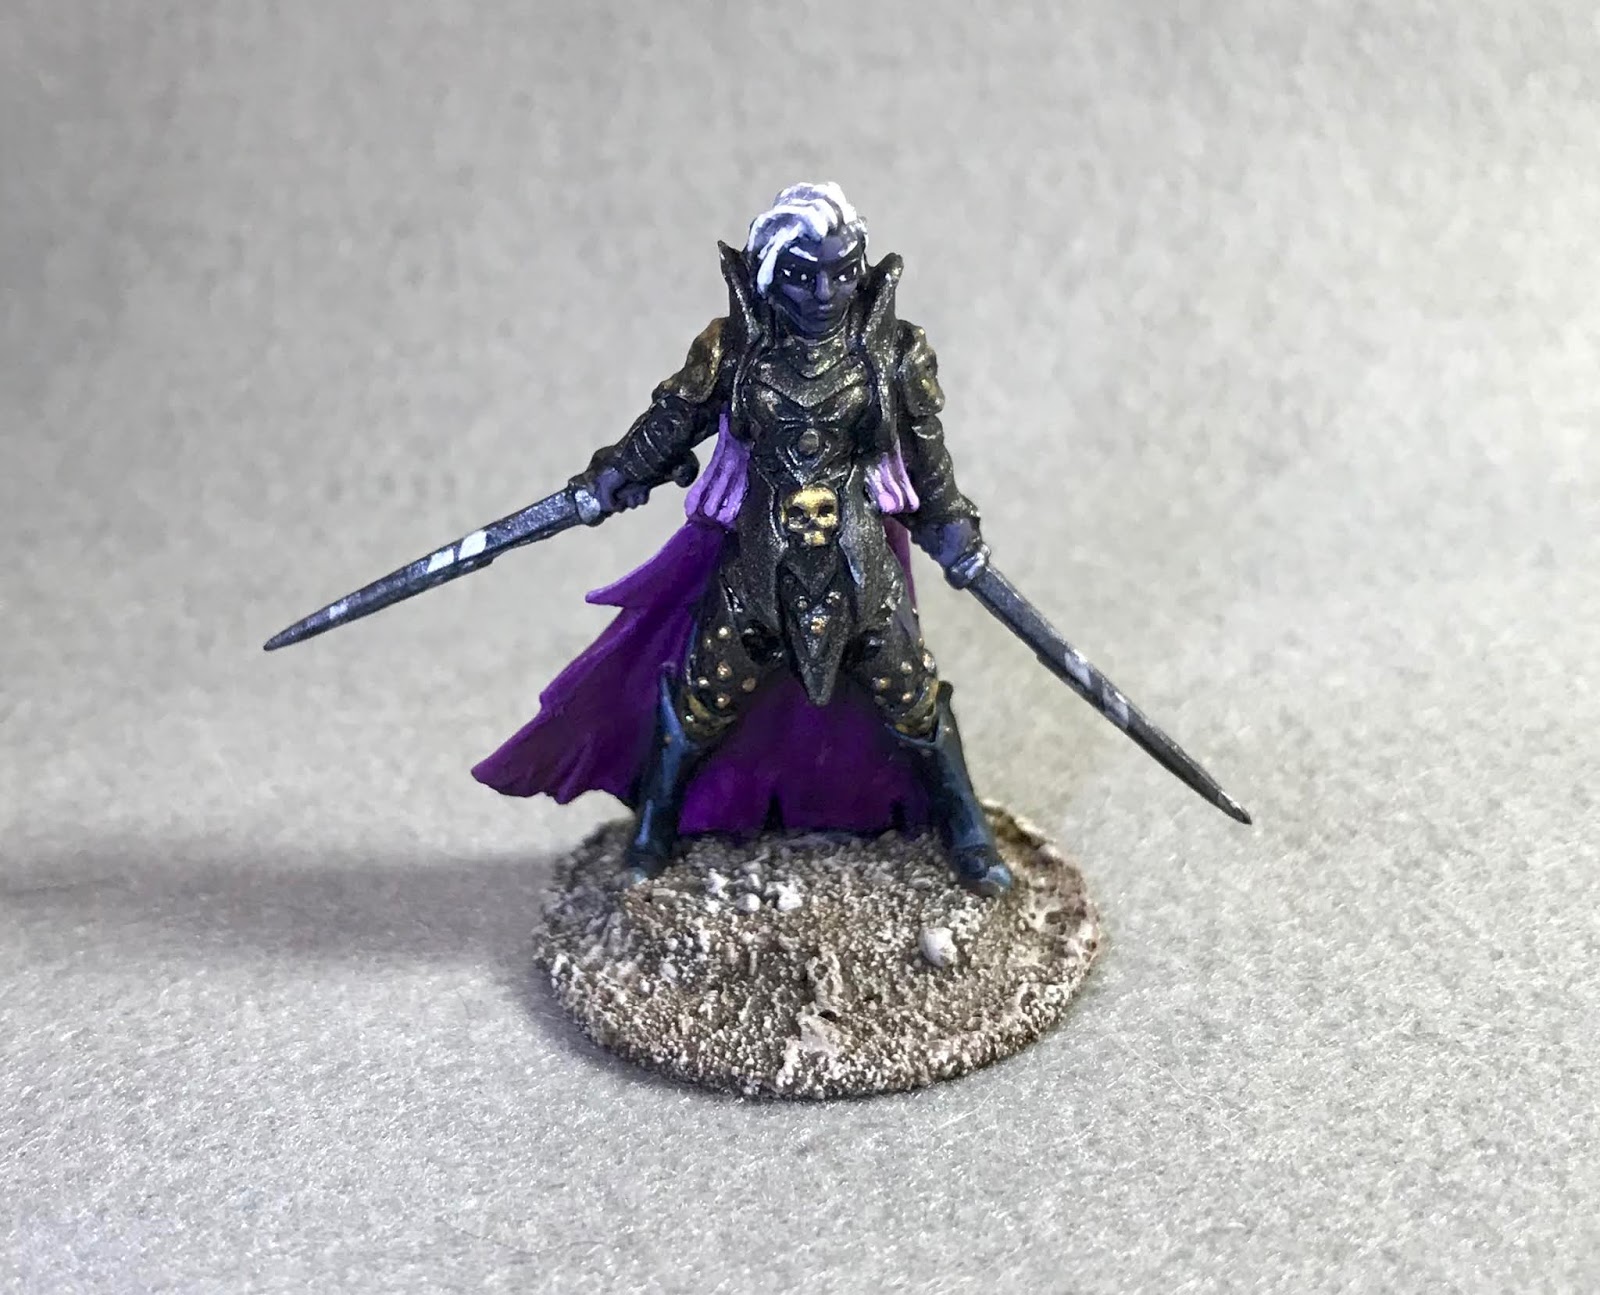
This past week I got back to working on the Bones 4 Darkreach expansion and painted the "Dark Elf Elite" figure.
I prepped the figure in the usual way, soaking it in a dish of water with a couple drops of dish-soap added, then giving it a light scrub with a soft toothbrush, and then rinsing and drying it. I then glued the figure to a brown-primed 1" fender washer with Aleene's Tacky glue, and then placed the figure in my painting grip.
I began by painting the figure with Ceramcoat "Black". When dry, I drybrushed the armor with Folk Art Color Shift "Black Flash". When the "Black Flash" was dry, I went over it again with a light drybrush of Reaper MSP "Aged Pewter". After that I painted the face, knees, and hands with Reaper MSP "Dark Elf Skin".
Next, I decided to try painting the cape with a gradated ombre effect. I started with Crafter's Acrylic "African Violet" at the bottom, and then wet blended that into Anita's "Violet" in the center, and then mixed and blended that into Apple Barrel "Apple Lavender" at the top and the parts hanging down in the front. After that I painted her boots with Reaper MSP "Coal Black". I then mixed a little of the "Coal Black" into some of the "African Violet" and painted the shadowed underside along the bottom and the splits in the cape.
I then painted her hair with Americana "Grey Sky", and afterwards painted the sword blades with Ceramcoat "Charcoal". After that, I painted the skulls on her armor with Folk Art Brushed Metal "Brushed Bronze", and then repainted the swords Folk Art Metallics "Gunmetal Grey".
I let the figure dry for a while, and then gave the whole thing a coat of Citadel "Nuln Oil" wash. Then, when the wash was dry, I painted the eyes, then highlighted the face, and hands, with the base "Dark Elf Skin", and some Reaper MSP "Dark Elf Highlight". After that, I highlighted the hair with Americana "Snow White", and then highlighted the boots with a mix of the base "Coal Black" with some Folk Art "Cloudy Day".
Next, I highlighted the cape using the base colors "Violet" and the "Apple Lavender", with a little of the "Snow White" added in for the lightest highlights. I then highlighted the skulls on the armor with Folk Art Metallic "Pure Gold", and after that, I did all the rivets on the armor using DecoArt Metallic "Rich Espresso". I finished up by adding some highlights to the swords with Ceramcoat "Metallic Silver", and lastly, I painted the entire base with Americana "Mississippi Mud".
I let the figure dry overnight and the next day I gave it a coat of Americana "DuraClear Matte" varnish. I then used some white glue to glue some fine sand to the base. When the sand was dry, I painted it with a coat of Americana "Charcoal Grey". When this was dry, I drybrushed the sand with the "Mississippi Mud", and then with some Apple Barrel "Rock Grey"; lastly I drybrushed it with a little Americana "Dove Grey".
Another overnight dry, and I sprayed the figure with Testor's Dullcote".
I like how this figure turned out, though in the end I think my ombre experiment with the cape was not a success. I needed to start the lightening further down, as I don't think you really get a sense that the color is supposed to be getting lighter as you go up...it just looks like some highlighting in the end.
I prepped the figure in the usual way, soaking it in a dish of water with a couple drops of dish-soap added, then giving it a light scrub with a soft toothbrush, and then rinsing and drying it. I then glued the figure to a brown-primed 1" fender washer with Aleene's Tacky glue, and then placed the figure in my painting grip.
I began by painting the figure with Ceramcoat "Black". When dry, I drybrushed the armor with Folk Art Color Shift "Black Flash". When the "Black Flash" was dry, I went over it again with a light drybrush of Reaper MSP "Aged Pewter". After that I painted the face, knees, and hands with Reaper MSP "Dark Elf Skin".
Next, I decided to try painting the cape with a gradated ombre effect. I started with Crafter's Acrylic "African Violet" at the bottom, and then wet blended that into Anita's "Violet" in the center, and then mixed and blended that into Apple Barrel "Apple Lavender" at the top and the parts hanging down in the front. After that I painted her boots with Reaper MSP "Coal Black". I then mixed a little of the "Coal Black" into some of the "African Violet" and painted the shadowed underside along the bottom and the splits in the cape.
I then painted her hair with Americana "Grey Sky", and afterwards painted the sword blades with Ceramcoat "Charcoal". After that, I painted the skulls on her armor with Folk Art Brushed Metal "Brushed Bronze", and then repainted the swords Folk Art Metallics "Gunmetal Grey".
I let the figure dry for a while, and then gave the whole thing a coat of Citadel "Nuln Oil" wash. Then, when the wash was dry, I painted the eyes, then highlighted the face, and hands, with the base "Dark Elf Skin", and some Reaper MSP "Dark Elf Highlight". After that, I highlighted the hair with Americana "Snow White", and then highlighted the boots with a mix of the base "Coal Black" with some Folk Art "Cloudy Day".
Next, I highlighted the cape using the base colors "Violet" and the "Apple Lavender", with a little of the "Snow White" added in for the lightest highlights. I then highlighted the skulls on the armor with Folk Art Metallic "Pure Gold", and after that, I did all the rivets on the armor using DecoArt Metallic "Rich Espresso". I finished up by adding some highlights to the swords with Ceramcoat "Metallic Silver", and lastly, I painted the entire base with Americana "Mississippi Mud".
I let the figure dry overnight and the next day I gave it a coat of Americana "DuraClear Matte" varnish. I then used some white glue to glue some fine sand to the base. When the sand was dry, I painted it with a coat of Americana "Charcoal Grey". When this was dry, I drybrushed the sand with the "Mississippi Mud", and then with some Apple Barrel "Rock Grey"; lastly I drybrushed it with a little Americana "Dove Grey".
Another overnight dry, and I sprayed the figure with Testor's Dullcote".
I like how this figure turned out, though in the end I think my ombre experiment with the cape was not a success. I needed to start the lightening further down, as I don't think you really get a sense that the color is supposed to be getting lighter as you go up...it just looks like some highlighting in the end.
Monday, July 13, 2020
Goblin Bodyguard: Bones 4 Figure
This past week I took a break from painting Dark Elves and Gnomes and did the "Goblin Bodyguard" from the Bones 4 Goblin Heroes set. I had planned to work on all three of the Goblins from the Goblins Heroes set at the same time, as kind of side project as I worked on the Darkreach figures, so I had prepped the figures in the usual way, soaking them in a dish of water with a couple drops of dish-soap added, then giving them a light scrub with a soft toothbrush, and then rinsing and drying them. I then glued them to 1" brown-primed fender washers with Aleene's Tacky glue. I then glued the washers onto a tongue depressor with a couple drops of Elmer's white glue.
I then had begun painting all their exposed skin areas with Citadel Contrast "Snakebite Leather". But when I was studying them after the "Snakebite Leather" application, I realized that they really weren't similar enough to paint as a group, and so I popped them off the tongue depressor so I could work on them separately. I reattached the bodyguard to a pill bottle with some blue tac. After that, I painted his loin cloth with Reaper MSP "Blood Red", his boots with Citadel Contrast "Wyldwood",and his gauntlets with Americana "Fawn".
Next, I painted his belt and straps with Americana "Charcoal Grey", and is scimitar, armor, and belt buckle with Ceramcoat "Charcoal". I also painted his earrings with Folk Art Brushed Metal "Brushed Bronze". Then after everything had a chance to dry, I gave his loin cloth, belts, straps, and gauntlets all a coat of Citadel "Agrax Earthshade " wash.
I then had begun painting all their exposed skin areas with Citadel Contrast "Snakebite Leather". But when I was studying them after the "Snakebite Leather" application, I realized that they really weren't similar enough to paint as a group, and so I popped them off the tongue depressor so I could work on them separately. I reattached the bodyguard to a pill bottle with some blue tac. After that, I painted his loin cloth with Reaper MSP "Blood Red", his boots with Citadel Contrast "Wyldwood",and his gauntlets with Americana "Fawn".
Next, I painted his belt and straps with Americana "Charcoal Grey", and is scimitar, armor, and belt buckle with Ceramcoat "Charcoal". I also painted his earrings with Folk Art Brushed Metal "Brushed Bronze". Then after everything had a chance to dry, I gave his loin cloth, belts, straps, and gauntlets all a coat of Citadel "Agrax Earthshade " wash.
Then, when the ash was dry, I painted his eye. After that, since I felt his skin had come out rather splotchy from using the Contrast Paint on it, I tried blending it a bit with some Accent Golden Oxide. I then used some Apple Barrel "Maple Sugar Tan" mixed with the "Golden Oxide". to highlight his skin.
As I prepared to highlight the loin cloth, I realized I had painted part of what was supposed to be his legs as loin cloth, so I took some time to repaint his legs with the "Golden Oxide" and "Maple Sugar Tan" and blend the areas back into the body. I then highlighted the loin cloth with a mix of the base "Blood Red" and some Reaper MSP "Golden Glow". After that, I highlighted his gauntlets with some of the base "Fawn" mixed with a little Americana "Bleached Sand", and I highlighted his belt and straps with some Americana "Mississippi Mud".
Next, I painted the scimitar, shoulder armor, and belt buckle with Folk Art Metallics "Gunmetal Grey" and then highlighted all of it with some Ceramcoat "Metallic Silver. I then highlighted the hilt of the scimitar and his jewelry with Ceramcoat "Wedding Gold". Lastly, I painted his base with the "Mississippi Mud".
I let the figure dry overnight and the next day I gave it a coat of Americana "DuraClear Matte" varnish. Then, when the varnish was dry, I used some white glue to flock the base. Another overnight dry, and I sprayed it with Testor's "Dullcote".
The Contrast paint really didn't work well on these guys, but I'm generally happy with the outcome. As with so many Reaper figures, the great character of the sculpt really carries the paint job a long way.
Monday, July 6, 2020
Deep Gnome Rogue, and Deep Gnome Captain: Bones 4 Darkreach Figures
This past week I painted the "Deep Gnome Rogue", and "Deep Gnome Captain", from the Bones 4 Darkreach Expansion.
I prepped the figures in the usual way, soaking the parts in a dish of water with a couple drops of dish-soap added, then giving them a light scrub with a soft toothbrush, and then rinsing and drying them. I then glued them to 7/8" black-primed fender washers with Aleene's Tacky glue. I then glued the washers onto a tongue depressor with a couple drops of Elmer's white glue.
I began by painting the skin on both of them with Americana "Sable Brown". I then painted the tunic on the Rogue, and shirt on the Captain with Americana "Charcoal Grey". After that, I painted the cape on the Rogue and the leggings on the Captain with Americana "Asphaltum".
I prepped the figures in the usual way, soaking the parts in a dish of water with a couple drops of dish-soap added, then giving them a light scrub with a soft toothbrush, and then rinsing and drying them. I then glued them to 7/8" black-primed fender washers with Aleene's Tacky glue. I then glued the washers onto a tongue depressor with a couple drops of Elmer's white glue.
I began by painting the skin on both of them with Americana "Sable Brown". I then painted the tunic on the Rogue, and shirt on the Captain with Americana "Charcoal Grey". After that, I painted the cape on the Rogue and the leggings on the Captain with Americana "Asphaltum".
Next, I painted the hood on the Rogue with Americana "Neutral Grey", and then painted the tunic on the Captain with Crafter'a Acrylic "Orange Spice". I also used the "Orange Spice" to paint the leggings on the Rogue, and then painted the belt and scabbards on the Rogue with Ceramcoat "Charcoal", and the belt and pouches on the Captain with Nicole's "Brown". After that, I painted all their shoes with Accent "Real Umber".
I decided at that point that I didn't like the Rogue's leggings being orange, so I repainted them with Accent "Mustard Seed". I also used the "Mustard Seed" to paint the cuffs of the Captain's tunic. I then painted the Rogue's gloves, and the Captain's scabbard and dagger grip, with Reaper MSP HD "Umber Brown". After that, I painted all the metal bits, weapons and armor, with Americana "Zinc".
Next, I painted the handle of the Captain's axe with Americana "Light Cinnamon", and then I painted their hair with Americana "Grey Sky". I then painted their armor, weapons and assorted metal parts with Folk Art Metallics "Gunmetal Grey". I let the figures dry for a while. and then gave their faces, and the Captain's ears and hands, a coat of Citadel "Reikland Fleshshade" wash. When that wash was dry, I gave their clothes a coat of Citadel "Agrax Earthshade". Another drying break and then I finished the washes by giving a coat of Citadel "Nuln Oil" wash to their hair, armor, and weapons.
When all the washes were dry, I painted their eyes, and then highlighted their skin with a mix of the base "Sable Brown", and Americana "Fawn". I then highlighted theRogue's tunic and the Captain's shirt with Folk Art "Dark Brown", and then mixed a little Americana "Mississippi Mud" in for lighter highlights. After that, I highlighted the Rogue's cape with Nicole's Brown".
I let the figures dry overnight and the next day I gave them a coat of Americana "DuraClear Matte" varnish. I then used some white glue to glue some fine sand to their bases. When the sand was dry, I painted it with a coat of Americana "Charcoal Grey". When this was dry, I drybrushed the sand with the "Mississippi Mud", and then with some Apple Barrel "Rock Grey"; lastly I drybrushed it with a little Americana "Dove Grey".
Another overnight dry, and I sprayed the figures with Testor's Dullcote".
I'm really happy with this pair. To be fair, the facial sculpts come with a ton of character, so making these two look good was an easier task.
I decided at that point that I didn't like the Rogue's leggings being orange, so I repainted them with Accent "Mustard Seed". I also used the "Mustard Seed" to paint the cuffs of the Captain's tunic. I then painted the Rogue's gloves, and the Captain's scabbard and dagger grip, with Reaper MSP HD "Umber Brown". After that, I painted all the metal bits, weapons and armor, with Americana "Zinc".
Next, I painted the handle of the Captain's axe with Americana "Light Cinnamon", and then I painted their hair with Americana "Grey Sky". I then painted their armor, weapons and assorted metal parts with Folk Art Metallics "Gunmetal Grey". I let the figures dry for a while. and then gave their faces, and the Captain's ears and hands, a coat of Citadel "Reikland Fleshshade" wash. When that wash was dry, I gave their clothes a coat of Citadel "Agrax Earthshade". Another drying break and then I finished the washes by giving a coat of Citadel "Nuln Oil" wash to their hair, armor, and weapons.
When all the washes were dry, I painted their eyes, and then highlighted their skin with a mix of the base "Sable Brown", and Americana "Fawn". I then highlighted theRogue's tunic and the Captain's shirt with Folk Art "Dark Brown", and then mixed a little Americana "Mississippi Mud" in for lighter highlights. After that, I highlighted the Rogue's cape with Nicole's Brown".
I then highlighted the Rogue's hood with Apple Barrel "Rock Grey", and afterwards highlighted the the Captain's tunic with the base "Orange Spice" mixed with some Reaper MSP "Pumpkin Orange", and then mixed with some Apple Barrel "Apple Maple Sugar" for lighter highlights. After that, I highlighted the Rogue's leggings, and the Cpatan's cuffs with the base Accent "Mustard Seed" mixed with some Ceramcoat "Maple Sugar Tan", and then highlighted their shoes with Folk Art "Teddy Bear Brown".
Next, I highlighted their hair with Americana "Snow White", and then highlighted the Rogue's scabbards and belt with Americana "Zinc". I then highlighted the Captain's belt, pouches, and scabbard with Ceramcoat "Territorial Beige, followed by lighter highlights using Americana "Khaki Tan". After that, I highlighted their weapons armor and other metal bits with Ceramcoat "Metallic Silver".Lastly, I painted both their bases with Americana "Mississippi Mud".I let the figures dry overnight and the next day I gave them a coat of Americana "DuraClear Matte" varnish. I then used some white glue to glue some fine sand to their bases. When the sand was dry, I painted it with a coat of Americana "Charcoal Grey". When this was dry, I drybrushed the sand with the "Mississippi Mud", and then with some Apple Barrel "Rock Grey"; lastly I drybrushed it with a little Americana "Dove Grey".
Another overnight dry, and I sprayed the figures with Testor's Dullcote".
I'm really happy with this pair. To be fair, the facial sculpts come with a ton of character, so making these two look good was an easier task.
Monday, June 29, 2020
Dark Elf Queen on Throne: Bones 4 Darkreach Figure
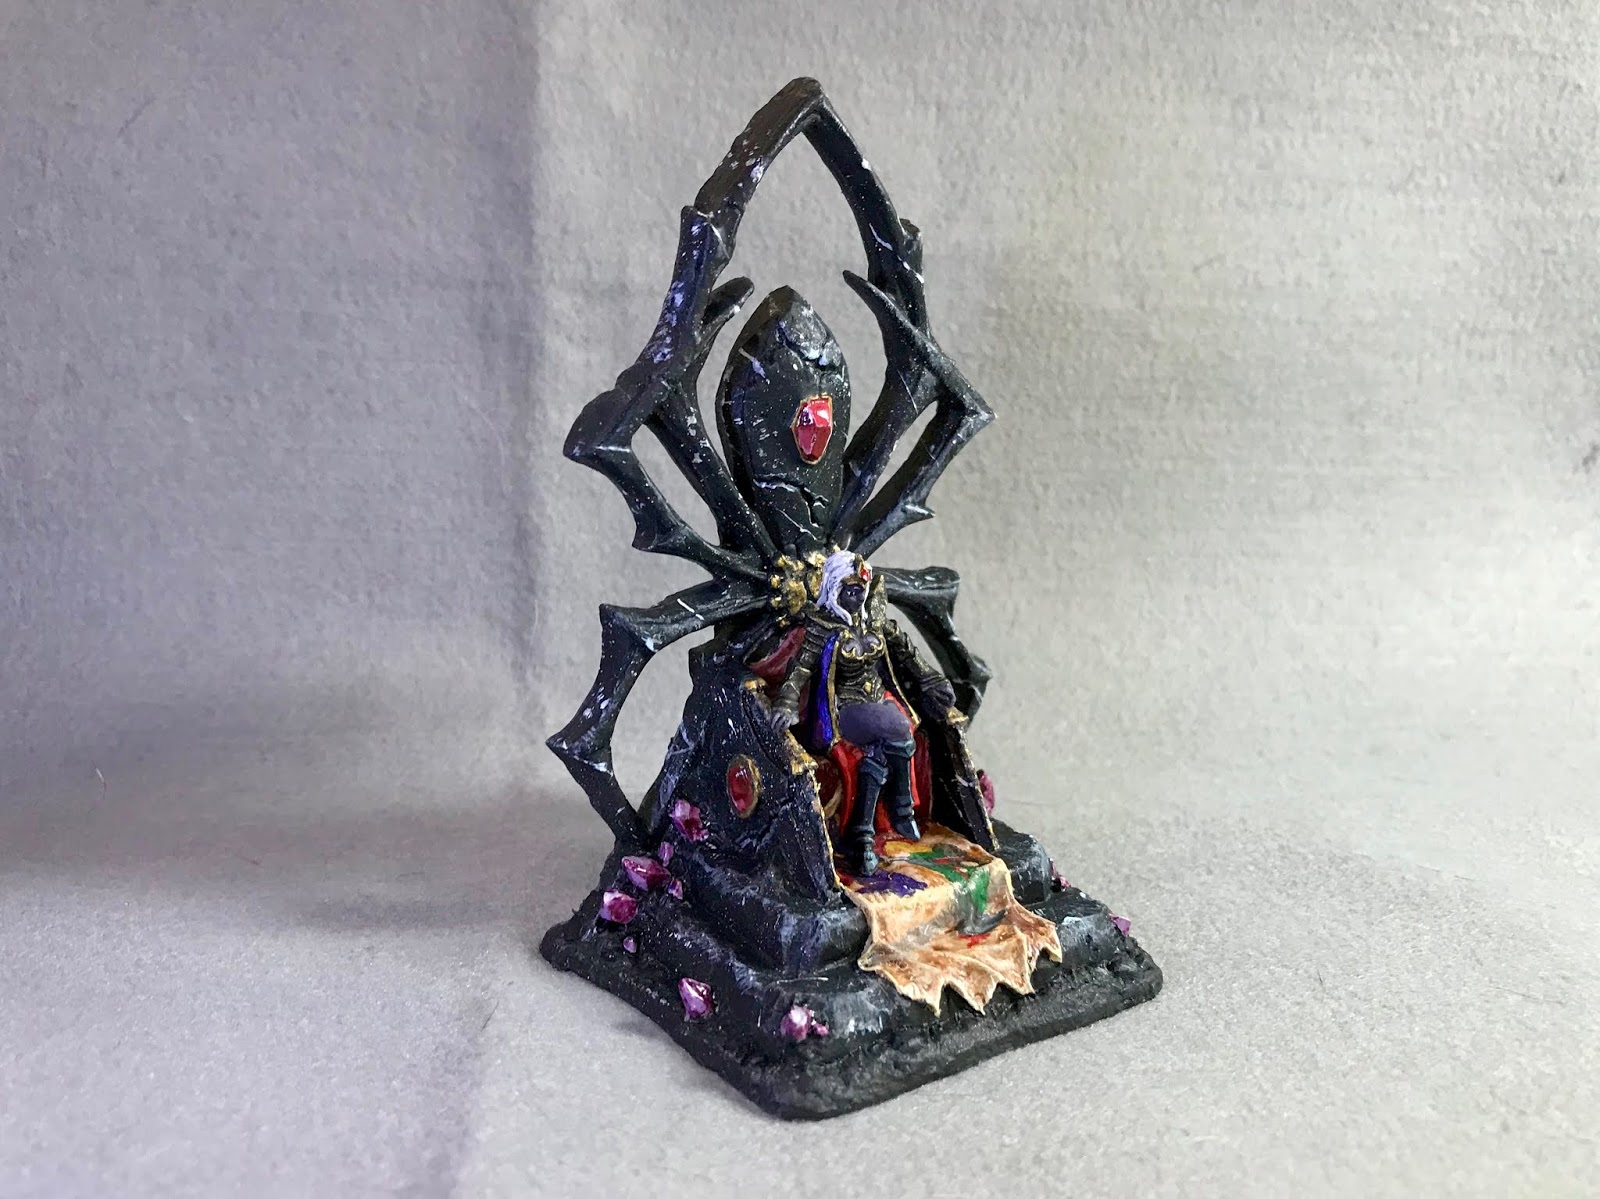
This past week I painted the "Dark Elf Queen on Throne" from the Bones 4 Darkreach Expansion, in my continuing effort to concentrate on working my way through that expansion.
I prepped the figure in the usual way, soaking the parts in a dish of water with a couple drops of dish-soap added, then giving them a light scrub with a soft toothbrush, and then rinsing and drying them.
I wanted to make the queen removable so I could use the throne both as a simple terrain piece and also with the queen in place if needed. I decided to use a pair of rare earth magnets to facilitate this. So, to begin with, I sliced the tab where the queen is supposed to be mounted off the throne's seat, and then drilled a hole in both the throne's seat, and the underside of the queen to fit the magnets. It was handy to have the site where the tab was on the throne, and the pre-existing hole in the queen, to help align the magnet placement correctly.
I then used Gorilla superglue gel to glue the magnets in place, being careful to get the polarity correct.
I then stuck the queen's magnet onto an alligator clip in preparation for painting.
For the throne, I used the superglue gel to glue a fender washer into the recess under the seat to help provide a base that would stick to my magnetic sheet lined storage boxes. I then glued the back piece to the throne using the superglue gel. When dry, I glued the completed throne to the top of a pill bottle with a couple drops of Elmers white glue.
I began by painting the queen with Ceramcoat "Black". When dry, I drybrushed the armor with Folk Art Color Shift "Black Flash". When the "Black Flash" was dry, I went over it again with a drybrush of "Folk Art "Pure Gold". After that I painted the face, legs, and hands with Reaper MSP "Dark Elf Skin".
After that, I let everything dry for a while, and then gave the entire figure a coat of Citadel "Nuln Oil" wash. Then, when the wash was dry, I painted the eyes, then highlighted the face, chest, legs and hands with the base "Dark Elf Skin", and some Reaper MSP "Dark Elf Highlight".
I then began work on the throne, which I decided to paint to look like black marble. I started by painting all the stone parts with the "Black". When that was dry, I used a stiff bristled brush, running my finger across it, to spatter white paint on the throne. I let it dry some more, and then gave it a coat of the "Nuln Oil" wash.
Next, I again used a stiff bristled brush, running my finger across it, to spatter white paint on the throne. I also painted some thin lines to make striations. After that, I tried to do some highlighting with the "Frosty Blue".
I had deliberated on how to paint the cloth running down the seat of the throne, and had decided to try and paint it as an old ragged repurposed tapestry. So, I looked on Google for images of tapestries, and decided on this one:
I felt I could easily adapt it to depict a Dark Elf queen executing a prisoner. Suitable intimidation for anyone coming before the throne...
So, continuing on, I painted the cloth with Americana "Antique White" to resemble an old tapestry base material. I then penciled in the design. This was going to be quite a challenge. Luckily, the Queen, when seated would obscure part of it. :)
I then attempted to paint in the design. I'm not a good artist when it comes to realistic painting, particularly people, but I made my best effort to get a rough blocked in image. my fingers were crossed that weathering would help make up for my lack of skill.
I let the throne dry for a while, and then I gave the tapestry a coat of Citadel "Agrax Earthshade" wash. I then painted the spider motif on the back of the throne behind the queen's head, as well as the mounts the throne gems were in, with Folk Art Brushed Metal "Brushed Bronze". After that, I painted the gems with Ceramcoat "Opaque Red", and painted the crystals on the throne's base with the "Snow White".
I'm very pleased with how this turned out. It's a little gaudy and "busy" looking, but I don't think thats terribly out of place in a Dark Elf setting. I think the tapestry turned out well; not great, but good enough. All in all a pretty nice piece I think.
I prepped the figure in the usual way, soaking the parts in a dish of water with a couple drops of dish-soap added, then giving them a light scrub with a soft toothbrush, and then rinsing and drying them.
I wanted to make the queen removable so I could use the throne both as a simple terrain piece and also with the queen in place if needed. I decided to use a pair of rare earth magnets to facilitate this. So, to begin with, I sliced the tab where the queen is supposed to be mounted off the throne's seat, and then drilled a hole in both the throne's seat, and the underside of the queen to fit the magnets. It was handy to have the site where the tab was on the throne, and the pre-existing hole in the queen, to help align the magnet placement correctly.
I then used Gorilla superglue gel to glue the magnets in place, being careful to get the polarity correct.
I then stuck the queen's magnet onto an alligator clip in preparation for painting.
For the throne, I used the superglue gel to glue a fender washer into the recess under the seat to help provide a base that would stick to my magnetic sheet lined storage boxes. I then glued the back piece to the throne using the superglue gel. When dry, I glued the completed throne to the top of a pill bottle with a couple drops of Elmers white glue.
I began by painting the queen with Ceramcoat "Black". When dry, I drybrushed the armor with Folk Art Color Shift "Black Flash". When the "Black Flash" was dry, I went over it again with a drybrush of "Folk Art "Pure Gold". After that I painted the face, legs, and hands with Reaper MSP "Dark Elf Skin".
I then painted her skirt with Reaper MSP "Blood Red", and then her cape with Crafter's Acrylic "Purple Passion". After that, I painted her hair with Americana "Grey Sky".
Next, I repainted her cape with Folk Art Color Shift "Purple Flash", and then painted her boots with Reaper MSP "Coal Black". I than painted the edges of her cape with the "Black", and then went over it again with the edges "Pure Gold".After that, I let everything dry for a while, and then gave the entire figure a coat of Citadel "Nuln Oil" wash. Then, when the wash was dry, I painted the eyes, then highlighted the face, chest, legs and hands with the base "Dark Elf Skin", and some Reaper MSP "Dark Elf Highlight".
I then highlighted the skirt with the base "Blood Red" mixed with some Reaper MSP "Holly Berry", and then further mixed in a little Crafter's Acrylic "Daffodil Yellow" to do even lighter highlights. I also used the "Holly Berry" and Blood Red", along with a little Americana "Snow White" to paint the gem in her crown. After that, I mixed some of the "Purple Flash" with some Ceramcoat "Metallic Silver" to highlight her cape. Next, I highlighted her boots with the base "Coal Black" mixed with a little Reaper MSP "Frosty Blue", and then I highlighted her hair with the "Snow White". I finished up by using some Ceramcoat "Wedding Gold" to highlight her crown, armor, and the edges of her cape.
Next, I again used a stiff bristled brush, running my finger across it, to spatter white paint on the throne. I also painted some thin lines to make striations. After that, I tried to do some highlighting with the "Frosty Blue".
I had deliberated on how to paint the cloth running down the seat of the throne, and had decided to try and paint it as an old ragged repurposed tapestry. So, I looked on Google for images of tapestries, and decided on this one:
I felt I could easily adapt it to depict a Dark Elf queen executing a prisoner. Suitable intimidation for anyone coming before the throne...
So, continuing on, I painted the cloth with Americana "Antique White" to resemble an old tapestry base material. I then penciled in the design. This was going to be quite a challenge. Luckily, the Queen, when seated would obscure part of it. :)
I then attempted to paint in the design. I'm not a good artist when it comes to realistic painting, particularly people, but I made my best effort to get a rough blocked in image. my fingers were crossed that weathering would help make up for my lack of skill.
I let the throne dry for a while, and then I gave the tapestry a coat of Citadel "Agrax Earthshade" wash. I then painted the spider motif on the back of the throne behind the queen's head, as well as the mounts the throne gems were in, with Folk Art Brushed Metal "Brushed Bronze". After that, I painted the gems with Ceramcoat "Opaque Red", and painted the crystals on the throne's base with the "Snow White".
Next, I did highlights and shadows on the gems with Pathfinder MSP "Urgathoa Red" for the shadows and the "Snow White" for the highlights. I then mixed some Citadel Technical "Spiritstone Red" and "Soulstone Blue" together to make a purple color, and used that to paint the crystals on the throne's base; then when dry, I added highlights with the "Snow White". After that, I went around to all the parts I had painted with the "Brushed Bronze" and highlighted them with, first, the "pure Gold", and then a little of the "Wedding Gold".
I let the throne and queen dry overnight and the next day I gave them a coat of Americana "DuraClear Matte" varnish. Another overnight dry, and I sprayed the figure with Testor's Dullcote". When the "Dullcote" was dry, I went back and repainted all the gems and crystals, with a little Americana "DuraClear Gloss" varnish.
I'm very pleased with how this turned out. It's a little gaudy and "busy" looking, but I don't think thats terribly out of place in a Dark Elf setting. I think the tapestry turned out well; not great, but good enough. All in all a pretty nice piece I think.
Monday, June 22, 2020
Dark Elf Priestess: Bones 4 Darkreach Figure
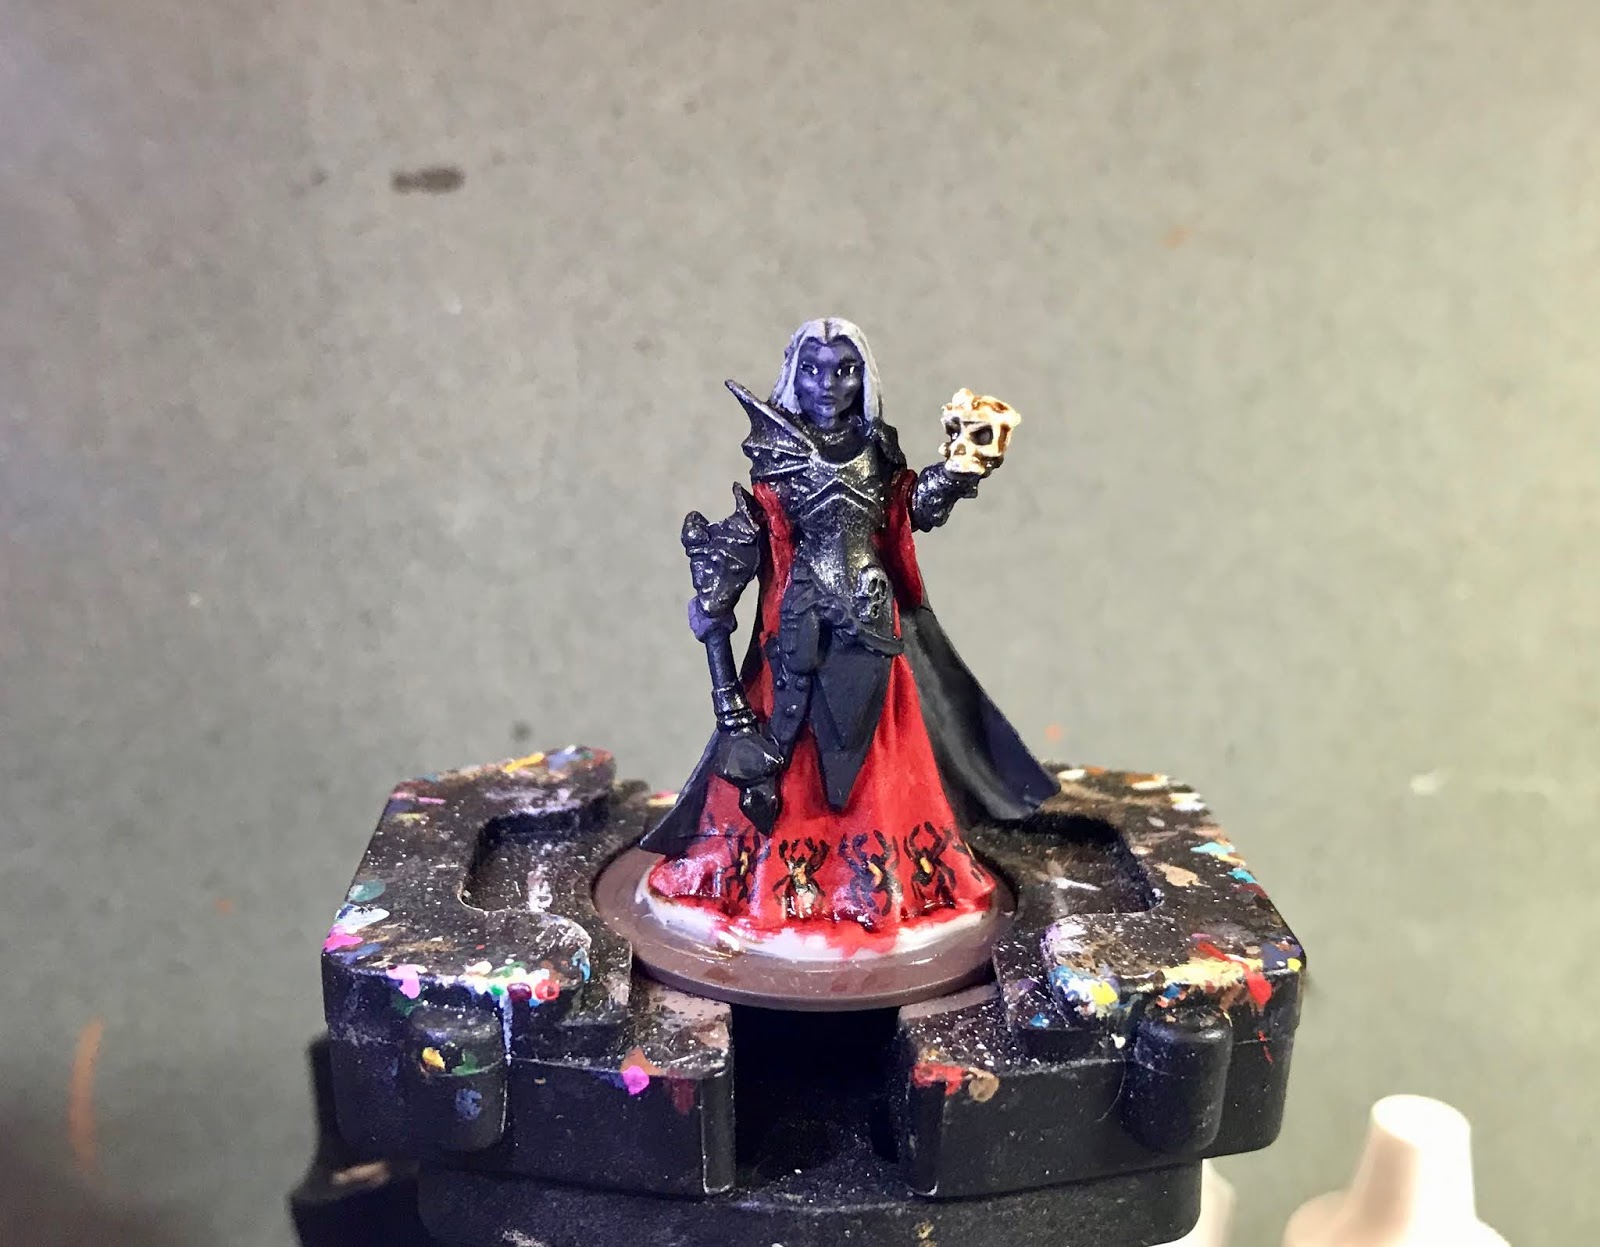
This past week I painted the "Dark Elf Priestess" from the Bones 4 Darkreach Expansion.
I prepped the figure in the usual way, soaking it in a dish of water with a couple drops of dish-soap added, then giving it a light scrub with a soft toothbrush, and then rinsing and drying it. I then glued the figure to a brown-primed 1" fender washer with Aleene's Tacky glue, and then placed the figure in my painting grip.
I forgot to take a beginning photo of the figure, so here is a shot from the Reaper online store.
I began by painting all the armor with Ceramcoat "Black". When dry, I drybrushed the armor with Folk Art Color Shift "Black Flash". When the "Black Flash" was dry, I went over it again with a light drybrush of Reaper MSP "Aged Pewter". After that I painted the face, knees, and hands with Reaper MSP "Dark Elf Skin".
I prepped the figure in the usual way, soaking it in a dish of water with a couple drops of dish-soap added, then giving it a light scrub with a soft toothbrush, and then rinsing and drying it. I then glued the figure to a brown-primed 1" fender washer with Aleene's Tacky glue, and then placed the figure in my painting grip.
I forgot to take a beginning photo of the figure, so here is a shot from the Reaper online store.
I began by painting all the armor with Ceramcoat "Black". When dry, I drybrushed the armor with Folk Art Color Shift "Black Flash". When the "Black Flash" was dry, I went over it again with a light drybrush of Reaper MSP "Aged Pewter". After that I painted the face, knees, and hands with Reaper MSP "Dark Elf Skin".
Next, I painted her robes with Reaper MSP "Blood Red", and then painted her cape with Ceramcoat "Charcoal". After that, I painted the tabard-like pieces that hang down from her armor, using Americana "Black", and then did her hair with Americana "Grey Sky".
I then painted her belt and pouch with Reaper MSP "Coal Black", and also used the color to paint the handle of her mace. After that, I painted a pattern of black spiders on her robe using the "Black", and then added runes with, first, Reaper MSP "Holly Berry", and then going over them with some Americana "Primary Yellow".
I let everything dry for a while, and then I applied a coat of Citadel "Nuln Oil" wash to her skin, hair, armor, and cape. After that, I applied a coat of Citadel "Reikland Fleshshade" wash to her robe. While those dried, I painted the skull in her hand with some Citadel Contrast "Skeleton Horde". Then, when the wash was dry, I painted the eyes, then highlighted the face, and hands with the base "Dark Elf Skin", and some Reaper MSP "Dark Elf Highlight".
Next, I highlighted the robe with the "Holly Berry", then mixed a little Reaper MSP "Brest Cancer Awareness Pink" in to do some lighter highlights. I then highlighted the cape using a mix of the base "Charcoal, mixed with some Americana "Zinc", and then did lighter highlights with just the "Zinc'. After that, I highlighted the triangular hangings on her front with a mix of the "Charcoal" and some Citadel "The Fang". I then highlighted her pouch and belt, as well as the handle of the mace, with some Crafter's Acrylic "Cool Blue" mixed with some of the "Black".
I then highlighted the skull with some Americana "Bleached Sand", and afterwards highlighted her hair with Americana "Snow White". Turning back to the skull, I painted the crown on it with the "Black", and then went over the crown again with Folk Art Brushed Metal "Brushed Bronze". I finished the crown by highlighting it with Ceramcoat "Wedding Gold". Next, I painted her belt buckle and highlighted the mace with Folk Art Metallics "Gunmetal Grey". After that, I painted the fastener on her pouch and the skull on the bottom of her breastplate with Ceramcoat "Metallic Silver". Lastly, I painted the entire base with Americana "Mississippi Mud".
I let the figure dry overnight and the next day I gave it a coat of Americana "DuraClear Matte" varnish. I then used some white glue to glue some fine sand to the base. When the sand was dry, I painted it with a coat of Americana "Charcoal Grey". When this was dry, I drybrushed the sand with the "Mississippi Mud", and then with some Apple Barrel "Rock Grey"; lastly I drybrushed it with a little Americana "Dove Grey".
Another overnight dry, and I sprayed the figure with Testor's Dullcote".
I'm really happy with how this one turned out. There's just something about her stance and gaze that seems to have a lot of character. And I think the spider border on her robe turned out pretty good.
Subscribe to:
Posts (Atom)