Monday, April 6, 2015
No New Figure Today
Due to a having a really bad cold last week I was unable to complete any figures, and so will not be able to do my usual Monday posting. I'm going to try to get something ready to post on Thursday. See you all then.

Monday, March 30, 2015
Mother & Children: Figure 144 of 265
This week I painted the Mother & Children figure from the Townsfolk set. That leaves just one more figure to go to complete that set.
I prepped the figure in the usual way; soaking it in a dish of water with a couple drops of dish- soap added, then giving it a light scrub with a soft toothbrush, and then rinsing and drying. I then glued the figure to a 1" black-primed fender washer with Aleene's Tacky glue, and glued the washer to a tongue depressor with a couple drops of Elmer's White Glue.
 I began by painting the mother's dress with Folk art "Golden Harvest". I then painted the boy's tunic with GW "Ice Blue". I then went back to the mother and painted her top and apron with White.
 Next, I painted the baby's cloths with Americana "Dove Grey". Then I painted the mother's and boy's skin with Americana "Mocha", and the baby's with Apple Barrel "Apple Flesh" I painted the boy's shoes with Americana "Sable Brown", and the baby's booties and boy's socks with Folk Art "Barn Wood". Lastly, I painted the mother's shoes, and the integral white base, with accent "Real Umber"
 I painted the baby's hair with Americana "Moon Yellow", and then let the figure dry for a while. After it was good and dry, I gave the entire figure a wash with GW "Agrax Earthshade" wash, using a wet brush.
 After the wash was dry, I painted the mother's and boy's hair Black. I then drybrushed it with some Duncan "Slate Blue" to add highlights. Next, I painted the eyes on all three figures, with Black sockets, White whites, an Black pupils. Doing those tiny baby eyes was quite a challenge, and he turned out a bit wobbly-eyed; but I could only paint over them so many times. I then did skin highlights on the boy and mother with the "Mocha", then added a little white to it to do further highlights. The boy basically has no molded nose, so I tried as best I could to paint one in with highlights. Same with the baby, who I did skin highlights on with the "Apple Flesh" with a little white added. I then highlighted the boys tunic with the "Ice Blue" with a little white added, and the mother's dress with the "Golden Harvest" with a little white added. I highlighted her apron and top with plain white, and the baby's clothes with the plain "Dove Grey". I highlighted the baby's hair with Apple Barrel "Lemon Chiffon". Lastly, I painted the entire base with GW "Khemri Brown".
The next morning I gave the figure a coat of Ceramcoat "Matt Varnish". The following day, I sprayed the figure with "Testor's Dullcote".
 I'm really please with how this little vignette turned out, despite the lack of detail on the kids' faces.
Figure 144 of 265: Complete
I prepped the figure in the usual way; soaking it in a dish of water with a couple drops of dish- soap added, then giving it a light scrub with a soft toothbrush, and then rinsing and drying. I then glued the figure to a 1" black-primed fender washer with Aleene's Tacky glue, and glued the washer to a tongue depressor with a couple drops of Elmer's White Glue.
The next morning I gave the figure a coat of Ceramcoat "Matt Varnish". The following day, I sprayed the figure with "Testor's Dullcote".
Figure 144 of 265: Complete
Thursday, March 26, 2015
Water Wierd Translucent from Bones II
This week I also completed the blue translucent Water Weird figure from Bones II. I prepped the figure in the usual way; soaking it in a dish of water with a couple drops of dish- soap added, then giving it a light scrub with a soft toothbrush, and then rinsing and drying. I then glued it to a 1" black-primed fender washer with Aleene's Tacky glue, and glued the washers to a tongue depressor with a couple drops of Elmer's White Glue.
 First, I gave the "creature" part of the figure a heavy wash with Iron Wind Metals "Dark Blue" ink. I used a brush I had dipped in water, to help thin the ink slightly.
 When the ink was good and dry, I drybrushed the figure with plain white. I then painted the vessel and washer with Apple Barrel "Rock Grey".
 When the grey paint was thoroughly dry, I gave the vessel a wash with thinned Black ink. When the ink was dry, I gave the vessel a good drybrushing with the base "Rock Grey", and then some lighter highlights with Americana "Dove Grey".
The next morning I gave the figure a coat of Ceramcoat "Mate Varnish". The following day, I sprayed the figure with "Testor's Dullcote". After the Dullcote had had a day to dry, I painted the "water" part with Americana "DuraClear Gloss Varnish".
 I'm really pleased with how this figure turned out. I really like the texture juxtaposition between the wet water and the gritty old vessel.
The next morning I gave the figure a coat of Ceramcoat "Mate Varnish". The following day, I sprayed the figure with "Testor's Dullcote". After the Dullcote had had a day to dry, I painted the "water" part with Americana "DuraClear Gloss Varnish".
Monday, March 23, 2015
Innkeeper and Wench: Figures 142 and 143 of 265
This week I painted the Innkeeper and Wench from the Townsfolk set. Since they were both such basically simple straightforward figures, I thought I'd work on both of them at the same time.
I prepped the couple in the usual way; soaking them in a dish of water with a couple drops of dish- soap added, then giving them a light scrub with a soft toothbrush, and then rinsing and drying. I then glued each figure to a 1" black-primed fender washer with Aleene's Tacky glue, and glued the washers to a tongue depressor with a couple drops of Elmer's White Glue.
 First, I painted the Wench's dress, and the Innkeeper's pants with Americana "Wedgwood Blue" I then painted the Innkeeper's shirt with Americana "Khaki Tan". Next, I did the aprons on both of them, and the Wench's shirt, with White. I worked on their skin next, painting the Innkeeper with Americana "Mocha", and the Wench with Apple Barrel "Apple Flesh"
 Next, I painted the beer mugs with Duncan "Slate Grey". I then painted the Innkeeper's hair and eyebrows with Folk Art "Medium Grey". I moved on to painting the Wench's hair Crafter's Edition "Spice Brown". I used the "Spice Brown" to also paint the Innkeeper's belt and shoes. I painted the Innkeeper's cleaning rag with Folk Art "Barn Wood". I finished up with painting the foam in the beer mugs with Americana "Buttermilk".
 After everything had a chance to dry, I then gave both figures a head to toe wash with GW "Agrax Earthshade" wash, using a wet brush.
 When the wash was good and dry, I began the detailing. I started with the eyes, doing both sets with White whites and then Black pupils. Next, I did their hair highlights, using the "Slate Grey" for the Innkeeper, and Americana "Sable Brown" for the Wench. Skin highlights were next with the base skin colors I had used. I followed with doing highlights on the pants and dress with the base "Wedgwood Blue", I then mixed in a little Folk Art "Settlers Blue" to the "Wedgwood Blue"to lighten it, and did some further highlights. I then used the base "Khaki Tan" to highlight the Innkeeper's shirt. The aprons were next, and I used plain white to do their highlights, along with the Wench's shirt as well. I highlighted the cleaning rag with the base "Barn Wood", and the beer foam with the base "Buttermilk". I wrapped up the figures with doing small designs on each of the mugs with a mix of the "Wegdewood" and "Settlers" blues. lastly, I painted the bases and washers with GW "Khemri Brown".
I let the figures sit overnight, and the next morning I gave them a coat of Ceramcoat "Matte Varnish". That afternoon I gave the figure a coat of Testor's "Dullcote" spray varnish.
 Well, file these with figures that might have been great. I unfortunately do not often notice the flashing on these bright white Bones figures until after I've started, and by then it's too late; much to the detriment of these figures. It seems I do a figure like these with the bad flashing, then become hyper about checking, then get several flash free figures and get lazy and start not checking, then get surprised with another like these...it's a bad cycle. Granted these are "background scenery' figures in most cases, so it's not the worst that could happen. I also was a little heavy handed with the wash on the Innkeeper's face, and it left a bit of a splotch by his nose on the left, I tried my best to hide it, but you can still see a bit of it. Oh, well. So, I move on to the figure next in line...
Be sure to tune in Thursday for another Bones II figure.
Figures 142 & 143 of 265: Complete
I prepped the couple in the usual way; soaking them in a dish of water with a couple drops of dish- soap added, then giving them a light scrub with a soft toothbrush, and then rinsing and drying. I then glued each figure to a 1" black-primed fender washer with Aleene's Tacky glue, and glued the washers to a tongue depressor with a couple drops of Elmer's White Glue.
I let the figures sit overnight, and the next morning I gave them a coat of Ceramcoat "Matte Varnish". That afternoon I gave the figure a coat of Testor's "Dullcote" spray varnish.
Be sure to tune in Thursday for another Bones II figure.
Figures 142 & 143 of 265: Complete
Sunday, March 22, 2015
Dwarven Forge Adds Battlements, More Street Sets, and Sewers Only Pledge Level
I just wanted to let folks know that Dwarven Forge has now added Battlement sets, and several expanded Street sets to their City Builder Kickstarter. And, with just two weeks to go, it's a great time to jump in on these deals.
You can check it out here: Dwarven Forge City Builder
UPDATE: In response to popular demand, Dwarven Forge just added a Sewers Only pledge level, so folks can buy into the sewer stuff without having to buy any of the building stuff.


You can check it out here: Dwarven Forge City Builder
UPDATE: In response to popular demand, Dwarven Forge just added a Sewers Only pledge level, so folks can buy into the sewer stuff without having to buy any of the building stuff.
Thursday, March 19, 2015
Blue Translucent Crystal Outcropping from Bones II
I continued to work on the translucent Blue set from Bones II this past week, doing the big crystal outcropping. My plan was to do this just like the Ice Golem from last week.
I prepped this figure in the usual way; soaking it in a dish of water with a couple drops of dish- soap added, then giving it a light scrub with a soft toothbrush, and then rinsing and drying. I then glued the figure to a 1.5" black-primed fender washer with Aleene's Tacky glue. The washer was big enough to hold, comfortably, so I didn't glue it to a tongue depressor like I usually do.
 I began by giving the crystals a heavy wash with Iron Wind Metals "Dark Blue" ink with a pin point of dish soap added to help it flow into the crevices. I used a brush I had dipped in water, to help thin the ink slightly. Then, when the ink was good and dry, I drybrushed the figure lightly with Americana "Salem Blue", and then went over that with a drybrushing of plain white.
 Lastly, I painted the base white; then after everything had had time to dry, I gave the figure a coat of Cermacoat "Matte Varnish". When this was good and dry, I gave the base a coat of Elmer's white glue and flocked it with Woodland Scenics "Snow" Flock. I didn't spray with the usual Testor's "Dullcoat", as I liked the slight sheen left over from the Ceramcoat "Matte Varnish" (Which is not 100% Matte.)
 I think it turned out pretty good. I'm thinking it might be neat if this turned into the Golem as some unsuspecting adventurer is passing by. :)
I prepped this figure in the usual way; soaking it in a dish of water with a couple drops of dish- soap added, then giving it a light scrub with a soft toothbrush, and then rinsing and drying. I then glued the figure to a 1.5" black-primed fender washer with Aleene's Tacky glue. The washer was big enough to hold, comfortably, so I didn't glue it to a tongue depressor like I usually do.
Monday, March 16, 2015
Dain Deepaxe, Dwarf Fighter: Figure 141 of 265
This week I wrapped up the Dwarves Set by painting Dain Deepaxe. The Dwarves now join the list of completed sets over in the right-hand column. This was a rather straightforward figure to paint, and didn't really pose any real challenges.
I prepped this figure in the usual way; soaking it in a dish of water with a couple drops of dish- soap added, then giving it a light scrub with a soft toothbrush, and then rinsing and drying. I then glued the figure to a 1" black-primed fender washer with Aleene's Tacky glue, and glued the washer to a tongue depressor with a couple drops of Elmer's White Glue.
 I began by painting the figure with black, and when dry, gave it a heavy drybrushing of Ceramcoat "Metallic Pewter". I then went over this with a lighter drybrushing of Folk Art "Silver Sterling".
 Next, I painted his face and and hands with Americana "Shading Flesh", his pants with Anita's "Burnt Sienna"; and his loin hanging, scabbard and shield with Americana "True Blue".
 The back of his shield I painted with Americana "Zinc", the handle of his ax I painted Americana "Sable Brown", and the grips on his sword and hammer and the straps on his shield I painted Accent "Real Umber" His boots, and his backpack I painted with Americana "Asphaltum".
 I did the little pouch on his back with GW Snakebite Leather", and the blanket roll with Folk Art "Settlers Blue". His beard I painted with "Crafter's Edition "Spice Brown". I painted the base of the horns with Americana "Charcoal Grey" and then blended that with Americana "Buttermilk" to paint the middle, and lastly painted the points with plain "Buttermilk". The fur around the base of the horns, and the rope tying the blanket roll, I painted with Americana "Khaki Tan"
 After everything had a while to dry, I gave the figure a wash with GW "Agrax Earthshade" wash.
 When the wash was good and dry, I worked on his face; painting in his eyes with black sockets, white whites, and black pupils. I then did highlights on his face and hands with the base "Shading Flesh". Likewise, I did highlights on his beard, pants, blanket roll, pouch, loin hanging, and scabbard all with the base colors. I also did some further lighter highlights on his beard with the "Sable Brown".
Next I worked on the metallics, painting the decorations on his loin hanging, scabbard, shield, sword hilt, helmet, beer stein, and beads in his beard with Ceramcoat "Bronze". I then went back over these and added highlights with Ceramcoat "14K Gold". I then did final highlights on his armor and weapons with the "Silver Sterling".
I let the figure sit all day, and that evening I gave it a coat of Ceramcoat "Matte Varnish". The next morning I flocked the base, and that afternoon I gave the figure a coat of Testor's "Dullcote" spray varnish.
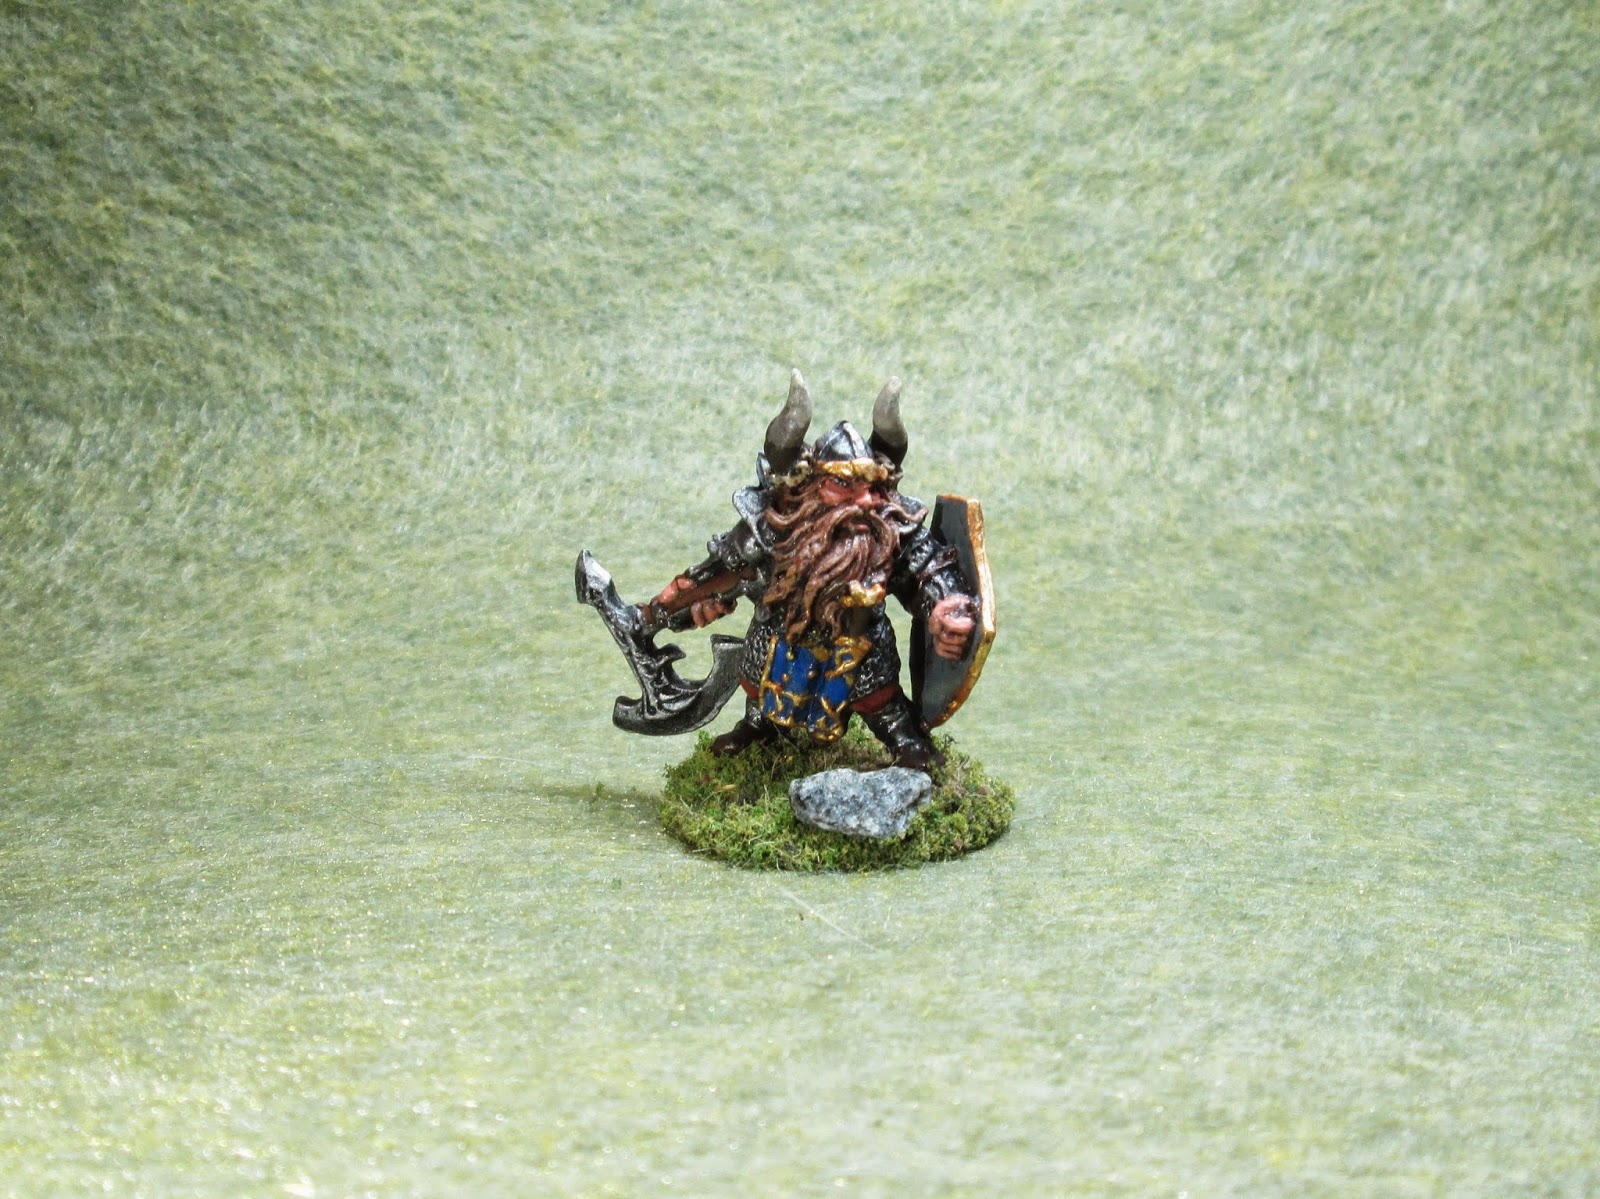 I like how this little guy turned out. I think there's some nice character to the sculpt.
 Next, I will be working on completing the Townsfolk set. And, tune in Thursday for another figure from Bones II.
Figure 141 of 265: Complete
I prepped this figure in the usual way; soaking it in a dish of water with a couple drops of dish- soap added, then giving it a light scrub with a soft toothbrush, and then rinsing and drying. I then glued the figure to a 1" black-primed fender washer with Aleene's Tacky glue, and glued the washer to a tongue depressor with a couple drops of Elmer's White Glue.
Next I worked on the metallics, painting the decorations on his loin hanging, scabbard, shield, sword hilt, helmet, beer stein, and beads in his beard with Ceramcoat "Bronze". I then went back over these and added highlights with Ceramcoat "14K Gold". I then did final highlights on his armor and weapons with the "Silver Sterling".
I let the figure sit all day, and that evening I gave it a coat of Ceramcoat "Matte Varnish". The next morning I flocked the base, and that afternoon I gave the figure a coat of Testor's "Dullcote" spray varnish.
Figure 141 of 265: Complete
Subscribe to:
Posts (Atom)