Monday, December 20, 2021

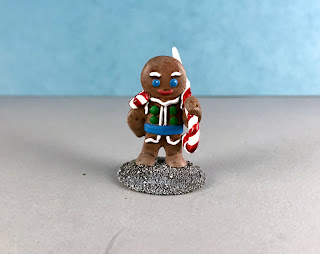
Gingerbread Knight: Christmas 2021 Promo Figure

     The past two week I worked on the Gingerbread Knight, which was a Bones USA promo figure that came in this year's Reaper Christmas Sampler.  With all that was going on with preparation for Christmas, I thought this would be a fast and fun figure to work on.
        I prepped the figure in the usual way, soaking the parts (comes with the left arm as a separate piece) in a dish of water with a couple drops of dish-soap added, then giving them a light scrub with a soft toothbrush, and then rinsing and drying them.  I then glued the arm to the body using Gorilla superglue gel. Next, I glued the figure to a 1" primed metal washer, using Aleene's Tacky Glue.  I glued the washer to a tongue depressor with a couple drops of Elmer's School Glue. 
     I tried to take the easy route first and use Citadel Contrast paint for the gingerbread.  So I gave the figure a base coat of Ceramcoat "White"; and when dry, I mixed some Citadel Contrast "Fyreslayer Flesh" and Citadel Contrast "Snakebite Leather" together and painted it on the figure.  When dry, I was sad to see that it came out very mottled.  I had hoped it wouldn't, but knew in the back of my mind that it probably would.  Oh, well; I tried.
     I then started over, painting directly over the Contrast paint, with a mix of Folk Art "Teddy Bear Brown" and a little Accent "Mustard Seed".  When dry, I gave the entire figure a coat of Citadel Shade "Agrax Earhdahde".  I let that dry, and then drybrushed the figure with some Reaper MSP "Ginger Cookie", because I just had to.  :) 
     Next, I painted all the icing decorations, as well as his epaulette and candy cane, with Americana "Snow White"  I let that dry, and then did his eyes and belt with a mix of Reaper MSP "Ultramarine Blue" and  Crafter's Acrylic "Tropical Blue".  Then I painted his mouth a mix of Folk Art "Tomato Red" and Crafter's Acrylic "Tutti Frutti".  After that, I painted his buttons with Crafter's Acrylic "Holiday Green".
     I then painted the stripes on the candy cane and epaulette with some Citadel Contrast "Blood Angels Red" in hopes it would give it a bit of a translucent look. When it was dry, I touched up all the white parts of the icing with Reaper MSP "Peppermint White".  Again, becuase I felt I just had to. :) Lastly I painted the entire base with Americana "Zinc". 
      I let the figure dry overnight and the next day I gave him a coat of Americana "DuraClear Matte" varnish.  Then when the varnish was dry, I used some white glue to glue some sand onto the base.  When this was dry I  painted it with Citadel Contrast "Basilicanum Grey".  When that was dry,  I drybrushed the sand withAmericana "Grey Sky".  Another overnight dry, and I sprayed the figures with Testor's Dullcote".   Afterwards, I went back and painted the epaulette and candy cane with some Americana "DuraClear Gloss" varnish.


     I'm pleased with how this fun figure turned out. It was just the perfect simple sculpt to tackle in the busy weeks leading up to Christmas.

Monday, December 6, 2021

Durman's Ledgers: Bones 5 Figures

      Over the past few weeks, as time permitted, I worked on painting the pair of "Durman's Ledgers" I had from ordering two of the Dwarf King's Crypt Encounter Set from the Bones 5 Kickstarter.  This past week I finally finished them up. 
      I prepped the figures in the usual way, soaking them in a dish of water with a couple drops of dish-soap added, then giving them a light scrub with a soft toothbrush, and then rinsing and drying them.  I then glued them to 1.25" primed metal washers, using Aleene's Tacky Glue.  I glued the washers to a tongue depressor with a couple drops of Elmer's School Glue.
     I began by painting the bases of the bookstands with Ceramcoat "Charcoal".  I then painted the top parts of the stands with Americana "Snow White".  When dry, I used Citadel Contrast "Templar Black" to make marble-like striations on the white tops, doing some with the paint straight from the bottle, and some thinned a little.
     Next, I painted the pages of the books with Ceramcoat "White".  I then painted the cover of the lefthand book with Reaper MSP "Auburn Shadow".  I then used this color to paint the bookmark of the righthand book.  Then, I painted the cover of the righthand book with Accent "Mustard Seed", and then used this color to paint the bookmark of the lefthand book.  There appeared to be some sort of clasp mechanisms on the edges of the covers, so I painted them with Folk Art Brushed Metal "Brushed Bronze".  I also used the "Brushed Bronze" to paint the metal plates on the bookmarks.
      I let everything dry for a while,  and then gave the bookstands a coat of Citadel "Nuln Oil" Shade.    Then, I painted the pages of the books with Citadel Contrast "Skeleton Horde".  I followed with using some Citadel "Agrax Earthsahde" Shade on the book covers and the bookmarks.
     I let all the washes dry, and then drybrushed the bottoms of the bookstands with Americana "Zinc", Crafters Acrylic "Storm Cloud Grey", and Americana "Grey Sky".  I then carefully applied some highlights to the tops of the bookstands with the base "Snow White". 
     Next, I drybrushed the book pages with Americana "Bleached Sand".  I then painted in some text, using Reaper MSP "Heraldic Red" for the big letters, and the "Charcoal" for the small text.  After that, I highlighted the lefthand book cover with the base "Auburn Shadow", and the lefthand book cover with the base "Mustard Seed". I finished up by highlighting the metal parts with Ceramcoat "Metallic Bronze". 
      I then painted the bases with Americana "Neutral Grey"; and when dry, I went around the outline of the bookstand bottoms with some of the "Nuln Oil".
      The next day I gave both pieces a coat of Americana "DuraClear Matte" varnish.   Another overnight dry, and I sprayed all the pieces with Testor's Dullcote".    


     I'm really happy with how these turned out.  One of the few times the end result matched the original vision I had had in my head.

     My next post will be in two weeks on December 20th.

Monday, November 29, 2021

New Posting Schedule Reminder: 1st & 3rd Mondays

     I just wanted to remind my readers, as I announced a couple weeks ago, I am changing my new figure posting schedule to now be only on the first and third Monday of each month.  So please tune back in on December 6th for my next post.  See you then!


Monday, November 22, 2021

Dwarf Statues: Bones 5 Figures, Part 2 (Completed)

      A couple weeks ago, I started work on the pair of "Dwarf Statue" models from the two The Dwarf King's Crypt Encounter Sets that I got through the Bones 5 Kickstarter.   This past week I had time to complete them.  There wasn't much left to do.
     For Part 1, see: Dwarf Statues Part 1

     I let the painting I had done in Part 1 dry for a bit, and then I gave the top part of both statues a thinned coat of Folk Art "Patina".  I let this dry, and then went back and drybrushed it with Folk Art "Celadon Green".
      I let the Statues dry overnight and the next day I gave them a coat of Americana "DuraClear Matte" varnish.  Then when the varnish was dry, I used some white glue to glue some sand onto the bases.  When this was dry I  painted it with Citadel Contrast "Black Templar".  When that was dry,  I drybrushed the sand with Folk Art "Rock Grey", and then a bit of Folk Art "Porcelain White".  Another overnight dry, and I sprayed the figures with Testor's Dullcote".       


  I'm happy with these terrain pieces, and glad I decided to go with the metal and rock scheme, rather than doing them as all rock.  I still haven't perfected my verdigris bronze look yet, but am pleased with how it turned out this time.
     

Monday, November 15, 2021

Dwarf Statues: Bones 5 Figures, Part 1

      For the past couple of weeks, I have been working on painting a pair of the "Dwarf Statue" models from the pair of The Dwarf King's Crypt Encounter Sets that I got through the Bones 5 Kickstarter.   
     I've come to realize that life has gotten much busier for me this year, and I'm not finding the time to paint my Bones like I used to.  Therefore, going forward, I'm going to try changing my posting schedule to just the first and third Monday's each month rather than having to do these 2-part posts that I find myself doing more and more often. 
      I prepped the pair of figures in the usual way, soaking them in a dish of water with a couple drops of dish-soap added, then I gave them a light scrub with a soft toothbrush, and then rinsed and dried them.  I then glued the figures to 2" primed metal washers with some Aleene's Tacky glue.  When that glue was dry, I glued each one to a tongue depressor with a couple drops of Elmer's glue. 
     While I believe these are intended to be all stone, that felt too drab to me, so I decided I would paint the base as stone, and the tops as bronze covered in verdigris.
     So, I began by painting the bases the same way I had painted the bases of the "Everliving Flames" that belong to this set back in September.   To start, I painted the bases with Ceramcoat "Charcoal".  When dry, I  drybrushed them with, first, Americana "Zinc", and then Crafter's Acrylic "Storm Cloud Grey".
     Next, I did some final highlights with a bit of Americana "Grey Sky".   Then, I painted the statues with Accent "Mustard Seed"   to give a good base color; and when dry, repainted the statues with Folk Art Brushed Metal "Brushed Bronze".
     When the "Brushed Bronze was dry, I gave the top statue portions a wash with Citadel "Agrax Earthshade" Shade.   When that was dry, I drybrushed the statues with, first, Ceramcoat "Metallic Bronze", and then a little Deco Art Dazzling Metallic "Bright Brass".
    And that's as far as I've progressed.    Please tune in next Monday for the conclusion.


Monday, November 8, 2021

No Post this Week

   I was out of town for a memorial service Friday through Sunday, so was unable to finish painting a figure, or even get a partial post written up.  Please stay tuned for next week, when hopefully regular Monday posts will resume.


Monday, November 1, 2021

Durman's Tomb and Queen's Tomb: Bones 5 Figures.

     This past week I painted the "Durman's Tomb" model from the Bones 5 The Dwarf King's Crypt Encounter Set; and I also painted the Queens Tomb conversion I did from my second "Durman's Tomb" model that I had worked on back in the beginning of the month.
    This model is actually in three parts; the lid of the tomb, the base of the tomb, and a corpse insert that fits within the tomb.  I deiced to paint each part separately, since the way the tomb is constructed required that I paint both insides and undersides of the parts.  
     I decided I wanted to paint the tombs like marble, as I figured the Dwarf royalty deserved something a little more fancy than plain carved stone. I then needed to decide on a color of marble.  Black and Red both seemed to indicate more of an evil tomb in my mind, where as white seemed to holy, and green seemed more Elvish.  This left me with blue, which I felt was a worthy color for the Dwarf King and Queen.
    The other decision I made was to not do any conversion work on the second corpse insert to make it more Queen-looking.  In practical game terms the times that the appearance of the inner corpse would matter would be so few and far between (if ever!) it did not warrant the effort it would take to do the conversion.
     I began with the pair of corpses; having pre-washed and dried them, I used a bit of blue-tac to secure them to a tongue depressor.
     I egan by painting the piece entirely with Ceramcoat "White".  When dry, I gave the floor of the tomb a coat of Citadel Contrast "Ultramarines Blue".  When this was dry, I used some Americana "Snow White" to make thin striations on the floor to make it look like marble.
     Next, Next, I painted both the bodies entirely with Citadel Contrast "Basilicanum Grey".  When dry, I went over the armor areas with Citadel Contrast "Templar Black".  Antoehr drying period, and then I drybrushed the amor with Reaper MSP "Scorched Metal".  next I did some dabbing on the metal with, first, Americana "Terra Cotta", and then, Americana "Tangerine" to give a rusty appearance.  Afterwards, I painted the heads, arms, and hands with Reaper MSP "Alien Flesh". 
     I then painted the boots with Americana "Charcoal Grey", and the soles with Ceramcoat "Charcoal".  Next, I painted the beards and hair with Crafter's Acrylic "Storm Cloud Grey", and their teeth with Americana "Bleached Sand".  After that, I painted the tunics wit Crafter's Acrylic "African Violet", the belt with Americana "Asphaltum", and the boot tops with Americana "Sable Brown".
     Next, I painted the crowns with Folk Art Brushed Metal "Brushed Bronze".  I then let everything dry for a while, and afterwards gave both corpses, but specifically not the floor, a wash of Citadel Shade "Nuln Oil". 
     When the "Nuln Oil" was dry, I painted the eyes with Apple Barrel "Lemon Chiffon", and then gave them pupils with Americana "Zinc".  Next, I highlighted the teeth with a little of the "White", and then drybrushed a little Folk Art Metallics "Gunmetal Gmay" over the armor.  After that, I highlighted the face, arms, and hands, with the base "Alien Skin", and added in a little Americana "Dove Grey" for lighter highlights. 
     I then highlighted the beards and hair with the base "Storm Cloud Grey", and did lighter highlights with some Americana "Grey Sky". Next, I highlighted he boots and belt with some Nicole's 'Brown", and the boot tops with the "Terra Cotta".  Lastly, I highlighted the tunics with Crafter's Edition "Purple Passion", and I highlighted the crowns with some Folk Art Metallics "Pure Gold". 
       I let the corpse inserts dry overnight and the next day I gave them a coat of Americana "DuraClear Matte" varnish.   When these were dry, I pulled them off the tongue depressor,  turned them over, and painted the undersides with the "White".  When this was dry, I applied a coat of the "Ultramarines Blue" to the underside of the inserts.  I let the inserts dry overnight again, and the next day I gave the undersides a coat of Americana "DuraClear Matte" varnish as well. 

   I put those pieces aside, and began work on the tombs themselves.  The lids I affixed to a tongue depressor with blue-tac like I had done with the corpse inserts.  The tomb bottoms I glued to 2" grey primed washers, and attached these to a tongue depressor with a couple drops of Elmers glue each. 

     Like with the inserts, I began by giving these pieces complete coats of the Ceramcoat "White".  When dry, I gave the lids and bottoms complete coats of the Citadel Contrast "Ultramarines Blue".  I let this dry, and then drybrushed the pieces with some Crafter's Acrylic "Cool Blue"

     I didn't feel the highlights were light enough, so I mixed some Americana "Snow White' into the "Cool Blue", and did some more drybrushing for lighter highlights.  Afterwards, I used the "Snow White" to add thin striations all over the pieces to help give the marble look.
     I then painted the bases on the tomb bottoms with Americana "Neutral Grey"; and when dry, I went around the outline of the tomb bottoms with some of the Citadel Shade "Nuln Oil".
      I let the tomb lids and bases dry overnight and the next day I gave them all a coat of Americana "DuraClear Matte" varnish.   When this was dry, I pulled the lids off the tongue depressor,  turned them over, and painted the undersides with the "White".  When this was dry, I applied a coat of the "Ultramarines Blue" to the underside of the lids.  I let the lids dry overnight again, and the next day I gave the undersides a coat of Americana "DuraClear Matte" varnish as well.   
 Another overnight dry, and I sprayed all the pieces with Testor's Dullcote".    

     I'm really happy with how these turned out.  The splotchy results the Contrast paint usually gives on flat surfaces really served well here to help give the marble look.