Monday, January 25, 2016

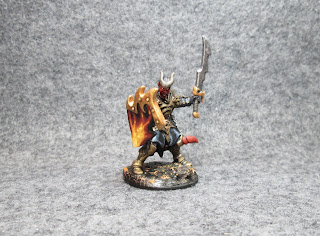
Vandorendra, Snake Demon: Figure 193 of 266

     This week I wrapped up the Bedevilled Set by painting Vandorendra, Snake Demon.  The Bedevilled Set now joins the list of completed sets over in the righthand column.  I'm going to take a short break from doing Vampire sets next week, and start working on 4 of the Orcs from the Orcpocalpyse add-on set.  I realized I didn't want to get to the end of painting the Bones I Vampire pledge, and suddenly be faced with 20 orcs to paint, so I thought I'd start feeding them in between sets.
      I prepped Vandorendra in the usual way; soaking the figure in a dish of water with a couple drops of dish- soap added, then giving it a light scrub with a soft toothbrush, and then rinsing and drying it.  I then glued the figure to a black-primed 1.25" fender washer with Aleene's Tacky glue, and then glued the washer-mounted figure to a tongue depressor with a couple drops of the Elmer's glue.

     I began by painting her entire upper body, and the underbelly scales, all Ceramcoat "Territorial Beige".  I then painted the rest of her upper snake scales with Crafters Acrylic "Cinnamon Brown".  I also painted the area of the base in between her snake coils; were the skull, bones, and sword are, as well as the weapon grips, with Ceramcoat Walnut.  Next, I painted all the weapon hilts and jewelry with Ceramcoat "Bronze".
    After the first colors had had a while to dry, I gave the entire a figure a wash with GW "Agrax Earthshade" wash.  When the wash was dry, I painted her hair black.  I also painted the skull and bones on the base with Americana "Khaki Tan", and the sword scabbard with Apple Barrel "Burnt Sienna".
     Next, I highlighted the hair with a mix of Folk Art "Cloudy Day" and Black, then I did finer highlights with just the "Cloudy Day".  Then lastly, I mixed a little White with the "Cloudy Day" and did some spot highlights on the hair.  I also did highlights on the the skull and bones with Americana "Buttermilk, and finer highlights with Crafter's Acrylic "Light Antique White".  I then finished painting the ground under the skull, bones, and scabbard by drybrushing it lightly with GW Khemri Brown", and then Crafter's Edition "Taupe"
     I then painted her eyes, giving her pupils with Apple Barrel "Apple Maroon", I also used the "Apple Maroon" to paint the tiny gem on her forehead".  Next I mixed some of the "Apple Maroon" with some of the Territorial Beige" to paint her lips.  Next, I highlighted her skin and the underbelly scales with the base "Territorial Beige", I then mixed a little Crafter's Acrylic "Flesh" with the "Territorial Beige" to do some lighter highlights.   I followed this with doing highlights on the rest of the scales with Americana "Sable Brown."   Next, I painted her nipples with Americana "Charcoal Grey" mixed with a little of the "Territorial Beige". 
       My next step was to paint all the weapon blades with Folk Art "Gunmetal Grey".   Then, I used Ceramcoat 14K Gold to  highlight all the weapon hilts and jewelry that I had painted Bronze earlier.  I then went back and used Folk Art Silver Sterling to add highlights to the blades.  Lastly, I painted the rest of the figure's integral base with the "Walnut".
     After the figure had the afternoon to dry, I gave it a coat of Ceramcoat "Matte Varnish" in the evening.  The next morning I flocked the base using a sand mixture, and later that afternoon I sprayed the figure with Testor's Dullcote.  

   
I'm very pleased with how this figure turned out.  I was interested to see how the "Territorial Beige" would work for a darker skin tone, and I think it came out looking pretty good.  

Figure 193 of 266: Complete


Thursday, January 21, 2016

Bones II: Two Skeletons

     This week I also completed two skeletons fro the Bones II "Shambling Dead" set.  In the past I have always painted my skeletons by priming them black, and then drybrushing them with various shades of off-whites and white.  This time, I wanted to try starting with a white undercoat, and then using a black wash to darken the recesses.  I also wanted to try using a darker off-white in my drybrushing.
      I prepped the figures in the usual way; soaking them in a dish of water with a couple drops of dish- soap added, then giving them a light scrub with a soft toothbrush, and then rinsing and drying them.  I then glued one of the figure to a white-primed 1" fender washers with Aleene's Tacky glue and the other to a black primed 1" fender washer.  I then glued the washers to a tongue depressor with a couple drops of the Elmer's glue each.
     I began by painted both skeletons entirely with White.  When the White was dry, I gave both a wash with GW "Badab Black" wash.

     I drybrushed them first with Americana "Khaki Tan", and then with Americana "Buttermilk", then lastly with Crafters Acrylic "Light Antique White".  

     I then painted the shaft of the halberd, and the bow, with Americana "Mississippi Mud".  Next, I painted the head of the halberd, and the base of the archer, with Ceramcoat "Walnut".  I also painted the base of the halberdier with Americana "Neutral Grey".   My next step was to give the halberd shaft and the bow a wash with GW "Agrax Earthshade" using a wet brush.  While I had the "Agrax Earthsahde" out, I also used some of it with a fine brush to help delineate some of the bone joints that had become obscured by the drybrushing.   
     I then worked on completing the rust effects on the halberd head by adding splotches of Crafters Edition "Spice Brown", and then some lighter splotches of  Accent "Golden Oxide" to give the impression of rust.  Afterwards, I drybrushed it lightly with Some Folk Art "Gunmetal Grey".  I then worked on the rocks that the halberdier stands on, and drybrushed them with Crafter's Acrylic "Storm Cloud Grey", followed by Folk Art "Platinum Grey"
    When everything had overnight to dry, I gave the figures a coat of Ceramcoat "Matte Varnish".  That afternoon I flocked the halberdier's base with Woodland Scenics "Snow" flock, and the archer's base with regular green flock.  The next day, I sprayed the figures with Testor's Dullcote.

     I'm pleased with how the new methods I tired turned out.  I think these skeletons turned out looking pretty good.  

Monday, January 18, 2016

Tiviel, Hellborn Rogue: Figure 192 of 266

    This week I completed Tiviel Hellborn Rogue, from the Bedevilled set.  I now only have one more figure left to do from this set.
    When looking at this figure there was something about it that looked more Sci-Fi than Fantasy to me.  I don't know if it was the outfit, or the stance, or just the general demeanor of the figure; but to me it looked a bit more like a Star Trek alien than a fantasy world demon. So, I decided to go with that for my painting scheme.
     I prepped the figure in the usual way; soaking it in a dish of water with a couple drops of dish- soap added, then giving it a light scrub with a soft toothbrush, and then rinsing and drying it.  I then glued the figure to a black-primed 1" fender washer with Aleene's Tacky glue, and then glued the washer-mounted figure to a tongue depressor with a couple drops of the Elmer's glue.
     I began by painting all her skin with Americana "Olive Green".   I then made a 50/50 mix of Iron Wind Metals "Mid Green" and "Dark Green" inks, and applied it on the skin using a wet brush.
  When the wash was dry, I painted her pants with Ceramcoat "Raw Sienna". I then did highlights on the pants with Folk Art "Mustard Seed", and finer highlights with Crafter's Acrylic "Daffodil Yellow".  Next, I painted her chaps with Black.
     I then did highlights on the chaps with a mix of Black and Ceramcoat "Denim Blue".  I painted her top next with Americana "Neutral Grey"; then painted the pouches, belt, and dagger handles with Americana "Asphaltum".   I next painted her hair with Americana "Forest Green", and her horns with Americana "Zinc".
     I then highlighted her top with Folk Art "Platinum Grey", and then painted her wrist ornamentations with Black, and highlighted them with a mix of Black and the "Denim Blue". While I had the "Denim Blue" out, I also used it to paint her dagger blades and do some highlights on her horns.  Next, I painted over her top with Folk Art Extreme Glitter "Hologram" paint to make it look glittery.  I then painted her dagger blades again, this time with "Metallic Blue Sapphire", and then did highlights on the blades with Folk Art Pearl "Aqua Moire".
      At this point I painted her boots,  shoulder and tail armor, dagger fittings and the decorations on her top with Ceramcoat "Bronze".  When dry, I gave the "Bronze parts a careful wash with GW "Agrax Earthshade" wash using a wet brush.   When the wash was dry, I highlighted the "Bronze" with Ceramcoat "14K Gold".
     Next, I painted her hair again, this time with Folk Art "Metallic Emerald Green", then added some White to the "Metallic Emerald Green" and did some highlights on the hair.  I then painted her eyes, and then did her lips with the "Forest Green".  I then highlighted her skin with the base "Olive Green".   Lastly, I painted her integral base with Black.
    When everything had overnight to dry, I gave the figure a coat of Ceramcoat "Matte Varnish".   When that was dry, I then spread glue on the base and covered it with black sand.  When dry, I drybrushed the sand with the "Neutral Grey".  Then, the following day, I sprayed the figure with Testor's Dullcote.

     I'm pleased with how the Sci-Fi look turned out on her.  I think she looks like a good alien assassin, or perhaps some sort of exotic knife dancer.

Figure 192 of 266: Complete

Friday, January 15, 2016

Bones II: Three Armored Skeletons

     Last week I finished these three armored skeletons from the Bones II Shambling Dead set for use in my Frostgrave games.  I had hoped to post these last Thursday (but didn't finish them in time), then I was so busy yesterday I forgot to finish up this article, so I am posting them today.
      I prepped the figures in the usual way; soaking them in a dish of water with a couple drops of dish- soap added, then giving them a light scrub with a soft toothbrush, and then rinsing and drying them.  I then glued the figures to white-primed 1" fender washers with Aleene's Tacky glue.  I then glued the bases of the figures to a tongue depressor with a couple drops of the Elmer's glue each.
      I began by painting all the skeletons Black.  When the Black was dry, I drybrushed them first with Americana "Buttermilk", then with Crafters Acrylic "Light Antique White".

  I then painted their armor, the sword, axe head, and spear point, as well as the shield, with Ceramcoat "Walnut".  I then added splotches of Crafters Edition "Spice Brown", and then some lighter splotches of  Accent "Golden Oxide" to give the impression of rust.
    I then finished up the rust effect by drybrushing the rusted surfaces with Folk Art "Gunmetal Grey".   Next, I painted the garment remnants on the first skeleton with Crafter's Acrylic "Navy Blue, the second skeleton with Apple Barrel "Apple Blue Spruce"for the bottom and Apple Barrel "Apple Maple Syrup" for the head piece, and the third with Anita's "Burnt Sienna".  I then highlighted the first with Americana "True Blue, the second's bottom with Folk Art "Hunter Green", and the third with Reaper MSP Bones "Cinnamon Red".   I then painted the rocky bases with Americana "Neutral Grey".
     I then dry brushed the rocky bases with Crafter's Acrylic "Storm Cloud Grey", followed by Folk Art "Platinum Grey".   Then I did the boots on the second and third skeleton with Americana "Asphaltum".  After painting the boots, I painted the spear shaft and axe handle with Americana "Mississippi Mud", then did the sword grip and any belts or straps the skellies had with Americana "Charcoal Grey"  When these were dry, I gave the boots, spear shaft, axe handle, sword grip, and the head cloth on the second skellie, a wash with GW "Agrax Earthshade" wash using a wet brush.  I also applied a wash of GW "Badab Black " wash around the tops of the boots on the second and third skellies to give the impression of them being open and having depth.
       When everything had overnight to dry, I gave the figures a coat of Ceramcoat "Matte Varnish".  That afternoon I flocked the base with Woodland Scenics "Snow" flock.  The next day, I sprayed the figures with Testor's Dullcote.
     I recently had a discussion with a follower of this blog named Jici, in the comments section of this recent article I posted featuring a couple skeletons, about the quality of my skeletons.  While perfectly suitable for the gaming use I intend them for, I've never been a hundred percent happy with them because, as Jici, pointed out, the heavy initial drybrushing obscures a lot of the detail.  So, I'm going to work on a couple skeletons for next week, using a method Jici recommends, using a white base first wth a black wash, instead of my usual method of black undercoat with a white drybrush.  I'm interested to see how it works for me.

Monday, January 11, 2016

Vaeloth, Hellborn Paladin: Figure 191 of 266

     Before getting into today's blog entry, I wanted to take care of a little bit of bookkeeping.  It always bothered me a little, after trading my "Bones I" Griffon figure away at Historicon '13 (See notations on figure total amounts on the top right column), that I wouldn't in fact end up painting all the "Bones I" Kickstarter figures; since I no longer owned that one figure. So, I finally rectified that problem over the holidays, and ordered a new Bones Griffon from Reaper.  I am now adding this figure back into the count, so my new total for this blog will be 266 figures.  These changes have been marked over in the top of the right hand column, and will be reflected in the figure countdown in each new figure article's title.
     Now, back to our regularly scheduled blogging! :)
    This week I continued to work on the Bedevilled set, and painted the Vaeloth, Hellborn Paladin figure.  Since I did the ice-devil blue-themed paint scheme on last week's figure, I though I would go for a more conventional red fire-themed paint job on this week's.
     I prepped the figure in the usual way; soaking it in a dish of water with a couple drops of dish- soap added, then giving it a light scrub with a soft toothbrush, and then rinsing and drying it.  I then glued the figure to a black-primed 1" fender washer with Aleene's Tacky glue, and then glued the washer-mounted figure to a tongue depressor with a couple drops of the Elmer's glue.

      I began by painting all the armor Black, and then when it was dry, drybrushing it with  Ceramcoat "Bronze".  I then drybrushed highlights with Cermacoat "14K Gold".
    I then repainted the garments under the armor, and the wolfskin cape hanging on his back, using Black; to cover areas where the metallic drybrushing had gotten onto parts I didn't want it. Afterwards, I drybrushed the wolf skin with Americana "Neutral Grey", followed by Crafter's Acrylic "Storm Cloud Grey".  I then added spot highlights with Folk Art "Platinum Grey".  Next, I painted the Wolf's nose and the top of his muzzle with Black.
     Next, I did highlights on all the black garments and straps using first GW "Shadow Grey", and then lighter highlights with Folk Art "Settler's Blue".   I painted the shield Black, and then painted his head and tail with Reaper MSP Bones "Cinnamon Red".
    I then went to work on the shield.  I thought the shape of the shield's top was somewhat reminiscent of flames, so I wanted to carry that image through on the shield's motif itself.   I began by painting the outer edge of the flames, almost filing the shield, using Folk Art "True Burgundy".  I then worked inward towards the center of the flame with this succession of colors: Crafter's Acrylic "Deep Red", Crafter's Acrylic "Orange Spice", Crafter's Acrylic "Pure Pumpkin, Americana "Tangerine", Apple Barrel "Yellow", Crafter's Acrylic "Daffodil Yellow", and lastly a small center of White.  While I had the "Pure Pumpkin open, I also used it to paint the figure's base.
     My next step was to give the face and tail a wash with Winsor-Newton "Peat Brown" ink using a wet brush.  I then painted his hair Black, and when it was dry, I drybrushed it with the "Shadow Grey", followed by the "Settlers Blue".  After that, I painted his horns and the sword grip with Americana "Charcoal Grey", and did highlights on them both with Americana "Mississippi Mud".   I then painted his eyes, giving them "Deep Red" pupils; and I also, at this time, painted the wolf's eyes with the "Deep Red" as well.  I then painted the figure's teeth White, and did small highlight dots on the wolf's eyes with the White while I had it out.  Next, I highlighted the figure's head and tail, first with Folk Art "Deep Tomato Red", and then some finer highlights with the "Orange Spice".
        Next, I painted the sword blade with Folk Art "Gunmetal Grey". I then painted the top of the shield and the metal on the sword hilt with Ceramcoat "Bronze".   I then went back and highlighted the sword blade with Folk Art "Silver Sterling", and then did highlights on the shield top and sword hilt with Cermacoat "14K Gold".
      When everything had overnight to dry, I gave the figure a coat of Ceramcoat "Matte Varnish".  Then, the following day, I sprayed the figure with Testor's Dullcote.      Later that evening,  I painted over the section of base I had earlier painted "Pure Pumpkin", with Distress "Black Soot" crackle paint.  I also, while the crackle paint was still wet, put a piece of black gravel in the wet paint to look like a large chunk of volcanic rock.  I set this aside for a day for the crackle paint to dry.  When it had dried, I very lightly drybrushed it with the "Tangerine" paint.


          I'm very pleased with how this fellow turned out, and especially like the effect the black crackle paint had over the bright orange paint on the base.

Figure 191 of 266: Complete

Monday, January 4, 2016

Sinessa, Hellborn Sorceress: Figure 190 of 265

     This week I found time to start the Bedeviled Set, and completed Sinessa, Hellborn Sorceress.  When I was looking at the figure and considering how I wanted to paint her, I thought she might work good as some kind of ice demon for my Frostgrave games, so I decided to paint her in a more wintery paint scheme.  I also thought I would experiment with the techniques for making ice bases written my MonkeySloth on the Reaper forums: Ice Base Tutorial .
    I prepped the figure in the usual way; soaking it in a dish of water with a couple drops of dish- soap added, then giving it a light scrub with a soft toothbrush, and then rinsing and drying it.  I then glued the figure to a white-primed 1" fender washers with Aleene's Tacky glue, and then glued the washer-mounted figure to a tongue depressor with a couple drops of the Elmer's glue.
      I began by painting all the skin with Crafter's Acrylic "Cool Blue".  When it was dry, I gave it a wash with Iron Wind Metals "Mid Blue" Ink using a wet brush.   I then painted her horns with GW "Shadow Grey", and her hair with Americana "Neutral Grey".
     Next, I painted her spear with Americana "Buttermilk", and when it was dry, I gave it a wash with GW "Agrax Earthshade" wash using a wet brush. I then painted her skirt and collar with Crafter's Acrylic "Navy Blue".
     Then, when the wash on her spear was dry, I drybrushed it with Crafter's Acrylic "Light Antique White".  Then I painted the top of the spearhead with GW "Ice Blue".  I also used the "Ice Blue" to paint a section of the base.  Next, I did highlights on her hair; first with Folk Art "Platinum Grey", and then with "White". I then also drybrushed the spearhead with white as well.   I then did highlights on her horns with Folk Art "Settlers Blue".
     Next, I painted her eyes, doing her pupils with Americana "True Blue". I then highlighted all her skin with the base "Cool Blue".  I then did highlights on her skirts and collar with my new bottle of Reaper MSP Bones "Tropical Blue", that I had received as a freebie during their 12 Days of Christmas promotion.    I also used the "Tropical Blue" to paint the sleeves under her arm guards, and her shoes.  When dry, I painted over the "Tropical Blue" arm guard sleeves and shoes with Folk Art "Metallic Blue Sapphire".  I next used Ceramcoat "Bronze to paint all her armor, and when this was dry, I highlighted it with Ceramcaot "14K Gold".
      When everything had overnight to dry, I gave the figure a coat of Ceramcoat "Matte Varnish".  Then, the following day, I sprayed the figure with Testor's Dullcote.      Later that evening, I gave her spearhead a couple coats of Americana "DuraClear Gloss Varnish" to make it look more ice-like.  I also painted over the section of base I had earlier painted "Ice Blue", with Distress "Rock Candy" crackle paint.  I also, while the crackle paint was still wet, put a hunk of dried "Rock Candy" paint* in the wet paint to look like a large chunk of ice.  I set this aside for a couple days for the crackle paint to dry.
     When it had dried, I drybrushed it with White paint.   I also, at this point, decided I wanted to make the spearhead look a bit more icy, so I added some Woodland Scenics "Water Effects" to the tips.  The next day, I flocked the base with Woodland Scenics "Snow" flock.
Water Effects added to spearhead.

     I'm very happy with how the figure turned out.  I think she looks suitably frosty to be some sort of ice demon.  I'm also happy to have reached the point where I can start the minus 10 countdown to 200 figures completed.

Figure 190 of 265: Complete


    * Several weeks ago, I had poured an eighth of an inch of the "Rock Candy" paint into a small plastic cup, and let it dry.  When it had dried, I was able to crack it up into many little ice-like chunks.