Monday, August 31, 2015

Ellen Stone, Cowgirl: Figure 168 of 265

     This week I completed the Ellen Stone, Cowgirl figure as I begin working on the Chronoscope set.  This figure is notorious for it's missing nose (another Bones I casting error), and I know some folks have painted the figure like an alien for space-cowboy settings because of its almost snake-like facial appearance.  I, however, wanted to see if with generous shadow and highlight, could get her looking more normal in her face, and so decided to paint her like a normal woman.
    As I studied how I wanted to paint her, the fact that she wasn't wearing anything under her shirt was obviously apparent.  I thought about painting the shirt white, and as I thought this it occurred to me that it might be neat opportunity to try and attempt a level of translucency to the shirt, as might occur with a thin white cotton shirt.
       I prepped the figure in the usual way; soaking it in a dish of water with a couple drops of dish- soap added, then giving it a light scrub with a soft toothbrush, and then rinsing and drying.   I then glued the figure to a 1" black-primed fender washer with Aleene's Tacky glue, and glued the washer to a tongue depressor with a couple drops of Elmer's White Glue.
      I began by painting her hands, face, and entire torso with Americana "Shading Flesh". I then painted her shirt with Americana "Dove Grey".  When this was dry, I went back and gave the shirt a wash with some of the "Shading Flesh" heavily thinned with water.  This caused it to flow into the creases that would be laying closer to her skin.  I then mixed a little of the "Dove Grey" and "Shading Flesh" together and painted the shirt where it lay directly on her breasts. I then took some of the "Dove Grey" and retouched up all the raised creases in her shirt, and where the placket ran down each side of the front.
      Next, I painted the pants with Crafters Acrylic "Navy Blue" and then her chaps with Accent "Mustard Seed".  I then painted her duster with Americana "Khaki Tan".  I worked on her hair next, painting that Apple Barrel "Burnt Sienna". Then I did her gun stock and grips with Crafters Edition Spice Brown. Her belt and shoes I painted  Americana "Asphaltum", and her holsters Crafters Acrylic "Cinnamon Brown". I painted her neckerchief with Folk Art "Deep Tomato Red"
    When all the paint had time to dry, I gave the figure a wash with Winsor Newton "Peat Brown" ink using a wet brush, being very careful to not let any get on the white shirt.
     When the ink wash was dry, I began on the highlights.  I did the eyes first, then I worked on the face, hands and chest, using the base "Shading Flesh" first, and then Crafters Acrylic "Flesh" second to do lighter highlights.  I added a little White to do the very tip of the nose and the chest.  I then did the lips by mixing some of the "Shading Flesh" with the "Deep Tomato Red". I mixed in a little white to do the lip highlights. I added eyebrows with the "Burnt Sienna".   Next, I worked on the hair, drybrushing it first with the base "Burnt Sienna", and then with Americana "Georgia Clay", then painting on finer highlights with Americana "Burnt Orange".
   I moved to the shirt next, painting on highlights with "White".  I then highlighted the chaps with Ceramcoat "Raw Sienna", and the duster with Crafters Edition "Taupe". I highlighted the shoes and belt with the "Cinnamon Brown", the holsters with the "Spice Brown", and the gun stock and grips with Americana "Sable Brown". I highlighted the neckerchief with the base "Deep Tomato Red".
    Next, I did the metals; painting the guns' metal parts  with Accent "Princely Pewter". I then painted the belt buckles with Ceramcoat "Metallic Pewter", and then used this color to add highlights to the guns' metal parts.  I wrapped up by painting the white base with Ceramcoat "Walnut".
     After the figure had the afternoon to dry, I gave it a coat of Ceramcoat "Matte Varnish" in the evening.  The next morning I flocked the base, using both a sand mixture and regular green flock; and later that afternoon I sprayed the figure with Testor's Dullcote. 
   
     I'm happy with how she came out; particularly the face, which I think is one of my best to date.   Despite it's casting flaws I'm very pleased with this figure.

Thursday, August 27, 2015

Another Sharkman (Desert Version): Bones II Figure

  I also completed another Sharkman figure this week, from the Bones II Core Set "Under the Sea" group.   For those who missed the first Sharkman I   painted you can see it here.  Like the first one I did, this figure was slanted off to one side.   So I used the same fix;  putting something under the foot on the tilted side to bring the figure back up into alignment.  Also, like the first, there were gaps where the arms were attached to the body that  needed to be filled.
      As with the first Sharkman,  the figure was easy to pry from its base with a little help from a hobby knife. And with some two-part epoxy putty I made a small boulder for the Sharkman's right foot to sit on, and filed the space under the left foot where it's peg no longer fit directly into it's mounting hole.  I also filled the small gaps at his shoulders.
   Backtracking a little,  I prepped the figure in the usual way; soaking it in a dish of water with a couple drops of dish-soap added, then giving it a light scrub with a soft toothbrush, and then rinsing and drying.  I then glued the figure's separate base to a 2" black-primed fender washer with Aleene's Tacky glue.  Once the figure's base was firmly glued to the washer, I then added my new boulder foot rest.  The 2" washer was big enough to just hand hold, so I didn't glue it to a tongue depressor.
     I wanted to do something a little different with this second one.  The first Sharkman I painted just like a normal shark would look: so this one I wanted to do more as a creature who had adapted to life on dry land. Perhaps a desert world where all the oceans had dried up.  In keeping with that, I wanted to do this one in more a brown scheme like he had evolved to blend in with the surrounding rocks and landscape.   For fun, I thought I would keep a little bit of his ancestor's grey coloring in his tail.
     I began by painting his upper body with Americana "Mississippi Mud".  I then painted his tail  with Crafters Acrylic "Storm Cloud Grey". Next, I mixed some of these two colors together and worked on blending them on his body, so the color change from the brown body to the grey tail appeared natural.  I then took some of the "Storm Cloud Grey" and added some spots gradually extending from the tail on to the body.  I also added some spots to the top of the fin.  I then painted his undersides with Crafters Edition "Taupe".  His open mouth I painted with Crafters Acrylic "Cherry Blossom Pink".
   Next I painted his claws (both feet and hands) with Folk Art "Milkshake", and his teeth with Americana "Buttermilk".  I painted his sharktooth weapon with Folk Art "Porcelain White" on the pointy part and a Folk Art "Dark Grey" base.
  I then painted the wooden parts of his arm guards with Folk Art "Bar Wood", the wrap around his wrist with FolkArt "Barnyard Red" and the chains and handle of his weapon with Cermacoat "Walnut".  I fished off the chain and the weapon handle with my usual rust effects, using an old frazzled small brush and stippling Crafters Edition "Spice Brown" over the chains.   Next, I did the same, but to a lesser extent with Accent "Golden Oxide".  Lastly, I drybrushed them with Ceramcoat "Metallic Pewter".
       I then painted all the shells and other baubles hanging on his wrist guards with an assortment of yellows, grays, and blues I grabbed haphazardly off my painting table.    I also painted the rock he's standing on with GW  "Khemri Brown".
 Then, I drybrushed the rock he's standing on with first the "Golden Oxide", followed by the "Buttermilk".   When all the paint had a few hours to dry, I gave the entire figure a wash with GW "Agrax Earthshade" wash using a wet brush.
  After the wash was dry, I drybrushed the Sharkman's upper body with the base "Mississippi Mud" and then painted highlight details with the lighter Americana "Khaki".  I highlighted the underside body with the base "Taupe".  His mouth I highlighted with the base "Cherry Blossom Pink", and his teeth I highlighted with the base "Buttermilk" first, and then some Crafters Acrylic "Light Antique White".  His claws I highlighted with the base "Milkshake".  His eyes I painted Black and then added a tiny pinpoint White dot to each. 
   His sharktooth weapon I drybrushed with  the base "Porcelain White" on the pointy part, and the base "Dark Grey" on the bottom.  His wood wrist guards I drybrushed with the base "Barn Wood". The wrist under-wraps I highlighted with the base "Barnyard Red", and the baubles were all highlighted in their base colors as well.  
       After the figure had the afternoon to dry, I gave it a coat of Ceramcoat "Matte Varnish" in the evening.  The next morning I brushed white glue all over the the base and dipped it in a sand mixture.   When the sand mixture was dry, I painted it with Cermacoat "Walnut".  When the "Walnut" was dry, I drybrushed it with the same colors I had used on the rock: "Khemri Brown" "Golden Oxide" and "Buttermilk".  I then glued on a couple clumps of dried grasses.   Later that afternoon I sprayed the figure with Testor's Dullcote. 
   I like how this guy turned out.  I think he has a good alternative look to the previous one I painted.

Monday, August 24, 2015

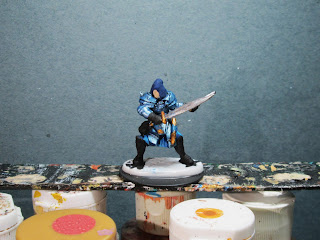
Drago Voss, Assassin: Figure 167 of 265

    This week I painted this fellow with 2 weapons from the Heroes set.   I could not find him listed on the Reaper online store anywhere, so I could not find out his name.  If any of you can locate him on their website and provide me with a name and stock number I'd appreciate it. Did he never make it into their catalog?  He's only shown as concept art in the Kickstarter page, so I don't think he came from an existing mini.  Anyway, this fellow marks the end of the Heroes set, so it joins the list of completed sets over on the right.
(Edit:  The folks on the Reaper forum helped me with an ID for him as Drago Voss, Assassin.  Apparently not available currently in Bones due to mold issues, but still in the catalog in metal)
    I wasn't particularly inspired by this figure, so thought I would use him to experiment doing a figure in colored armor, and another one all in just one color scheme (The other all-one-color-scheme figure I did was the Dwarf Wizard, who I did all in grays).
     I prepped the figure in the usual way; soaking it in a dish of water with a couple drops of dish- soap added, then giving it a light scrub with a soft toothbrush, and then rinsing and drying.   I then glued the figure to a 1.25" black-primed fender washer with Aleene's Tacky glue, and glued the washer to a tongue depressor with a couple drops of Elmer's White Glue.
  I began by painting all the areas where he wears armor with Black.   Then, when the Black was dry, I drybrushed his armor with Folk Art "Metallic Blue Sapphire". I then went over it a little lighter with Folk Art "Aqua Moire" Pearl acrylic (which kind of has a pearlescent sheen that looks somewhat like a metallic acrylic).
     Next, I painted his boots, belt, pouches, and gauntlets Black. I painted his hood and the tiny areas of leg that show with Crafters Acrylic "Navy Blue". His kilt? skirt? pleated lower body garment? I painted Crafters Acrylic "Tropical Blue".
    His scabbards I painted Americana "Wedgewood Blue", and his face I painted Crafters Acrylic "Flesh".  I then gave his pleated lower body garment a wash with Iron Wind Metals "Dark Blue" ink using a wet brush.  When this was dry, I painted his blades with Ceramcoat "Metallic Pewter", and the hilts, belt buckle, and scabbard fittings with Ceramcoat "Bronze".
       Next, I gave his face a wash with some Winsor-Newton "Peat Brown" Ink using a wet brush.  I then worked on highlighting the pleated garment with first the base "Tropical Blue", and then the lighter Americana "Salem Blue".   I then drybrushed the parts I had painted Black, as well as the "Navy Blue" hood, with Apple Barrel "Apple Scotch Blue" to highlight them.  I mixed a little of the "Salem Blue" into the "Wedgewood Blue" to do highlights to the scabbards.   I decided I wanted to add a little extra something to the boots, so I went back and painted the medallion on the front with the "Bronze".
      By then the wash on the face was dry, so I did highlights on the face with the base "Flesh", then added a little white and did a finer highlight on the nose. I did highlights on the blades with Folk Art "Silver Sterling", and highlights on the parts I had painted "Bronze with Cermcoat "14K Gold".  I finished up by adding detailed highlights to the armor with the "Aqua Moire" pearl acrylic.   Lastly, I painted the white base with Ceramcoat "Walnut".
       After the figure had the overnight to dry, I gave it a coat of Ceramcoat "Matte Varnish" the next morning.  That afternoon I flocked the base, and the next morning I sprayed the figure with Testor's Dullcote.
     I'm actually rather pleased with how this figure turned out.  I think the all-blue look, and the blue armor, came out looking pretty nifty.

Figure 167 of 265: Complete

Thursday, August 20, 2015

Sharkman: Bones II Figure

    I also completed the Sharkman figure this week from the Bones II Core Set "Under the Sea" group.  I didn't like this figure at first because it is sculpted oddly, so that the whole body of the Sharkman is slanted off to one side.  I have looked at a couple of these figures, and they all seem to share this quality.  It doesn't seem to be a typical Bones bent leg problem, but actually the way the figure is constructed.  I decided that putting something under the foot on the tilted side might help bring the figure back up into alignment.  Also, there were gaps where the arms were attached to the body that would need to be filled.  I sometimes think it would be better for Reaper to supply figures like this unassembled so the hobbyist could put them together with more care than the Chinese factory worker does.
  The figure was easy to pry from its base with a little help from a hobby knife. And with some two-part epoxy putty I made a small boulder for the Sharkman's right foot to sit on, and filed the space under the left foot where it's peg no longer fit directly into it's mounting hole.  I also filled the small gaps at his shoulders.
     Backtracking a little,  I prepped the figure in the usual way; soaking it in a dish of water with a couple drops of dish-soap added, then giving it a light scrub with a soft toothbrush, and then rinsing and drying.  I then glued the figure's separate base to a 2" black-primed fender washer with Aleene's Tacky glue.  Once the figure's base was firmly glued to the washer, I then added my new boulder foot rest.  The 2" washer was big enough to just hand hold, so I didn't glue it to a tongue depressor.
     I began by painting his upper body with Crafters Acrylic "Storm Cloud Grey", and his undersides with White.  His open mouth I painted with Crafters Acrylic "Cherry Blossom Pink".
     Next I painted his claws (both feet and hands) with Folk Art "Platinum Grey", and his teeth with Americana "Buttermilk".  I painted his sharktooth weapon with a Black pointy part and a Folk Art "Barn Wood" base.
     I then painted the wooden parts of his arm guards with Americana "Mississippi Mud", the wrap around his wrist with Crafter Acrylic "Forest Green" and the chains and handle of his weapon with Cermacoat "Walnut".  I also painted the rock he's standing on with Americana "Asphaltium".
     I fished off the chain and the weapon handle with my usual rust effects, using an old frazzled small brush and stippling Crafters Edition "Spice Brown" over the chains.   Next, I did the same, but to a lesser extent with Accent "Golden Oxide".  Lastly, I drybrushed them with Ceramcoat "Metallic Pewter".
     I then painted all the shells and other baubles hanging on his wrist guards with an assortment of yellows, grays, and blues I grabbed haphazardly off my painting table. Then, I drybrushed the rock he's standing on with first Americana "Sable Brown", followed by Americana "Khaki".   When all the paint had a few hours to dry, I gave the entire figure a wash with diluted Black in with a little drop of dish soap added.
      After the ink wash was dry, I drybrushed the Sharkman's upper body with the base "Storm Cloud Grey" and then painted highlight details with the lighter "Platinum Grey".  I highlighted the underside body with the base White.  His mouth I highlighted with the base "Cherry Blossom Pink", and his teeth I highlighted with the base "Buttermilk" first, and then some Crafters Acrylic "Light Antique White".  His claws I highlighted with Americana "Dove Grey".  His eyes I painted Black and then added a tiny pinpoint White dot to each.
   His sharktooth weapon I drybrushed with  Apple Barrel "Apple Scotch Blue" on the pointy part, and the base "Barn Wood" on the bottom.  His wood wrist guards I drybrushed with the base "Mississippi Mud", and then mixed a little of the "Mississippi Mud" with some Folk Art "Milkshake" and did lighter highlights. The wrist under-wraps I highlighted with the base "Forest Green", and the baubles were all highlighted in their base colors as well.   Lastly, I painted the base with the "Walnut", being careful to leave the sculpted rock exposed.
       After the figure had the afternoon to dry, I gave it a coat of Ceramcoat "Matte Varnish" in the evening.  The next morning I flocked the base, using mainly a sand mixture, and later that afternoon I sprayed the figure with Testor's Dullcote.
    I'm pleased with how Mr Sharkman turned out.  And I think the base turned out suitably so that he won't look too out of place either on land or an underwater setting.  I may go back and hit the eyes with a little gloss varnish as I think they look a little flat and not beady enough.

Monday, August 17, 2015

Elquin, High Elf Adventurer, Figure 166 of 265

  So this week we start the countdown of the remaining 99 figures with Elquin, High Elf Adventurer, from the Heroes Set.  Just one figure left from the Heroes set now.
    As I looked at this figure and considered how to paint him, there was something about his outfit that struck me as very Napoleonic in appearance.  So, I got the idea to paint him in the style of a French soldier from that era.
        I prepped the figure in the usual way; soaking it in a dish of water with a couple drops of dish- soap added, then giving it a light scrub with a soft toothbrush, and then rinsing and drying.   I then glued the figure to a 1" black-primed fender washer with Aleene's Tacky glue, and glued the washer to a tongue depressor with a couple drops of Elmer's White Glue.
      I began painting by giving the figure a wash with thinned black ink with a tiny pin-point drop of dishsoap added to help it flow into the crevices and help show the sculpting details.
 When the ink wash was dry, I painted his pants White, and his jacket with DecoArt "Navy Blue". Next, I painted his cloak and the hanging at his front with DecoArt "Storm Cloud grey".
     After these colors had had time to dry, I gave them a wash with GW "Badab Black" wash using a wet brush.  When this wash was dry, I then painted his face with DecoArt "Flesh", and his hair with Folk Art "Dark Brown". His staff I painted with DecoArt "Cinnamon Brown", and his gloves with Americana "Buttermilk".  The front of his shirt I painted with GW "Blood Red", and his cross belt I painted White.  The pack on his back I painted with Accent "Real Umber", and the 3 (what I assumed were) scrolls carried in it I painted with the "Buttermilk", DecoArt  "Light Antique White" and Americana "Khaki".
     Then, when these colors had had time to dry, I gave them all a wash with GW "Agrax Earthshade" using a wet brush, avoiding those areas I had already given a wash with the "Badab Black".
     When the "Agrax Earthshade" wash had dried, I painted his boots, and the assorted pouches and scroll cases he carried with "Black".  The two bottles carried in his cross belt I painted Americana "Forest Green", and DecoArt "Dark Turquoise". I then painted corks in the bottles with the "Khaki".  The (what I assumed were) scrolls in the front cases I painted with the "Buttermilk" and the "Light Antique White".  The handle (sword grip?) carried at his waist I painted with the "Real Umber".  I let the scrolls and handle dry, and I then gave them a quick wash with some of the "Agrax Earthshade" using a wet brush.
     I then began on the highlights, starting first with his hair and drybrushing it with Americana "Sable Brown".  I then did his eyes; Black sockets,White whites, and Black pupils. Next, I highlighted his face with the base "Flesh", and added eyebrows with some of the "Dark Brown".  I then highlighted all the black items with Folk Art "Settlers Blue"; then mixed some of the "Settlers Blue" with the "Navy Blue" and highlighted his jacket. After that, I highlighted his pants with White, and while I had the White out I added a small highlight dot to each of the bottles in his crossbelt.  The front of his jacket I highlighted with the base "Blood Red".  I highlighted his cloak first with the base "Storm Cloud Grey", and then with the lighter Folk Art "Platinum Grey". His staff, and the pack on his back,  I highlighted with the Cinnamon Brown", and his gloves with the base "Buttermilk.  All the scrolls I highlighted with their original base colors.
     I then painted the top of his staff (which I think looks slightly reminiscent of a stylized French Imperial Eagle standard), the end of the handle at his waist, and all his buttons with Ceramcoat "Bronze".  I let this dry, and I then gave the top of his staff and the handle end a quick wash with some of the "Agrax Earthshade" using a wet brush.  When dry, I highlighted the staff top, handle end and buttons all with Ceramcoat "14K Gold".   Lastly I painted the figure's white base with Ceramcoat "Walnut".
      After the figure had the overnight to dry, I gave it a coat of Ceramcoat "Matte Varnish" the next morning.  That afternoon I flocked the base, and the next morning I sprayed the figure with Testor's Dullcote.    That afternoon I gave the bottles in his crossbelt a coat of Americana "DuraClear Gloss" Varnish to help with the glass look.
     I'm really pleased how this figure turned out.  I think the Napoleonic French infantry color scheme looks very good on him.  He would make a good steampunk wizard in the right setting.

Thursday, August 13, 2015

Burrowing Horror: Bones II Core Set Figure

     This week I also painted the Burrowing Horror figure from the Bones II Core Set as part of my continuing effort to work on some of the larger figures from this Kickstarter.  While this is a nifty figure, and certainly quick to paint, it suffers from a lack of any kind of dynamic aspect to its pose.
       I prepped the figure in the usual way; soaking it in a dish of water with a couple drops of dish-soap added, then giving it a light scrub with a soft toothbrush, and then rinsing and drying.  I then glued the troll to a 2" black-primed fender washer with Aleene's Tacky glue.  The 2" washer was big enough to just hand hold, so I didn't glue it to a tongue depressor.
    I began by painting all the scales along the back and the legs, and the armor plates on the head with Americana "Zinc". I then filled in the areas I hadn't painted with the "Zinc": the sides, underbelly, and the backs and bottoms of the legs, with Americana "Charcoal Grey". Next, I painted the mouth and the claws with Black, and the area behind the large central plate on the figure's back with Americana "Shading Flesh".
   After these colors had several hours to dry, I gave the entire figure a wash with GW "Badab Black" wash using a wet brush.
   Once the wash had had a few hours to dry, I drybrushed the entire beastie with DecoArt "Storm Cloud Grey". I then took a fine brush and outlined each of the scale and plate edges with the "Storm Cloud Grey". I then took the base "Shading Flesh" and painted highlights on the area behind the large back plate. I followed this with using some Apple Barrel "Apple Flesh" to do some smaller fine highlights on that area.
      Next, I drybrushed the claws with Folk Art "Settlers Blue". I then painted all the teeth with Americana "Buttermilk".  I let that dry, and then gave the teeth a wash with Winsor Newton "Peat Brown " Ink using a wet brush.   When this wash was dry, I added highlights to the teeth with DecoArt "Light Antique White". Lastly, I painted the eyes with Apple Barrel "Apple Maroon", and then added small highlights with Cermacoat "Bright Red", and finally small pinpoint highlights with White.
     After the figure had the afternoon to dry, I gave it a coat of Ceramcoat "Matte Varnish" in the evening.  The next morning I flocked the base, and later that afternoon I sprayed the figure with Testor's Dullcote.
   I'm pleased with how this figure turned out.  It was a fun and quick one to paint.

Monday, August 10, 2015

Mason Thornwarden: Figure 165 of 265

This week I completed Mason Thornwarden from the Heroes Set. Only two Heroes from the set left to do.  Most importantly though, this figure marks another great milestone as I now only have 100 figures left to complete. My goal is to get those done before the Bones 3 Kickstarter ships.
   When I began painting this figure I assumed he was an elf, (just like last week's elf ranger)  and I decided to paint him in real bold garish Wood Elf colors using bright greens and yellows.  It was until about halfway through that I realized his long chin was in fact a goatee, meaning he was most likely a human.  So, now I have a very brightly dressed human archer.  But, hey, why not.
      I prepped the figure in the usual way; soaking it in a dish of water with a couple drops of dish- soap added, then giving it a light scrub with a soft toothbrush, and then rinsing and drying.   I then glued the figure to a 1" black-primed fender washer with Aleene's Tacky glue, and glued the washer to a tongue depressor with a couple drops of Elmer's White Glue.
          This is another nice dynamic sculpt, and just like last week's figure, it has a bit of loss of detail on the sides of the legs.
     I began by painting his under-tunic with DecoArt "Wild Green", and the jerkin over that with Accent "Mustard Seed". It appeared as if he has some sort of leggings strapped onto the front of his legs, so I painted the backs of the legs with Americana "Khaki".
   Next, I painted his top shirt with Americana "Leaf Green", then I painted his cloak with DecoArt "Bright Yellow". I painted the leggings on the front of his legs, and his shoes, with Crafters Edition "Spice Brown".
     I then painted his forearm guards, quiver, and belts all with DecoArt "Cinnamon Brown". Next, I painted his bow with Folk Art "Grey Green". The grip on his bow I painted with Accent "Real Umber". The arrow shafts I painted with Folk art "Barn Wood", and the fletchings with "White". His face and hands I painted with DecoArt "Flesh".
     When the paint had a few hours to dry, I went back and gave the entire figure a wash with  Winsor-Newton "Peat Brown" Ink using a wet brush.
     It was as I was looking at the figure after the ink wash dried that I realized the guy had a beard. So I took some Americana "Sable Brown" and painted the beard. I then took some Folk Art "Butter Pecan" and added some highlights to it.  I then painted his eyes with black sockets, white whites and black pupils, then did the highlights on his face with the base "Flesh".  I then added a little White to some of the "Flesh" and did a finer highlight on the bridge of his nose.
     I then highlighted his under tunic with the base "Wild Green" with a little White added, and his jerkin with some Apple Barrel "Maple Brown Sugar". Next, I highlighted his shirt with DecoArt "Holiday Green".  His cloak I highlighted first with DecoArt "Daffodil Yellow" and then Apple Barrel "Lemon Chiffon". His forearm guards, leggings, and quiver I all highlighted with the "Sable Brown". His pants I used the base "Khaki" to do the highlights, and on the bow I used the base "Grey Green". The arrow shafts I highlighted with the base "Barn Wood", and the fletchings I highlighted with the base "White".  I then took some Ceramcoat "Metallic Pewter" and painted his buckles. Lastly, I painted his white base with Ceramcoat "Walnut"
        After the figure had overnight to dry, I gave it a coat of Ceramcoat "Matte Varnish".  That afternoon  I flocked the bases, and the next morning I sprayed it with Testor's "Dullcote" spray varnish.
     I'm generally pleased with how this fellow came out. I prefer these simpler figures without all the assorted bits and bobs strapped to them that need to be deciphered, and somewhat basic clothing (though I could have done without four layers of it!) that was sculpted symmetrically so that all the sleeves and parts matched on both sides of the figure.

Figure 165 of 265: Complete
On to the last 100!

Thursday, August 6, 2015

Mountain Troll: Bones II Figure

     This week I also completed the Mountain Troll from the Bones II, Expansion Pack 1.  I tend to hesitate to select the large figures to do, as I somehow find the prospect of painting them intimidating; and I want to try and make more of an effort to work on them in the future.  This guy, for all his size, was a nice easy figure to complete.
       I prepped the figure in the usual way; soaking it in a dish of water with a couple drops of dish-soap added, then giving it a light scrub with a soft toothbrush, and then rinsing and drying.  I then glued the troll to a 2" black-primed fender washer with Aleene's Tacky glue.  The 2" washer was big enough to just hand hold, so I didn't glue it to a tongue depressor.
 I began by painting the chainmail areas Black, and then drybrushing them with Ceramcoat "Metallic Pewter". I then painted the troll's body with Folk Art "Medium Grey", and then went back and painted his abdomen, chest, palms, and the sole of his raised left foot with the lighter Duncan "Slate Grey".
    Next, I painted all his belts and straps with Americana "Charcoal Grey" and the underside of his wrist guards with Americana "Asphaltium".  His ax handle I painted Folk Art "Dark Brown".  To add a splash of color on what was turning out to be an all brown and grey figure,  I painted his loin cloth with Americana "Cranberry Wine".  His pouches I painted Americana "Sable Brown" (one on his right), and Americana "Mississippi Mud" (one on his left).
   I had originally planned at this point to just paint all the metal parts with the "Metallic Pewter" and then give the figure a Black wash; but I had got to thinking about how (and whether) a troll would keep all his armor in such good shape, and decided instead to paint the armor in a more rusty way.  If I had thought of this at the beginning I would have done it first off; as it involves a lot of splotchy painting and drybrushing, which is difficult to do on and already painted figure and not get paint everywhere.  So, I attempted to do my best, and began by painting all the metal parts (even going back over the chainmail I had already done) with Ceramcoat "Walnut".  I then, with an old frazzled small brush, stippled and splotched Crafters Edition "Spice Brown" over all the metal areas that I had just painted with the "Walnut", trying to keep more towards the centers and along seams.  Next, I did the same, but to a lesser extent with Accent "Golden Oxide".
     I then took some Accent "Princely Pewter" (which is darker than the "Metallic Pewter"), and carefully drybrushed all the metal parts.  Next, I went back with the lighter "Metallic Pewter" and did some very slight highlight drybrushing.   When this was done, I went back over the figure and fixed all the areas that my "rust effects" had gotten on, such as his skin, straps, and belts, etc. I then moved to his mouth, painting the inside with GW "Tanned Flesh", and his teeth with Americana "Buttermilk". Next, I painted his finger and toe nails with Folk Art "Grey Green". Lastly, I painted the rocks sculpted into the base with DecoArt "Storm Grey".
      After all the paint had a while to dry, I gave the entire figure a wash with thinned black ink with a  pinhead drop of dish-soap added.  When the ink was thoroughly dry, I painted his eyes using the "Buttermilk" for the "whites" and then Black pupils.  I highlighted his tongue with the base "Tanned Flesh", and the teeth with the base "Buttermilk"  His skin I carefully drybrushed with the base "Medium Grey" then added some specific highlights with a fine brush; and then highlighted the lighter areas on his body with the base "Slate Grey".  I drybrushed the ax handle with the base "Dark Brown", and then painted highlights on the loin cloth with the base "Cranberry Wine".  His finger and toe nails I highlighted with the base "Grey Green". Likewise, I highlighted his belts, straps, and pouches all with their base colors.  Lastly, I painted the base with the "Walnut, being careful to leave the sculpted rocks exposed.
       After the figure had the afternoon to dry, I gave it a coat of Ceramcoat "Matte Varnish" in the evening.  The next morning I flocked the base, and later that afternoon I sprayed the figure with Testor's Dullcote.
     I'm really happy with this fellow.  I think he turned out looking suitably fierce and battle worn.

Monday, August 3, 2015

Nienna, Female Elf Ranger; Figure 164 of 265

   This week I painted Nienna, Female Elf Ranger, from the Heroes Set.  The next "Bones I" figure I do (Figure 165 of 265) will put me at the 100-remaining-figures mark, which is a great milestone to reach.  I really would like to get Bones I completed before Bones III ships, which will give me just over a year to do those last 100 figures.
        I prepped the figure in the usual way; soaking it in a dish of water with a couple drops of dish- soap added, then giving it a light scrub with a soft toothbrush, and then rinsing and drying.   I then glued the figure to a 1" black-primed fender washer with Aleene's Tacky glue, and glued the washer to a tongue depressor with a couple drops of Elmer's White Glue.
         Though this is a great dynamic sculpt, it has a lot of hard to see detail, and a bit of loss of detail on the sides of the bent leg.
    I began painting by giving her a wash with thinned black ink with a tiny pin-point drop of dishsoap added to help it flow into the crevices and help show the sculpting outlines. I think I used too much ink, or not enough dishsoap, as I got a bit of a mottled mess, that didn't help with the details.
  I then drybrushed the figure a bit with White to help maybe clarify the details in the muddy ink wash.  Finally I just needed to grit my teeth and jump in to painting the figure.  I began by painting her pants with DecoArt "Light Antique White".  Next, I painted her boots with Americana "Mississippi Mud".  I then did her tunic and the dead tree trunk with Americana "Charcoal Grey".
   I then painted her cloak with Folk Art "Grey Green", and the loin hanging with Folk Art Porcelain White".  The leaf-looking hanging I painted Apple Barrel "Burnt Sienna", and the mossy growth on the side of the tree trunk I painted Accent "Golden Oxide".
     Next, I painted her face and hands with DecoArt "Flesh". I then painted her dagger sheath and quiver with Folk Art "Dapple Grey".  The bow I painted Folk Art "Butter Pecan", and the arrow shafts I did with Americana "Khaki Tan".  The fletchings I painted White, and the sword grip I painted Americana "Asphaltum." Her knee guards, shoulder guard, and belt I painted Americana "Sable Brown". The tie around her quiver I painted Aleene's "Deep Khaki"
    When the paint had had a chance to thoroughly dry, I gave the entire figure a wash with GW "Agrax Earthshade" using a wet brush.
   After the wash was dry, I painted her hair Black, and then added some Folk Art "Settlers Blue" highlights.   I then painted her lips with Americana "Shading Flesh", and then highlighted her face and hands with the base "Flesh".   Next,  I worked on highlighting the rest of the figure.  I used the base "Grey Green" to highlight the cloak, then added finer highlights to the cloak with the "Porcelain White".  While I had the "Porcelain White" out, I did the highlights on her loin hanging.  I highlighted her boots with the base "Mississippi Mud", and then mixed some of the "Mississippi Mud" with the "Charcoal Grey" to highlight her tunic and the tree trunk.  The rest of he smaller parts of her outfit and accouterments I highlighted with the base colors I had used.
      I then worked on the metal parts; painting the sword, buckles and pin, bow fittings and dagger parts, all with Ceramcoat "Metallic Pewter".  I then did highlights with Folk Art "Silver Sterling".
       Lastly, I painted her base White, and added some white spots to the tree trunk.  When everything had overnight to dry, I gave the figure a coat of Ceramcoat "Matte Varnish".  The next morning I flocked the base with Woodland Scenics "Snow" flock.  Late that afternoon I sprayed the figure with Testor's Dullcote.
     I'm generally pleased with the results with this figure.  I wanted to do  a winter figure without using blue (which seems to be my default), and I think the colors I chose works well on this.

Figure 164 of 165: Complete