Monday, August 1, 2022

The Time Has Come

     As many of my regular readers may have noticed over the last couple months, my posts have become less than regular.  I have found over the course of this past year, my interest in painting Bones figures has dropped considerably.  My attention has been grabbed by other projects, and my Fantasy based gaming has all but dwindled to nothing.  
     I'm not going to say a permanent goodbye, as I don't know if this is temporary; and somewhere down the line I might pick up a Bones figure again and be inspired, or get a new set of rules that spurs my interest and need to paint more of this sort of figure.  
My first completed Bones Kickstarter figures, posted June 27th 2013.
     
     I began this blog in June of 2013 as a means to spur me on to painting the entirety of my Bones 1 purchase, and over the past 9 years it has expanded so much further than what I could have imagined; I've painted figures from 5 Bones Kickstarters now (6 counting the first CAV Kickstarter.)   And it's hard to believe that Bones 6 just finished its campaign a couple months ago.  I haven't purchased much from that on, as even then I was beginning to feel Bones saturated.   
     I want to thank all the readers who have stopped by over the years, and especially those who would leave a comment or two.  It was your enthusiasm that spurred me on over the years.    So, farewell for now.  Hopefully, I'll see you all around the internet. 


Monday, June 6, 2022

Not Bones, But A Big Terrain Project!

     For the past three weeks, all my hobby time has been taken up with a big terrain project I am doing for a "Wars of Ozz" game I'll be helping run at Historicon in July:  making the walls for an Attack on the Emerald City" game.  
    Besides painting Reaper Bones, my other big figure painting effort is currently figures for the "Wars of Ozz" rules by Old Glory.  I was part of the playtest group that helped develop the rules, and now that in-person conventions are resuming I will be helping with the demo games as well.  
   So in the end, this means I didn't have time to complete any figures this past three weeks.  I thought that instead perhaps, I would show some photos of the wall project in progress. I know it's not Bones, but it's all I have to offer at the moment.
Over the course of two sessions, a group of us on the "Wars of Ozz" demo team got together and spend several hours cutting and gluing all the parts for the wall. 

We then assembled everything.

Then it was time to base coat everything with a paint and Mod-Podge mixture.

I then worked on painting the walls.  I have them completed now, so will be turning my attention to building and painting the towers. 

This is the info about the game.  


Monday, May 16, 2022

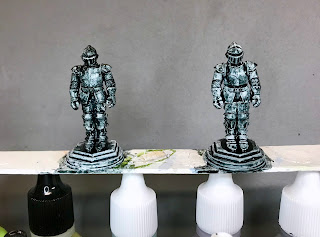
Suit of Armor: Bones 5 Figures

     This past week I continued to work on the Bones 5 Core Armory set and painted up a pair of the "Suit of Armor " figures.  I had one from the Core Set, and one from an additional Armory set I had pledged for from the Core break out offerings .  
     I prepped the figures in the usual way, soaking them in a dish of water with a couple drops of dish-soap added, then giving them a light scrub with a soft toothbrush, and then rinsing and drying them.  I then glued each of them to a 7/8" grey-primed metal washer with some Aleene's Tacky glue.  I then glued the figures to a large craft stick with a couple drops of Elmer's glue. 
     I began by painting the figures entirely with Ceramcoat "White".  I let that dry, and then gave both pieces a complete coat of slightly thinned Citadel Contrast "Templar Black".
     When the "Templar Black was dry, I drybrushed them with Ceramcoat "Metallic Silver".  I then did follow-up drybrush coats with Reaper MSP "Polished Silver", and a lighter final drybrush with Reaper MSP "Sophie Silver"
     Next, I gave the support pole on the back of each figure a coat of Citadel Contrast "Snakebite Leather".  After that, I painted the belt on each one with Crafter's Acrylic "Cinnamon Brown", and the platform each stands on with Ceramcoat "Charcoal".
     I then gave the belts a wash with Citadel Shade "Agrax Earthshade", and the platforms a wash of Citadel Shade "Nuln Oil".  I let those washes dry, and then I highlighted the belts with Americana "Sable Brown", and I did a drybrush highlighting on each platform with Crafter's Acrylic "Storm Cloud Grey".  I also added highlights to the support poles with DecoArt Dazzling Metallics "Bright Brass".  Lastly, I went back and did some spot highlights on some of the rivets with the "Sophie Silver".
     I let the figures dry overnight and the next day I gave them a coat of Americana "DuraClear Matte" varnish.   Another overnight dry, and I sprayed the figures with Testor's "Dullcote". 


     I happy with how these turned out with a quick paint job on them.  Not perfect, but just right for some nice scenery.

Monday, May 2, 2022

Scale Armor Rack: Bones 5 Figure

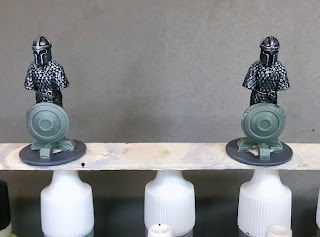
     This past week I painted up a pair of the "Scale Armor Racks" from the Bones 5 Core Set Armory addition.  I had one from the Core Set, and one that I pledged for from the Core Set  break out Armory set.   Since I had just posted last week (due to Easter weekend putting me behind), I picked these simple figures to do. (And I barely managed that, finishing them only today!)
     I prepped the figures in the usual way, soaking them in a dish of water with a couple drops of dish-soap added, then giving them a light scrub with a soft toothbrush, and then rinsing and drying them.  I then glued each of them to a 7/8" grey-primed metal washer with some Aleene's Tacky glue.  I then glued the figures to a large craft stick with a couple drops of Elmer's glue. 
      I began painting by giving all the scale armor and the helmets a coat of Ceramcoat "Black".  When dry, I drybrushed it with Folk Art Metallic "Gunmetal Grey".  I then went over it lightly with a drybrush of Reaper MSP "Polished Silver". 
     Next, I painted the wood rack bases with Crafter's Acrylic "Cinnamon Brown", and the belts with Accent "Real Umber".  I let these dry, and then gave them a wash with Citadel Shade "Agrax Earthshade".   When the wash was dry, I painted the back of the shields with Ceramcoat "Charcoal".
     I then drybrushed the rack base with Americana "Sable Brown".    Next, I painted the shield faces with Americana "Snow White".  When the white was dry, I painted two of the rings on the left one with Americana "True Blue", and two of the rings on the righthand one with Speed Paint "Blood Red".    After that, I painted the riveted ring with the "Gunmetal Grey".  I let the shield faces dry, and then gave them a wash with Citadel Shade "Nuln Oil".   
     When the wash was dry, I highlighted the white with the base "Snow White", highlighted the blue with the base "True Blue", and highlighted the red with Reaper MSP "Fresh Blood".    Lastly, I went around and did spot highlighting on the metal with the "Polished Silver, and highlighted the belts with Folk Art "Teddybear Brown".  I finished by then painted the bases with Americana "Neutral Grey".  
     Since I was painting thee right up to the wire, I didn't have time to do a final brush on matte varnish, or spray.  Hopefully I can get to that in the next day or two.  Here, however are the finished paint jobs. 

    I'm generally pleased with how these turned out.  They're not perfect, but as minor terrain pieces, I don't think they have to be. 


     Bones 6 ended this past weekend.  Like others, I did not find this one to be as tempting as ones in the past.  I don't know if it's my overabundance of unpainted stuff from Bones 4 & 5, or the lack of a lot that interested me, but I went in at the beginning for a Core Set pledge and never raised it at all.   In the end, I don't think I'll even get the Core Set... there just wasn't enough in it that I thought I would have a use for, since my gaming is primarily wargaming, not RPGs.   I think I will get the Lighthouse,  the Owlbear Legendary Tale Encounter, the Phoenix Egg Legendary Tale Encounter, and one or two Orc Add-ons.    Not sure what else.  Possible the Storm Goddess simply because she's an exclusive. 
   So, what did you all pledge for, if anything? 
Random thoughts:
    1)  Interesting that Reaper is just going ahead and calling the bigger pieces "Exclusives", after a series of big pieces from past Kickstarters that never actually made it to retail. 
    2)   Where were all the Encounter sets?  One of the big hits of Bones 5 was the Encounter sets.  These sets had a handful of figures and some cool terrain.   There were only 3 this time, and two of them came very late in the game.
    3)  I'm not liking Reapers increasing tendency to produce cartoon-like figures.  So many of them have faces, and body proportions that look like they're straight from a Disney or Pixar movie.  I really perfer more realistic stuff.  I'm not a fan.


Monday, April 25, 2022

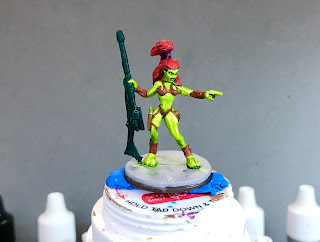
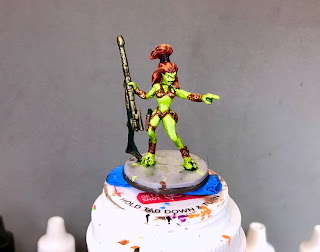
Andromedan Hunter: Bones 4 Chronoscope Figure

      Over the past few weeks I have worked on the "Andromedan Hunter" figure from the Bones 4 Chronoscope Expansion, as a change of pace from doing the Dwarves last time.  
     I prepped the figure in the usual way, soaking it in a dish of water with a couple drops of dish-soap added, then giving it a light scrub with a soft toothbrush, and then rinsing and drying it.  I then trimmed the figure's integral base a little, and glued the figure to a 1" brown-primed metal washer with some Aleene's Tacky glue.  I then affixed the figure to the top of a pill bottle with some blue-tac.    
     I decided to go a little color craz on this one, and I wanted to try doing her skin with one of the Folk Art Color Shift Paints.  So, I painted her body with a base coat of Reaper MSP Bones "Dungeon Slime", and when dry, I went over it with Folk Art Color Shift "Green Flash". 
     Next, I gave her skin a thinned coat of Citadel Contrast "Creed Camo" to act as a wash.  It was not as effective at doing this as the purpose-designed Citadel Shades.  So, I went back and reapplied some to various spots to add a little more shadow.  I then painted her hair with Reaper MSP Bones "Heraldic Red"., and her clothing, bracers, shinguards/shoes, pouch, and holster with Reaper MSP "Auburn Shade".  After that, I painted her rifle with Reaper MSP "Spruce Green", and her hair tie, as well as the pompoms on the back of her shoes, with Reaper MSP Monarch Purple. 
     I then painted the "U" shaped parts of her top, the front piece of her little bottom, and her bracers, with  Ceramcoat "Metallic Copper".  After that, I painted the metal parts of her rifle and pistol with Folk Art Brushed Metal "Brushed Bronze".   I let the figure dry for a while, and then gave her hair, clothing, and accessories, a wash of Citadel Shade "Reikland Fleshshade"; and then her rifle, hair tie, and shin pompoms a wash with Citadel Shade "Nuln Oil". 
     When the washes were dry, I painted her eyes (I used Crafter's Acrylic "Daffodil Yellow" for the "whites"), and then highlighted her skin with a mix of the base "Green Flash" and some Reaper MSP "Sophie Silver".  After that, I highlighted her hair with Crafter's Acrylic "Orange Spice", and some Crafter's Acrylic "Pure Pumpkin".   
     Next, I highlighted her clothing and accessories with a mix of the base "Auburn Shadow", and some Americana "Shading Flesh".  I then highlighted her hair tie and shin pompoms with Anita's "Violet", and followed with highlighting the guns with Folk Art "Hunter Green", and a little Americana "Sea Breeze".  After that, I highlighted the metal parts of her clothing with the base "Metallic Copper", some Reaper MSP "Rose Gold", and a little pf the "Sophie Silver". Finally, I highlighted the metal on the guns with Ceramcoat "Metallic Bronze", and some DecoArt Dazzling Metallics "Bright Brass".   Lastly, I painted the base with Americana "Neutral Grey".  
      I let the figure and base dry overnight and the next day I gave them a coat of Americana "DuraClear Matte" varnish.   Another overnight dry, and I sprayed the figure with Testor's "Dullcote". 


     Well, I had fun using some wild colors on her, and I don't think she looks half bad.  Unfortunately, any effect from the color shift paint was lost between the Contrast Paint wash, the non-color shift highlights, and the final Matt Varnish and Dullcote.  

Monday, April 18, 2022

No Figure This Week. :(

     Over the past two weeks I've been working slowly on the "Andromedan Hunter" figure from the Bones 4 Chronoscope Expansion as a change of pace from doing the Dwarves last time.   Unfortunately, with the Easter Holiday this past weekend, and company staying into this week, I was not able to finish the figure, so I hope to get it posted next Monday.   Apologies for the delay.


Monday, April 4, 2022

Valgar Swiftaxe (A) and Dagar Bronzebeard (A) Bones 5 Figures (Complete!)

       I returned this past month back to working on the Dwarves from the The Dwarf King's Crypt Encounter Sets that I got through the Bones 5 Kickstarter.  Between the two sets, I have 12 of the Dwarf warriors (2 each of the 6 that came in each set. I randomly picked one of the "Valgar Swiftaxe" figures, and one of the "Dagar Bronzebeard" figures to work on.
     I had decided to work on these two at a time to help save a little time.  My plan was to paint them basically the same; with the hopes that when mixed into a unit, combined with the difference in the poses, they wouldn't look too identical. 
     I prepped the figures in the usual way, soaking them in a dish of water with a couple drops of dish-soap added, then giving them a light scrub with a soft toothbrush, and then rinsing and drying them.  I then trimmed the figures' integral bases a little, and glued each of them to a 1" grey-primed metal washer with some Aleene's Tacky glue.  I then glued the figures to a large craft stick with a couple drops of Elmer's glue. 
      I began painting by giving all the chainmail armor a coat of Ceramcoat "Black".  When dry, I drybrushed it with Folk Art Metallic "Gunmetal Grey".  I then went over it lightly with a drybrush of Reaper MSP "Polished Silver".  Next I painted their faces, arms, and hands with Reaper MSP "Tanned Skin", and their tunics with Ceramcoat "Denim Blue".
     Next, I painted fur lining on the righthand one's hood, and both their shoes with Folk Art "Real Brown", and I did their belts and pouches with Americana "Raw Umber".  After that, I painted their boot tops with Americana "Sable Brown", and the soles with "Black".   I noticed there was a bit of trouser peaking above the boot tops on the righthand one, and I painted it with Folk Art "Dapple Grey".  
     I then painted their beards with Americana "Light Cinnamon", and their axe handles with Reaper MSP "Shield Brown".  After that, I did the axe heads, handle base, belt buckle, and bracelets, with Americana "Zinc". I also painted the border around their tunics with Americana "Snow White".
      I decided at that point that the white trim on both made them look too similar, so I repainted the righthand one with Americana "Festive Green".  I then painted the beard holders with Ceramcoat "Metallic Copper"; and then did the axe heads and the handle base with Reaper MSP "Honed Steel".  After that, I painted the bracelets, with the "Gunmetal Grey" that I had used earlier on the chainmail. 
     I let the figure dry for a while, and then gave his face, arms, and hands a coat of Citadel Shade "Reikland Fleshshade".   I let that dry, and then gave the rest of the figure a coat of Citadel Shade "Nuln Oil". 
      I let all the washes dry for a while, and then began on the highlighting.  First I painted their eyes, and then highlighted his skin with the base "Tanned Skin", mixed with "Reaper MSP "Tanned Highlight".  I then highlighted his beard with first Folk Art "Teddy Bear Brown", and then Folk Art "Barn Wood".
     Next, I highlighted the tunics with the base "Denim Blue", and some Crafter's Apple Barrel "Apple Scotch Blue".  I then highlighted their boot tops with the base "Sable Brown" and some Americana "Fawn".  After that, I highlighted the boots, and the fur lining on the right one's hood with Folk Art "Dark Brown", and did the highlights on the belts and pouches with Americana  "Mississippi Mud" . 
 I then did the highlights on the axe handles with some Americana "Khaki Tan".  After that, I highlighted their beard rings with some Ceramcoat "Metallic Copper", mixed with some of the "Polished Silver". I also highlighted the axes with the Silver"Metallic Silver", and the bracelets with the "Polished Silver".  I wrapped up the painting  by highlighting the left one's tunic trim with the base "Snow White", and the right one's tunic trim with the base "Festive Green" mixed with some Crafter's Acrylic "Wild Green".
     I let the figure dry overnight and the next day I gave them a coat of Americana "DuraClear Matte" varnish.  Then when the varnish was dry, I used some white glue to glue some sand onto the bases.  When this was dry I  painted it with Citadel Contrast "Wyldwood".  When that was dry,  I drybrushed the sand with Americana "Neutral Grey", and then a bit of Folk Art "Barn Wood".  Due to the weather, I was not able to give the figures a final spray varnish.

     I'm happy with them, and while I think they look very similar here, my hope is that when they're mixed with the other 10 of their best Dwarf buddies it won't be so noticeable.


Thursday, March 31, 2022

Reaper BONES 6 Kickstarter is Live!!

    The Reaper BONES 6 Kickstarter went live today. So far, I'm in for the Core Set amount.  The reality is that I have almost all of Bones 5, and most of Bones 4, still unpainted, so my intent is to go easy on this one.  Fingers crossed I pass all my Will roles. :)


Monday, March 21, 2022

Floating Disc Spell Effect: Bones 5 Figure

      Well, last week I lost track of what week it was and posted a figure thinking it was the third Monday of the month, when in fact it was only the second Monday.  So I thought I'd do up a quick figure this week to get us back on the proper schedule.  At this point, I had painted all the Bones 5 Spell Effects that I got with my Kickstarter except the floating disc from the Core Set Spell Effects set.  So I thought I'd tackle that one for today.
           I prepped the figure in the usual way, soaking it in a dish of water with a couple drops of dish-soap added, then giving it a light scrub with a soft toothbrush, and then rinsing and drying it.  I then glued the figure to 1" grey-primed metal washer with some Aleene's Tacky Glue.  I then glued the Floating Disc into onto a pill bottle with a couple drops of white glue.
 I began by painting the figure completely with Americana "DuraClear Matte" varnish.  When the varnish was dry,  I carefully painted the inscriptions on the disc with thinned Americana "Snow White". Thinned to help it flow into the lines and letters better.  I had some vague idea of trying to make the designs and letters look glowing.
     I then painted the disc with Citadel Contrast "Gryph-Hound Orange", and when dry, I painted the vapors under it with Citadel Contrast "Aethermatic Blue".  I had hoped the areas I had painted white would look brighter somehow, but I hadn't thought it through, and the Contrast paint just pooled in the inscribed recesses of the deigns and letters on the disc and ended up covering up the white and looking just plain orange like the rest of the disc.   So I set out to repaint the designs,   this time with thinned Crafter's Acrylic "Daffodil Yellow".  When the "Daffodil Yellow" was dry, I went over it with some more of the thinned "Snow White". 
    Next, I painted the stonework base with Americana "Neutral Grey".  When dry, I gave the base a  wash with Citadel Shade "Nuln Oil". I let the "Nuln Oil" dry, and then drybrushed the base with, first, Folk Art "Gray Green" , and then, secondly, some Americana "Dove Grey".      
      The next day I gave all the piece a complete coat of Americana "DuraClear Matte" varnish. 

     Well, I can't say I got any glowing effect.  Trying to do light effects on the translucent figures has always been challenging.  Still, it doesn't look bad; it's just a good serviceable figure.

Monday, March 14, 2022

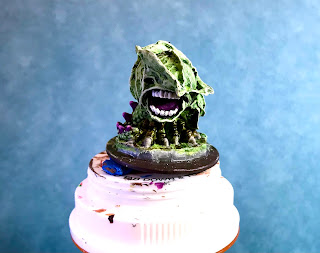
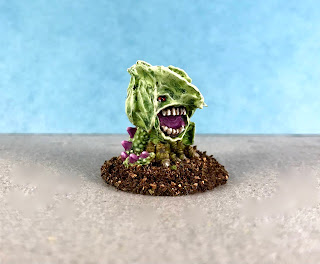
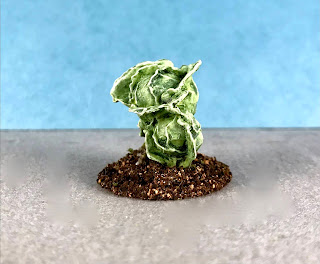
Dire Cabbage: Bones 5 Fan Favorites Figure

    This past week I painted the "Dire Cabbage" from the Bones 5 Fan Favorites Expansion.  
    I prepped the figure in the usual way, soaking it in a dish of water with a couple drops of dish-soap added, then giving it a light scrub with a soft toothbrush, and then rinsing and drying it.  I then trimmed the figure's integral base a little, and glued the figure to a 1" black-primed metal washer with some Aleene's Tacky glue.  I then placed the figure in my painting grip.   
     I began by painting the entire figure with Americana "Olive Green".  I then heavily drybrushed it with Ceramcoat "White".
     I let the first coats dry for a while, and then gave the entire figure a coat of thinned Citadel  Contrast "Creed Camo".  When this was dry, I went back and dry brushed it again with the base "Olive Green", and then drybrushed with the "White". 
               Next, I went over his legs with a coat of Citadel Contrast "Aggaros Dunes".  I then painted the mouth with Anita's "Violet", and the spikes on his tail with Crafter's Acrylic "African Violet" .  After that, I mixed a little Reaper MSP "Breast Cancer Awareness Pink" into the "African Violet", and blended in some lighter tips on the tail spikes.
          I then painted his claws with Folk Art "Barn Wood", and his teeth with Reaper MSP "Bleached Linen". After that, I painted the eye socket with Citadel Contrast "Wyldwood". 
      I let the claws and teeth dry for a while, and then gave then a coat of Citadel "Agrax Earthshade" wash.  When the wash was dry, I highlighted the claws with the base "Barn Wood", and the teeth with the base "Bleached Linen".  After that, I painted the eye with Reaper MSP "Holy Berry".  I went back then and did spot highlights on the teeth, and a pinpoint highlight in the eye, using some Ceramcoat "White".  Lastly, I painted the base with Americana "Charcoal Grey". 
     I let the figure dry overnight and the next day I gave it a coat of Americana "DuraClear Matte" varnish. When dry, I used some white glue to glue a mix of dried used coffee grounds and nutmeg to the figure's base. Another overnight dry, and I sprayed the figure with Testor's Dullcote". 


     I'm really happy with this little guy!  It is such a fun and imaginative figure; and there's a lot of detail in the sculpt which made painting it a lot of fun.