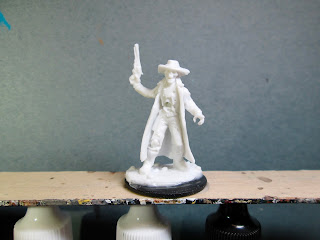
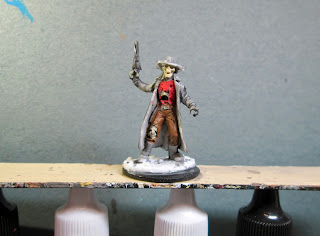
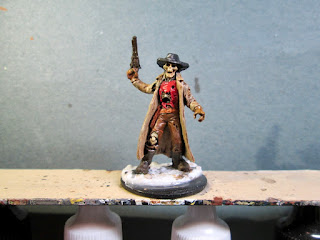
This past week I painted the Undead Outlaw figure from the Bones 2, Savage Worlds set.
I prepped the figure in the usual way; soaking it in a dish of water with a couple drops of dish-soap added, then giving it a light scrub with a soft toothbrush, and then rinsing and drying it. I then glued the figure to a black-primed 1" fender washer with Aleene's Tacky glue, and then glued the washer-mounted figure to a tongue depressor with a couple drops of the Elmer's glue.
I began by giving the figure a wash with heavily thinned Reaper "Grey Liner" using a wet brush. When the wash was dry, I painted the shirt with Ceramcoat "Opaque Red", and the pants with Reaper MSP "Turkey Brown". I then painted the skull and exposed bones with Americana "Antique White".
Next, I painted the duster coat with Americana "Khaki Tan", and then the boots with Americana "Charcoal Grey". After that, I painted his gloves with Accent "Mustard Seed", and the handle of the gun with Crafter's Acrylic "Cinnamon Brown".
I then painted the belt and holster with Americana "Terra Cotta", and then let the figure dry for a while. Afterwards, I gave the entire figure a wash with Citadel "Agrax Earthshade" wash, using a wet brush. When the wash was dry, I painted the metal parts of the gun with Ceramcoat "Walnut", and his hat, shirt collar, and hair with Black.
Next, I highlighted the head and other areas of exposed bones with White. I then highlighted his red shirt with Crafter's Acrylic "Orange Spice", and his pants with Americana "Sable Brown". I highlighted his boots with Americana "Mississippi Mud", and his hat with "Citadel "The Fang". After that, I gave the metal parts of his gun a wash with thinned Accent "Golden Oxide" paint; and while that wash was drying I highlighted his duster coat with Americana "Bleached Sand" and his gloves with Folk Art "Butter Pecan".
I then painted his buttons with Ceramcoat "Bronze", and then did his belt buckle with Folk Art Metallics "Gunmetal Grey". I then did a light drybrushing on the metal parts of the gun with the "Gunmetal Grey".
When I was done painting the figure, I used some white glue to glue a little sand to the base. When this was dry, I painted the sand, and the figure's integral base, with the "Charcoal Grey", and when the paint was dry, I drybrushed the base and sand with some Americana "Territorial Beige", then some of the "Antique White", and lastly the "Bleached Sand".
I let the figure dry overnight and the next day I gave him a coat of Americana "DuraClear Matte" varnish. Another overnight dry, and I sprayed him with Testor's Dullcote".
I'm really happy with how he turned out. I'm not exactly sure what I will use him for, but it's a fun and cool figure to have in the collection. And, it's another Bones 2 figure completed as I anxiously wait for my Bones 3 shipping notice.
My Efforts to Paint the Miniatures From the 1st, 2nd, 3rd, and 4th BONES Kickstarters!
Monday, May 29, 2017
Monday, May 22, 2017
Goroloth: Bones 2 Sea Monster
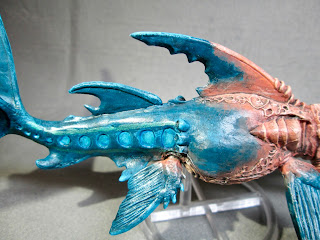
This week I painted up the Goroloth figure from the Bones 2, Expansion Set #1, add-on set. In looking at the figure, I decided I wanted to paint it like some crazy wizard decided to cross an Octopus with a Shark. (Crazy you say?! Behold the glory of my Sharktopus! Who's crazy now, I ask!! Muuwahahahaha!) :)
I prepped the figure in the usual way; soaking the pieces over night in a dish of water with a couple drops of dish-soap added, then giving them a light scrub with a soft toothbrush, and then rinsing and drying them. I then assembled the model using Gorilla superglue. When the superglue was set, I tested the fit of the mounting hole in the model with a spare Reaper CAV flight stand I had, and was very happy to see it fit perfectly.
I began by painting the front of the "Sharktopus" with Americana "Shading Flesh", an the rear of the figure with Americana "Wedgewood Blue". I then made a mix of the two paints and carefully blended the front and back colors together.
Next, I painted the underside of the tentacles with Americana "Mocha". I let everything dry for a while, then gave the entire figure a wash with Citadel "Nuln Oil" wash using a wet brush.
I then drybrushed the front part of the figure with first a Reaper Free Sample color that was a nice Salmon hue, and followed that with some Folk Art "Almond Parfait". I then drybrushed the back of the model with Crafter's Acrylic "Tropical Blue".
I then painted two lines running down the tail, one above and one below the circle indents, using Folk Art "Metallic Emerald Green". After that, I painted the circle indents themselves with Folk Art Pearl "Aqua Moire". I then moved to the eyes, painting them a mix of Crafter's Acrylic "Orange Spice" and Ceramcoat "14K Gold". Next, I drybrushed the underside of the tentacles with Crafter's Acrylic "Light Antique White". I then went back and gave the circle indents a wash with some Iron Wind Metals "Medium Blue" ink using a wet brush. I then returned to the eyes, and painted White pupils, and then gave them Black centers. When the ink wash was dry in the circles, I repainted the center of them with the base "Aqua Moire".
I let the figure dry overnight, and the next day I gave it a coat of Americana "DuraClear Matte" varnish. Since this has a slight sheen to it, rather than being true matte, I decided to go with just this as my final coat. I did however go back and paint the eyes with Americana "DuraClear Gloss" Varnish to give them an extra shine.
Wednesday, May 17, 2017
Bones 3 ...Soon...!
Monday, May 15, 2017
2 More Gnoll Warriors: Bones 2 Figures
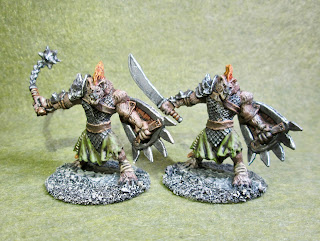
This past week I painted the remaining two Gnoll Warriors from the Bones II 24 Bonus Figures set.
I prepped these figures in the usual way; soaking them in a dish of water with a couple drops of dish-soap added, then giving them a light scrub with a soft toothbrush, and then rinsing and drying them.
I wanted to make these look a little different than the other two I did a few weeks ago; so for the one on the left, I cut his hand off at the wrist, and then rotated backwards and super-glued it back on, so it would look more like he was on the back part of his swing rather than the forward part. For the one on the right, I sliced off his hand, and replaced it with a sword wielding one from the Bones 1 Orcapocalypse figures; left over from when I was converting some of those a year or so ago.
I then glued the figures to black-primed 1.5" fender washers with Aleene's Tacky glue, and then glued the washer-mounted figures to a tongue depressor with a couple drops of the Elmer's glue under each washer.
I began by giving the figure a wash with heavily thinned Reaper "Brown Liner" using a wet brush.
Next, I painted their armor all Black, and when it was dry I drybrushed it with Folk Art Metallics "Gunmetal Grey". I then passed over the armor with a lighter drybrush of Folk Art "Silver Sterling". Next, I painted heir fur with Americana "Mississippi Mud", and then painted their manes and the end of their tails with Games Workshop "Vermin Brown".
I then repainted the shield metalwork, and morning star metal parts with the "Gunmetal Grey", and then let everything dry for a while. When I returned to the figures, I gave them both a wash with Citadel "Nuln Oil" wash using a wet brush. When the wash was dry, I highlighted their fur with Folk Art "Barn Wood", and their manes, and the end of their tails, with Accent "Golden Oxide". After that, I painted their muzzles, noses, eyes, claws, and the bases, Black.
I prepped these figures in the usual way; soaking them in a dish of water with a couple drops of dish-soap added, then giving them a light scrub with a soft toothbrush, and then rinsing and drying them.
I wanted to make these look a little different than the other two I did a few weeks ago; so for the one on the left, I cut his hand off at the wrist, and then rotated backwards and super-glued it back on, so it would look more like he was on the back part of his swing rather than the forward part. For the one on the right, I sliced off his hand, and replaced it with a sword wielding one from the Bones 1 Orcapocalypse figures; left over from when I was converting some of those a year or so ago.
I then glued the figures to black-primed 1.5" fender washers with Aleene's Tacky glue, and then glued the washer-mounted figures to a tongue depressor with a couple drops of the Elmer's glue under each washer.
I began by giving the figure a wash with heavily thinned Reaper "Brown Liner" using a wet brush.
Next, I painted their armor all Black, and when it was dry I drybrushed it with Folk Art Metallics "Gunmetal Grey". I then passed over the armor with a lighter drybrush of Folk Art "Silver Sterling". Next, I painted heir fur with Americana "Mississippi Mud", and then painted their manes and the end of their tails with Games Workshop "Vermin Brown".
I then painted their kilts with Vallejo "Brown Violet", and then did the inside of their shield backs with Folk Art "Teddy Bear Brown". After that, I painted all their straps and belts with Americana "Raw Umber", and then painted the handle of their morning stars with Crafter's Acrylic "Cinnamon Brown" and their teeth with Americana "Antique White".
Next, I painted alternating stripe patterns on their shields with Ceramcoat "Black Cherry", and Apple Barrel "Yellow". I then painted the shield metalwork, and the morning star metal parts with Americana Zinc. After that, I painted the patch of material under the strap on their left shoulder blade and the wraps on their feet, with the "Antique White" again.I then repainted the shield metalwork, and morning star metal parts with the "Gunmetal Grey", and then let everything dry for a while. When I returned to the figures, I gave them both a wash with Citadel "Nuln Oil" wash using a wet brush. When the wash was dry, I highlighted their fur with Folk Art "Barn Wood", and their manes, and the end of their tails, with Accent "Golden Oxide". After that, I painted their muzzles, noses, eyes, claws, and the bases, Black.
Next, I highlighted their kilts with Americana "Avocado", and then painted the stitching on the kilts with Americana "Buttermilk". After that, I highlighted all the straps and belts with Americana "Sable Brown", and then highlighted the front of the shields with Reaper MSP "Holly Berry" for the red stripes, and Reaper MSP "Golden Glow" on the yellow stripes. I then highlighted the handle of the morning stars and the feet wraps with Folk Art "Butter Pecan", and then did the teeth with Crafter's Acrylic "Light Antique White". I then went back over the metal parts adding highlights with Ceramcoat "Metallic Silver".
Lastly, I used some white glue to glue a little sand to the bases. When this was dry, I painted it all Black. When the Black was dry, I drybrushed it, and the Gnolls' bases, with Americana "Neutral Grey", and then some Folk Art "Platinum Grey". I let the figures dry overnight and the next day I gave them a coat of Americana "DuraClear Matte" varnish. Another overnight dry, and I sprayed them with Testor's Dullcote".
I'm happy with how these turned out as well. And I think the conversions ended up looking pretty good too. Here is a photo of all the Gnolls from Bones II together.
Monday, May 8, 2017
Brass Bull: Bones 2 Figure
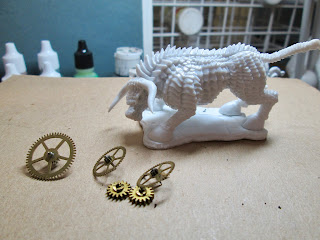
This past week I took a break from Gnolls and Beastmen, and painted the Brass Bull from the Bully for You set. I thought this figure was so plain that I wanted to fancy it somehow; and I got the idea of making it look more like a clockwork bull by adding some old watch gears I had in my bits cabinet.
I prepped the figure in the usual way; soaking it in a dish of water with a couple drops of dish-soap added, then giving it a light scrub with a soft toothbrush, and then rinsing and drying it.
I had plans to add several of the gears to the figure; one as the main gear coming from the back, and a set emerging from each of the shoulders and thighs; but in the end I just went with the main drive gear coming out of the back. The way the body is angled and bent, I didn't feel confident enough about adding all the gears and having them end up looking like part of the same machinery, and not just random assorted gears angled this way and that. Sometimes simplest is best.
So I cut a slot in his back between his shoulders, and then cut the gear roughly in half, so it would nest down in the slot. I then superglued it in place. When the modification was done, I then glued the figure to a black-primed 1.5"x 2" steel base with Aleene's Tacky glue.
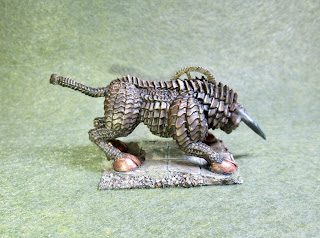
I began by painting the entire figure with Americana "Bittersweet Chocolate", and the figure's base with Americana "Charcoal Grey"
Next, I drybrushed the entire figure with Ceramcoat "Bronze". I then painted the horns with Folk Art Metallics "Gunmetal Grey", and the hooves with Ceramcoat "Copper".
When everything was dry, I gave the entire figure a wash with Citadel "Nuln Oil" wash using a wet brush".
Then, when the wash was dry, I drybrushed the body with Ceramcoat "14k Gold". I then highlighted the horns with Ceramcoat "Metallic Silver", and the hooves with the base "Copper". I mixed a little of the "Metallic Silver" with the "14K Gold", and did some spot highlighting on the sprockets of the gear in an effort to make them look more worn.
Next, I painted the eyes with Ceramcoat "Opaque Red", and used this color to add drybrushed reflections around the eye socket and on the horns. Next, I added inner highlights to the eyes with Crafter's Acrylic "Pure Pumpkin", and then Reaper MSP "Golden Glow" for the inner pinpoint of light in the eye.
When I was done painting the figure, I used some white glue to glue a little sand to the base. When this was dry, I painted the sand with the "Charcoal Grey", and when the paint was dry, I drybrushed the base with some of the "Territorial Beige", then some of the "Antique White", and lastly Americana "Bleached Sand".
I let the figure dry overnight and the next day I gave him a coat of Americana "DuraClear Matte" varnish. Another overnight dry, and I sprayed him with Testor's Dullcote".
I'm happy with how he turned out, though I think I probably should have gone a little brighter with the brass to get the contrast between the plates to look a little better. Ideally I should have hand-painted in each plate's shadow, and highlighted each plate's edge, instead of relying on washes and drybrushing; but it's a gaming model after all, and for that purpose I think it looks just fine.
Thursday, May 4, 2017
Mantic "Terrain Crate" Kickstarter
I recently went in on this nifty Kickstarter, and I thought I'd let folks know about it, as it seems a great deal for scenery items. And, Mantic is a know company with a good track record. Check it out, or better yet, become a backer!
TERRAIN CRATE
Here's an example of one of the sets. The sets cost between $75 and $60, depending on how many you order, so the individual pieces cost less than $1 each! There are two others; "Battlefield", and "Town", plus a number of smaller add-on sets.
Monday, May 1, 2017
Bronzeheart, Minotaur Hero: Bones 2 Figure
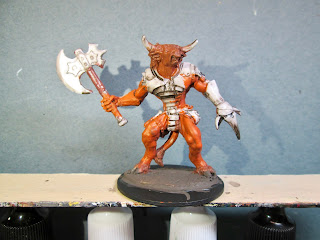
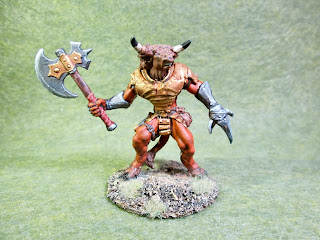
This past week, I painted the second of the Bones II minotaur figures from the Beast Mode set: Bronzeheart, Minotaur Hero.
I prepped the figure in the usual way; soaking it in a dish of water with a couple drops of dish-soap added, then giving it a light scrub with a soft toothbrush, and then rinsing and drying it. I then glued the figure to a black-primed 1.5" fender washer with Aleene's Tacky glue, and then glued the washer-mounted figure to a tongue depressor with a couple drops of the Elmer's glue.
I began by giving the figure a wash with heavily thinned Reaper "Brown Liner" using a wet brush.
When I was done painting the figure, I used some white glue to glue a little sand to the base. When this was dry, I painted the sand with the "Charcoal Grey", and when the paint was dry, I drybrushed the base with some of the "Territorial Beige", and then some of the "Antique White".
I let the figure dry overnight and the next day I gave him a coat of Americana "DuraClear Matte" varnish. Another overnight dry, and I sprayed him with Testor's Dullcote".
I prepped the figure in the usual way; soaking it in a dish of water with a couple drops of dish-soap added, then giving it a light scrub with a soft toothbrush, and then rinsing and drying it. I then glued the figure to a black-primed 1.5" fender washer with Aleene's Tacky glue, and then glued the washer-mounted figure to a tongue depressor with a couple drops of the Elmer's glue.
I began by giving the figure a wash with heavily thinned Reaper "Brown Liner" using a wet brush.
When the wash was dry, I painted his skin with Games Workshop "Vermin Brown". I then painted his head, leg, and arm fur with Crafter's Acrylic "Cinnamon Brown", and the handle of his axe with Folk Art "Dark Brown".
Next, I painted the wraps on the handle of his axe with Folk Art "Barnyard Red", and then painted his horns with Folk Art Platinum Grey" and his teeth with Americana "Antique White". I then painted his armor all with Accent "Mustard Seed", and his weapons, and wrist guards wth Americana "Zinc". After that I did all his belts and straps with Americana "Raw Umber" and the pouch at his side with Folk Art "Teddy Bear Brown". I then painted his hooves and the base with Americana "Charcoal Grey".
I then painted the armor with Ceramcoat "Bronze", and the weapons and wrist guard with Folk Art Metallics "Gunmetal Grey". Then, when everything had a while to dry, I gave the entire figure a wash with Citadel "Agrax Earthshade" wash using a wet brush. When the wash was dry, I highlighted his skin with a mix of Americana "Terra Cotta" and the "Vermin Brown". After that, I highlighted his head and the fur on his legs and arms with Americana "Sable Brown". I painted his eyes with Accent "RealUmber", and added tiny white dots to each. After that, I highlighted his teeth with Americana "Bleached Sand".
Next, I highlighted the straps, and the axe handle, with Americana "Mississippi Mud", and the wraps on the axe handle with Americana "Shading Flesh". I also blended in some black to the ends of his horns, and highlighted the pouch at his side with Ceramcoat "Territorial Beige". I then worked on the metallics; highlighting the weapons and wrist guards that I had originally painted with the "Gunmetal Grey" using Ceramcoat "Metallic Silver", and the armor and other parts I had painted with the "Bronze", I highlighted using Ceramcoat "14K Gold".When I was done painting the figure, I used some white glue to glue a little sand to the base. When this was dry, I painted the sand with the "Charcoal Grey", and when the paint was dry, I drybrushed the base with some of the "Territorial Beige", and then some of the "Antique White".
I let the figure dry overnight and the next day I gave him a coat of Americana "DuraClear Matte" varnish. Another overnight dry, and I sprayed him with Testor's Dullcote".
Like his brother that I did last week, I'm pleased with the results. Nothing exciting, but good solid gaming figures.
Subscribe to:
Comments (Atom)
