Monday, July 26, 2021

Boulderkin: Bones 5 Figures

      This past week I painted the "Boulderkin" from the Bones 5 Core Set.  In Bones 5, Reaper added a couple sets of figures that were groupings of similar figures in different poses.  As a gamer I loved this concept for unit building.  The Boulderkin were one such set, including 6 poses of the same basic rock creature.  As a wargamer I thought this was great, and ended up buying 3 extra sets of these figures for a total of 4; giving me 24 Boulderkin figures.   I decided to divide them into two groups: one group of 12 to base individually, and one group of 12 to mount on movement stands.
     With four total sets, that gave me 4 of each individual pose; so I decided to paint them in groups of 4 like figures.  Since I wanted half for individual basing, and half for stand basing, I glued 2 to 1" primed washers using Aleene's Tacky glue, and left 2 on just their integral bases.  I then glued my groups of 4 onto tongue depressors using regular white glue.

     But before I did that, I decided I wanted one of my individually-mounted Boulderkin to be a distinct command figure.  So I choose a suitable pose, and chopped him in the middle and then chopped of one arm..
     Using green stuff, I extended his middle so he would be slightly taller, and repositioned his right arm, and then re-sculpted the hand into a classic officer pointing pose.
          Since I had so many of these to point, I decided I wanted to use Citadel Contrast Paints to speed the process.  So, to begin, I gave all the figures a base coat of Ceramcoat "White".
     When the base coat was dry, I painted each figure entirely with Citadel Contrast "Basilicanum Grey".
     When the "Basilicanum Grey" was dry, I then went back and added a second layer to the insides of the mouths and their eyebrows to darken them.  On some of their eyebrows I did the second coat with "Citadel Contrast "Space Wolves Grey" to mix things up. At this point, I drybrushed the figures with some Americana "Dove Grey", paying particular attention to their "teeth" to help them stand out.   I then dabbed some of the "Space Wolves Grey", some Citadel Contrast Militarium Green", and some Citadel Contrast Aggaros Dune" here and there on different rocks of their bodies to add some visual interest.  After that, I painted their eyes with Crafters' Acrylic "Daffodil Yellow", and then painted Ceramcoat "Black" pupils.
     Lastly, I painted their bases with Americana "Mississippi Mud".
     I let all of them dry overnight and the next day I gave them a coat of Americana "DuraClear Matte" varnish.    Then, when  the varnish was dry, I  gave them tiny hairdos with some  different kinds of static grass and flock in an attempt to look like moss; gluing it on with white glue. When dry, I used the white glue to flock the bases. 
     Another overnight dry, and I sprayed the figures with Testor's Dullcote". 


     I'm generally happy with how these guys turned out.  The "Basilicanum Grey"  is a little splotchier than I would have liked, but the ability to paint so many figures quickly overshadowed those concerns.  

Thursday, July 22, 2021

Bones 5 Kickstarter Arrival Photos Part 2

    Hooray!  I was able to pick up my newly-repaired computer this morning, so I thought I would do a special Thursday edition post, and use the opportunity to post the second batch of photos from my Bones 5 Kickstarter haul, then next week I will get back to posting about painting.
Not-Dejah Thoris, from the Chronoscope Expansion.

The Monster from Chronoscope.  Sadly, this comes glued together. I wish they had left the translucent part separate.

The trailer from the Chronoscope expansion.  This seems a little small to me.

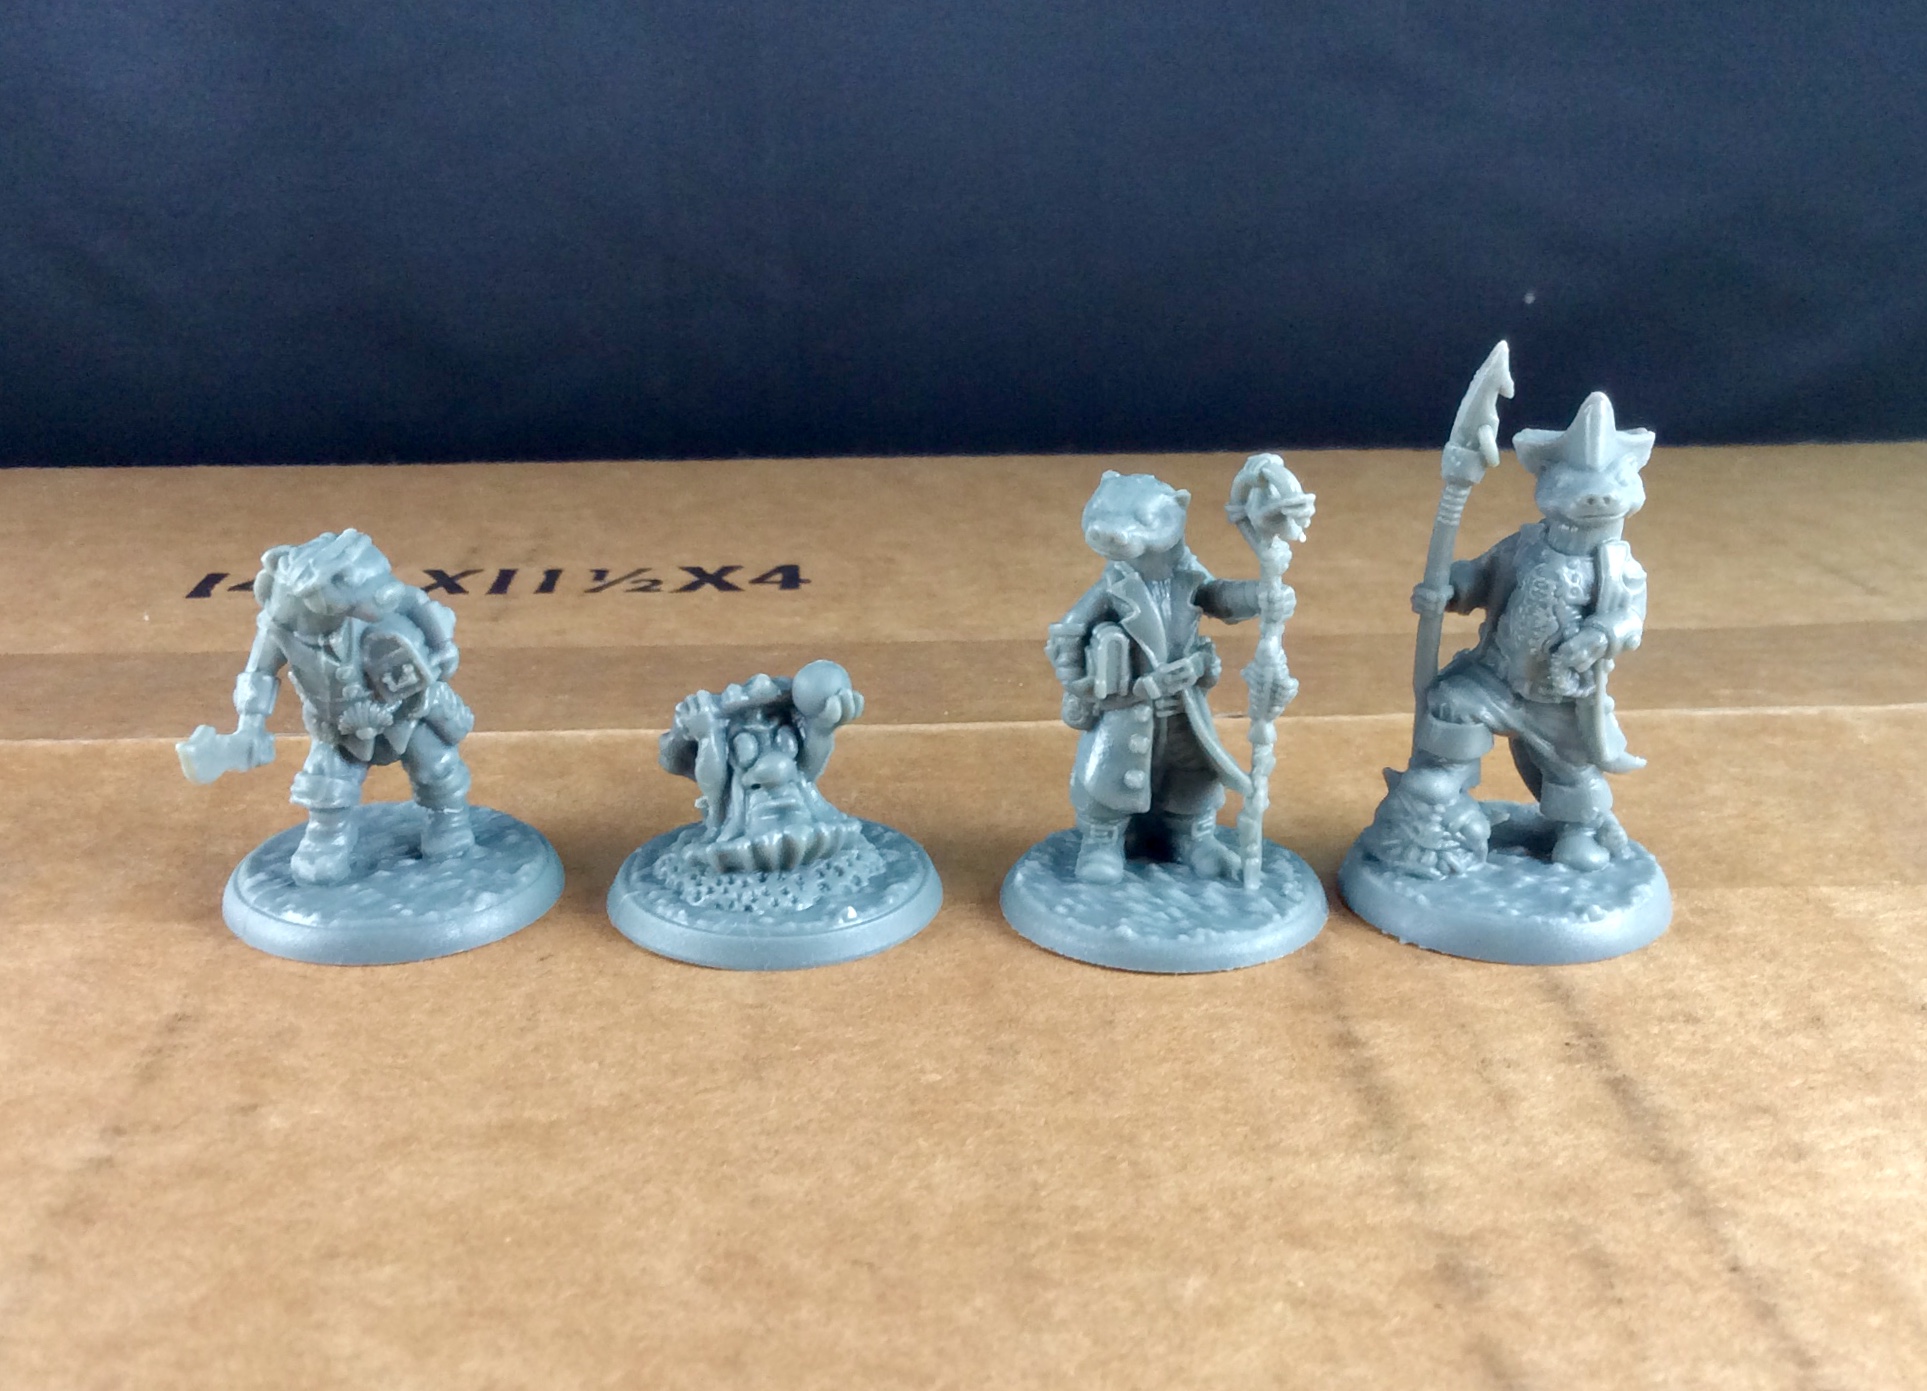
Otter Pirates! And the Oyster Familiar.  From the Brinewind Expansion.
 So much character!
Ghost Pirate Captain

Anchor of Damnation and Shrine to Maersuluth from the Brinewind Expansion.  These are great little pieces of scatter terrain.

Seamstress from Brinewind.

Brinewind Doxies and bed.

Assortment of Brinewind scallywags.  The Innkeeper (on left) has some issues with her shoulders and arms looking wonky.
Brinewind Cook, Shark Butcher, and Merchant.


Cat Pirates! :)

The Ogre Porter from Brinewind. This is a wonderful model, but unfortunately the kitty riding the cart is not very detailed with mushy face details and stubby ears. 

The Dungeon Dwellers "Treasure Dragon".  This is a beautiful little dragon and sadly gets overshadowed by its bigger cousins in the Kickstarter.  Shown with the Knight from the same expansion.

The Sea Giant from the Dark Depths Expansion.  This a gorgeous figure with so many cool details!  In my mind, the best figure in Bones 5!

   So tune in next Monday for a return to regularly scheduled service!  I will be posting my first painted stuff from Bones 5!

Monday, July 12, 2021

No Post Today: Computer Died

   Well, my computer started having problems this past week, and that has prevented me from getting today’s post ready.  I tried putting this week’s post together on my IPad, but found the editing function next to useless on that platform, especially when I tired to add photos. So I managed to get this simple text post ready. And add a single photo. But anything more seems beyond my skill.  Hopefully we can resume next week.

Not-Dejah Thoris, from the Chronoscope Expansion.


Monday, July 5, 2021

BONES 5 Arrives!

 I am happy to announce that last week my Bones 5 Kickstarter order arrived from Reaper! Below are some pictures of the haul and a few things I initially looked at. Due to company visiting over a long Fourth of July weekend, I didn't have a lot of time to paw through everything, so hopefully more photos next week.
Our official box inspector does his job upon Bones 5's arrival.  Note the upper left side is totally caved in.  It arrived in that condition.  Reaper did not use a very sturdy box to ship in, and did not stuff it with enough packing material to support it from within.  Luckily, though a few of the interior boxes were crushed a little, no minis appear damaged yet.

My haul of the Core and Expansions. Also shown, Sophie's Lucky Dice set.

My mound of baggie wrapped Add-Ons and Extra Sets.  Figure included for scale.

The Core Set's "Gem Dragon". The base is actually hollow, so crafty folks can attempt to electrify it if they want.

The terrain from the Mandupar Pass Encounter. This is a beautiful big hunk of plastic.  I was amazed at how dynamic and detailed the monkey face above the cave was.

The back of the Mandupar Pass cave entrance.  I really appreciated Reaper making the effort to add detail to the back, making it to a playable area as well.


Krateryx, the Shadow Dragon.  I love that Reaper left its stone base totally natural and did not feel temped to mold the feet directly to it, or put slots in it for feet tabs to go into it.  This way it can also be used as terrain.

Townsfolk, half set.  These figures are great and full of character.  I bought them thinking I could use some as siege engine crew, and I was not disappointed.  While their static poses put me off a little when I saw them listed in the Kickstarter, seeing them in person I realize they will also make great prisoners/captives as well as the more obvious NPCs.

The other half of theTownsfolk set.

The Henchmen set.  Lots of character in these guys!


The Dwarf King's Crypt.  This is another beautiful set with the figures oozing character.  My one disappointment is the blue they used for the Dwarf King's ghost.  I wish they had just left it clear.


That's all I have time for now.  I will do more next week, so if there's anything you want to see, please let me know in the comments.  Last week I posted a list of all the sets I ordered at the bottom of my painting article.

Tuesday, June 29, 2021

Malvernis Soldier: Bones 4 Chronoscope Figure

        This week I painted the "Malvernis Soldier" from the Bones 4 Chronoscope Expansion.  Like the Rach Soldier I did earlier, I have no idea what the official CAV faction colors are, so I did what I found pleasing.
      I prepped the figure in the usual way, soaking it in a dish of water with a couple drops of dish-soap added, then giving it a light scrub with a soft toothbrush, and then rinsing and drying it.  I then trimmed the figure's integral base a little, and glued the figure to a 1" green-primed metal washer with some Aleene's Tacky glue.  I then placed the figure in my painting grip.    
     I began by painting the face and hands with a mix of Pathfinder MSP "Medusa Green" and Reaper MSP "Olive Skin".  I then painted the outfit with Crafter's Acrylic "Navy Blue"; and the boots, belts, straps, and pouches with Americana "Zinc".
     Next, because I found I had been painting all my Sci-Fi weaponry black and wanted a change, painted the gun with Pathfinder MSP "Urgathea Red".  A red gun; why not! :)   I then painted the hair with Apple Barrel "Apple Black Green".  When everything had time to dry I gave the skin a coat of Citadel "Reikland Fleshshade" wash; and when that was dry, I gave the outfit and gun a coat of Citadel "Nuln Oil" wash.
     When the washes were dry, I painted the eyes, and then highlighted the skin with a mix of the base "Medusa Green" and "Olive Skin".  I then mixed Reaper MSP "Olive Highlight" with the "Medusa Green" for lighter skin highlights.  After that, I highlighted the hair with Americana "Forest Green", and then did the outfit highlights with Reaper MSP "Ultramarine Blue".
     I decided the hair highlights weren't bright enough, so I added some Americana "Festive Green" to lighten them up a little.  I then highlighted the boots, belts, straps and pouches with the base "Zinc", and then mixed in a little Crafter's Acrylic "Storm Cloud Grey".   After that, I highlighted the gun with the base "Urgathea Red", then mixed in some Reaper MSP" Fresh Blood" for lighter highlights.  Lastly, I painted the base with Americana "Neutral Grey".  
      I let the figure and base dry overnight and the next day I gave them a coat of Americana "DuraClear Matte" varnish.   Another overnight dry, and I sprayed the figure with Testor's "Dullcote". 


    I'm happy with the figure, and I like the splash of color the gun provides.  I only gave this a quick spray of the Dullcote, as I held the figure just out the door, becuase it was very humid out.  I can see now that it as not enough, or I didn't shake the can well enough, as it's still very shiny.  I will have to respray it when the humidity lowers.

   In other news, I received my Bones 5 shipping notification!  So next Monday's post will be a Bones 5 show and tell.  If you have anything from Bones 5 you want to see, and I ordered it, I will happily post a photo of it.  Let me know in the comments here.

My Consolidated List of Purchases:

1)Core                                                  
2) Brinewind Expansion                                                                                     
3) Dark Depths Expansion x2
4) Chronoscope Expansion
5) Dungeon Dwellers Expansion X2                                
6) Brinewind Extras
7) Dwarf King Crypt X2
8) Catfolk 
9) Catapult x2
10) War Mammoth
11) Trebuchet
12) Balista
13) Henchmen
14) Boulderkin
15) Zombies
16) Elves                                                   
17) Gem Dragon
18) Charnel Pit      
19) Armory
20)Foerster’s Favorites Paint
21)Fan Favorites
22)Townsfolk
23)Shadow of Ravenhome
24) Constructs set
25) Mandupar Pass
26) Shadow Dragon
27) Boulderkin, 2 sets

Monday, June 28, 2021

Post Tomorrow

    Due to time constraints, I'm not going to be able to put my usual post up today.  I have the figure finished, just no time to edit the photos, and write it up.  So see you tomorrow! 

Monday, June 21, 2021

Female Android: Bones 4 Chronoscope Figure

    This past week I continued painting Sci-Fi for Stargrave, and painted the "Female Android" from the Bones 4 Chronoscope Expansion.  I think this figure is a pretty close match for the iconic robot "Maria" in the classic 1927 film "Metropolis".
  I prepped the figure in the usual way, soaking it in a dish of water with a couple drops of dish-soap added, then giving it a light scrub with a soft toothbrush, and then rinsing and drying it.  I then trimmed the figure's integral base a little, and glued the figure to a 1" green-primed metal washer with some Aleene's Tacky glue.  I then placed the figure in my painting grip.           
      I knew I wanted to paint it in the silver tones of the figure's movie counterpart, so I began by giving it a base coat of Ceramcoat "White".   When dry, I gave the figure a coat of Citadel Contrast "Black Templar". 
     I let the Contrast paint dry, and then drybrushed the figure with, first, Folk Art Metallics "Gunmetal Grey", and then Ceramcoat "Metallic Silver".
     Next, I did lighter highlights with Reaper MSP "Sparkling Snow", and then some specific highlights with Reaper MSP "Sophie Silver".  After that I painted the eyes, using Crafter's Acrylic "Cool Blue", and adde Americana "Snow White" highlights.  Lastly, I painted the base with Americana "Neutral Grey".  
      I let the figure and base dry overnight and the next day I gave them both a coat of Americana "DuraClear Matte" varnish.   Another overnight dry, and I sprayed the figure with Testor's "Dullcote". 


    This was a quick paint, and I'm really pleased with the results.  Also like how the Contrast paint worked as a base for metallic drybrushing.  It should be good for knights as well.