This week I completed the Hordlings set from the Bones II, Expansion I. I needed something quick and simple to do because, like I said with my Monday figure, I was traveling over Spring Break, so knew my painting time would be limited.
Since there were three of these figures in the set, I decided to base up two of them for Frostgrave, to represent Minor Demons; and the third I based regularly for other Fantasy games. I prepped the figures in the usual way; soaking them in a dish of water with a couple drops of dish- soap added, then giving them a light scrub with a soft toothbrush, and then rinsing and drying them. I then glued one of the figure to a black-primed 7/8" fender washers with Aleene's Tacky glue and the other two to white-primed 7/8" fender washer. I then glued the washers to a tongue depressor with a couple drops of the Elmer's glue each.
I began by painting the Hordlings with Crafter's Acrylic "Citrus Green", and then when the "Citrus Green" was dry, I gave it a wash with Iron Wind Metals "Dark Green" ink using a wet brush. When the ink was dry, I painted the tentacles and wings of the center Hoardling, and the spine bumps of the first and third Hoardlings, with Apple Barrel "Apple Lavender".
When the "Apple Lavender" was dry I gave the tentacles, wings, and spine bumps all a wash with Iron Wind Metals "Purple" ink using a wet brush. I then applied some slight thinned Black paint to the mouths of Hoardling 1 and 3, and painted the eye sockets on all three with the Black. I then went back and painted the eyes with Crafter's Acrylic "Daffodil Yellow".
My next step was to paint the tongue on 3 with Crafter's Acrylic "Purple Passion", followed by doing the teeth on 1 and 3 with Americana "Buttermilk", and then highlighting the teeth with Crafter's Acrylic "Light Antique White". I then painted their irises with Crafter's Acrylic "Deep Red", followed by Black pupils. Next, I added highlights to the wings, tentacles, tongue, and spine bumps with the "Apple Lavender" followed by doing highlights on their bodies with Reaper MSP Bones "Dungeon Slime". Lastly, I painted the the hooves on all three of them, and the horns on the third one, with Americana "Neutral Grey", and when dry, I gave the hooves and horns a wash with some GW Agrax Earthshade" using a wet brush.
After I was finished painting the figures, I cut a small section of the sprue these Hoardlings came on and glued it to the base of the second one to represent some old stonework; and when dry, I painted it with Americana Zinc and then drybrushed it with Crafter's Acrylic "Storm Cloud Grey", followed by Folk Art "Platinum Grey". Then, when everything had overnight to dry, I gave the figures a coat of Ceramcoat "Matte Varnish". Later that afternoon I flocked the first two's bases with Woodland Scenics "Snow" flock, and the third one's base with regular green flock. The next day, I sprayed the figures with Testor's Dullcote.
I'm happy with how these little fellows turned out. They were quick to do, and I was glad to have an excuse to use some vibrant colors for a change.
My Efforts to Paint the Miniatures From the 1st, 2nd, 3rd, and 4th BONES Kickstarters!
Thursday, March 31, 2016
Monday, March 28, 2016
Village Rioter: Figure 208 of 266
Knowing I would be short of time for painting this past week due to Spring Break traveling, I skipped doing another figure from the Necromancer set that I had been working on, and instead selected one of the simpler figures from the Townsfolk II set to paint: the Village Rioter.
I prepped the figure in the usual way; soaking it in a dish of water with a couple drops of dish- soap added, then giving it a light scrub with a soft toothbrush, and then rinsing and drying it. I then glued the figure to a black-primed 1" fender washer with Aleene's Tacky glue, and then glued the washer-mounted figure to a tongue depressor with a couple drops of the Elmer's glue.
I began by painting his head and right hand with Americana "Shading Flesh". I then painted his pants with Crafter's Acrylic "Navy Blue", his tunic with Nicole's "Brown", and his cowl with Ceramcoat "Territorial Beige".
Next, I painted the torch with Americana "Mississippi Mud", and the shaft of his pitchfork with Folk Art "Barn Wood". I then painted his gloved hand with Folk Art "Dapple Grey". I used Folk Art "Dark Brown" to paint his shoes, and Folk Art "Porcelain White" to paint his socks.
I painted his hair with Folk Art "Butter Pecan", and then painted his belt and pouch with Americana "Asphaltum". I let the paint dry for a while, and then gave the entire figure a wash with Winsor-Newton "Peat Brown" ink using a wet brush. When the wash was dry, I painted the fire on his torch using a series of five colors progressing from a light yellow to a brick red-orange. I then added a little Black at the bottom of the flames to help blend them into the top of the torch handle, and a little Black at the top to make the flames look a little sooty. Next, I painted the head of the pitchfork, his belt buckle, and the fitting on the torch handle, with Folk Art Metallics "Gunmetal Grey".
I decided the pitchfork looked too new, so I mixed some of the "Asphaltum" and "Gunmetal Grey" together to get a more aged looking metal color, and painted the base of the fork with that, transitioning up to the bare "Gunmetal Grey" on the tines.
I then highlighted his hair using Americana "Buttermilk"; followed by painting his eyes, and then highlighting his face with the base "Shading Flesh", then a little of the "Shading Flesh" mixed with some Americana "Mocha" to do lighter highlights. Next, I highlighted his cowl with Americana "Khaki Tan", and his tunic with Americana "Sable Brown". I then did highlights on his pants with Americana "Wedgewood Blue", and on his socks with the base "Porcelain White". I highlighted his shoes, and his belt and pouch, with Crafter's Edition "Spice Brown", and his glove with the base "Dapple Grey". After that, I highlighted the torch handle with the base "Mississippi Mud", and the pitchfork shaft with the base "Barn Wood". Lastly, I painted the figures sculpted base with Ceramcoat "Walnut".
After the figure had overnight to dry, I gave it a coat of Ceramcoat "Matte Varnish" the following morning. Later that morning I flocked the base, and that evening I sprayed the figure with Testor's Dullcote.
I'm happy with how he turned out. Nothing fancy, just a good solid villager figure.
Figure 208 of 266: Complete
Thursday, March 24, 2016
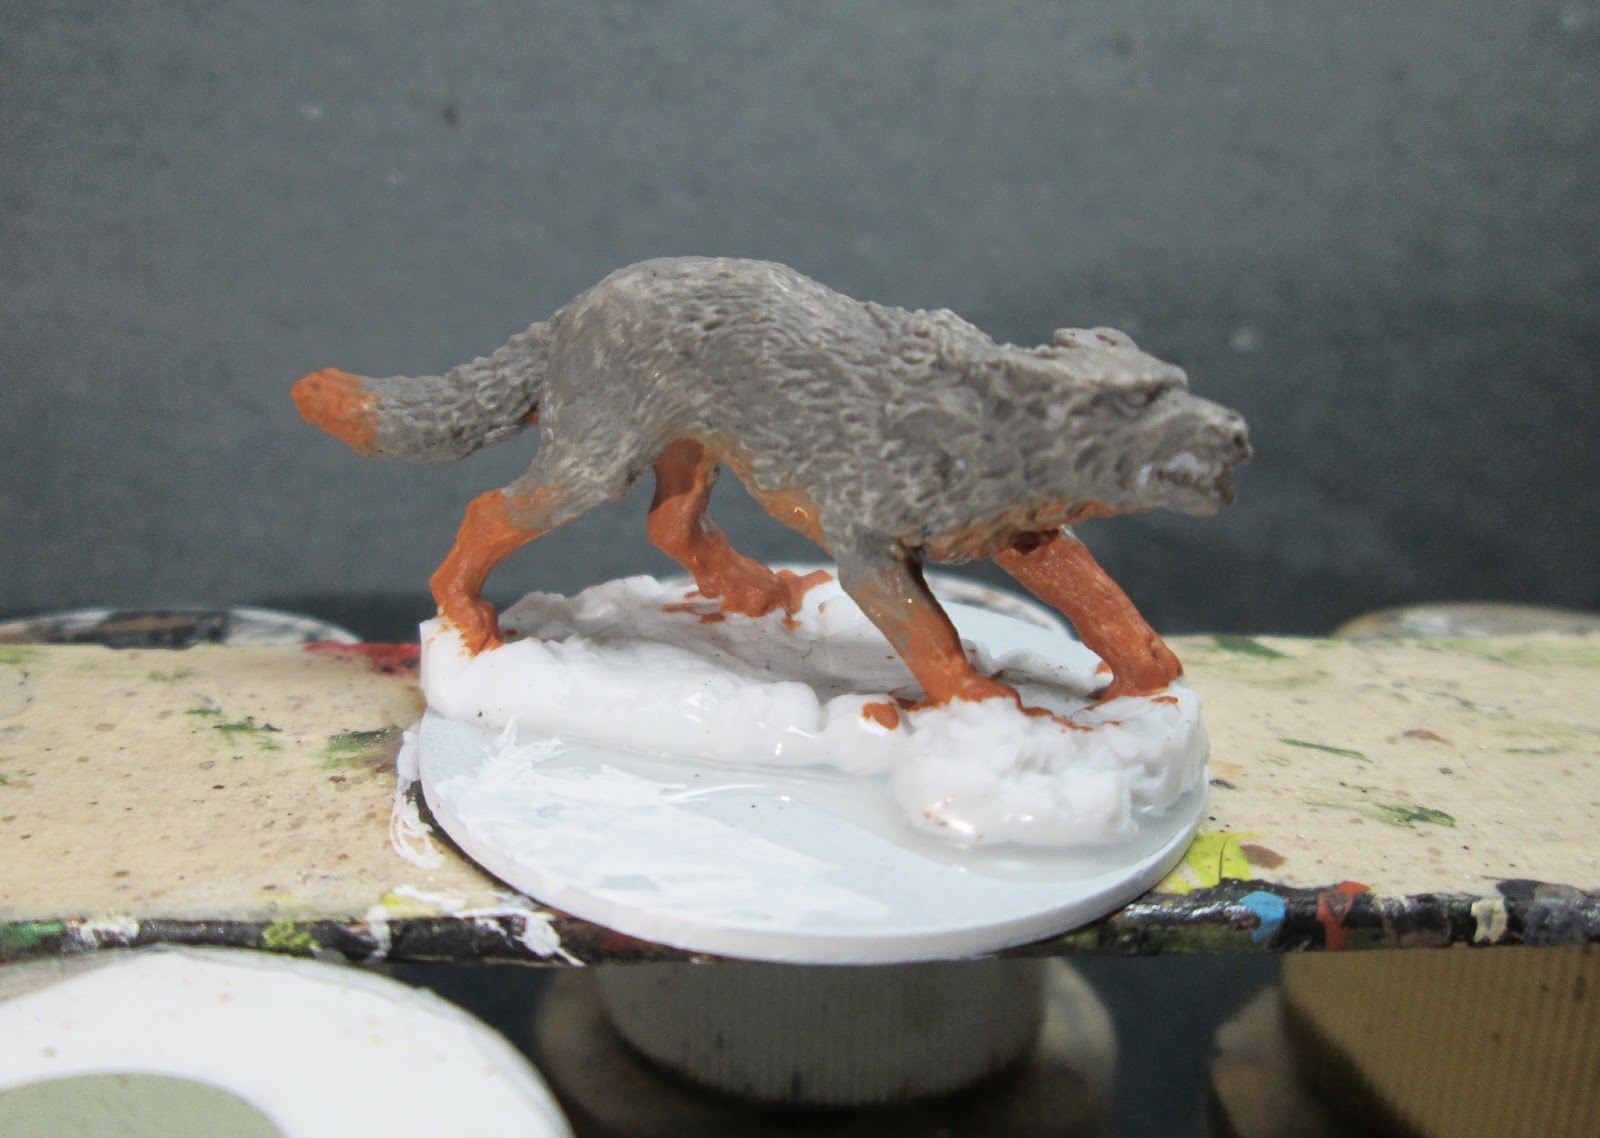
Warg Painted as Arctic Wolf: Bones II
This week I completed the Warg figure from the Bones II original figures set. I didn't realize he was a Warg when I started painting him; I just assumed he was a large wolf. So, I decided to paint him as an Arctic Wolf because, as with the rest of the animals I've been doing recently, I was painting him up for Frostgrave.
I prepped the figure in the usual way; soaking it in a dish of water with a couple drops of dish- soap added, then giving it a light scrub with a soft toothbrush, and then rinsing and drying it. I then glued the figure to a white-primed 1.25" fender washers with Aleene's Tacky glue, and then glued the washer-mounted figure to a tongue depressor with a couple drops of the Elmer's glue.
I began by painting the entire figure with Americana "Dove Grey". I then drybrushed his top half with Americana "Neutral Grey", followed by doing is top third with Americana "Zinc".
I then mixed a little of the "Zinc" into some Black and painted his very top spine area and the tip of his tail and also around his face and ears. I then painted his mouth and nose Black, and then I painted his eyes. Next, I painted his teeth with Americana "Buttermilk, followed with highlights using Crafter's Edition "Light Antique White". I used some of the "Zinc" to highlight his nostrils.
Lastly, I painted the base White. When everything had overnight to dry, I gave the figure a coat of Ceramcoat "Matte Varnish". Then, the next morning I flocked the white areas with Woodland Scenics "Snow" flock and added some tufts of twine to represent dead grasses. Later that afternoon I sprayed the figure with Testor's Dullcote.
I like the way this fellow turned out. I think he will make quite a formidable wolf to encounter in the frozen city.
Monday, March 21, 2016
Malek Necromancer: Figure 207 0f 266
Last week, before I left for Cold Wars, I put the finishing touches on Malek Necromancer from the Necromancers set. I'm now half way through this set, with two done, and two to go.
I prepped the figure in the usual way; soaking it in a dish of water with a couple drops of dish- soap added, then giving it a light scrub with a soft toothbrush, and then rinsing and drying it. I then glued the figure to a white-primed 1" fender washer with Aleene's Tacky glue, and then glued the washer-mounted figure to a tongue depressor with a couple drops of the Elmer's glue.
I began by painting the figure entirely in Black. I then drybrushed the cape with Folk Art "Dapple Gray". Next, I painted his leggings and sleeves with Americana "Zinc", and then I added highlights to his loincloth with Duncan "Olive Green".
I took some time to work on the skulls he's standing upon at this point. First, I drybrushed them with Americana "Khaki Tan", and then with Americana "Buttermilk". I then painted on spot highlights with Crafter's Acrylic "Light Antique White". By now the wash was dry, so I worked on his mask. First I carefully painted in eyes, then I used some of the "Light Antique White to do highlights. Next, I added highlights to his staff with Americana "True Blue", and I highlighted the ribbon that seems to be hanging from the staff, with Ceramcoat "Black Cherry". I then did highlights to his leggings and sleeves with Crafter's Acrylic "Storm Cloud Grey"; and then touched up the highlights on his cape with the original "Dapple Grey", and his gloves and boots with the "Neutral Grey". Moving on to the metallics, I did highlights on his sword with Folk Art "Silver Sterling", and I highlighted all the gold parts with Ceramcoat "14K Gold".
Lastly, I painted the base White. When everything had overnight to dry, I gave the figure a coat of Ceramcoat "Matte Varnish" early the next morning. Midday, I flocked the white areas with Woodland Scenics "Snow" flock and late that afternoon I sprayed the figure with Testor's Dullcote. When the Dullcote was dry, I superglued a green nail-art gem to the circle at the top of his staff.
I really like how he turned out, and I think the gem on his staff makes a really nice accent.
I prepped the figure in the usual way; soaking it in a dish of water with a couple drops of dish- soap added, then giving it a light scrub with a soft toothbrush, and then rinsing and drying it. I then glued the figure to a white-primed 1" fender washer with Aleene's Tacky glue, and then glued the washer-mounted figure to a tongue depressor with a couple drops of the Elmer's glue.
I began by painting the figure entirely in Black. I then drybrushed the cape with Folk Art "Dapple Gray". Next, I painted his leggings and sleeves with Americana "Zinc", and then I added highlights to his loincloth with Duncan "Olive Green".
My next step was to paint his mask with Crafter's Acrylic "Light Antique White". I then painted highlights on his boots, belt, and gauntlets with Americana "Neutral Grey". Next, I painted all the parts I planned to eventually paint gold with Folk Art "Golden Harvest".
I then painted the skulls at his feet with Nicole's "Brown", and the rod of his staff with Crafter's Acrylic "Navy Blue". After that I painted his sword with Folk Art Metallics "Gunmetal Grey", and the sword hilt, scabbard top, staff parts, and the skulls on his outfit with Ceramcoat "Bronze". After everything had a while to dry, I gave his mask and all the metallic parts a wash with GW Agrax Earthshade" wash using a wet brush.I took some time to work on the skulls he's standing upon at this point. First, I drybrushed them with Americana "Khaki Tan", and then with Americana "Buttermilk". I then painted on spot highlights with Crafter's Acrylic "Light Antique White". By now the wash was dry, so I worked on his mask. First I carefully painted in eyes, then I used some of the "Light Antique White to do highlights. Next, I added highlights to his staff with Americana "True Blue", and I highlighted the ribbon that seems to be hanging from the staff, with Ceramcoat "Black Cherry". I then did highlights to his leggings and sleeves with Crafter's Acrylic "Storm Cloud Grey"; and then touched up the highlights on his cape with the original "Dapple Grey", and his gloves and boots with the "Neutral Grey". Moving on to the metallics, I did highlights on his sword with Folk Art "Silver Sterling", and I highlighted all the gold parts with Ceramcoat "14K Gold".
Lastly, I painted the base White. When everything had overnight to dry, I gave the figure a coat of Ceramcoat "Matte Varnish" early the next morning. Midday, I flocked the white areas with Woodland Scenics "Snow" flock and late that afternoon I sprayed the figure with Testor's Dullcote. When the Dullcote was dry, I superglued a green nail-art gem to the circle at the top of his staff.
I really like how he turned out, and I think the gem on his staff makes a really nice accent.
Thursday, March 17, 2016
Wild Dog: Bones II Figure
This week I finished up the Dog/Wolf figure from the Bones II Original Figures set. I chose to paint it up like a Wild Dog and base it for Frostgrave.
I prepped the figure in the usual way; soaking it in a dish of water with a couple drops of dish- soap added, then giving it a light scrub with a soft toothbrush, and then rinsing and drying it. I then glued the figure to a white-primed 1.25" fender washers with Aleene's Tacky glue, and then glued the washer-mounted figure to a tongue depressor with a couple drops of the Elmer's glue.
I bagn by painting his legs and underside with Americana "Terra Cotta". I then painted his upper body with Americana "Neutral Grey".
When these first colors of paint were dry, I gave the figure a wash with GW "Agrax Earthshade" wash using a wet brush. When the wash was dry, I drybrushed the figure with Folk Art "Barn Wood"
I then painted his muzzle, open mouth, and eyes Black. Next, I added tiny White pinpoint highlights to his eyes, and painted his teeth with Americana "Buttermilk". Then I added some highlights to his nose with the "Neutral Grey".
Lastly, I painted the base White. When everything had overnight to dry, I gave the figure a coat of Ceramcoat "Matte Varnish". Then, the next morning I flocked the base with Woodland Scenics "Snow" flock, and added some fiber grasses. Later that afternoon I sprayed the figure with Testor's Dullcote.
I'm pleased with how this puppy turned out. I think he has a nice feral look about him.
Monday, March 14, 2016
Ghoul Queen: Figure 206 of 266
This past week I started working on the Necromancer set, and over the weekend I finished painting the Ghoul Queen figure from this set. I had previously modified this figure, removing one of the scabbards she originally came with. You can see the article I wrote about the conversion I did on her here: Ghoul Queen Conversion.
After I completed the conversion, I glued the figure to a white-primed 1" fender washers with Aleene's Tacky glue, and then glued the washer-mounted figure to a tongue depressor with a couple drops of the Elmer's glue.
I began by painting the figure entirely in Black. I then drybrushed her with Americana "Zinc". I then painted her skin with Folk Art "Milkshake"
When the "Milkshake" was dry, I gave it a wash with GW "Agrax Earthshade" wash using a wet brush. I then painted her various belts, straps, and cords with Folk Art "Hunter Green". Next, I painted the bone adornments on her sleeves, headdress, and on her scabbard with a mix of Americana "Buttermilk and Americana "Mississippi Mud". I then painted all the parts I planned to make gold, with Americana "Terra Cotta".
I then highlighted all the "Hunter Green" areas with first, Americana "Forest Green", and then Americana "Leaf Green". I followed that with highlighting all the bone adornments with first the "Buttermilk", and then some Crafter's Edition "Light Antique White". Next, I painted the all the "Terra Cotta" parts with Ceramcoat "Bronze".
My next step was to highlight her hair with a mix of the "Zinc" and some Folk Art "Cloudy Day". I then painted her eyes, and used some of the "Hunter Green" to apply eye shadow. Next, I highlighted her skin with first the "Milkshake", and then the "Light Antique White". I used Crafter's Acrylic "Storm Cloud Grey" to do some specific highlights on her dress, and then I did the final metallic highlights with Ceramcoat "14K Gold".
I painted the base White, and when dry I applied a small area of white glue to the base and glued on some course sand. When the glue was dry, I painted the sand Black, then drybrushed the sand with the "Zinc", followed with Folk Art "Platinum Grey". When everything had overnight to dry, I gave the figure a coat of Ceramcoat "Matte Varnish" early the next morning. Midday, I flocked the white areas with Woodland Scenics "Snow" flock and late that afternoon I sprayed the figure with Testor's Dullcote.
I'm very happy with how she turned out. I think she has the right hangs-around-with-the-dead look about her. :) In retrospect, I think she would have been further improved if, during her surgery, I had removed that big crab-claw ornamentation behind her head. It's a redundancy with the bone hair adornments she already has.
Figure 206 of 266: Complete. 60 more to go.
Friday, March 11, 2016
Reaper CAV Bones Kickstarter Boxes Arrive
I'm happy to report that my shipments from Reaper's CAV: Strike Operations Kickstarter arrived this week! I happily spent that night sorting through all my goodies. :)
I didn't go in for a lot of the big stompy robots, as I was more interested in getting a bunch of the well-priced 10mm tanks and other vehicles for a set of Sci_Fi rules we will be working on based on our popular "Look, Sarge, No Charts" system.
So, you can expect to see the occasional tank or two, as well as a couple of the big stompy robots, to show up here; since they are made from the Bones material, so fall under the jurisdiction of this blog. :).
Subscribe to:
Posts (Atom)