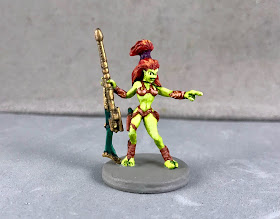
Over the past few weeks I have worked on the "Andromedan Hunter" figure from the Bones 4 Chronoscope Expansion, as a change of pace from doing the Dwarves last time.
I prepped the figure in the usual way, soaking it in a dish of water with a couple drops of dish-soap added, then giving it a light scrub with a soft toothbrush, and then rinsing and drying it. I then trimmed the figure's integral base a little, and glued the figure to a 1" brown-primed metal washer with some Aleene's Tacky glue. I then affixed the figure to the top of a pill bottle with some blue-tac.
I decided to go a little color craz on this one, and I wanted to try doing her skin with one of the Folk Art Color Shift Paints. So, I painted her body with a base coat of Reaper MSP Bones "Dungeon Slime", and when dry, I went over it with Folk Art Color Shift "Green Flash". Next, I gave her skin a thinned coat of Citadel Contrast "Creed Camo" to act as a wash. It was not as effective at doing this as the purpose-designed Citadel Shades. So, I went back and reapplied some to various spots to add a little more shadow. I then painted her hair with Reaper MSP Bones "Heraldic Red"., and her clothing, bracers, shinguards/shoes, pouch, and holster with Reaper MSP "Auburn Shade". After that, I painted her rifle with Reaper MSP "Spruce Green", and her hair tie, as well as the pompoms on the back of her shoes, with Reaper MSP Monarch Purple.
I then painted the "U" shaped parts of her top, the front piece of her little bottom, and her bracers, with Ceramcoat "Metallic Copper". After that, I painted the metal parts of her rifle and pistol with Folk Art Brushed Metal "Brushed Bronze". I let the figure dry for a while, and then gave her hair, clothing, and accessories, a wash of Citadel Shade "Reikland Fleshshade"; and then her rifle, hair tie, and shin pompoms a wash with Citadel Shade "Nuln Oil".
When the washes were dry, I painted her eyes (I used Crafter's Acrylic "Daffodil Yellow" for the "whites"), and then highlighted her skin with a mix of the base "Green Flash" and some Reaper MSP "Sophie Silver". After that, I highlighted her hair with Crafter's Acrylic "Orange Spice", and some Crafter's Acrylic "Pure Pumpkin". Next, I highlighted her clothing and accessories with a mix of the base "Auburn Shadow", and some Americana "Shading Flesh". I then highlighted her hair tie and shin pompoms with Anita's "Violet", and followed with highlighting the guns with Folk Art "Hunter Green", and a little Americana "Sea Breeze". After that, I highlighted the metal parts of her clothing with the base "Metallic Copper", some Reaper MSP "Rose Gold", and a little pf the "Sophie Silver". Finally, I highlighted the metal on the guns with Ceramcoat "Metallic Bronze", and some DecoArt Dazzling Metallics "Bright Brass". Lastly, I painted the base with Americana "Neutral Grey".
I let the figure and base dry overnight and the next day I gave them a coat of Americana "DuraClear Matte" varnish. Another overnight dry, and I sprayed the figure with Testor's "Dullcote".


Hello,
ReplyDeleteI have a couple questions about your prep technique, if you don't mind. First, how long do you leave the mini in the soap water; and second, do you glue multi-part minis before or after the soak?
Thanks for your time.
Hello! I do not soak the figures a specific time. Usually I will start them before bed, and rinse them when I get up in the morning. Or, put them in to soak in the morning, and take them out before bed. I soak the figures before I assemble any multi part figures. That way I can assure that the joins are clean and free of any mold-release agents before gluing them.
DeleteThank you for the explanation!
DeleteHere's hoping her Stargrave career is a long and eventful one!
ReplyDeleteThanks!
DeleteYeah, you really want to do the color shifts last. I like to drybrush them on to a similar normal paint color.
ReplyDeleteDo all the skin stuff - base, wash, highlight - and then drybrush with the color shift. Then you can do the non-skin parts and paint over the excess drybrush.
Still, nice looking mini!
Thank you; and thanks for the advice!
Delete